2004 INFINITI FX35 window wiring
[x] Cancel search: window wiringPage 3132 of 4449
SERVICE INFORMATION FOR ELECTRICAL INCIDENT
GI-29
C
D
E
F
G
H
I
J
K
L
MB
GI
Revision: 2004 November 2004 FX35/FX45
UNDER SEATING AREAS
An unclamped or loose harness can cause wiring to be pinched by seat components (such as slide guides)
during vehicle vibration. If the wiring runs under seating areas, inspect wire routing for possible damage or
pinching.
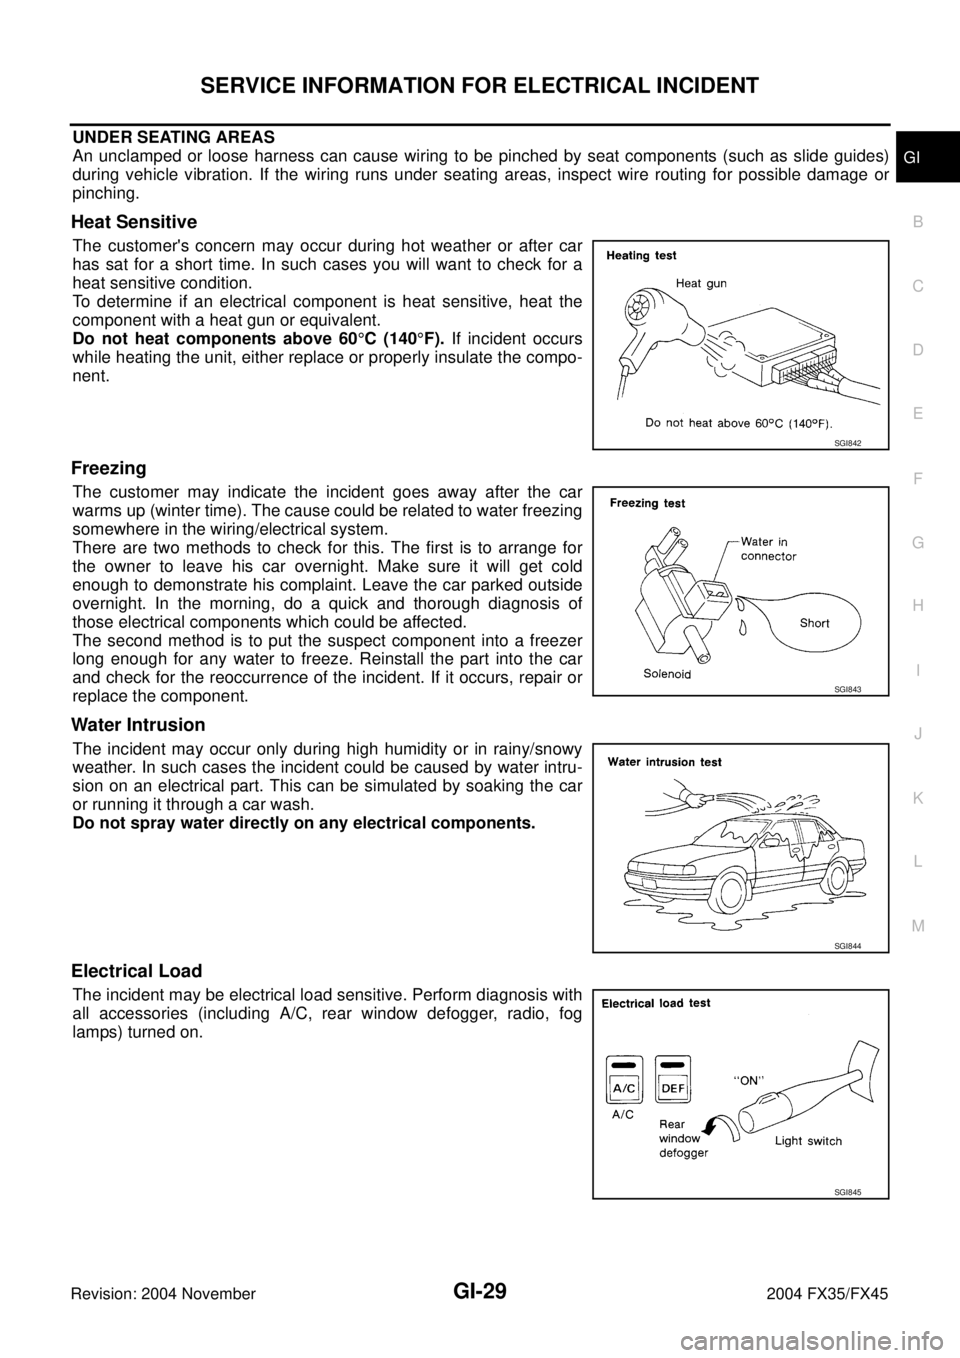
Heat Sensitive
The customer's concern may occur during hot weather or after car
has sat for a short time. In such cases you will want to check for a
heat sensitive condition.
To determine if an electrical component is heat sensitive, heat the
component with a heat gun or equivalent.
Do not heat components above 60°C (140°F). If incident occurs
while heating the unit, either replace or properly insulate the compo-
nent.
Freezing
The customer may indicate the incident goes away after the car
warms up (winter time). The cause could be related to water freezing
somewhere in the wiring/electrical system.
There are two methods to check for this. The first is to arrange for
the owner to leave his car overnight. Make sure it will get cold
enough to demonstrate his complaint. Leave the car parked outside
overnight. In the morning, do a quick and thorough diagnosis of
those electrical components which could be affected.
The second method is to put the suspect component into a freezer
long enough for any water to freeze. Reinstall the part into the car
and check for the reoccurrence of the incident. If it occurs, repair or
replace the component.
Water Intrusion
The incident may occur only during high humidity or in rainy/snowy
weather. In such cases the incident could be caused by water intru-
sion on an electrical part. This can be simulated by soaking the car
or running it through a car wash.
Do not spray water directly on any electrical components.
Electrical Load
The incident may be electrical load sensitive. Perform diagnosis with
all accessories (including A/C, rear window defogger, radio, fog
lamps) turned on.
SGI842
SGI843
SGI844
SGI845
Page 3160 of 4449
GW-1
GLASSES, WINDOW SYSTEM & MIRRORS
I BODY
CONTENTS
C
D
E
F
G
H
J
K
L
M
SECTION GW
A
B
GW
Revision: 2004 November 2004 FX35/FX45
GLASSES, WINDOW SYSTEM & MIRRORS
PRECAUTIONS .......................................................... 3
Precautions for Supplemental Restraint System
(SRS) “AIR BAG” and “SEAT BELT PRE-TEN-
SIONER” .................................................................. 3
Handling for Adhesive and Primer ........................... 3
Wiring Diagrams and Trouble Diagnosis .................. 3
PREPARATION ........................................................... 4
Special Service Tools ............................................... 4
Commercial Service Tools ........................................ 4
SQUEAK AND RATTLE TROUBLE DIAGNOSES ..... 5
Work Flow ................................................................ 5
CUSTOMER INTERVIEW ..................................... 5
DUPLICATE THE NOISE AND TEST DRIVE ....... 6
CHECK RELATED SERVICE BULLETINS ........... 6
LOCATE THE NOISE AND IDENTIFY THE
ROOT CAUSE ...................................................... 6
REPAIR THE CAUSE ........................................... 6
CONFIRM THE REPAIR ....................................... 7
Generic Squeak and Rattle Troubleshooting ........... 7
INSTRUMENT PANEL .......................................... 7
CENTER CONSOLE ............................................. 7
DOORS ................................................................. 7
TRUNK .................................................................. 8
SUNROOF/HEADLINING ..................................... 8
SEATS ................................................................... 8
UNDERHOOD ....................................................... 8
Diagnostic Worksheet .............................................. 9
WINDSHIELD GLASS ...............................................11
Removal and Installation ......................................... 11
REMOVAL ............................................................ 11
INSTALLATION ................................................... 12
REAR WINDOW GLASS AND MOLDING ............... 13
Removal and Installation ........................................ 13
REMOVAL ........................................................... 13
INSTALLATION ................................................... 14
POWER WINDOW SYSTEM .................................... 15
Component Parts and Harness Connector Location ... 15
System Description ................................................ 16
WITH FRONT POWER WINDOW ANTI-PINCH
SYSTEM ............................................................. 16WITH FRONT AND REAR WINDOW ANTI-
PINCH SYSTEM ................................................. 16
MANUAL OPERATION ........................................ 17
AUTO OPERATION ............................................. 19
POWER WINDOW SERIAL LINK ....................... 20
POWER WINDOW LOCK ................................... 20
RETAINED POWER OPERATION ...................... 21
ANTI-PINCH SYSTEM ........................................ 21
POWER WINDOW CONTROL BY THE KEY
CYLINDER SWITCH ........................................... 21
CAN Communication System Description .............. 22
CAN Communication Unit ....................................... 22
Schematic (With Front Power Window Anti-pinch
System) .................................................................. 23
Wiring Diagram —WINDOW— (With Front Power
Window Anti-pinch System) .................................... 24
Terminal and Reference Value for BCM / With Front
Power Window Anti-pinch System .......................... 28
Terminal and Reference Value for Power Window
Main Switch / With Front Power Window Anti-pinch
System .................................................................... 29
Terminal and Reference Value for Front Power Win-
dow Switch (Passenger Side) / With Front Power
Window Anti-pinch System ..................................... 30
Schematic (With Front and Rear Power Window
Anti-pinch System) ................................................. 31
Wiring Diagram —WINDOW— (With Front and
Rear Power Window Anti-pinch System) ................ 32
Terminal and Reference Value for BCM / With Front
and Rear Power Window Anti-pinch ....................... 37
Terminal and Reference Value for Power Window
Main Switch / With Front and Rear Power Window
Anti-pinch System ................................................... 38
Terminal and Reference Value for (Front and Rear)
Power Window Switch / With Front and Rear Win-
dow Anti-pinch System ........................................... 39
Work Flow ............................................................... 39
CONSULT-II Inspection Procedure ......................... 40
ACTIVE TEST ..................................................... 41
WORK SUPPORT ............................................... 41
Page 3161 of 4449

GW-2Revision: 2004 November 2004 FX35/FX45DATE MONITOR ................................................. 41
Trouble Diagnosis Symptom Chart / With Front
Power Window Anti-pinch System .......................... 42
Trouble Diagnosis Symptom Chart / With Front and
Rear Power Window Anti-pinch System ................. 43
BCM Power Supply and Ground Circuit Check ...... 44
Power Window Main Switch Power Supply Circuit
Check ..................................................................... 45
Front Power Window Switch (Passenger Side)
Power Supply and Ground Circuit Check ............... 46
Rear Power Window Switch (LH or RH) Power Sup-
ply and Ground Circuit Check / With Front and Rear
Power Window Anti-pinch System .......................... 47
Front Power Window Motor (Driver Side) Circuit
Check ..................................................................... 48
Front Power Window Motor (Passenger Side) Cir-
cuit Check ............................................................... 49
Rear Power Window Motor (LH) Circuit Check / With
Front Anti-pinch Power Window System ................ 50
Rear Power Window Motor (RH) Circuit Check / With
Front Anti-pinch Power Window System ................ 52
Rear Power Window Motor (LH or RH) Circuit Check
/ With Front and Rear Power Window Anti-pinch
System .................................................................... 55
Limit Switch Circuit Check (Driver Side) ................. 56
Limit Switch Circuit Check (Passenger Side) ......... 57
Limit Switch Circuit Check (Rear LH or RH) / With
Front and Rear Anti-pinch System ......................... 59
Encoder Circuit Check (Driver Side) ....................... 61
Encoder Circuit Check (Passenger Side) ............... 63
Encoder Circuit Check (Rear LH or RH) / With Front
and Rear Power Window Anti-pinch System .......... 65
Door Switch Check ................................................. 67
Front Door Key Cylinder Switch Check .................. 69
Power Window Serial Link Check (Passenger Side) ... 71
Power Window Serial Link Check (Rear LH or RH)
/ With Front and Rear Power Window Anti-pinch
System .................................................................... 73
Power Window Lock Switch Check ........................ 73
SIDE WINDOW GLASS ............................................ 74
Removal and Installation ........................................ 74
REMOVAL ........................................................... 74
INSTALLATION .................................................... 75
FRONT DOOR GLASS AND REGULATOR ............. 76
Removal and Installation ........................................ 76
DOOR GLASS ..................................................... 76
REGULATOR ASSEMBLY .................................. 77
Disassembly and assembly .................................... 78
REGULATOR ASSEMBLY .................................. 78
Inspection after Installation ..................................... 78
SETTING OF LIMIT SWITCH .............................. 78
FITTING INSPECTION ........................................ 78
REAR DOOR GLASS AND REGULATOR ............... 80
Removal and Installation ........................................ 80
DOOR GLASS ..................................................... 80REGULATOR ASSEMBLY ................................... 81
Disassembly and assembly .................................... 82
REGULATOR ASSEMBLY ................................... 82
Inspection after Installation ..................................... 82
SETTING OF LIMIT SWITCH (WITH ANTI-
PINCH SYSTEM ONLY) ...................................... 82
FITTING INSPECTION ........................................ 83
INSIDE MIRROR ....................................................... 84
Wiring Diagram —I/MIRR— ................................... 84
Removal and Installation ......................................... 85
REMOVAL ............................................................ 85
INSTALLATION .................................................... 85
COMPASS ........................................................... 85
REAR WINDOW DEFOGGER .................................. 86
Component Parts and Harness Connector Location ... 86
System Description ................................................. 86
CAN Communication System Description .............. 88
CAN Communication Unit ....................................... 88
Schematic ............................................................... 89
Wiring Diagram —DEF— ........................................ 90
Terminal and Reference Value for BCM .................. 94
Terminal and Reference Value for IPDM E/R .......... 94
Work Flow ............................................................... 94
CONSULT-II Inspection Procedure ......................... 95
DATA MONITOR .................................................. 96
ACTIVE TEST ...................................................... 96
Trouble Diagnoses Symptom Chart ........................ 97
BCM Power Supply and Ground Circuit Check ...... 97
Rear Window Defogger Switch Circuit Check ......... 98
Rear Window Defogger Power Supply Circuit
Check ....................................................................100
Rear Window Defogger Circuit Check ..................102
Door Mirror Defogger Power Supply Circuit Check .103
Driver Side Door Mirror Defogger Circuit Check ...104
Passenger Side Door Mirror Defogger Circuit Check
.105
Rear Window Defogger Signal Check ..................106
Filament Check .....................................................107
Filament Repair .....................................................107
REPAIR EQUIPMENT .......................................107
REPAIRING PROCEDURE ...............................108
DOOR MIRROR .......................................................109
Door Mirror (Only Manual Operation) ...................109
WRING DIAGRAM —MIRROR— FOR MAN-
UAL OPERATION DOOR MIRROR ...................109
Automatic Drive Positioner Interlocking Door Mirror .110
WRING DIAGRAM –MIRROR– FOR AUTO-
MATIC DRIVE POSITIONER INTERLOCKING
DOOR MIRROR ................................................. 111
Removal and Installation .......................................113
REMOVAL ..........................................................113
INSTALLATION ..................................................113
Disassembly and Assembly ..................................113
DISASSEMBLY ..................................................113
ASSEMBLY ........................................................114
Page 3181 of 4449

GW-22
POWER WINDOW SYSTEM
Revision: 2004 November 2004 FX35/FX45
CAN Communication System DescriptionAIS004PY
CAN (Controller Area Network) is a serial communication line for real time application. It is an on-vehicle mul-
tiplex communication line with high data communication speed and excellent error detection ability. Many elec-
tronic control units are equipped onto a vehicle, and each control unit shares information and links with other
control units during operation (not independent). In CAN communication, control units are connected with 2
communication lines (CAN H line, CAN L line) allowing a high rate of information transmission with less wiring.
Each control unit transmits/receives data but selectively reads required data only.
CAN Communication UnitAIS004RO
Refer to LAN-6, "CAN Communication Unit" .
Page 3183 of 4449
GW-24
POWER WINDOW SYSTEM
Revision: 2004 November 2004 FX35/FX45
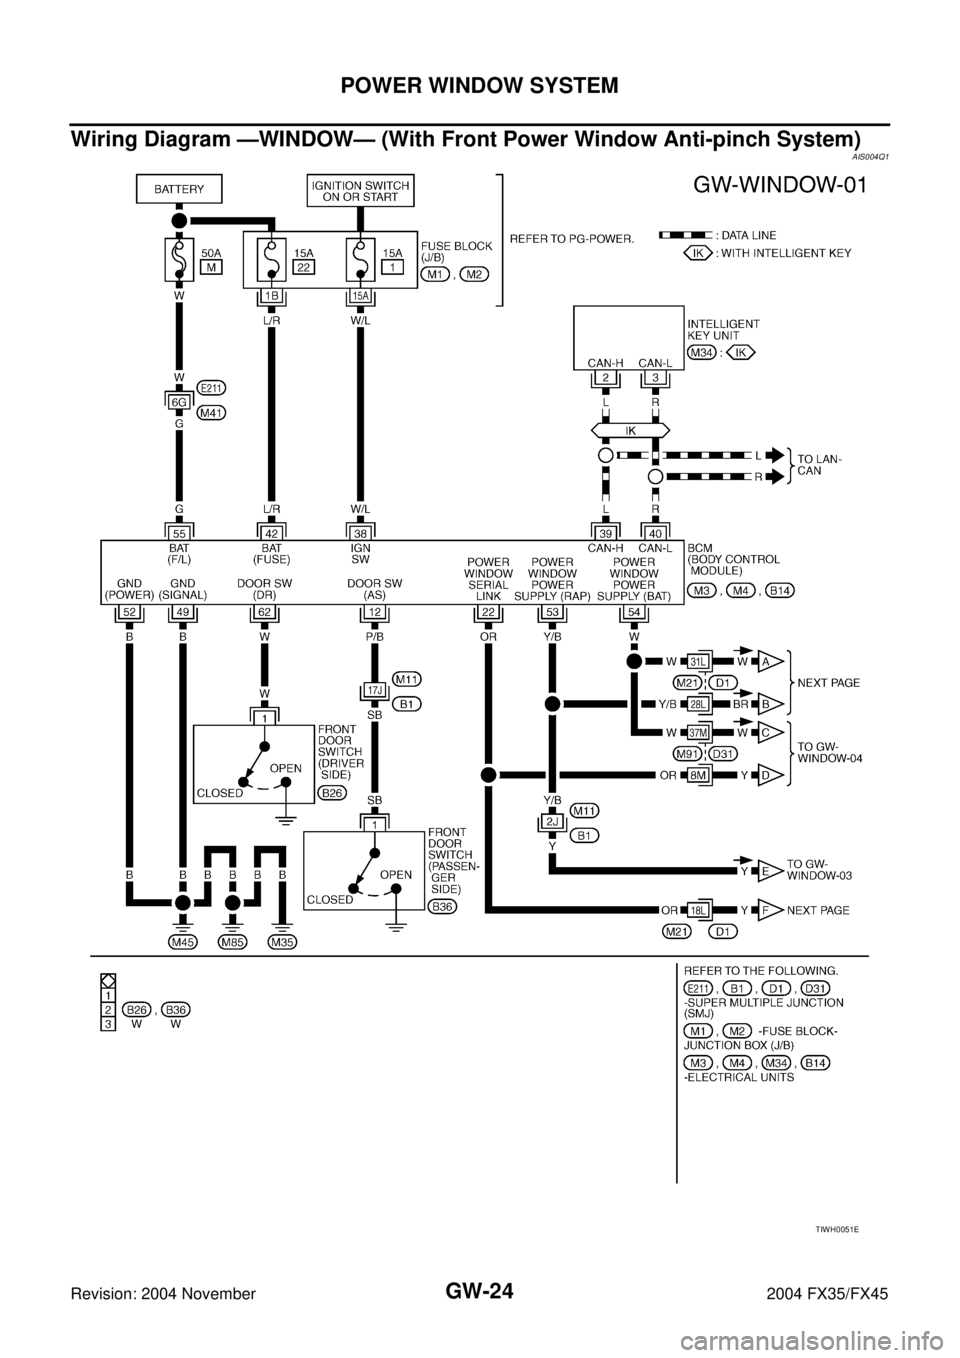
Wiring Diagram —WINDOW— (With Front Power Window Anti-pinch System)AIS004Q1
TIWH0051E
Page 3191 of 4449
GW-32
POWER WINDOW SYSTEM
Revision: 2004 November 2004 FX35/FX45
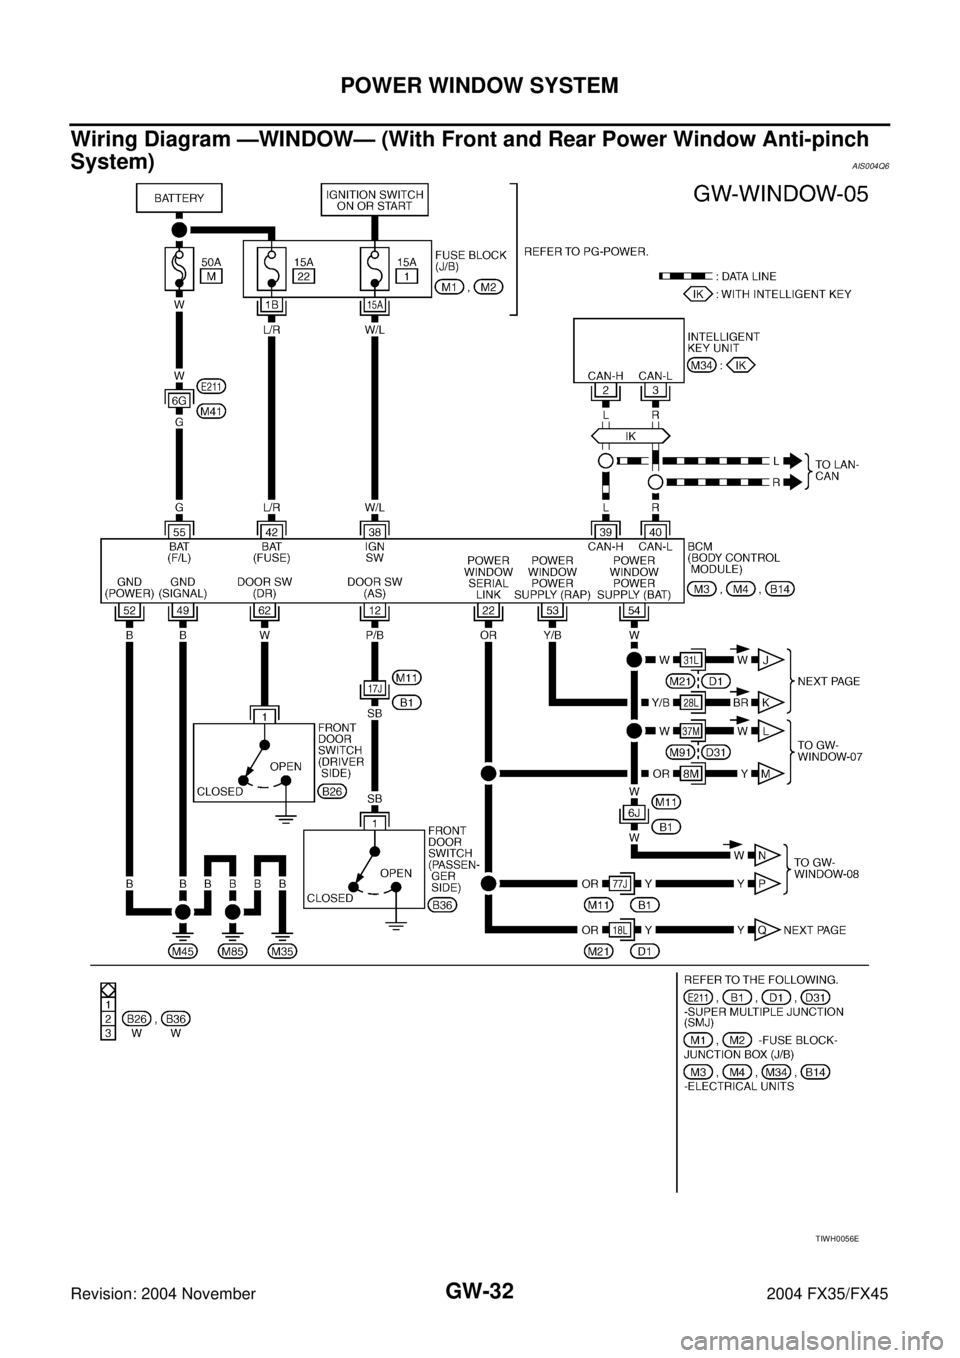
Wiring Diagram —WINDOW— (With Front and Rear Power Window Anti-pinch
System)
AIS004Q6
TIWH0056E
Page 3247 of 4449

GW-88
REAR WINDOW DEFOGGER
Revision: 2004 November 2004 FX35/FX45
CAN Communication System DescriptionAIS004R0
CAN (Controller Area Network) is a serial communication line for real time application. It is an on-vehicle mul-
tiplex communication line with high data communication speed and excellent error detection ability. Many elec-
tronic control units are equipped onto a vehicle, and each control unit shares information and links with other
control units during operation (not independent). In CAN communication, control units are connected with 2
communication lines (CAN H line, CAN L line) allowing a high rate of information transmission with less wiring.
Each control unit transmits/receives data but selectively reads required data only.
CAN Communication UnitAIS004RR
Refer to LAN-6, "CAN Communication Unit" .
Page 3249 of 4449
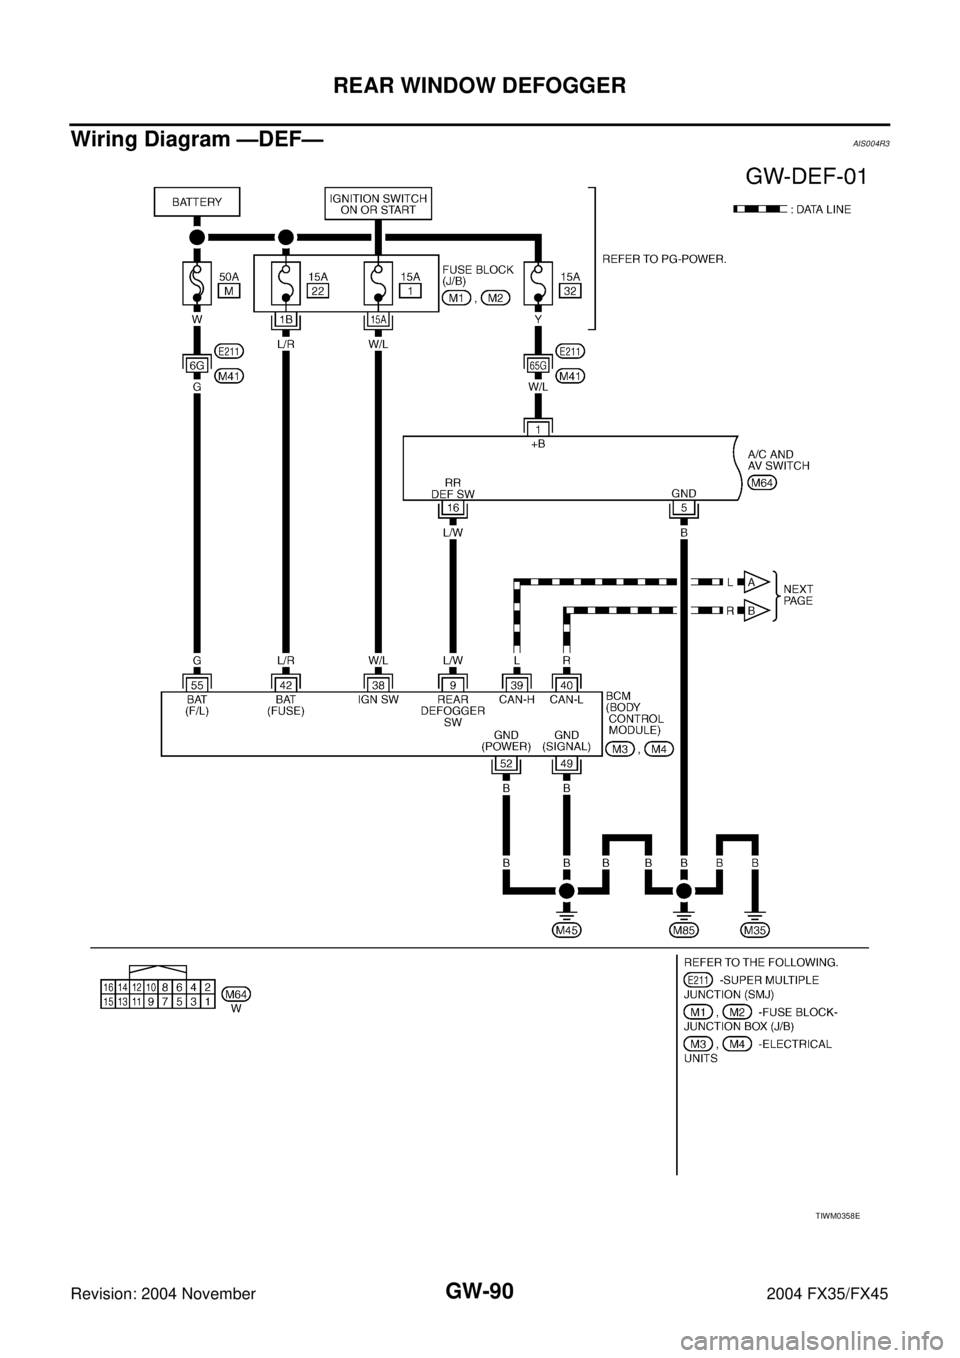
GW-90
REAR WINDOW DEFOGGER
Revision: 2004 November 2004 FX35/FX45
Wiring Diagram —DEF— AIS004R3
TIWM0358E