2004 INFINITI FX35 turn signal bulb
[x] Cancel search: turn signal bulbPage 3660 of 4449
TURN SIGNAL AND HAZARD WARNING LAMPS
LT-105
C
D
E
F
G
H
I
J
L
MA
B
LT
Revision: 2004 November 2004 FX35/FX45
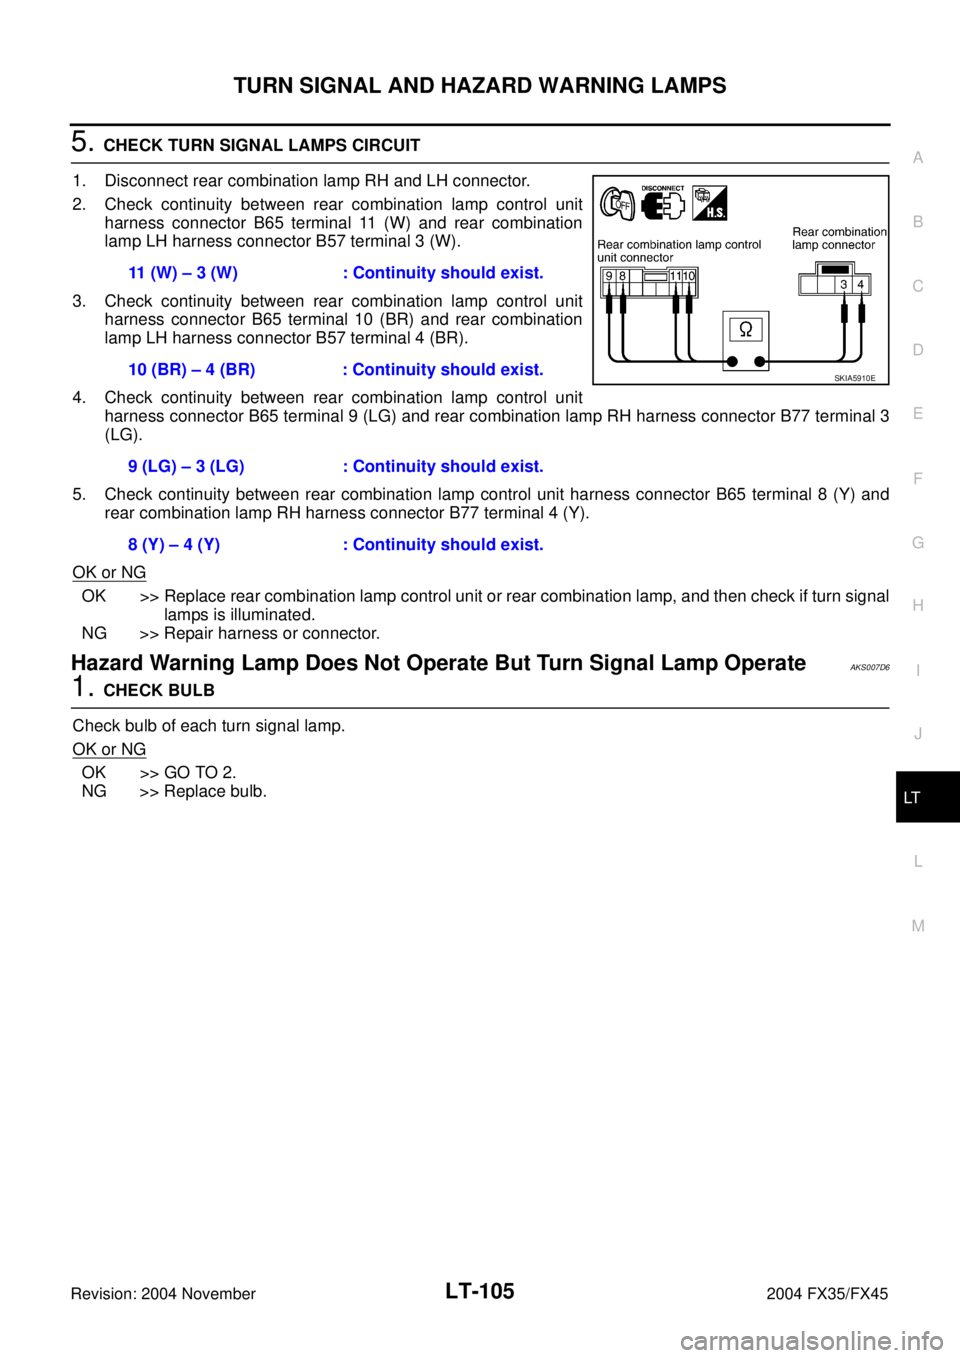
5. CHECK TURN SIGNAL LAMPS CIRCUIT
1. Disconnect rear combination lamp RH and LH connector.
2. Check continuity between rear combination lamp control unit
harness connector B65 terminal 11 (W) and rear combination
lamp LH harness connector B57 terminal 3 (W).
3. Check continuity between rear combination lamp control unit
harness connector B65 terminal 10 (BR) and rear combination
lamp LH harness connector B57 terminal 4 (BR).
4. Check continuity between rear combination lamp control unit
harness connector B65 terminal 9 (LG) and rear combination lamp RH harness connector B77 terminal 3
(LG).
5. Check continuity between rear combination lamp control unit harness connector B65 terminal 8 (Y) and
rear combination lamp RH harness connector B77 terminal 4 (Y).
OK or NG
OK >> Replace rear combination lamp control unit or rear combination lamp, and then check if turn signal
lamps is illuminated.
NG >> Repair harness or connector.
Hazard Warning Lamp Does Not Operate But Turn Signal Lamp OperateAKS007D6
1. CHECK BULB
Check bulb of each turn signal lamp.
OK or NG
OK >> GO TO 2.
NG >> Replace bulb.11 (W) – 3 (W) : Continuity should exist.
10 (BR) – 4 (BR) : Continuity should exist.
9 (LG) – 3 (LG) : Continuity should exist.
8 (Y) – 4 (Y) : Continuity should exist.
SKIA5910E
Page 3662 of 4449
TURN SIGNAL AND HAZARD WARNING LAMPS
LT-107
C
D
E
F
G
H
I
J
L
MA
B
LT
Revision: 2004 November 2004 FX35/FX45
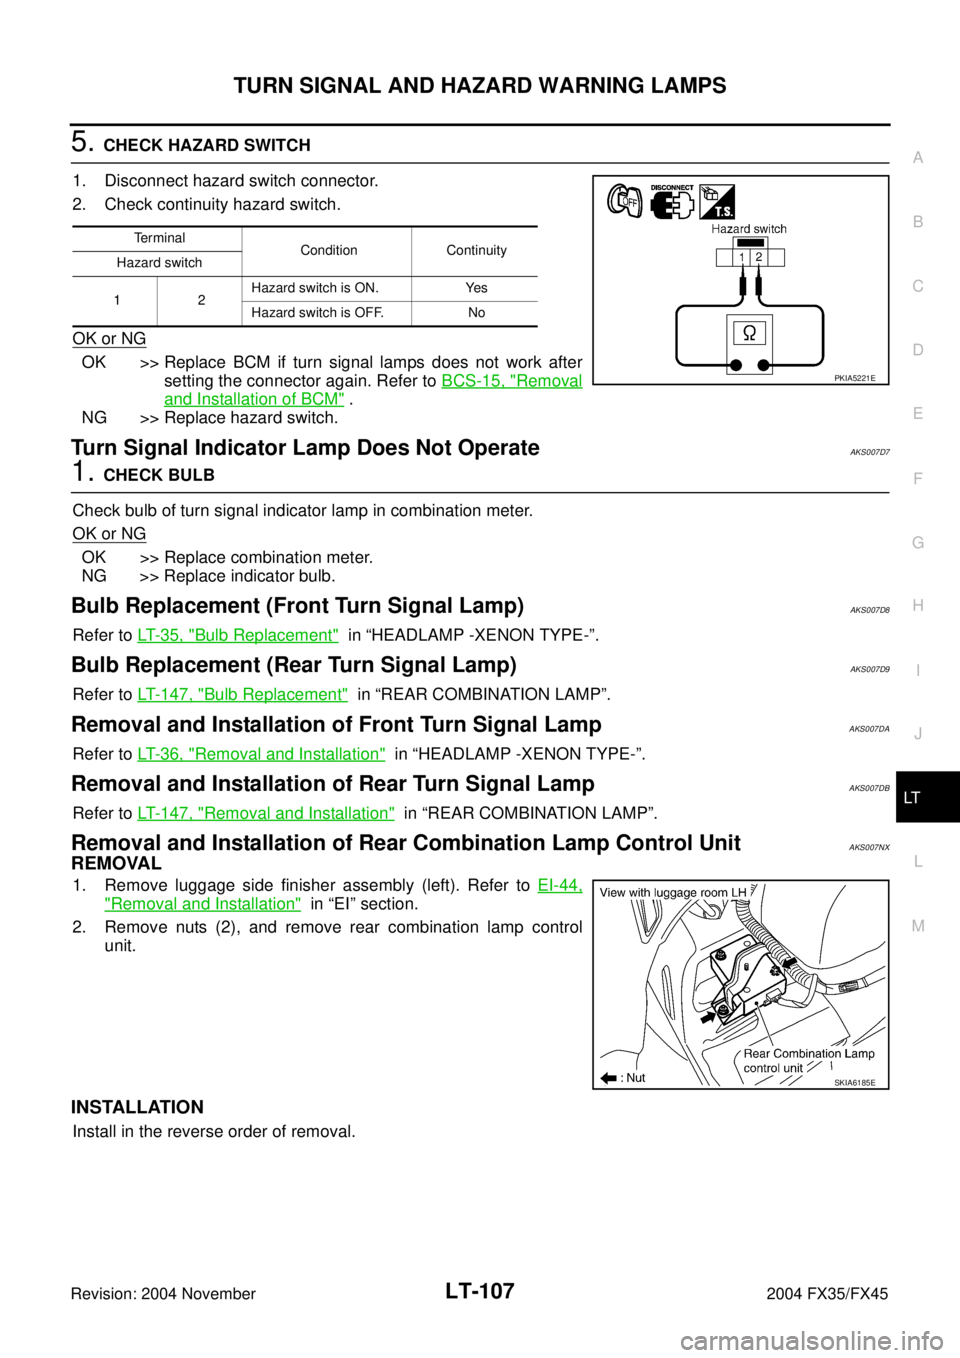
5. CHECK HAZARD SWITCH
1. Disconnect hazard switch connector.
2. Check continuity hazard switch.
OK or NG
OK >> Replace BCM if turn signal lamps does not work after
setting the connector again. Refer to BCS-15, "
Removal
and Installation of BCM" .
NG >> Replace hazard switch.
Turn Signal Indicator Lamp Does Not OperateAKS007D7
1. CHECK BULB
Check bulb of turn signal indicator lamp in combination meter.
OK or NG
OK >> Replace combination meter.
NG >> Replace indicator bulb.
Bulb Replacement (Front Turn Signal Lamp)AKS007D8
Refer to LT- 3 5 , "Bulb Replacement" in “HEADLAMP -XENON TYPE-”.
Bulb Replacement (Rear Turn Signal Lamp)AKS007D9
Refer to LT- 1 4 7 , "Bulb Replacement" in “REAR COMBINATION LAMP”.
Removal and Installation of Front Turn Signal LampAKS007DA
Refer to LT- 3 6 , "Removal and Installation" in “HEADLAMP -XENON TYPE-”.
Removal and Installation of Rear Turn Signal Lamp AKS007DB
Refer to LT- 1 4 7 , "Removal and Installation" in “REAR COMBINATION LAMP”.
Removal and Installation of Rear Combination Lamp Control UnitAKS007NX
REMOVAL
1. Remove luggage side finisher assembly (left). Refer to EI-44,
"Removal and Installation" in “EI” section.
2. Remove nuts (2), and remove rear combination lamp control
unit.
INSTALLATION
Install in the reverse order of removal.
Te r m i n a l
Condition Continuity
Hazard switch
12Hazard switch is ON. Yes
Hazard switch is OFF. No
PKIA5221E
SKIA6185E
Page 3678 of 4449
STOP LAMP
LT-123
C
D
E
F
G
H
I
J
L
MA
B
LT
Revision: 2004 November 2004 FX35/FX45
High-Mounted Stop LampAKS007DM
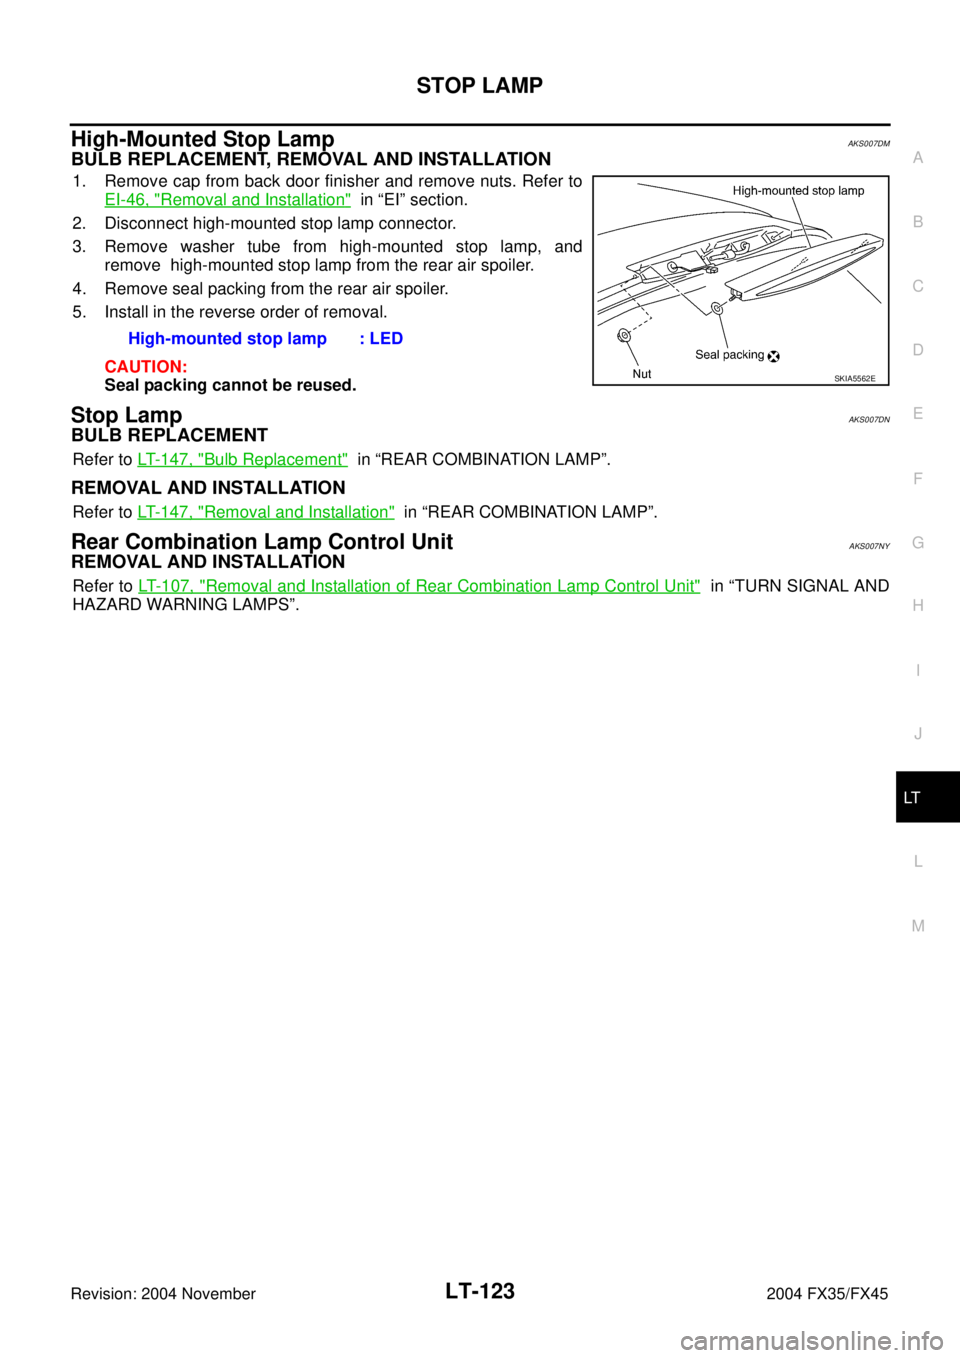
BULB REPLACEMENT, REMOVAL AND INSTALLATION
1. Remove cap from back door finisher and remove nuts. Refer to
EI-46, "
Removal and Installation" in “EI” section.
2. Disconnect high-mounted stop lamp connector.
3. Remove washer tube from high-mounted stop lamp, and
remove high-mounted stop lamp from the rear air spoiler.
4. Remove seal packing from the rear air spoiler.
5. Install in the reverse order of removal.
CAUTION:
Seal packing cannot be reused.
Stop LampAKS007DN
BULB REPLACEMENT
Refer to LT- 1 4 7 , "Bulb Replacement" in “REAR COMBINATION LAMP”.
REMOVAL AND INSTALLATION
Refer to LT- 1 4 7 , "Removal and Installation" in “REAR COMBINATION LAMP”.
Rear Combination Lamp Control UnitAKS007NY
REMOVAL AND INSTALLATION
Refer to LT- 1 0 7 , "Removal and Installation of Rear Combination Lamp Control Unit" in “TURN SIGNAL AND
HAZARD WARNING LAMPS”.High-mounted stop lamp : LED
SKIA5562E
Page 3700 of 4449
PARKING, LICENSE PLATE AND TAIL LAMPS
LT-145
C
D
E
F
G
H
I
J
L
MA
B
LT
Revision: 2004 November 2004 FX35/FX45
5. CHECK TURN SIGNAL LAMPS CIRCUIT
1. Disconnect rear combination lamp RH and LH connector.
2. Check continuity between rear combination lamp control unit
harness connector B65 terminal 11 (W) and rear combination
lamp LH harness connector B57 terminal 3 (W).
3. Check continuity between rear combination lamp control unit
harness connector B65 terminal 10 (BR) and rear combination
lamp LH harness connector B57 terminal 4 (BR).
4. Check continuity between rear combination lamp control unit
harness connector B65 terminal 9 (LG) and rear combination lamp RH harness connector B219 terminal 3
(LG).
5. Check continuity between rear combination lamp control unit harness connector B65 terminal 8 (Y) and
rear combination lamp RH harness connector B219 terminal 4 (Y).
OK or NG
OK >> Replace rear combination lamp control unit or rear combination lamp, and then check if turn signal
lamps is illuminated.
NG >> Repair harness or connector.
Parking, License Plate and Tail Lamps Do Not Turn OFF (After Approx. 10 Min-
utes)
AKS007E4
1. CHECK IPDM E/R
1. Turn ignition switch ON. Turn the combination switch (lighting switch) to the OFF position. Turn ignition
switch OFF.
2. Verify that the parking, license plate, and tail lamps turn ON and OFF after approximately 10 minutes.
OK or NG
OK >> Ignition relay malfunction. Refer to PG-19, "Function of Detecting Ignition Relay Malfunction" .
NG >> INSPECTION END
License Plate LampAKS007E5
BULB REPLACEMENT, REMOVAL AND INSTALLATION
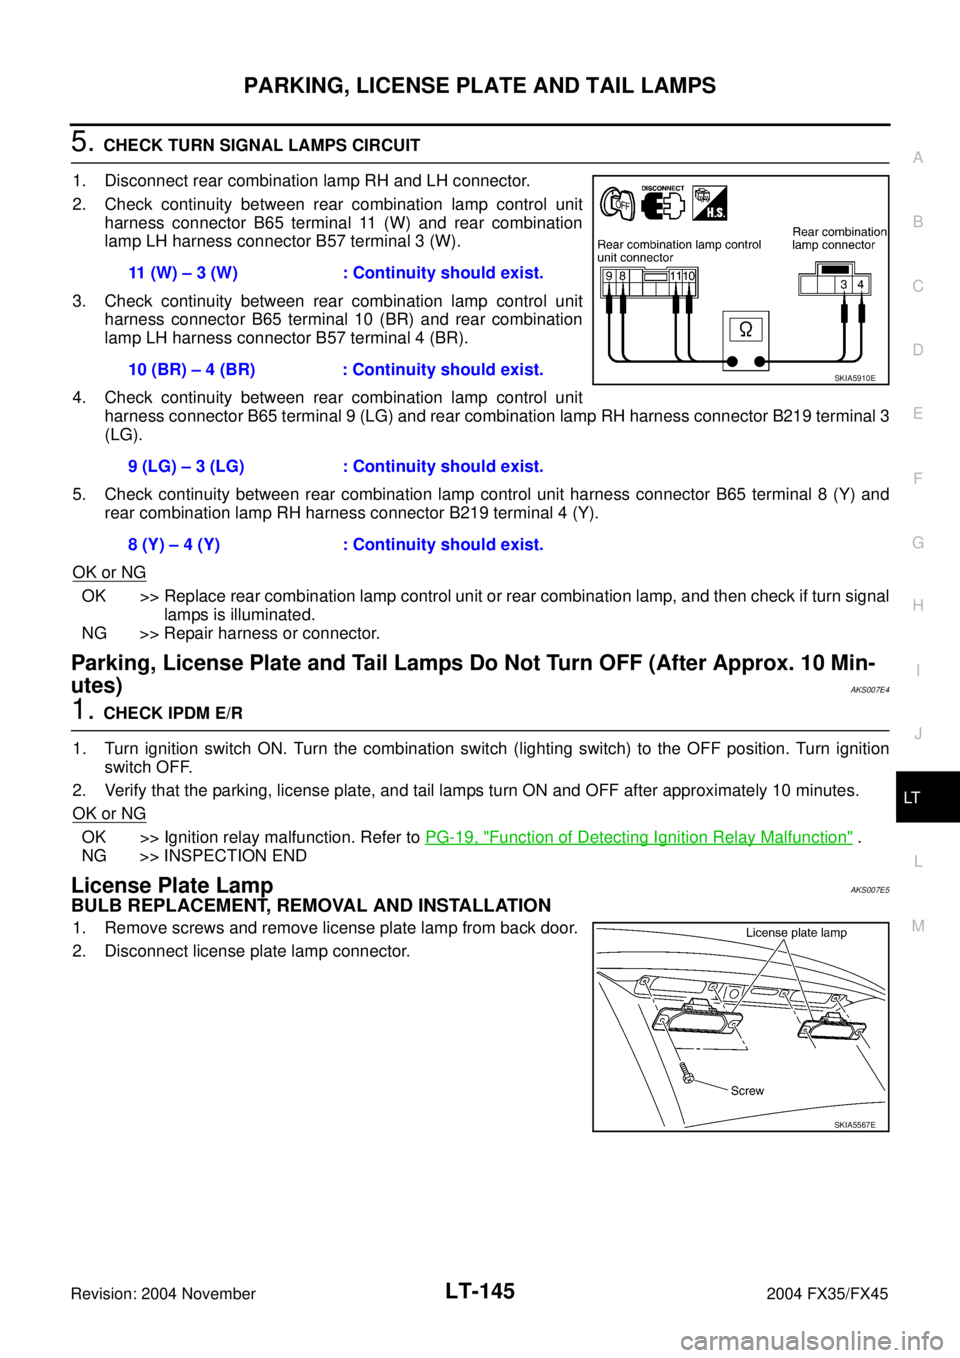
1. Remove screws and remove license plate lamp from back door.
2. Disconnect license plate lamp connector.11 (W) – 3 (W) : Continuity should exist.
10 (BR) – 4 (BR) : Continuity should exist.
9 (LG) – 3 (LG) : Continuity should exist.
8 (Y) – 4 (Y) : Continuity should exist.
SKIA5910E
SKIA5567E
Page 3701 of 4449
LT-146
PARKING, LICENSE PLATE AND TAIL LAMPS
Revision: 2004 November 2004 FX35/FX45
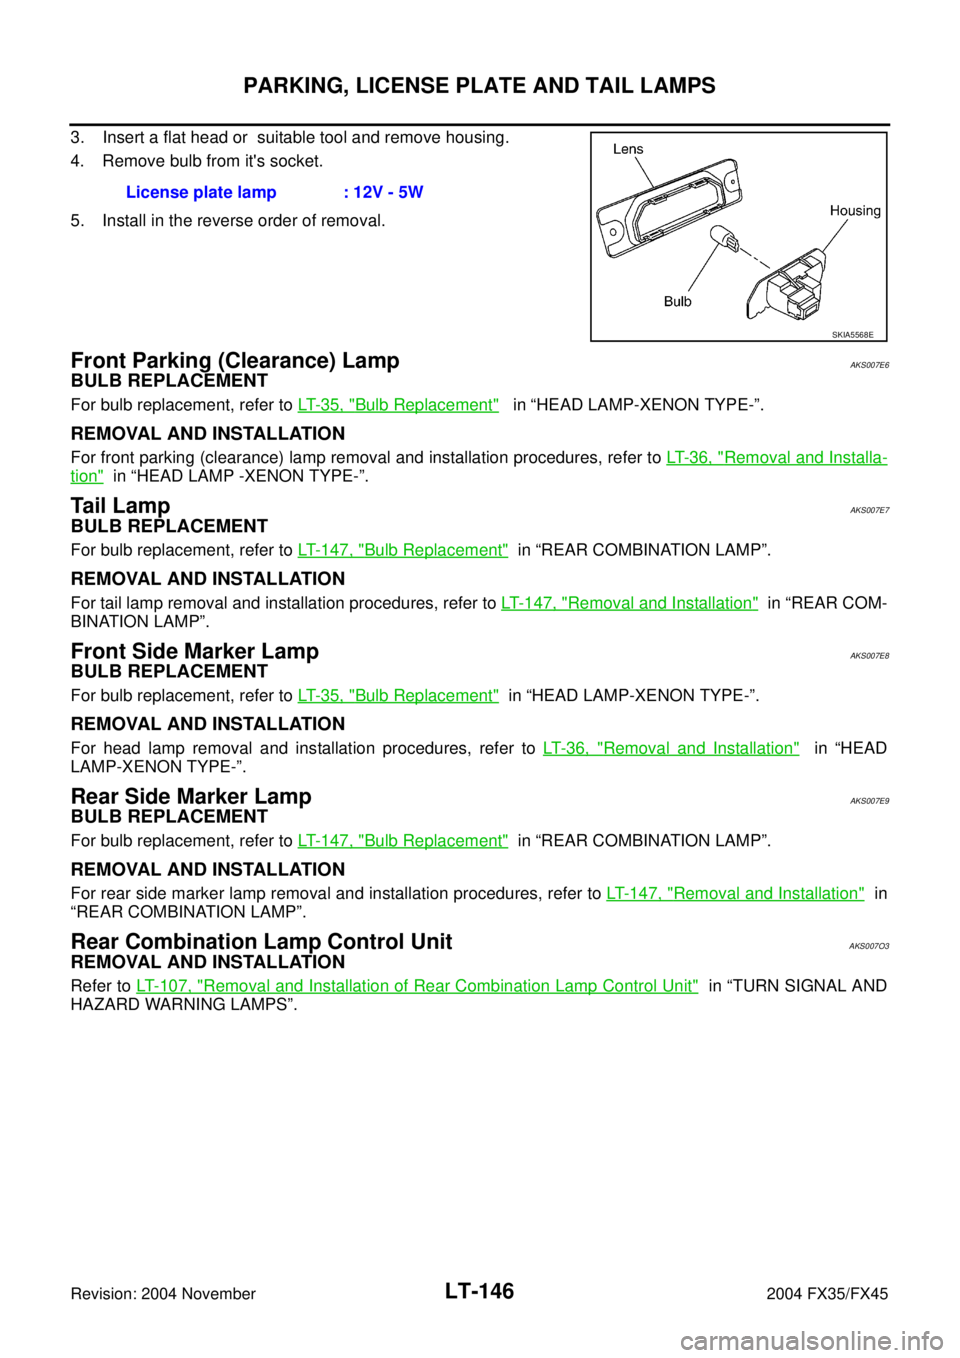
3. Insert a flat head or suitable tool and remove housing.
4. Remove bulb from it's socket.
5. Install in the reverse order of removal.
Front Parking (Clearance) LampAKS007E6
BULB REPLACEMENT
For bulb replacement, refer to LT- 3 5 , "Bulb Replacement" in “HEAD LAMP-XENON TYPE-”.
REMOVAL AND INSTALLATION
For front parking (clearance) lamp removal and installation procedures, refer to LT- 3 6 , "Removal and Installa-
tion" in “HEAD LAMP -XENON TYPE-”.
Tail LampAKS007E7
BULB REPLACEMENT
For bulb replacement, refer to LT- 1 4 7 , "Bulb Replacement" in “REAR COMBINATION LAMP”.
REMOVAL AND INSTALLATION
For tail lamp removal and installation procedures, refer to LT- 1 4 7 , "Removal and Installation" in “REAR COM-
BINATION LAMP”.
Front Side Marker LampAKS007E8
BULB REPLACEMENT
For bulb replacement, refer to LT- 3 5 , "Bulb Replacement" in “HEAD LAMP-XENON TYPE-”.
REMOVAL AND INSTALLATION
For head lamp removal and installation procedures, refer to LT- 3 6 , "Removal and Installation" in “HEAD
LAMP-XENON TYPE-”.
Rear Side Marker LampAKS007E9
BULB REPLACEMENT
For bulb replacement, refer to LT- 1 4 7 , "Bulb Replacement" in “REAR COMBINATION LAMP”.
REMOVAL AND INSTALLATION
For rear side marker lamp removal and installation procedures, refer to LT- 1 4 7 , "Removal and Installation" in
“REAR COMBINATION LAMP”.
Rear Combination Lamp Control UnitAKS007O3
REMOVAL AND INSTALLATION
Refer to LT- 1 0 7 , "Removal and Installation of Rear Combination Lamp Control Unit" in “TURN SIGNAL AND
HAZARD WARNING LAMPS”.License plate lamp : 12V - 5W
SKIA5568E
Page 3702 of 4449
REAR COMBINATION LAMP
LT-147
C
D
E
F
G
H
I
J
L
MA
B
LT
Revision: 2004 November 2004 FX35/FX45
REAR COMBINATION LAMPPFP:26554
Bulb ReplacementAKS007FP
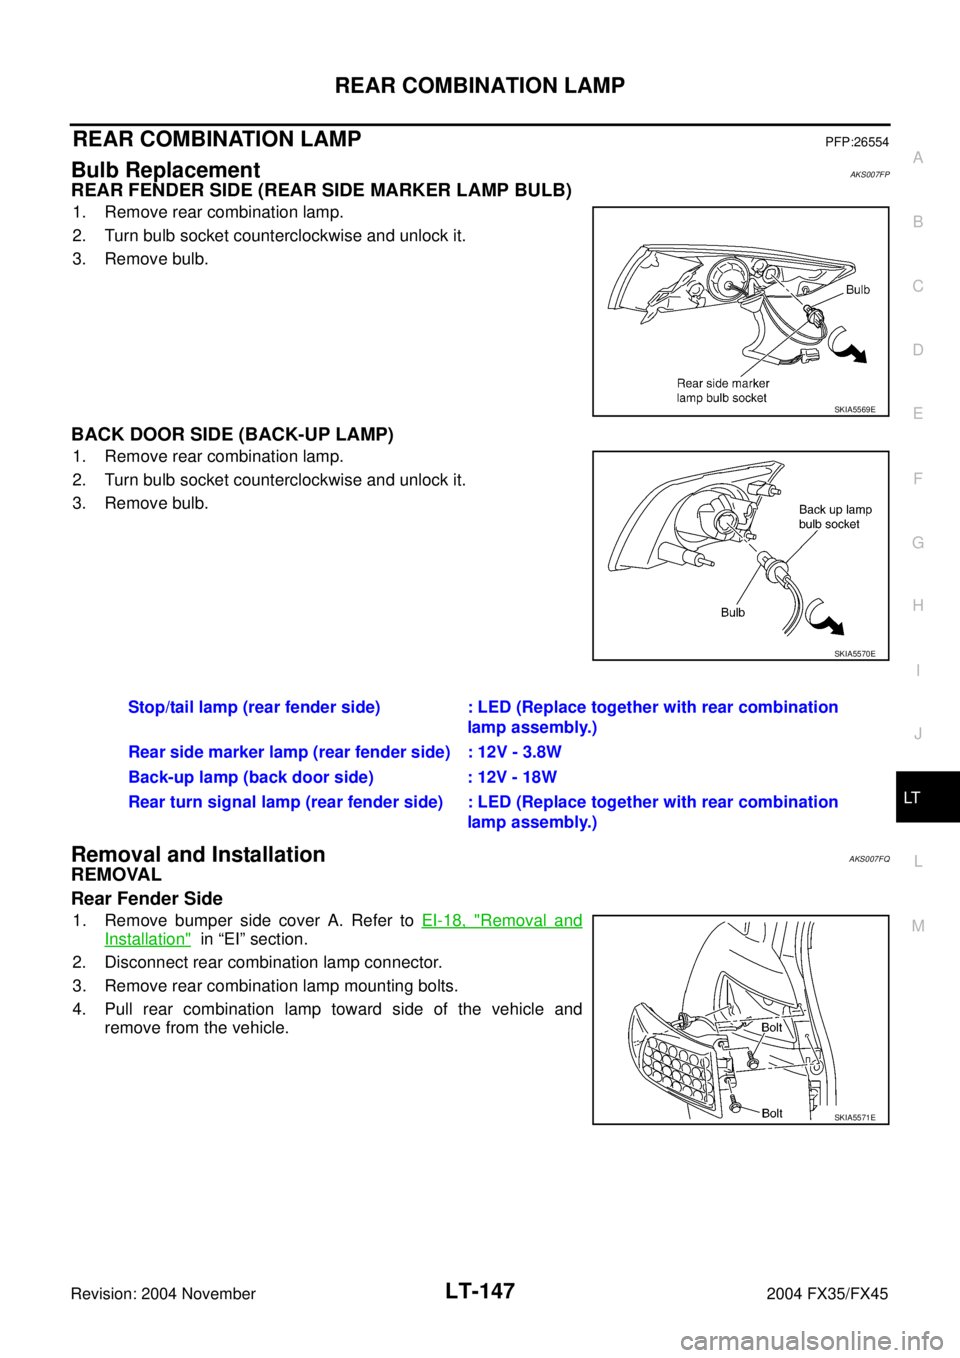
REAR FENDER SIDE (REAR SIDE MARKER LAMP BULB)
1. Remove rear combination lamp.
2. Turn bulb socket counterclockwise and unlock it.
3. Remove bulb.
BACK DOOR SIDE (BACK-UP LAMP)
1. Remove rear combination lamp.
2. Turn bulb socket counterclockwise and unlock it.
3. Remove bulb.
Removal and InstallationAKS007FQ
REMOVAL
Rear Fender Side
1. Remove bumper side cover A. Refer to EI-18, "Removal and
Installation" in “EI” section.
2. Disconnect rear combination lamp connector.
3. Remove rear combination lamp mounting bolts.
4. Pull rear combination lamp toward side of the vehicle and
remove from the vehicle.
SKIA5569E
SKIA5570E
Stop/tail lamp (rear fender side) : LED (Replace together with rear combination
lamp assembly.)
Rear side marker lamp (rear fender side) : 12V - 3.8W
Back-up lamp (back door side) : 12V - 18W
Rear turn signal lamp (rear fender side) : LED (Replace together with rear combination
lamp assembly.)
SKIA5571E
Page 3738 of 4449
INTERIOR ROOM LAMP
LT-183
C
D
E
F
G
H
I
J
L
MA
B
LT
Revision: 2004 November 2004 FX35/FX45
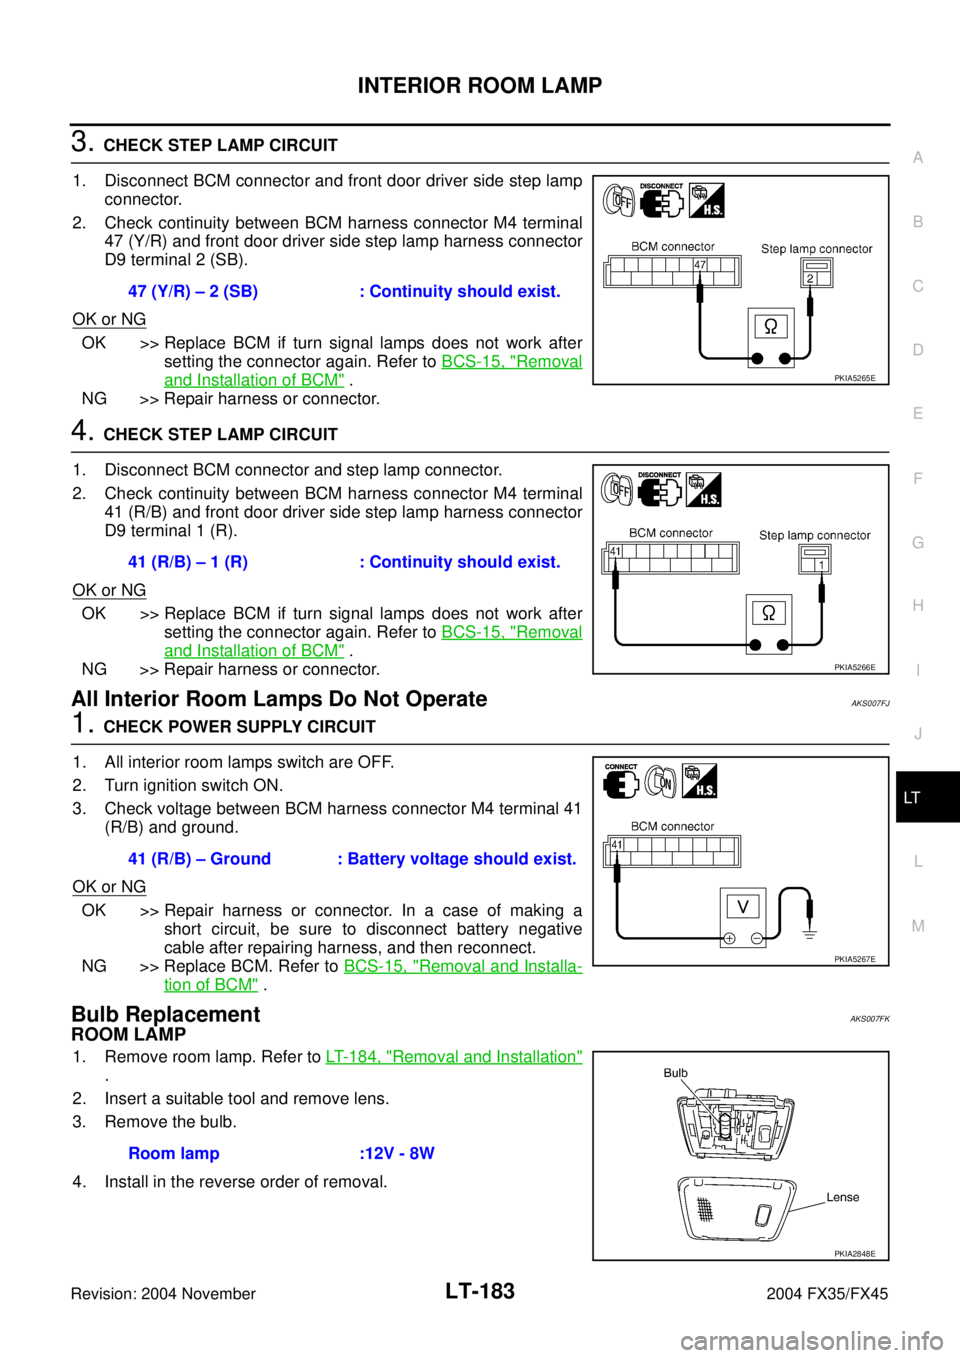
3. CHECK STEP LAMP CIRCUIT
1. Disconnect BCM connector and front door driver side step lamp
connector.
2. Check continuity between BCM harness connector M4 terminal
47 (Y/R) and front door driver side step lamp harness connector
D9 terminal 2 (SB).
OK or NG
OK >> Replace BCM if turn signal lamps does not work after
setting the connector again. Refer to BCS-15, "
Removal
and Installation of BCM" .
NG >> Repair harness or connector.
4. CHECK STEP LAMP CIRCUIT
1. Disconnect BCM connector and step lamp connector.
2. Check continuity between BCM harness connector M4 terminal
41 (R/B) and front door driver side step lamp harness connector
D9 terminal 1 (R).
OK or NG
OK >> Replace BCM if turn signal lamps does not work after
setting the connector again. Refer to BCS-15, "
Removal
and Installation of BCM" .
NG >> Repair harness or connector.
All Interior Room Lamps Do Not OperateAKS007FJ
1. CHECK POWER SUPPLY CIRCUIT
1. All interior room lamps switch are OFF.
2. Turn ignition switch ON.
3. Check voltage between BCM harness connector M4 terminal 41
(R/B) and ground.
OK or NG
OK >> Repair harness or connector. In a case of making a
short circuit, be sure to disconnect battery negative
cable after repairing harness, and then reconnect.
NG >> Replace BCM. Refer to BCS-15, "
Removal and Installa-
tion of BCM" .
Bulb ReplacementAKS007FK
ROOM LAMP
1. Remove room lamp. Refer to LT- 1 8 4 , "Removal and Installation"
.
2. Insert a suitable tool and remove lens.
3. Remove the bulb.
4. Install in the reverse order of removal.47 (Y/R) – 2 (SB) : Continuity should exist.
PKIA5265E
41 (R/B) – 1 (R) : Continuity should exist.
PKIA5266E
41 (R/B) – Ground : Battery voltage should exist.
PKIA5267E
Room lamp :12V - 8W
PKIA2848E
Page 3753 of 4449

LT-198
BULB SPECIFICATIONS
Revision: 2004 November 2004 FX35/FX45
BULB SPECIFICATIONSPFP:26297
HeadlampAKS007EO
Exterior LampAKS007EP
Interior Lamp/IlluminationAKS007EQ
Item Wattage (W)
High/Low (Xenon type)35 (D2S)
Item Wattage (W)
Front combination lampFront Turn signal lamp 21 (amber)
Parking lamp 5
Front side marker lamp 3.8
Rear combination lampStop/Tail lamp LED
Rear Turn signal lamp LED
Rear side marker lamp 3.8
Front fog lamp51 (HB4)
Back-up lamp18
License plate lamp5
High-mounted stop lamp (back door mount) LED
Item Wattage (W)
Map lamp8
Room lamp8
Personal lamp8
Luggage room lamp8
Step lamp5
Glove box lamp1.4
Vanity mirror lamp2
Ignition key hole illumination2
Front door inside handle illumination LED
Console illumination lamp1.4