Page 17 of 361

FEATURES OF YOUR HYUNDAI 1- 9
B070C01HP-GAT Alarm Stage
CAUTION: Do not arm the system until all passengershave left the car. If the system is armed whilea passenger(s) remains in the car, the alarmmay be activated when the remainingpassenger(s) leaves the car.
B070D01HP-AAT Disarmed Stage The system will be disarmed when the driver's or passenger's door is unlocked by depressing the"UNLOCK" button on the transmitter.After completion of the step above, the turnsignal lights will blink twice to indicate that thesystem is disarmed. If any door, tail gate or engine hood is not opened within 30 seconds, the system will be rearmed. CAUTION: Only the transmitter can disarm the armedstage. If the transmitter does not disarm thesystem, it is necessary to take the followingsteps;
1. Unlock the door with the key, which willcause the alarm to be activated.
2. Insert the key in the ignition key cylinder and turn the ignition key to "ON" position.
3. Wait for 30 seconds.After completing the steps above, the system will be disarmed.
B070C01HP
The alarm will be activated if any of the following occurs while the car is parked and the system isarmed.
1) A front or rear door is opened without using the transmitter.
2) The tail gate is opened without using the transmitter.
3) The engine hood is opened. The siren will sound and the turn signal lights will blink continuouly for 27 seconds (Type B/ Type
A : This happens 3 times). To turn off the system,unlock the door or tail gate with the transmitter. CAUTION: Avoid trying to start the engine while thesystem is armed.
B070F01A-GAT Keyless Entry System (If installed) Locking doors
1. Close all doors.
2. Push the "LOCK" button on the transmitter.
3. At the same time all doors lock, the turn signal
lights will blink once to indicate that the sys-tem is armed.
Unlocking doors
1. Push the "UNLOCK" button on the transmit- ter.
2. At the same time all doors unlock, the turn signal lights will blink twice to indicate that the system is disarmed.
B070E02HP-GAT Replacing the batteryWhen the transmitter's battery begins to get weak, it may take several pushes on the buttonto lock or unlock the doors, and the LED will notlight. Replace the battery as soon as possible. Battery type : CR2032(Type A) or CR1616 (Type B)
Page 18 of 361

FEATURES OF YOUR HYUNDAI
1- 10
B060A03L-DAT POWER WINDOWS
(1) (2)
B060A01HP
The power windows operate when the ignition key is in the "ON" position. The main switchesare located on the driver's armrest and controlthe front and rear windows on both sides of thevehicle. The windows may be opened by de-pressing the appropriate window switch andclosed by pulling up the switch. To open thewindow on the driver's side, press the switch(1)halfway down. The window moves as long asthe switch is operated. To fully open the driver'swindow automatically, press the switch fullydown. In automatic operation, the window willfully open even if you let go of the switch. To stopat the desired opening, pull up and release theswitch. In order to prevent operation of thepassanger front and rear windows, a windowlock switch(2) is provided on the armrest of thedriver's door. To disable the power windows,press the window lock switch. To revert tonormal operation, press the window lock switcha second time.
Replacement instructions:Type A:
MSO-0048-1
Screwdriver
1. Carefully separate the case with a blade screwdriver as shown in the illustration.
MSO-0048-2
Battery
CaseType B:
HMXOM033-2
Transmitter
Case
HMXOM033-3
Battery
Hole
Battery cover
2. Remove the old battery from the case and note the polarity. Make sure the polarity of the new battery is the same(+side facing down),then insert it in the transmitter. 1. Carefully separate the case with a phillips
screwdriver.
2. Take off the battery cover after separating the transmitter.
3. Remove the old battery from the transmitter with a blade screwdriver inserted in the holeand note the polarity. Make sure the polarityof the new battery is the same(+side facingup), then insert it in the transmitter.
Page 19 of 361

FEATURES OF YOUR HYUNDAI 1- 11
B060A02HP
NOTE: The power windows can be operated for 30seconds after the ignition key is turned to the"ACC" or "LOCK" positions, or removed fromthe ignition switch.If the front doors are opened during this 30second period, the power windows can nolonger be operated without the ignition keyturned to the "ON" position. WARNING:
(1) Be careful that someone's head, hands and body are not trapped by a closingwindow.
(2) Never try to operate the main switch on the driver's door and the individual doorwindow switch in opposing directions atthe same time. If this is done, the windowwill stop and cannot be opened or closed.
(3) Do not leave children alone in the car. Always remove the ignition key for theirsafety. To move the seat toward the front or rear, pull thelock release lever upward. This will release theseat on its track so you can move it forward orrearward to the desired position. When you findthe position you want, release the lever and slidethe seat forward or rearward on its track until itlocks into the desired position and cannot bemoved further.
B080A01A-AAT ADJUSTABLE FRONT SEATS WARNING: Never attempt to adjust the seat while thevehicle is moving. This could result in loss ofcontrol or an accident which may cause death,serious injury, or property damage. B080B02A-AAT Adjusting Seat Forward and Rearward
B080B01HP
B080C01A-AAT Adjusting Seatback Angle
To recline the seatback, lean forward to take your weight off it, then pull up on the recliner controllever at the outside edge of the seat. Now leanback until the desired seatback angle is achieved.To lock the seatback into position, release therecliner control lever. WARNING: To minimize risk of severe injury in the eventof a collision or a sudden stop, both the driverand passenger seatbacks should always bein an upright position while the vehicle is inmotion. The protection provided by the seat
B080C01HP
WARNING: To ensure the seat is locked securely, at-tempt to move the seat forward or rearwardwithout using the lock release lever.
Page 20 of 361

FEATURES OF YOUR HYUNDAI
1- 12
B080F01S-AAT Seat Cushion Height Adjustment (Driver's Seat Only) (If Installed) To raise or lower the front part of the seat cush- ion, turn the front knob forward or rearward. Toraise or lower the rear part of the seat cushion,turn the rear knob forward or rearward.
B080F01HP
B080E01A-AAT Lumbar Support Control (Driver's seat only) (If installed)
B080E01HP
To adjust the lumbar support, turn the handle on the inboard side of the seat. To increase theamount of lumbar support, pull the lever forward.To decrease it, push the lever toward the rear.
B080D01L-DAT Adjustable Headrests
B080D01HP
Lock knob
Headrests are designed to help reduce the risk of neck injuries.To raise the headrest, pull it up. To lower it, pushit down while pressing the lock knob. If equippedwith a horizontally adjustable type of headrest,pull on the top.
belts and airbags in a frontal collision may bereduced significantly when the seatbacks arereclined. There is greater risk that the driverand passenger will slide under the seat beltwhich may result in serious injury if a crashoccurs when the seatbacks are reclined.The seat belt cannot provide full protection toan occupant if the seat back is reclined.
WARNING:
o For maximum effectiveness in case of an
accident, the headrest should be adjustedso the top of the headrest is at the sameheight as the top of the occupant's ears.For this reason, the use of a cushion thatholds the body away from the seatback isnot recommended.
o Do not operate vehicle with the headrests removed as injury to the occupants mayoccur in the event of an accident. Head-rests may provide protection against neckinjuries when properly adjusted.
Page 21 of 361

FEATURES OF YOUR HYUNDAI 1- 13
B090B01L-AAT Adjusting Seat Forward and Rearward
Pull the control knob forward or backward to move the seat forward or backward to the de-sired position. Release the knob and the seat willlock at that position.
1. Reclining Control Knob
2. Sliding and Height Adjusting Control KnobB085B01HP
1
2
B090A02Y-AAT POWER DRIVER'S SEAT (If installed)The driver's seat can be adjusted appropriately by using the control knob on the left side of theseat. Before driving, adjust the seat to the properposition so as to easily control the steeringwheel, pedals and switches on the instrumentpanel. CAUTION: Do not operate two knobs at the same time. WARNING:
o Never attempt to adjust the seat while the
vehicle is moving. This could result inloss of control or an accident causingdeath, serious injury, or property dam-age.
o Do not sit or lean unnecessarily close to the airbag. B090C01Y-AAT Seat Cushion Height Adjustment Move the front portion of the control knob up or down to raise or lower the front part of the seatcushion. Move the rear portion of the controlknob up or down to raise or lower the rear part ofthe seat cushion.
B085C01HP
Page 22 of 361

FEATURES OF YOUR HYUNDAI
1- 14
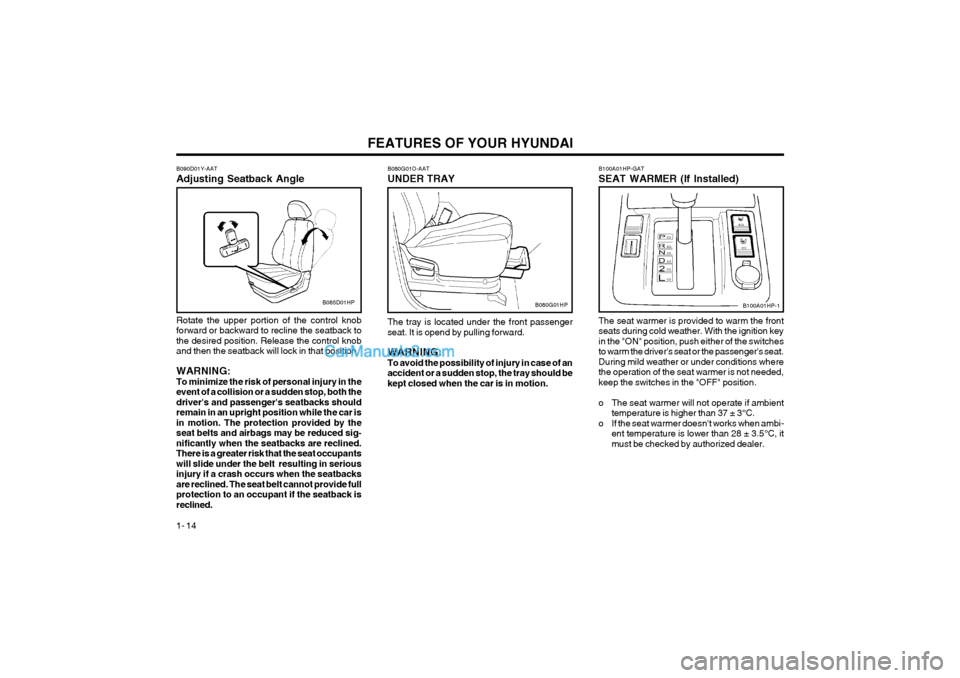
B100A01HP-GAT SEAT WARMER (If Installed) The seat warmer is provided to warm the front seats during cold weather. With the ignition keyin the "ON" position, push either of the switchesto warm the driver's seat or the passenger's seat.During mild weather or under conditions wherethe operation of the seat warmer is not needed,keep the switches in the "OFF" position.
o The seat warmer will not operate if ambient temperature is higher than 37 ± 3°C.
o If the seat warmer doesn't works when ambi- ent temperature is lower than 28 ± 3.5°C, it must be checked by authorized dealer.
B100A01HP-1
B080G01O-AAT UNDER TRAY
B080G01HP
The tray is located under the front passenger seat. It is opend by pulling forward. WARNING: To avoid the possibility of injury in case of anaccident or a sudden stop, the tray should bekept closed when the car is in motion.B085D01HP
B090D01Y-AAT Adjusting Seatback Angle Rotate the upper portion of the control knob forward or backward to recline the seatback tothe desired position. Release the control knoband then the seatback will lock in that position. WARNING: To minimize the risk of personal injury in theevent of a collision or a sudden stop, both thedriver's and passenger's seatbacks shouldremain in an upright position while the car isin motion. The protection provided by theseat belts and airbags may be reduced sig-nificantly when the seatbacks are reclined.There is a greater risk that the seat occupantswill slide under the belt resulting in seriousinjury if a crash occurs when the seatbacksare reclined. The seat belt cannot provide fullprotection to an occupant if the seatback isreclined.
Page 23 of 361

FEATURES OF YOUR HYUNDAI 1- 15
HHP231-2
B090A01HP-GAT SECOND SEAT Adjustable Headrests (If installed) Headrests are designed to help reduce the risk of neck injuries.To raise the headrest, pull it up. To lower it, pushit down while pressing the lock knob. WARNING:
o For maximum effectiveness in case of anaccident, the headrest should be adjustedso the top of the headrest is at the sameheight as the top of the occupant's ears.The use of a cushion that holds the bodyaway from the seatback is not recom-mended.
o Do not operate vehicle with the headrests removed as severe injury to an occupantmay occur in the event of an accident.Headrests may provide protection againstsevere neck injuries when properly ad-justed. B090C01HP-GAT Adjusting Seatback Angle To recline the seatback, push the seatback fold- ing lever toward the headrest, and release it afterthe desired seatback angle is achieved.When you recline the seatback to desired posi-tion, always be sure it has locked into position.
Seatbackfolding lever
B090A01HP-1
Lock
Knob
B090B01HP-DAT Folding Rear Seatback and Seat Cush- ion For greater convenience, the entire seatback and seat cushion may be folded down and up.
1. Lower the headrest completely while press- ing the lock knob. (If installed)
2. To fold down the seatback , first push and hold the seatback folding lever(1) inward,
then push down the seatback.
HHP228-1(1)
Page 24 of 361

FEATURES OF YOUR HYUNDAI
1- 16 o When you return the seatback to its upright
position, always be sure it is locked into position by pulling and pushing on the top ofseatback.
WARNING:o The purpose of the fold-down rear seat back and the fold-up rear seat cushion isto allow you to carry more objects thancould be accommodated. Never allow pas-sengers to sit on the cargo area while thecar is moving. This is not a proper seatingposition and no seat belts are available foruse when the seat back is folded down.This could result in serious injury or deathin case of an accident or a sudden stop.Objects should not extend higher than thetop of the front seatbacks.This could allow cargo to slide forwardand cause injury or damage during sud-den stops.
o When you return the rear seatback to its upright position after being folded down,be careful not to damage the seatbelt web-bing or buckle. In addition, do not allowthe seatbelt webbing or buckle to getcaught or pinched in the rear seat.
o Do not allow passengers to fold down and up the seatback and seat cushion whilethe car is moving.
3. Pull the seat cushion release lever(2) up-ward, then fold up the seat cushion.
B090B02HP
(2)
B090B03HP
(3)
4. To secure the seat, hook the securing strap(3) under the seat cushion to the headrest stay of front driver and passenger seat.
5. To return the seatback and seat cushion to its normal position, reverse the above proce-dure. B095A02HP-GAT THIRD SEAT(For 7 Passengers) Adjusting Seatback Angle To recline the seatback, pull the seatback re- cliner control lever backwards, and release itafter the desired seatback angle is achieved.When you recline the seatback to desired posi-tion, always be sure it has locked into position.
HHP236-1