2004 Hyundai Santa Fe Battery
[x] Cancel search: BatteryPage 145 of 253

2DRIVING YOUR HYUNDAI
8OPERATING THE AUTOMATIC
TRANSAXLE (2.4L, 2.7L - 4 A/T)
!WARNING:o Avoid high cornering speeds.
o Do not make quick steering wheel move-
ments, such as sharp lane changes or
fast, sharp turns.
o Always wear your seat belts.
In a collision crash, un unbelted person
is significantly more likely to die than a
person wearing a seatbelt.
o The risk of rollover is greatly increased if
you lose control of your vehicle at high-
way speeds.
o Loss of control often occurs if two or
more wheels drop off the roadway and
the driver oversteers to reenter the road-
way.
o In the event your vehicle leaves the road-
way, do not steer sharply. Instead, slow
down before pulling back into the travel
lanes.
o Never exceed posted speed limits.
C090A01O-GAT
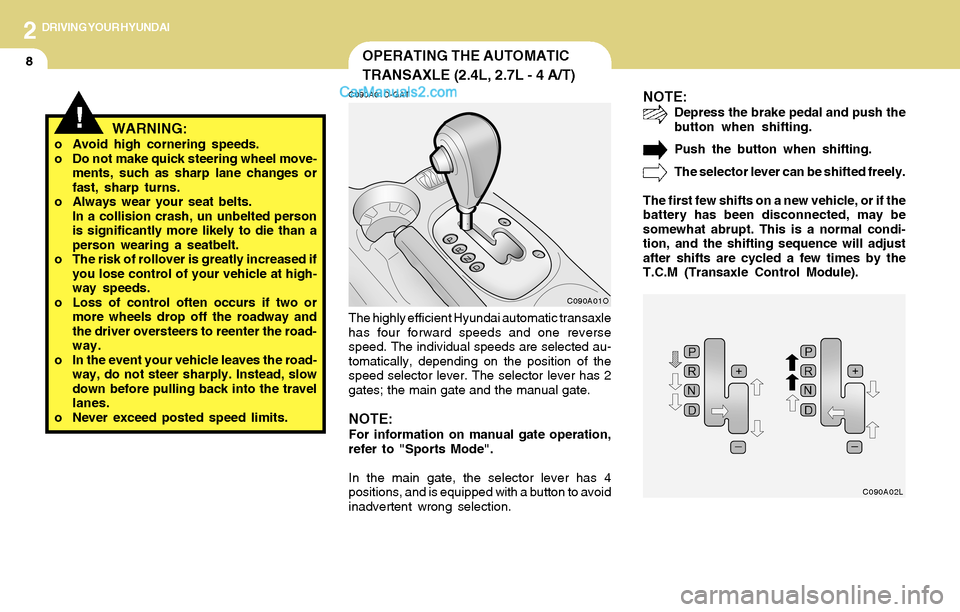
The highly efficient Hyundai automatic transaxle
has four forward speeds and one reverse
speed. The individual speeds are selected au-
tomatically, depending on the position of the
speed selector lever. The selector lever has 2
gates; the main gate and the manual gate.
NOTE:For information on manual gate operation,
refer to "Sports Mode".
In the main gate, the selector lever has 4
positions, and is equipped with a button to avoid
inadvertent wrong selection.
NOTE:Depress the brake pedal and push the
button when shifting.
Push the button when shifting.
The selector lever can be shifted freely.
The first few shifts on a new vehicle, or if the
battery has been disconnected, may be
somewhat abrupt. This is a normal condi-
tion, and the shifting sequence will adjust
after shifts are cycled a few times by the
T.C.M (Transaxle Control Module).
C090A01O
C090A02L
Page 148 of 253

2DRIVING YOUR HYUNDAI
11OPERATING THE AUTOMATIC
TRANSAXLE (3.5L - 5 A/T)
C090A02L-AAT
C090A01O
The highly efficient Hyundai automatic transaxle
has five forward speeds and one reverse speed.
The individual speeds are selected automati-
cally, depending on the position of the speed
selector lever. The selector lever has 2 gates;
the main gate and the manual gate.
NOTE:For information on manual gate operation,
refer to "Sports Mode".
In the main gate, the selector lever has 5
positions, and is equipped with a button to avoid
inadvertent wrong selection.
NOTE:Depress the brake pedal and push the
button when shifting.
Push the button when shifting.
The selector lever can be shifted freely.
The first few shifts on a new vehicle, or if the
battery has been disconnected may be
somewhat abrupt. This is a normal condi-
tion, and the shifting sequence will adjust
after shifts are cycled a few times by the
T.C.M (Transaxle Control Module).
The indicator lights in the instrument cluster
indicate the selector lever position when the
ignition is switched "ON". During sports mode
operation, green lights indicate the gear cur-
rently in use.
C090A02L
CAUTION:Never shift into "R" or "P" position while the
vehicle is moving.
!
Page 160 of 253

2DRIVING YOUR HYUNDAI
23SMOOTH CORNERING
C160A01A-AAT
The more severe weather conditions of winter
result in greater wear and other problems. To
minimize the problems of winter driving, you
should follow these suggestions:
C150A01A-AAT
Avoid braking or gear changing in corners,
especially when roads are wet. Ideally, corners
should always be taken under gentle accelera-
tion. If you follow these suggestions, tire wear
will be held to a minimum.
C160B01A-AATSnowy or Icy Conditions
To drive your vehicle in deep snow, it may be
necessary to use snow tires or to install tire
chains on your tires. If snow tires are needed,
it is necessary to select tires equivalent in size
and type of the original equipment tires. Failure
to do so may adversely affect the safety and
handling of your car. Furthermore, speeding,
rapid acceleration, sudden brake applications,
and sharp turns are potentially very hazardous
practices.
During deceleration, use engine braking to the
fullest extent. Sudden brake applications on
snowy or icy roads may cause skids to occur.
You need to keep sufficient distance between
the vehicle in operation in front and your vehicle.
Also, apply the brake gently. It should be noted
that installing tire chains on the tire will provide
a greater driving force, but will not prevent side
skids.
NOTE:Tire chains are not legal in all states. Check
state laws before fitting tire chains.
WINTER DRIVING
C160D01A-AAT
Check Battery and Cables
Winter puts additional burdens on the battery
system. Visually inspect the battery and cables
as described in Section 6. The level of charge
in your battery can be checked by your Hyundai
dealer or a service station.
C160C01A-AAT
Use High Quality Ethylene Glycol
Coolant
Your Hyundai is delivered with high quality
ethylene glycol coolant in the cooling system. It
is the only type of coolant that should be used
because it helps prevent corrosion in the cool-
ing system, lubricates the water pump and
prevents freezing. Be sure to replace or replen-
ish your coolant in accordance with the main-
tenance schedule in Section 5. Before winter,
have your coolant tested to assure that its
freezing point is sufficient for the temperatures
anticipated during the winter.
Page 168 of 253

3
2
WHAT TO DO IN AN EMERGENCY
IF THE ENGINE WILL NOT START
!
D010A01A-AAT D010B02A-AAT
If Engine Doesn't Turn Over or Turns
Over Slowly
D010C01Y-AAT
If Engine Turns Over Normally but Does
Not Start
1. Check fuel level.
2. With the key in the "OFF" position, check all
connectors at ignition, coil and spark plugs.
Reconnect any that may be disconnected or
loose.
3. Check the fuel line in the engine room.
4. If engine still refuses to start, call a Hyundai
dealer or seek other qualified assistance.
D010D01A-AAT
If Engine Stalls While Driving
1. Reduce your speed gradually, keeping a
straight line. Move cautiously off the road to
a safe place.
2. Turn on your emergency flashers.
3. Try to start the engine again. If your vehicle
will not start, contact a Hyundai dealer or
seek other qualified assistance.
WARNING:If the engine will not start, do not push or
pull the car to start it. This could result in a
collision or cause other damage. In addi-
tion, push or pull starting may cause the
catalytic converter to be overloaded and
create a fire hazard.
1. If your car has an automatic transaxle, be
sure the gear selector lever is in "N" or "P"
and the emergency brake is set.
2. Check the battery connections to be sure
they are clean and tight.
3. Turn on the interior light. If the light dims or
goes out when you operate the starter, the
battery is discharged.
4. Check the starter connections to be sure
they are securely tightened.
5. Do not push or pull the vehicle to start it. See
instructions for "Jump Starting".
D010B01Y
Page 169 of 253

3WHAT TO DO IN AN EMERGENCY
3JUMP STARTING
!
o If you should accidentally get acid on your
skin or in your eyes, immediately remove
any contaminated clothing and flush the area
with clear water for at least 15 minutes. Then
promptly obtain medical attention. If you
must be transported to an emergency facil-
ity, continue to apply water to the affected
area with a sponge or cloth.
o The gas produced by the battery during the
jump-start operation is highly explosive. Do
not smoke or allow a spark or an open flame
in the vicinity.
o The battery being used to provide the jump
start must be 12-volt. If you cannot deter-
mine that it is a 12-volt battery, do not attempt
to use it for the jump start.
o To jump start a car with a discharged battery,
follow this procedure exactly:
1. If the booster battery is installed in another
vehicle, be sure the two vehicles are not
touching.
2. Turn off all unnecessary lights and acces-
sories in both vehicles.
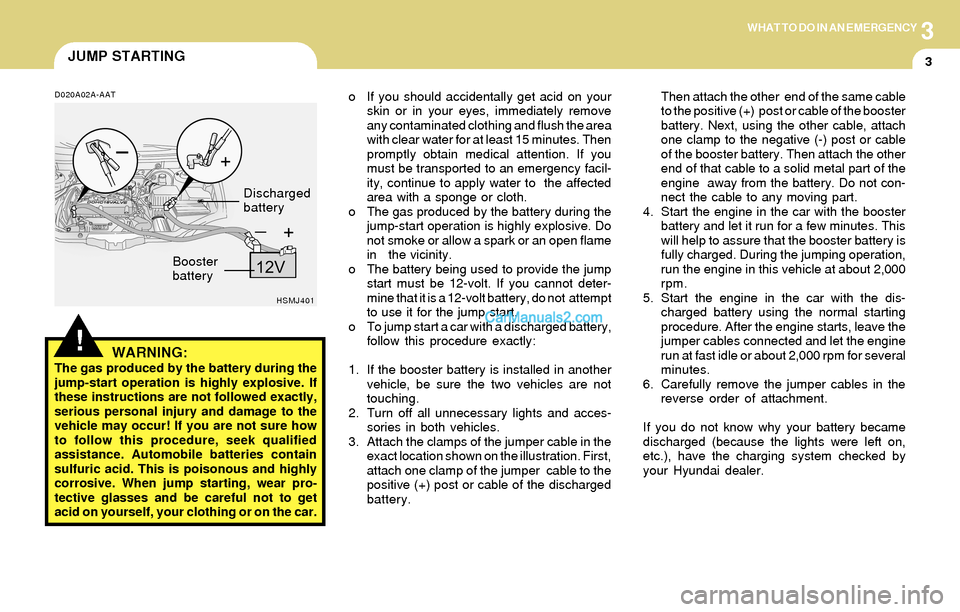
3. Attach the clamps of the jumper cable in the
exact location shown on the illustration. First,
attach one clamp of the jumper cable to the
positive (+) post or cable of the discharged
battery.Then attach the other end of the same cable
to the positive (+) post or cable of the booster
battery. Next, using the other cable, attach
one clamp to the negative (-) post or cable
of the booster battery. Then attach the other
end of that cable to a solid metal part of the
engine away from the battery. Do not con-
nect the cable to any moving part.
4. Start the engine in the car with the booster
battery and let it run for a few minutes. This
will help to assure that the booster battery is
fully charged. During the jumping operation,
run the engine in this vehicle at about 2,000
rpm.
5. Start the engine in the car with the dis-
charged battery using the normal starting
procedure. After the engine starts, leave the
jumper cables connected and let the engine
run at fast idle or about 2,000 rpm for several
minutes.
6. Carefully remove the jumper cables in the
reverse order of attachment.
If you do not know why your battery became
discharged (because the lights were left on,
etc.), have the charging system checked by
your Hyundai dealer.D020A02A-AAT
WARNING:The gas produced by the battery during the
jump-start operation is highly explosive. If
these instructions are not followed exactly,
serious personal injury and damage to the
vehicle may occur! If you are not sure how
to follow this procedure, seek qualified
assistance. Automobile batteries contain
sulfuric acid. This is poisonous and highly
corrosive. When jump starting, wear pro-
tective glasses and be careful not to get
acid on yourself, your clothing or on the car.
HSMJ401
Booster
batteryDischarged
battery
Page 184 of 253

4CORROSION PREVENTION AND APPEARANCE CARE
5CLEANING THE INTERIOR
E040B01A-AAT
To Clean the Leather Upholstery
(If installed)
In the normal course of use, leather upholstered
surfaces will, like any material, pick-up dust and
dirt. This dust and dirt must be cleaned off or it
may work into the surface of the leather, caus-
ing damage.
Fine leather needs care, and should be cleaned
when necessary. Washing leather thoroughly
with soap and water will keep your leather
lustrous, beautiful and ensure you have many
years of wear.
Take a piece of cheese cloth and using any mild
soap and lukewarm water, work up a good
lather. Thoroughly wash the leather. Wipe clean
with a slightly damp cloth and dry with soft cloth.
Do this as often as the leather becomes soiled.
During tanning operations, sufficient oils are
incorporated through processing that none need
be applied during the life of the leather. Oil
applied to the finished surface will in no way help
the leather and may do more harm than good.
Varnishes and furniture polishes should never
be used under any conditions.
E040A01A-AAT
To Clean the Vinyl Upholstery
To clean the vinyl upholstery, first remove loose
dirt and dust with a vacuum cleaner. Then apply
a solution of mild soap or detergent and water
using a clean sponge or soft cloth. Allow this to
stay on the surface to loosen the dirt, then wipe
with a clean damp sponge or cloth. If all the dirt
stains are not removed, repeat this procedure
until the upholstery is clean. Do not use gaso-
line, solvent, paint thinner or other strong clean-
ers.
E030E01A-AAT
Maintaining Bumpers
Special precautions must be observed to pre-
serve the appearance of the bumpers on your
Hyundai. They are:
o Be careful not to spill battery electrolyte or
hydraulic brake fluid on the bumpers. If you
do, wash it off immediately with clear water.
o Be gentle when cleaning the bumper sur-
faces. They are made of soft plastic and the
surface can be damaged if mistreated. Do
not use abrasive cleaners. Use warm water
and mild soap or car-washing solution.
o Do not expose the bumpers to high tem-
peratures. For example, if you have your car
repainted, do not leave the bumpers on the
car if the car is going to be placed in a high-
temperature paint booth.
Page 195 of 253

6
Engine Compartment.............................................................. 6-2
General Checks....................................................................... 6-5
Checking the Engine Oil........................................................ 6-6
Changing the Oil and Filter.................................................... 6-7
Checking and Changing the Engine Coolant.................... 6-8
Spark Plugs...........................................................................6-10
Changing the Air Cleaner Filter.........................................6-12
Checking the Transaxle Oil (Manual) ..............................6-13
Checking the Transaxle Fluid (Automatic).....................6-14
Checking the Brakes...........................................................6-16
Checking the Clutch Fluid..................................................6-17
Air Conditioning Care ...........................................................6-18
Checking Drive Belts...........................................................6-20
Checking and Replacing Fuses ........................................6-21
Checking the Battery...........................................................6-22
Power Steering Fluid Level................................................6-24
Replacement of Light Bulbs...............................................6-26
Bulb Wattage .........................................................................6-33
Fuse Panel Description.......................................................6-34
6
DO-IT-YOURSELF MAINTENANCE
Page 196 of 253

6DO-IT-YOURSELF MAINTENANCE
2ENGINE COMPARTMENT
G010A01O-AAT
(2.4 DOHC)
HSM241
12 34
6 7 8 9 10 11
1. Coolant reservoir cap
2 . Engine oil filler cap
3. Brake & Clutch fluid reservoir
4. Air cleaner5 . Fuse and Relay box
6. Windshield washer fluid reservoir
7 . Power steering fluid reservoir
8 . Engine oil level dipstick 9. Radiator cap
10. Automatic transaxle fluid level dipstick
(Vehicle with Automatic Transaxle)
11. Battery
CAUTION:When inspecting or servicing the engine,
you should handle tools and other heavy
objects carefully so that the plastic cover of
the engine is not damaged.
!
5