2004 Hyundai Santa Fe reset
[x] Cancel search: resetPage 61 of 253

1FEATURES OF YOUR HYUNDAI
48MULTI-FUNCTION LIGHT SWITCH
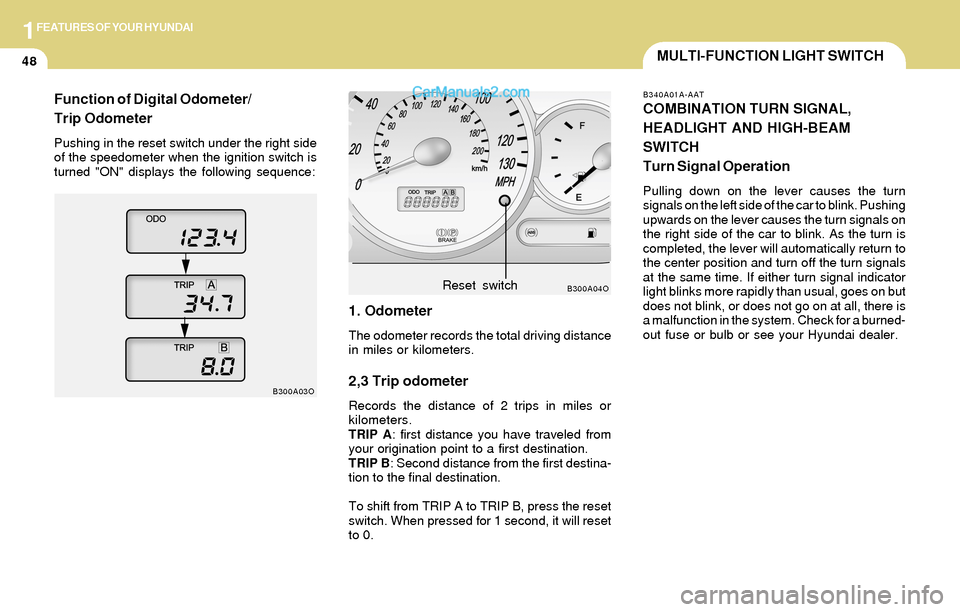
1. Odometer
The odometer records the total driving distance
in miles or kilometers.
2,3 Trip odometer
Records the distance of 2 trips in miles or
kilometers.
TRIP A: first distance you have traveled from
your origination point to a first destination.
TRIP B: Second distance from the first destina-
tion to the final destination.
To shift from TRIP A to TRIP B, press the reset
switch. When pressed for 1 second, it will reset
to 0.
B300A04O
B300A03OReset switch
B340A01A-AAT
COMBINATION TURN SIGNAL,
HEADLIGHT AND HIGH-BEAM
SWITCH
Turn Signal Operation
Pulling down on the lever causes the turn
signals on the left side of the car to blink. Pushing
upwards on the lever causes the turn signals on
the right side of the car to blink. As the turn is
completed, the lever will automatically return to
the center position and turn off the turn signals
at the same time. If either turn signal indicator
light blinks more rapidly than usual, goes on but
does not blink, or does not go on at all, there is
a malfunction in the system. Check for a burned-
out fuse or bulb or see your Hyundai dealer.
Function of Digital Odometer/
Trip Odometer
Pushing in the reset switch under the right side
of the speedometer when the ignition switch is
turned "ON" displays the following sequence:
Page 66 of 253

1FEATURES OF YOUR HYUNDAI
53DIGITAL CALENDARDIGITAL CLOCK
NOTE:The ignition must be in the "ON" position
for the rear window defroster to operate.
B400A01A-AAT
There are three control buttons for the digital
clock. Their functions are:
HOUR - Push "H" to advance the hour indi-
cated.
MIN - Push "M" to advance the minute indicated.
RESET - Push "R" to reset minutes to ":00" to
facilitate resetting the clock to the correct time.
When this is done:
Pressing "R" between 10 : 30 and 11 : 29
changes the readout to 11 : 00.
Pressing "R" between 11 : 30 and 12 : 29
changes the readout to 12 : 00.
B400B02O-GAT
(If installed)
How to adjust the date & the time
1. Whenever "M" button is pushed, the "YEAR",
"MONTH", "DAY", "HOUR" and "MINUTE"
blinks in order.
2. Adjust the date & the time by pushing
" (UP)", " (DOWN)" button when the
year/month/day/hour/minute each blinks.
3. After adjusting the date & the time, push "M"
button once more and the adjustment is
completed.
NOTE:When the battery has been reconnected or
charged, set the date and time as described
above. However, the first display mode is
set on DEC 01.
HSM100
HSM292
CAUTION:Do not clean the inner side of the rear
window glass with an abrasive type of glass
cleaner or use a scraper to remove foreign
deposits from the inner surface of the glass
as this may cause damage to the defroster
elements.
!
Page 84 of 253

1FEATURES OF YOUR HYUNDAI
71REMOTE FUEL-FILLER LID RELEASEAUTO FUEL CUT SWITCHHIGH-MOUNTED REAR STOP LIGHT
B550A01A-AAT
(If installed)
In addition to the lower-mounted rear stoplights
on either side of the car, the high mounted rear
stoplight in the center of the rear window also
lights when the brakes are applied.
B550A01O
!
B560B01O-AAT
The auto fuel cut switch is located on the driver's
side of the engine compartment.
In the event of a collision or sudden impact, the
auto fuel cut device cuts off the fuel supply. If this
device is activated, it must be reset by pressing
in on the top of the switch before the engine can
be restarted.
WARNING:Before resetting the auto fuel cut switch,
the fuel line should be checked for fuel
leaks.
B560B01O
B560A02S-AAT
The fuel-filler lid may be opened from inside the
vehicle by pulling up on the fuel-filler lid opener
located on the front floor area on the left side of
the car.
NOTE:If the fuel-filler lid will not open because ice
has formed around it, tap lightly or push on
the lid to break the ice and release the lid. Do
not pry on the lid. If necessary, spray around
the lid with an approved de-icer fluid (do
not use radiator anti-freeze) or move the
vehicle to a warm place and allow the ice to
melt.
B560A01O
Page 89 of 253

1FEATURES OF YOUR HYUNDAI
76
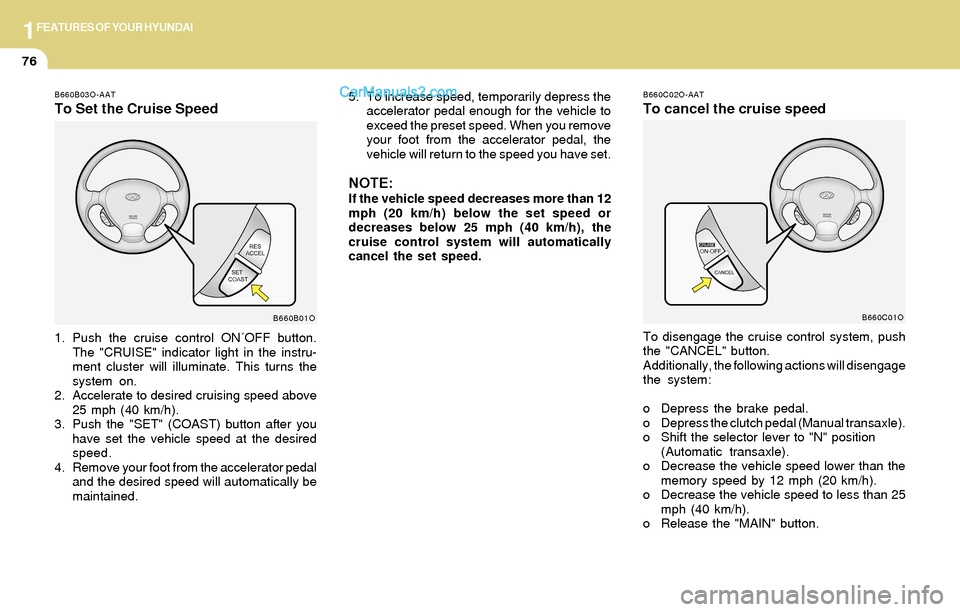
B660B03O-AAT
To Set the Cruise Speed
1. Push the cruise control ON´OFF button.
The "CRUISE" indicator light in the instru-
ment cluster will illuminate. This turns the
system on.
2. Accelerate to desired cruising speed above
25 mph (40 km/h).
3. Push the "SET" (COAST) button after you
have set the vehicle speed at the desired
speed.
4. Remove your foot from the accelerator pedal
and the desired speed will automatically be
maintained.
B660B01O
B660C02O-AAT
To cancel the cruise speed
To disengage the cruise control system, push
the "CANCEL" button.
Additionally, the following actions will disengage
the system:
o Depress the brake pedal.
o Depress the clutch pedal (Manual transaxle).
o Shift the selector lever to "N" position
(Automatic transaxle).
o Decrease the vehicle speed lower than the
memory speed by 12 mph (20 km/h).
o Decrease the vehicle speed to less than 25
mph (40 km/h).
o Release the "MAIN" button.
B660C01O
5. To increase speed, temporarily depress the
accelerator pedal enough for the vehicle to
exceed the preset speed. When you remove
your foot from the accelerator pedal, the
vehicle will return to the speed you have set.
NOTE:If the vehicle speed decreases more than 12
mph (20 km/h) below the set speed or
decreases below 25 mph (40 km/h), the
cruise control system will automatically
cancel the set speed.
Page 90 of 253

1FEATURES OF YOUR HYUNDAI
77
!WARNING:o Keep the main switch off when not using
the cruise control.
o Use the cruise control system only when
traveling on open highways in good
weather.
o Do not use the cruise control when it
may not be safe to keep the car at a
constant speed, for instance, driving in
heavy or varying traffic, or on slippery
(rainy, icy or snow-covered) or winding
roads or over 6% up-hill or down-hill
roads.
o Pay particular attention to the driving
conditions whenever using the cruise
control system.
o During cruise-control driving with a
manual transaxle vehicle, do not shift
into neutral without depressing the
clutch pedal, or the engine will be
overrevved. If this happens, depress the
clutch pedal or release the main switch.
o During normal cruise control operation,
when the "SET" button is activated or
reactivated after applying the brakes,
the cruise control will energize after
approximately 3 seconds. This delay is
normal.
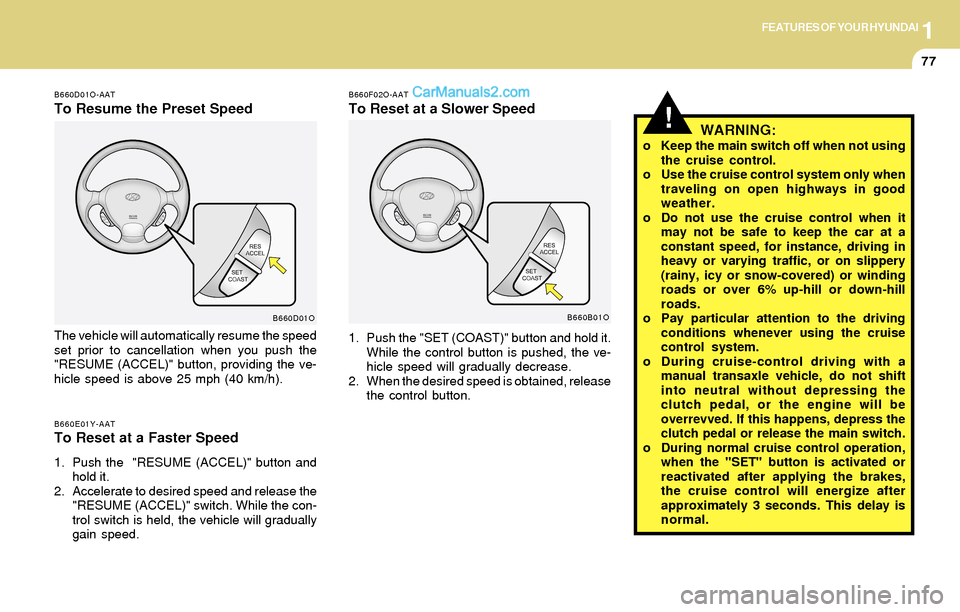
B660F02O-AAT
To Reset at a Slower Speed
1. Push the "SET (COAST)" button and hold it.
While the control button is pushed, the ve-
hicle speed will gradually decrease.
2. When the desired speed is obtained, release
the control button.
B660B01O
B660D01O-AAT
To Resume the Preset Speed
The vehicle will automatically resume the speed
set prior to cancellation when you push the
"RESUME (ACCEL)" button, providing the ve-
hicle speed is above 25 mph (40 km/h).
B660E01Y-AATTo Reset at a Faster Speed
1. Push the "RESUME (ACCEL)" button and
hold it.
2. Accelerate to desired speed and release the
"RESUME (ACCEL)" switch. While the con-
trol switch is held, the vehicle will gradually
gain speed.
B660D01O
Page 102 of 253

1FEATURES OF YOUR HYUNDAI
89
B970C01O-GAT
Automatic OperationNOTE:If the battery has been discharged or dis-
connected, the temperature mode will reset
to Fahrenheit degree.
This is a normal condition and you can
adjust the temperature mode from Fahren-
heit to Centigrade as follows;
Press the TEMP down ( ) button 3 seconds
or more with the AMB button held down.
The display shows that the unit of tempera-
ture is adjusted to Fahrenheit or Centigrade
(°F
→ →→ →
→ °C or °C
→ →→ →
→ °F).
The FATC (Full Automatic Temperature Con-
trol) system automatically controls the heating
and cooling by doing as follows:
1. Push the "AUTO" switch. The indicator light
will come on confirming that the Face, Floor
and/or Bi-Level modes as well as the blower
speed and, the air conditioning will operate if
ambient temperature is higher than 32°F
(0°C) and automatically turns off if the ambi-
ent temperature drops below 32°F(0°C).
NOTE:Never place things on the sensor which is
located in the car on the instrument panel
to ensure better control of the heating and
cooling system.
B970C01O
HSM502
Photo sensor 2. Push the "TEMP" button to set the desired
temperature.
The temperature will increase to the maxi-
mum "HI" by pushing on the button. Each
push of the button will cause the temperature
to increase by 1°F(0.5°C).
The temperature will decrease to the mini-
mum "LO" by pushing on the button. Each
push of the button will cause the temperature
to decrease by 1°F(0.5°C).
B970C03O
Page 109 of 253

1FEATURES OF YOUR HYUNDAI
96AUDIO SYSTEM
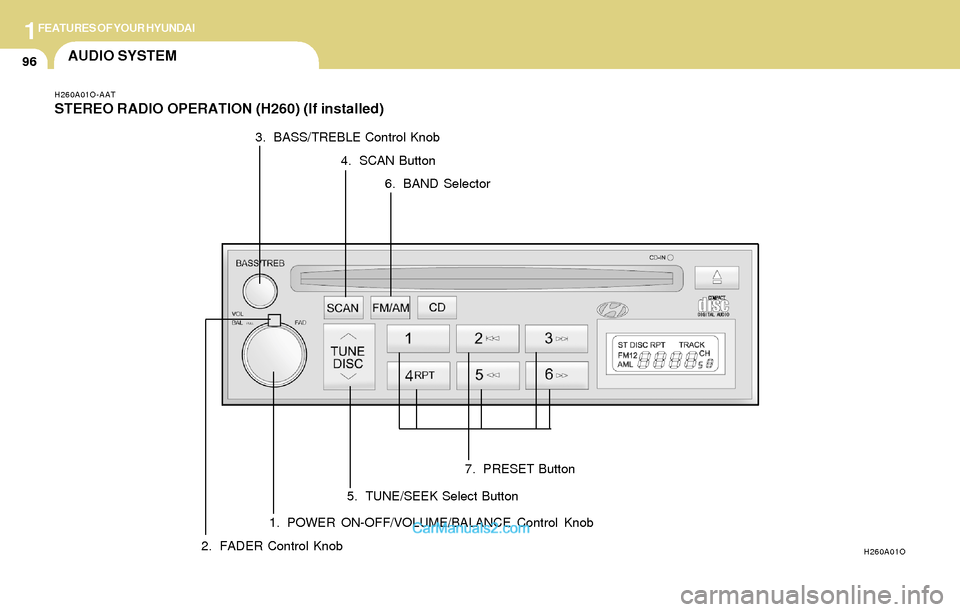
H260A01O-AAT
STEREO RADIO OPERATION (H260) (If installed)
1. POWER ON-OFF/VOLUME/BALANCE Control Knob
H260A01O2. FADER Control Knob3. BASS/TREBLE Control Knob
4. SCAN Button
5. TUNE/SEEK Select Button6. BAND Selector
7. PRESET Button
Page 110 of 253

1FEATURES OF YOUR HYUNDAI
97
H260B04O-AAT
1. POWER ON-OFF Control Knob
The radio unit may be operated when the ignition
key is in the "ACC" or "ON" position. Press the
knob to switch the power on. The LCD shows
the radio frequency in the radio mode or the CD
track indicator in the CD mode. To switch the
power off, press the knob again.
VOLUME Control
Rotate the knob clockwise to increase the
volume and turn the knob counterclockwise to
reduce the volume.
BALANCE Control
Pull and turn the control knob clockwise to
emphasize right speaker sound (left speaker
sound will be attenuated). When the control
knob is turned counterclockwise, left speaker
sound will be emphasized (right speaker sound
will be attenuated).
2. FAD (Fader Control) Knob
Turn the control knob counterclockwise to
emphasize front speaker sound (rear speaker
sound will be attenuated). When the control
knob is turned clockwise, rear speaker sound
will be emphasized (front speaker sound will be
attenuated).
3. BASS Control Knob
Press to pop the knob out and turn to the left or
right for the desired bass tone.
TREB (Treble Control) Knob
Pull the bass control knob further out.
Turn to the left or right for the desired treble tone.
4. SCAN Button
When the scan button is pressed, the frequency
will increase and the receivable stations will be
tuned in one after another, receiving each sta-
tion for 5 seconds. To stop scanning, press the
scan button again.
5. TUNE (Manual) Select Button
Press the ( ) side or ( ) side to increase or to
decrease the frequency. Press either button
and hold down to continuously scroll.
Release button once the desired station is
reached.
SEEK Operation
(Automatic Channel Selection)
Press the TUNE select button for 0.5 sec or
more. Releasing it will automatically tune to the
next available station with a beep sound.
When the ( ) side is pressed longer than 0.5
second, releasing will automatically tune to the
next higher frequency and when the ( ) side is
pressed longer than 0.5 second, releasing will
automatically tune to the next lower frequency.
6. BAND Selector
Pressing the button changes the AM, FM1
and FM2 bands. The mode selected is dis-
played on LCD.
7. PRESET STATION SELECT Button
Six (6) stations for AM, FM1 or FM2 respec-
tively can be preset in the electronic memory
circuit on this unit.
FM/AM