2004 Hyundai Coupe ESP
[x] Cancel search: ESPPage 2 of 389

A020A01A-AATRESPONSIBILITY FOR MAINTENANCE
The maintenance requirements for your new Hyundai are found in Section 5. As the owner, it is your responsibility to see that all maintenance operations specified by the manufacturer are carried out at theappropriate intervals. When the vehicle is used in severe driving conditions, more frequent maintenanceis required for some operations. Maintenance requirements for severe operating conditions are alsoincluded in Section 5.
Page 3 of 389

OWNER'S MANUAL A030A01F-GAT Operation MaintenanceSpecifications
All information in this Owner's Manual is current at the time of publication. However, Hyundai reserves the right to make changes at any time so that our policy of continual product improvement may be carried out.
This manual applies to all Hyundai models and includes descriptions and explanations of optional as well as standard equipment. As a result, you may find material in this manual that does not apply to your specific vehicle.
Please note that in Coupe/Tiburon models are equipped with Right-Hand Drive (RHD). The explanations and illustrations for some operations in RHD models are opposite of those written in this manual.
HGK037
Page 4 of 389

A050A04A-AATHYUNDAI MOTOR COMPANY
Note: Because future owners will also need the information included in this manual, if you sell this Hyundai, please leave
the manual in the vehicle for their use. Thank you. CAUTION: Severe engine and transaxle damage may result from the use of poor quality fuels and lubricants that do not meet Hyundai specifications. You must always use high quality fuels and lubricants that meet thespecifications listed on Page 9-3 in the Vehicle Specifications section of the Owner's Manual. Copyright 2004 Hyundai Motor Company. All rights reserved. No part of this publication may be reproduced, stored in any retrieval system or transmitted in any form or by any means without the prior written permission of Hyundai Motor Company.
A040A01A-AAT
FOREWORD
Thank you for choosing Hyundai. We are pleased to welcome you to the growing number of discriminating people who drive Hyundais. The advanced engineering and high-quality construction of each Hyundai we build is something of which we'revery proud. Your Owner's Manual will introduce you to the features and operation of your new Hyundai. It is suggested that you read it carefully because the information it contains can contribute greatly to the satisfaction you receive from your new car. The manufacturer also recommends that all service and maintenance on your car be performed by an authorized Hyundai dealer. Hyundai dealers are prepared to provide high-quality service, maintenance and any other assistance that may berequired.
Page 11 of 389

FEATURES OF YOUR HYUNDAI 1- 3
B040A02Y-AAT DOOR LOCKS WARNING:
o Unlocked doors can be dangerous. Be-
fore you drive away (especially if there are children in the car), be sure that all thedoors are securely closed and locked sothat the doors cannot be inadvertentlyopened from the inside. This helps ensurethat the doors will not be opened acciden- tally. Also, when combined with the proper use of seat belts, locking the doors helpskeep occupants from being ejected fromthe car in case of an accident.
o Before opening the door, always look for and avoid oncoming traffic.
o In case of accident, the door is unlocked automatically (If installed).
B880C02A-GAT Key Numbers
AX10030A-1
The vehicle key number is recorded upon a metal tag attached to the keys when the vehicleis first delivered to you.The key number should be recorded and kept ina safe place in case the need to order furtherkeys arises. New keys are available from anyHyundai dealer by quoting the relevant key num-ber.In the interest of security, the metal tag attachedto the keys which bears the key number shouldbe removed from the key ring after you receiveyour new vehicle. In addition, key numbers can-not be provided by Hyundai for security reasons.If you need additional keys or if you should loseyour keys, your authorized Hyundai dealer canmake new keys. B880D01GK-GAT Limp Home Procedures In case the immobilizer system is out of order, you cannot start the engine without the limphome procedures with ignition key.The following procedure is how to start the en-gine with the function of the limp home. (0, 1, 2,3 as a sample password). NOTE: You can get the limp home password whenthe vehicle is first delivered to you. If you donot have the password, consult your autho-rized Hyundai dealer.
1. To set the password, you may turn the ignition
key "ON" and then turn it "OFF" according to the digit numbers. For example, turn the igni- tion key once for digit number "1", and twice for "2", and so on. However, for the digitnumber "0", you must turn the ignition key for10 times.
2. Wait for 3~10 seconds.
3. You may set the remaining number of digits by following the same procedures 1 and 2.
4. If all of four digits have been tried success- fully, from this time, you have to start yourengine within 30 seconds. If you start yourengine after 30 seconds, your engine will notstart.
After doing the limp home procedure, you have toconsult with your authorized Hyundai dealer assoon as possible.
CAUTION: If you cannot start your engine in spite of limphome procedure, have your vehicle towed byan authorized Hyundai dealer.
Page 15 of 389

FEATURES OF YOUR HYUNDAI 1- 7
B050A01GK-AAT WINDOW GLASS Power Window
HGK096
(1)
The power windows operate only when the igni- tion key is in the "ON" position. The main switchesare located on the driver's arm rest and controlthe front windows on the respective sides of thevehicle. The windows may be opened by de-pressing the front portion of the switch. To stop atthe desired opening, release the switch. Thewindow may be closed by pulling the front portionof the switch. In order to prevent operation of thepassenger front window by the passenger, awindow lock switch (1) is provided on the armrest of the driver's door. To disable thepassenger's power window, push the windowlock switch. To revert to normal operation, pushin on the window lock switch again.
B050A02GK
CAUTION: Never try to operate the main switch and sub-switch in opposing directions at the sametime. If this is done, the window will stop and cannot be opened or closed. Auto-Down Window (Driver's Side) (If Installed) The Auto-Down window is moved to its fully open position by pushing the switch. To stop at thedesired position push in on the switch again. WARNING:
o Be careful that head, hands and body are
not trapped by a closing window.
o If passengers remain in the car when you leave, especially if a child remains alone,always remove the ignition key for theirsafety.
HGK097
Page 25 of 389

FEATURES OF YOUR HYUNDAI 1- 17
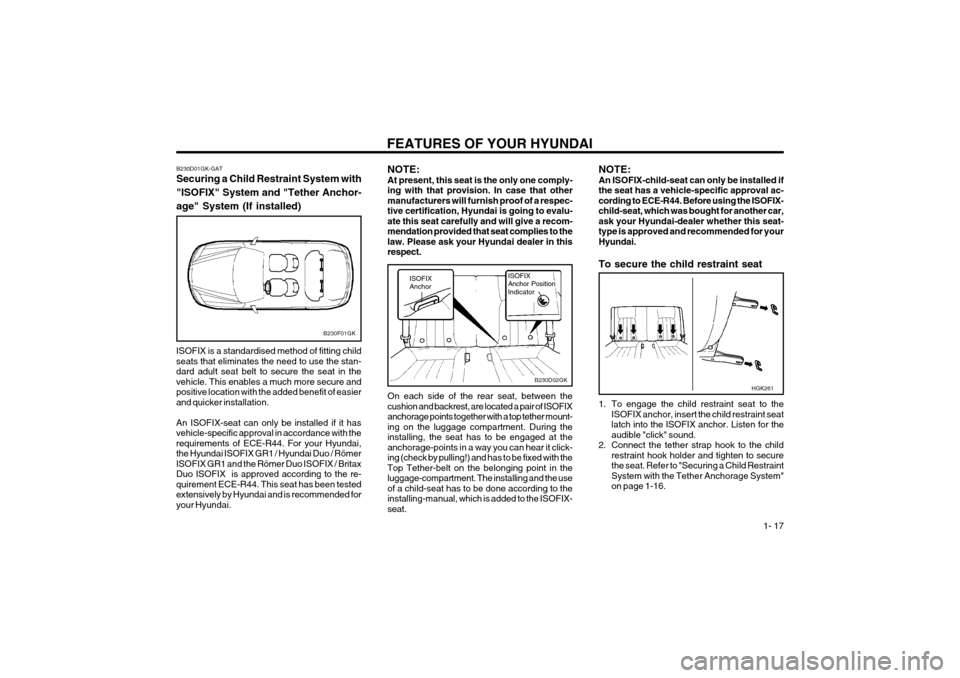
B230D01GK-GAT Securing a Child Restraint System with "ISOFIX" System and "Tether Anchor-age" System (If installed)
B230F01GK
ISOFIX is a standardised method of fitting child seats that eliminates the need to use the stan-dard adult seat belt to secure the seat in thevehicle. This enables a much more secure andpositive location with the added benefit of easierand quicker installation. An ISOFIX-seat can only be installed if it has vehicle-specific approval in accordance with therequirements of ECE-R44. For your Hyundai,the Hyundai ISOFIX GR1 / Hyundai Duo / RömerISOFIX GR1 and the Römer Duo ISOFIX / BritaxDuo ISOFIX is approved according to the re-quirement ECE-R44. This seat has been testedextensively by Hyundai and is recommended foryour Hyundai. NOTE:At present, this seat is the only one comply-ing with that provision. In case that othermanufacturers will furnish proof of a respec-tive certification, Hyundai is going to evalu-ate this seat carefully and will give a recom-mendation provided that seat complies to thelaw. Please ask your Hyundai dealer in thisrespect.
B230D02GK
ISOFIX AnchorISOFIX Anchor
Position
Indicator
On each side of the rear seat, between the cushion and backrest, are located a pair of ISOFIXanchorage points together with a top tether mount-ing on the luggage compartment. During theinstalling, the seat has to be engaged at theanchorage-points in a way you can hear it click-ing (check by pulling!) and has to be fixed with theTop Tether-belt on the belonging point in theluggage-compartment. The installing and the useof a child-seat has to be done according to theinstalling-manual, which is added to the ISOFIX-seat. NOTE:An ISOFIX-child-seat can only be installed ifthe seat has a vehicle-specific approval ac-cording to ECE-R44. Before using the ISOFIX-child-seat, which was bought for another car,ask your Hyundai-dealer whether this seat-type is approved and recommended for yourHyundai. To secure the child restraint seat
1. To engage the child restraint seat to the
ISOFIX anchor, insert the child restraint seat latch into the ISOFIX anchor. Listen for theaudible "click" sound.
2. Connect the tether strap hook to the child restraint hook holder and tighten to securethe seat. Refer to "Securing a Child RestraintSystem with the Tether Anchorage System"on page 1-16.
HGK261
Page 41 of 389

FEATURES OF YOUR HYUNDAI 1- 33
To operate the headlights, turn the barrel on the end of the multi-function switch. The first positionturns on the parking lights, sidelights, tail lightsand instrument panel lights. The second positionturns on the headlights. NOTE: The ignition must be in the "ON" position toturn on the headlights. Parking light auto cut (If installed) If you do not turn the parking lights "OFF" after driving, the parking lights will automatically shut"OFF" when the driver's door is opened.To turn them "ON" again, you must simply turnthe ignition key to the "ON" position.
Instantaneous Fuel Consumption gauge It shows instantaneous fuel consumption ac- cording to the driving condition. The more indi-cated figure is low, the more it indicates efficientdriving situation. Volt gauge It shows moment volt change and makes for diver correspond to low volt situation.
HGK231B340B01A-AAT Lane Change Signal
To indicate a lane change, move the lever up or down to a point where it begins flashing.
B340C03E-AAT Headlight Switch
HGK038 HGK039
B340A01A-AAT COMBINATION TURN SIGNAL, HEADLIGHT AND HIGH-BEAMSWITCH Turn Signal Operation Pulling down on the lever causes the turn signals on the left side of the car to blink. Pushingupwards on the lever causes the turn signals onthe right side of the car to blink. As the turn iscompleted, the lever will automatically return tothe center position and turn off the turn signals atthe same time. If either turn signal indicator lightblinks more rapidly than usual, goes on but doesnot blink, or does not go on at all, there is amalfunction in the system. Check for a burned-out fuse or bulb or see your Hyundai dealer.
The lever will automatically return to the center position when released.
Page 49 of 389

FEATURES OF YOUR HYUNDAI 1- 41
B510D01Y-AAT OUTSIDE REARVIEW MIRROR HEATER (If Installed)
B510B01Y-AAT OUTSIDE REAR VIEW MIRROR Electric Type
HGK128
The outside rearview mirrors can be adjusted to your preferred rear vision, both directly behindthe vehicle, and to the rear of the left and rightsides.The remote control outside rearview mirror switchcontrols the adjustments for both the right and leftoutside mirror. To Adjust the Position of Either Mirror:
1. Move the selecting switch to the right or left to activate the adjustable mechanism for the corresponding door mirror.
2. Now, adjust the mirror angle by depressing the appropriate perimeter switch as illustrated. CAUTION:
o Do not operate the switch continuously
for an unnecessary length of time.
o Scraping ice from the mirror face could cause permanent damage. To remove any ice, use a sponge, soft cloth or approveddeicer.
WARNING:Be careful when judging the size or distanceof any object seen in the passenger side rear-view mirror. It is a convex mirror with a curvedsurface. Any objects seen in this mirror arecloser than they appear.
B380A01GK
A Type
B Type
B500A01A-AAT GLOVE BOX WARNING: To avoid the possibility of injury in case of an accident or sudden stop, the glove box doorshould be kept closed when the car is inmotion.
o To open the glove box, pull on the glove box release lever.
HGK147