Page 150 of 256

Always use the parking brake when
you park your vehicle. Make sure
the parking brake is set f irmly or
your vehicle may roll if it is parked
on an incline.
If your vehicle has an automatic
transmission, set the parking brake
bef ore you put the transmission in
Park. This keeps the vehicle f rom
moving and putting pressure on the
parking mechanism in the
transmission.Make sure the moonroof and the
windows are closed.
Turn of f the lights.
Place any packages, valuables, etc.
in the cargo area, or take them
with you.
Lock the doors and the tailgate.
Make sure the hatch glass is
closed securely.
Never park over dry leaves, tall
grass, or other f lammable
materials. The hot three way
catalytic converter could cause
these materials to catch on fire.If the vehicle is f acing uphill, turn
the f ront wheels away f rom the
curb.
If the vehicle is f acing downhill,
turn the front wheels toward the
curb.
Make sure the parking brake is
f ully released bef ore driving away.
Driving with the parking brake
partially set can overheat or
damage the rear brakes.
Parking T ips
Driving
Parking T ips
146
Page 151 of 256

Your Honda is equipped with disc
brakes at all f our wheels. A power
assist helps reduce the ef f ort needed
on the brake pedal. The ABS (on
vehicles equipped with ABS) helps
you retain steering control when
braking very hard.
Resting your f oot on the pedal keeps
the brakes applied lightly, builds up
heat, and reduces their ef f ectiveness.
It also keeps your brake lights on all
the time, conf using drivers behind
you.Constant application of the brakes
when going down a long hill builds
up heat and reduces their ef f ective-
ness. Use the engine to assist the
brakes by taking your f oot of f the
accelerator and downshif ting to a
lower gear.
Check your brakes af ter driving
through deep water. Apply the
brakes moderately to see if they f eel
normal. If not, apply them gently and
f requently until they do. Be extra
cautious and alert in your driving.
The hydraulic system that operates
the brakes has two separate circuits.
Each circuit works diagonally across
the vehicle (the lef t-f ront brake is
connected with the right-rear brake,
etc.). If one circuit should develop a
problem, you will still have braking
at two wheels.
Braking System
Driving
Braking System Design
147
Front
Page 157 of 256

�µ�µ
CONT INUED
Check trailer light requirements f or
the areas where you plan to tow. Many states and Canadian provinces
require special outside mirrors when
towing a trailer. Even if they don’t,
you should install special mirrors if
you cannot clearly see behind you, or
if the trailer creates a blind spot.
Askyourtrailersalesorrental
agency if any other items are
recommended or required f or your
towing situation.
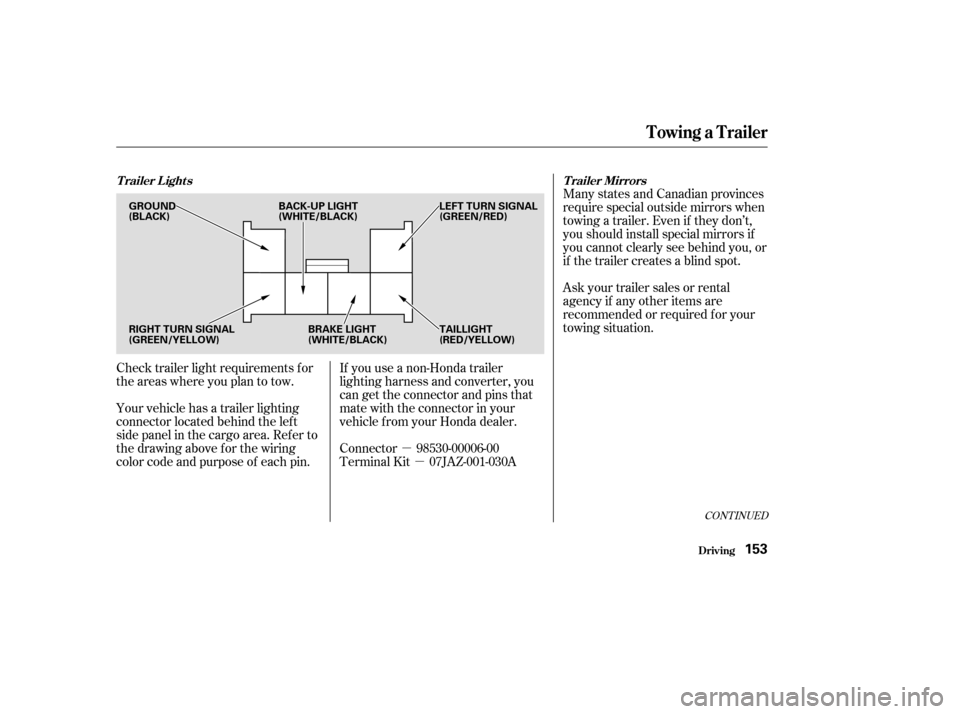
Your vehicle has a trailer lighting
connector located behind the lef t
side panel in the cargo area. Ref er to
thedrawingaboveforthewiring
color code and purpose of each pin. If you use a non-Honda trailer
lighting harness and converter, you
can get the connector and pins that
mate with the connector in your
vehicle f rom your Honda dealer.
Connector 98530-00006-00
Terminal Kit 07JAZ-001-030A
Towing a Trailer
Driving
Trailer Lights
Trailer Mirrors
153
GROUND
(BLACK)LEFT TURN SIGNAL
(GREEN/RED)
RIGHT TURN SIGNAL
(GREEN/YELLOW) BRAKE LIGHT
(WHITE/BLACK)TAILLIGHT
(RED/YELLOW)
BACK-UP LIGHT
(WHITE/BLACK)
Page 158 of 256
When preparing to tow, and bef ore
driving away, be sure to check the
f ollowing:The vehicle has been properly
serviced, and the tires, brakes,
suspension, and cooling system
are in good operating condition.
If you tow f requently, f ollow the
Severe Conditions maintenance
schedule.
The trailer has been properly
serviced and is in good condition.
Thehitch,safetychains,andany
other attachments are secure.
Allitemsonandinthetrailerare
properly secured and cannot shif t
while you drive. The lights and brakes on your
vehicle and the trailer are working
properly.
Your vehicle tires and spare are
properly inf lated (see page ),
and the trailer tires and spare are
inflated as recommended by the
trailer maker.
All weights and loads are within
limits (see page ). 151 190
Towing a Trailer
Driving
Pre-T ow Checklist
154
Page 167 of 256

This section explains why it is
important to keep your vehicle well
maintained and how to f ollow basic
maintenance saf ety precautions.
This section also includes
Maintenance Schedules f or normal
driving and severe driving conditions,
a Maintenance Record, and instruc-
tions f or simple maintenance tasks
you may want to take care of
yourself .
If you have the skills and tools to per-
f orm more complex maintenance
tasks on your Honda, you may want
to purchase the Service Manual. See
page f or inf ormation on how to
obtain a copy, or see your Honda
dealer.......................
Maintenance Saf ety .164
.................
Maintenance Schedule . 165
....................
Maintenance Record .170
..............................
Fluid Locations .172
........................
Adding Engine Oil .173
.........
Changing the Oil and Filter . 174
..............................
Engine Coolant .176
....................
Windshield Washers .178
.......................
Transmission Fluid .179
................
Brake and Clutch Fluid . 181
....................
Power Steering Fluid . 182
....................................
Hood Latch .182
.............................................
Lights .183
.......................................
Seat Belts .187
.....................................
Floor Mats .188
..................
Dust and Pollen Filter . 188
.................................
Wiper Blades .189
...............................................
Tires .190
...................
Checking the Battery . 196
.............................
Vehicle Storage .197
243
Maintenance
Maint enance163
Page 171 of 256

�µ�µ �µ
�µ
�µ �µ �µ
Youshouldcheckthefollowing
items at the specif ied intervals. If
you are unsure of how to perf orm
any check, turn to the appropriate
page listed. Engine oil level Check every
time you fill the fuel tank. See
page .
Engine coolant level Check the
radiator reserve tank every time
you f ill the f uel tank. See page .Tires Check the tire pressure
monthly. Examine the tread f or
wear and foreign objects. See page
.
Windshield washer f luid Check
the level in the reservoir monthly.
If weather conditions cause you to
use the washers f requently, check
the reservoir each time you stop
f or f uel. See page .
Brakes Check the f luid level
monthly. See page . Automatic transmission Check
the f luid level monthly. See page . Lights Check the operation of
the headlights, parking lights,
taillights, high-mount brake light,
turn signals, brake lights, and
license plate light monthly. See
page .
127
128
178
179 183
190
181
Maintenance Schedule
Maint enance
Owner’s Maintenance Checks
167
Page 173 of 256

�Î
�Î
�Ì �Î
�µ
�Ì�Ì�Î�Î
�Î
Follow the Severe Maintenance
Schedule if you drive your vehicle
MAINLY under one or more of the
f ollowing conditions: Extensive idling or long periods of
stop and go driving, such as a taxi or
a delivery vehicle. Driving less than 5 miles (8 km) per
trip or, in f reezing temperatures,
driving less than 10 miles (16 km)
per trip.
Driving in extremely hot [over 90°F
(32°C)] conditions.
Follow the
Maintenance Schedule f or Severe
Conditions. Driving on muddy, dusty, or de-iced
roads. T railer towing, driving with a roof
rack, or driving in mountainous
conditions.
commercial
Canadian Owners
Maint enance
169
miles x 1,000
km x 1,000
Every 3 years (independent of mileage)
( (O
O r
re
ev
ve
er
ry
y 3
3y
ye
ea
ar
rs
s, , w
w h
hi
ic
ch h e
ev
ve
er
r c
coo m
m e
es
s f
fi
ir
r s
st t)
)
(
(
O
O t
th
h e
er
rw
w i
is
se e a
ad
d j
ju
u s
stt o
o n
nl
ly
y i
if
f n
n o
oi
is
sy y )
)
(
(
O
O r
re
ev
ve
er
ry
y 2
2y
ye
ea
ar
rs
s, , w
w h
hi
ic
ch h e
ev
ve
er
r c
coo m
m e
es
s f
fi
ir
r s
st t)
)
10
16 50
8070
112
Check oil and coolant at each fuel stop 150
240
Service the items listed at the indicated distance (or time, if given).
Every 10,000 miles (16,000 km)
Check inflation and condition once a month
Every 5,000 miles (8,000 km) or every 6 months, whichever comes first
( (O
O r
re
ev
ve
er
ry
y 1
1y
ye
ea
ar
r,
, w
w h
hi
ic
ch h e
ev
ve
er
r c
coo m
m e
es
s f
fi
ir
r s
st t)
)
(
( O
O r
re
ev
ve
er
ry
y 1
1y
ye
ea
ar
r,
, w
w h
hi
ic
ch h e
ev
ve
er
r c
coo m
m e
es
s f
fi
ir
r s
st t)
)
40
64
20
32 60
9680
128
30
48
Every 160,000 miles (256,000 km)
At 120,000 miles (192,000 km) or 10 years, then every 60,000 miles (96,000 km) or 5 years
( (O
O r
re
ev
ve
er
ry
y 4
4y
ye
ea
ar
rs
s, , w
w h
hi
ic
ch h e
ev
ve
er
r c
coo m
m e
es
s f
fi
ir
r s
st t)
)
Replace at 60,000 miles (96,000 km) or 3
years, then every 30,000 miles (48,000
km) or 2 years.
90
144 100
160 140
224
130
208
120
192
110
176
See dust and pollen filter on page for
replacement information under special
driving conditions.
Check engine oil and coolant
Check tires
Replace engine oil
Rotate tires (follow pattern on page
193)
Replace engine oil filter
Check front and rear brakes
Lubricate all hinges, locks and latches
Inspect the following items: Tie rod ends, steering gear box, and boots
Suspension components, Driveshaft boots
Check parking brake adjustment
Inspect the following items: Brake hoses and lines (including ABS)
All fluid levels and condition of fluids
Exhaust system , Fuel lines and connections
Lights and controls/vehicle underbody
Inspect drive belts
Replace dust and pollen filter
Clean and replace air cleaner element
Replace spark plugs
Inspect valve clearance
Replace automatic transmission fluid
Replace manual transmission fluid
Replace rear differential fluid
Inspect idle speed
Replace engine coolant
Replace brake fluid Clean every 15,000 miles (24,000 km), and replace every 30,000
miles (48,000 km)
Use normal schedule except in dusty
condition.
See information on maintenance and
emission warranty on page .
1:
2:
: 188
3: 166
13
2
Maintenance Schedule for Severe Conditions
Page 179 of 256

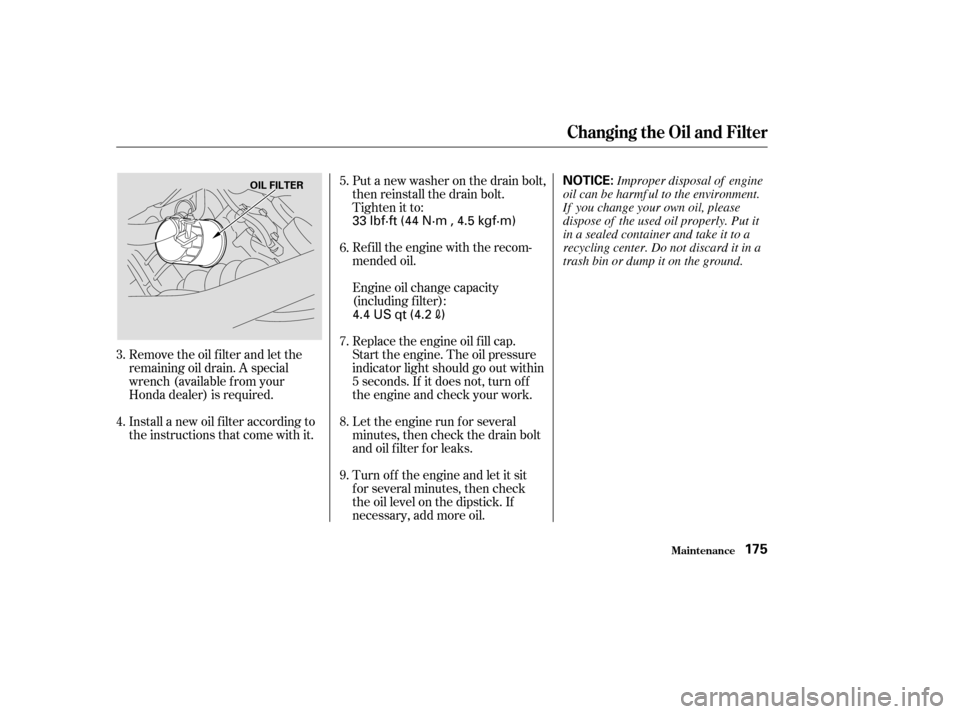
Remove the oil f ilter and let the
remaining oil drain. A special
wrench (available from your
Honda dealer) is required.
Install a new oil f ilter according to
the instructions that come with it.Put a new washer on the drain bolt,
then reinstall the drain bolt.
Tighten it to:
Refill the engine with the recom-
mended oil.
Engine oil change capacity
(including f ilter):
Replace the engine oil f ill cap.
Start the engine. The oil pressure
indicator light should go out within
5 seconds. If it does not, turn of f
the engine and check your work.
Let the engine run f or several
minutes, then check the drain bolt
and oil f ilter f or leaks.
Turn of f the engine and let it sit
f or several minutes, then check
the oil level on the dipstick. If
necessary, add more oil.
4. 3. 5.
6.
7.
8.
9.
Changing the Oil and Filter
Maint enance175
NOTICE:OIL FILTER
33 lbf·ft (44 N·m , 4.5 kgf·m)
4.4 US qt (4.2
)
Improper disposal of engine
oil can be harmf ul to the environment.
If you change your own oil, please
dispose of the used oil properly. Put it
in a sealed container and take it to a
recycling center. Do not discard it in a
trash bin or dump it on the ground.