Page 77 of 231
To open the trunk, pull the trunk
releasehandletotheleftof the
driver’s seat. To protect items in the
trunk when you need to give the key
to someone else, lock the trunk
releasehandlewiththemasterkey
and give the other person the valet
key.
To close the trunk, press down on
the trunk lid.You can also use the master key to
open the trunk lock.
Keep the trunk lid closed at all times
while driving to avoid damaging it
and to prevent exhaust gas from
getting into the interior. See Carbon
Monoxide Hazard, page .
Parents should decide if their
children should be shown how to use
this feature. As a saf ety f eature, your vehicle has
a release lever on the trunk latch so
the trunk can be opened f rom inside.
To open the trunk, push the release
lever to the lef t.
46
Trunk
Emergency Trunk Opener
Door L ocks
Inst rument s and Cont rols74
TRUNK RELEASE HANDLE
Pull
MASTER KEY
MASTER KEY
Page 78 of 231

�µ
�µ
�µ Press this button once
to unlock the driver’s door. Push it
twice to unlock the other doors. If
you do not open any doors within 30
seconds, they will automatically
relock.
Pressthisbuttonfor
about one second to attract attention;
thehornwillsoundandtheexterior
lights will f lash f or about 30 seconds.
To cancel panic mode, press any
other button on the remote
transmitter or turn the ignition
switch to ON (II). Avoid dropping or throwing the
transmitter.
Protect the transmitter from
extreme temperatures.
Do not immerse the transmitter in
any liquid.
If you lose a transmitter, the
replacement needs to be
reprogrammed by a Honda dealer.
Press this button once to
lock all doors. Some exterior lights
will f lash. When you push LOCK
twice within 5 seconds, you will hear
a beep to verify that the doors are
locked. You cannot lock it if any door
is not f ully closed or the key is in the
ignition switch. UNL OCK
PA NIC
LOCKRemote Transmitter Care
Remote Transmitter
Inst rument s and Cont rols75
UNLOCK
BUTTON LED LOCK
BUTTON
PANIC
BUTTON
Page 79 of 231

�´
�Ü
�Õ
If it takes several pushes on the
button to lock or unlock the doors,
replace the battery as soon as
possible.
Battery type: CR2025 To replace the battery, move the
round cover on the back of the
transmitter by turning it
counterclockwise with a coin. Insert
a new battery with the side facing
up. Align the mark on the cover
with the mark on the
transmitter. Set the cover in place
andturnitclockwise.
As required by the FCC:
This device complies with Part 15 of theFCC rules. Operation is subject to thef ollowing two conditions: (1) This devicemay not cause harmf ul interf erence, and(2) this device must accept anyinterf erence received, includinginterf erence that may cause undesiredoperation.
Changes or modif ications not expresslyapproved by the party responsible f orcompliance could void the user’sauthority to operate the equipment.
This device complies with IndustryCanada Standard RSS-210.Operation is subject to the f ollowing twoconditions: (1) this device may not causeinterf erence, and (2) this device mustaccept any interf erence that may causeundesired operation of the device.Replacing the Transmitter
Battery
Remote Transmitter
Inst rument s and Cont rols76
ROUND
COVER
CUSHION
RING
BATTERY
Page 80 of 231
�µ
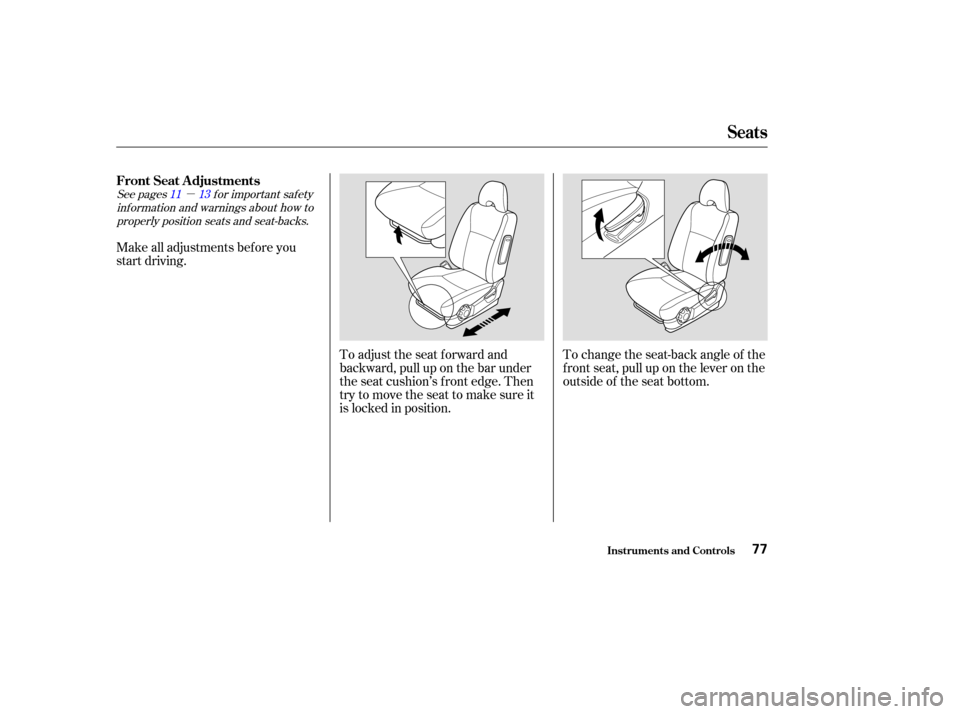
See pages f or important saf ety
inf ormation and warnings about how toproperly position seats and seat-backs. 11 13
Make all adjustments bef ore you
start driving.
To adjust the seat forward and
backward, pull up on the bar under
the seat cushion’s f ront edge. Then
trytomovetheseattomakesureit
is locked in position.To change the seat-back angle of the
f ront seat, pull up on the lever on the
outside of the seat bottom.
FrontSeatAdjustments
Seats
Inst rument s and Cont rols77
Page 86 of 231
The ceiling light has a three-position
switch; ON, Door Activated, and
OFF.
In the Door Activated (center)
position, the light comes on when
you:Open any door.
Remove the key from the ignition.
If you do not open a door, the light
f ades out in about 10 seconds.
Unlock the doors with the key or
remote transmitter. Push on the spotlight lenses to turn
the light on and of f . The lights around the ignition switch
come on when you open any door.
Af ter you close the door, the ignition
switch light stays on f or several
seconds.
Ceiling L ight
Individual Interior L ights
Interior Lights
Inst rument s and Cont rols83
DOOR ACTIVATED
OFF ON
FRONT
Page 90 of 231

The standard audio system has
many f eatures. This section de-
scribes those f eatures and how to
use them. (If you selected an
optional audio system, ref er to the
operating instructions that came
with it.) The heating and air conditioning
systems in your Honda provide a
comf ortable driving environment in
all weather conditions.
Your Honda has an anti-thef t audio
system that requires a code number
to enable it................
Vents, Heating, and A/C . 88
............................
Playing the Radio .94
..........................
Radio Reception .97
....................................
Playing a CD .99
..............................
CD Changer .100
................
Protecting Your CDs . 101
.....
CD Player Error Messages . 102
.
CD Changer Error Messages . 103
...............................
Playing a Tape .104
.................
Radio Thef t Protection . 107
..........................
Setting the Clock .108
...............................
Cruise Control .109
Comf ort and Convenience Features
Comf ort and Convenience Feat ures87
Page 93 of 231

The outside air intakes f or the
heating and cooling system are at
the base of the windshield. Keep this
area clear of leaves and other debris.
ThesystemshouldbeleftinFresh
Air mode under almost all conditions.
Keeping the system in Recirculation
mode, particularly with the A/C of f ,
can cause the windows to fog up.
Switch to Recirculation mode when
driving through dusty or smoky
conditions, then return to Fresh Air
mode.
This button turns the rear window
def ogger of f and on (see page ).
Use the mode control dial to select
the vents the air flow from. Some air
will f low f rom the dashboard vents in
all modes.Air flows from the center
and corner vents in the dashboard.
Air f low is divided between
the vents in the dashboard and the
f loor vents.
Air f lows f rom the f loor
vents. When you select , the
system automatically switches to
Fresh Air mode.
Air f low is divided between
the f loor vents and the def roster
vents at the base of the windshield.
Air f lows f rom the def roster
vents at the base of the windshield.
Turn this dial to control fan speed
and the air flow.
When the dial is set to AUTO, the
system controls the f an speed
automatically.
Turning this dial clockwise increases
the temperature of the airflow.
This button turns the air
conditioning on and of f . The light in
thebuttonisonwhentheA/Cison.
When the light in the button is on,
air f rom the vehicle’s interior is sent
throughout the system again. When
the light is of f , air is brought in f rom
the outside of the vehicle (Fresh Air
mode).
When you select or ,
the system automatically switches to
Fresh Air mode and turns on the
A/C and turns off the ECON mode.
68
Fan Control Dial
Rear Window Def ogger Button
Mode Control Dial
Air Conditioning (A/C) Button T emperature Control Dial
Recirculation Button
Comf ort and Convenience Feat ures
Vents, Heating, and A/C
90
Page 95 of 231

To use the heating and cooling
system in automatic mode, set the
system as f ollows.Set the f an control dial to AUTO.
Set the mode control dial to AUTO.
Set the desired temperature by
turning the temperature control
dial. Turning this dial clockwise
increases the temperature of the
air flow.
Select Fresh Air mode. The
indicator in the button should be
off.
Turn on the A/C by pressing the
button f or cooling and dehumidi-
f ying. The indicator in the button
lights. To heat or cool the interior f aster,
select Recirculation mode and set
the temperature control dial to the
upper or lower limit.
When you set the temperature to its
lower or its upper limit, the system
runs at f ull cooling or heating only. It
does not regulate the interior
temperature.
TurningthefancontroldialtoOFF.
However, a lack of air flow can cause
the windows to fog up. It is
recommended that you keep the f an
on at all times so stale air and
moisture do not build up in the
interior and cause f ogging.
1.
2.
3.
4.
5.
Comf ort and Convenience Feat ures
Automatic Operation
To Turn Everything Of f
Vents, Heating, and A/C
92


position, the light comes on when
you:Open any door.
Remove the key from the ignition.
If you")