Page 65 of 166

CONNECT Nav+
64
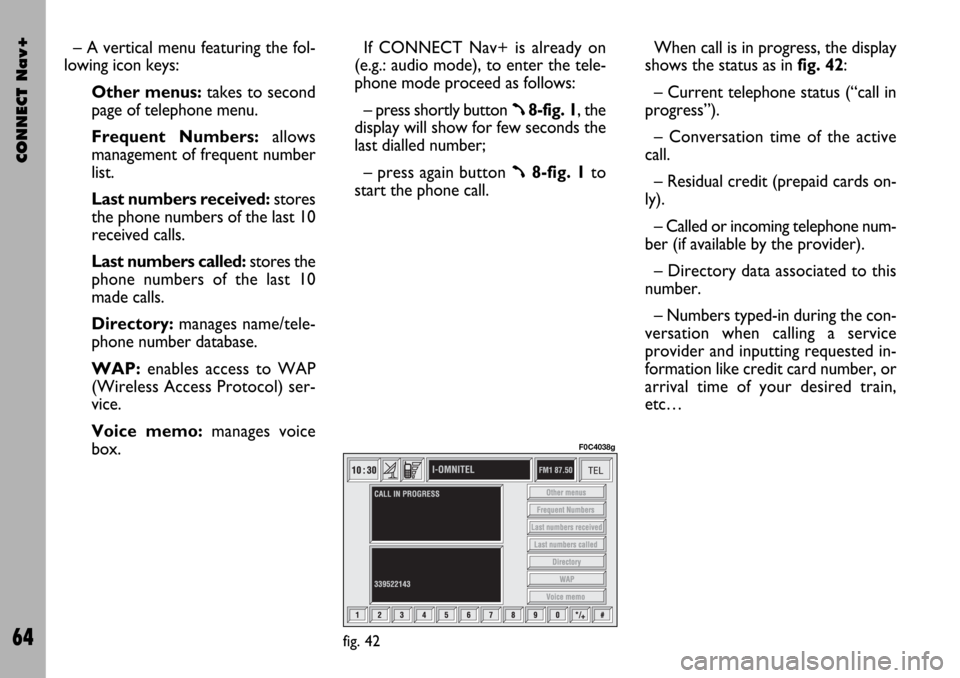
– A vertical menu featuring the fol-
lowing icon keys:
Other menus:takes to second
page of telephone menu.
Frequent Numbers: allows
management of frequent number
list.
Last numbers received:stores
the phone numbers of the last 10
received calls.
Last numbers called: stores the
phone numbers of the last 10
made calls.
Directory:manages name/tele-
phone number database.
WAP:enables access to WAP
(Wireless Access Protocol) ser-
vice.
Voice memo:manages voice
box.If CONNECT Nav+ is already on
(e.g.: audio mode), to enter the tele-
phone mode proceed as follows:
– press shortly button
ß8-fig. 1, the
display will show for few seconds the
last dialled number;
– press again button
ß8-fig. 1to
start the phone call.When call is in progress, the display
shows the status as in fig. 42:
– Current telephone status (“call in
progress”).
– Conversation time of the active
call.
– Residual credit (prepaid cards on-
ly).
– Called or incoming telephone num-
ber (if available by the provider).
– Directory data associated to this
number.
– Numbers typed-in during the con-
versation when calling a service
provider and inputting requested in-
formation like credit card number, or
arrival time of your desired train,
etc…
fig. 42
F0C4038g
Page 78 of 166

CONNECT Nav+
77
“Location”: this icon is used to store
the new entry on the SIM card or di-
rectory according to the chosen op-
tion. SIM card numbers are automat-
ically copied to the directory after PIN
validation and cleared at SIM card ex-
traction.
“Voice recognizer”: allows to man-
age a voice sample associated to
stored names/numbers.
“OK”: confirms the insertion of the
new entry, proceed as follows:
– rotate the encoder 14-fig. 1, se-
lect the “OK” icon and then press
“ENTER” 15-fig. 1; the display shows
“Please wait…” and the system will
store the new entry in the directory.IMPORTANTIf the same name is
already existing, the display will show
“Name already in directory”.
Voice recognition
(active only when Directory has
been selected as stored phone
number location)
To enter this mode proceed as fol-
lows:
– rotate the encoder 14-fig. 1, se-
lect “Voice recognizer” key and then
press “ENTER” to confirm 15-fig. 1;
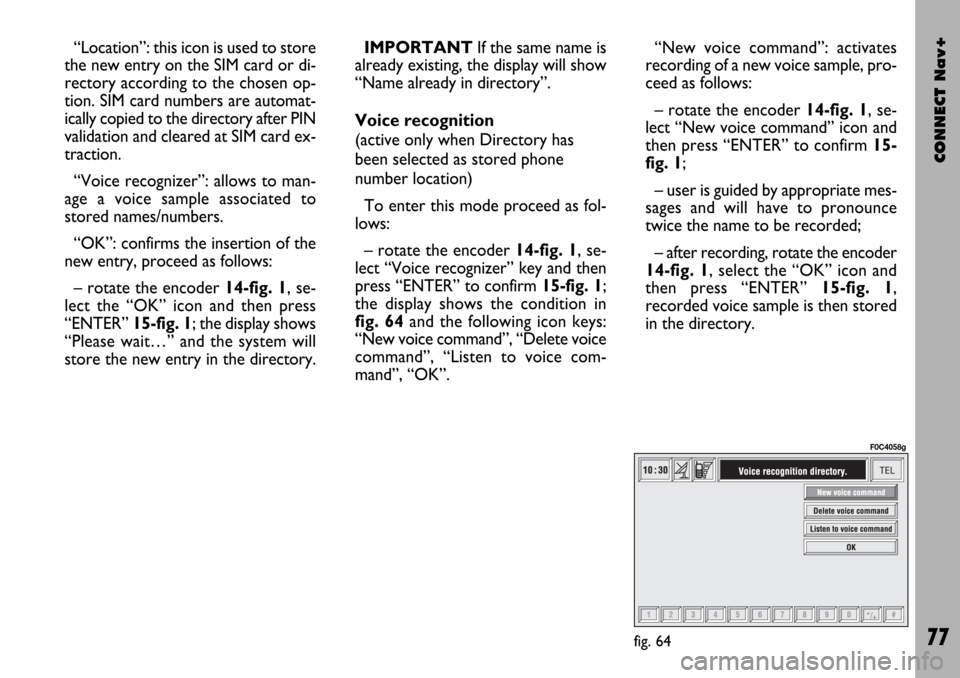
the display shows the condition in
fig. 64and the following icon keys:
“New voice command”, “Delete voice
command”, “Listen to voice com-
mand”, “OK”.“New voice command”: activates
recording of a new voice sample, pro-
ceed as follows:
– rotate the encoder 14-fig. 1, se-
lect “New voice command” icon and
then press “ENTER” to confirm 15-
fig. 1;
– user is guided by appropriate mes-
sages and will have to pronounce
twice the name to be recorded;
– after recording, rotate the encoder
14-fig. 1, select the “OK” icon and
then press “ENTER” 15-fig. 1,
recorded voice sample is then stored
in the directory.
fig. 64
F0C4058g
Page 92 of 166

CONNECT Nav+
91
Network operator
When selected and confirmed, “Net-
work operator” icon allows manage-
ment of network Providers; the dis-
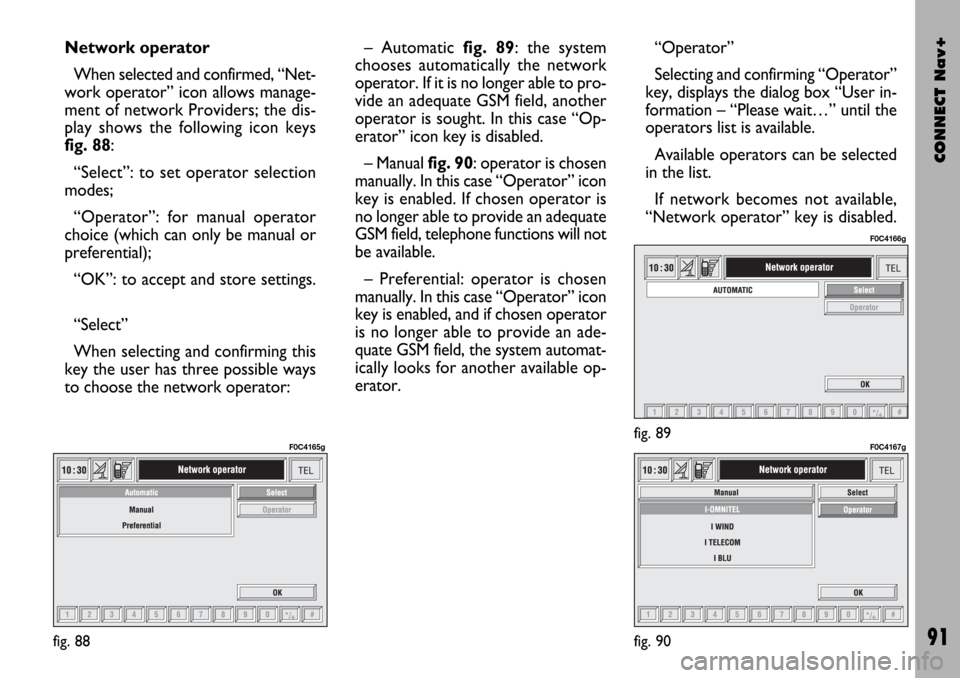
play shows the following icon keys
fig. 88:
“Select”: to set operator selection
modes;
“Operator”: for manual operator
choice (which can only be manual or
preferential);
“OK”: to accept and store settings.
“Select”
When selecting and confirming this
key the user has three possible ways
to choose the network operator:– Automatic fig. 89: the system
chooses automatically the network
operator. If it is no longer able to pro-
vide an adequate GSM field, another
operator is sought. In this case “Op-
erator” icon key is disabled.
– Manual fig. 90: operator is chosen
manually. In this case “Operator” icon
key is enabled. If chosen operator is
no longer able to provide an adequate
GSM field, telephone functions will not
be available.
– Preferential: operator is chosen
manually. In this case “Operator” icon
key is enabled, and if chosen operator
is no longer able to provide an ade-
quate GSM field, the system automat-
ically looks for another available op-
erator.“Operator”
Selecting and confirming “Operator”
key, displays the dialog box “User in-
formation – “Please wait…” until the
operators list is available.
Available operators can be selected
in the list.
If network becomes not available,
“Network operator” key is disabled.
fig. 88
F0C4165gfig. 89
F0C4166g
fig. 90
F0C4167g
Page 132 of 166

CONNECT Nav+
131
“Navigator” function
VOICE COMMANDS - KEYWORDS
1
stLEVEL
KEYWORDS
Navigator
Once a command has been pronounced and executed, second level “keywords” and all first level keywords will remain available for further
commands. (*) After these commands the system will ask: “The destination, please”.
2ndLEVEL
KEYWORDS
Destination (*)
Display/show
Zoom in
Zoom out
List of destinations
3rdLEVEL
KEYWORDS
Map
Route
Hotels
Restaurants
Parking
Petrol station
Nothing
Read
Delete
4thLEVEL
KEYWORDS
Destination (*)
All
REQUIRED FUNCTION
Navigator
Select destination (only with
“voice identification” mode)
Show map
Show route
Show hotels on the map
Show restaurants on the map
Show parking on the map
Show petrol stations on the map
Nothing (hide what is shown at the moment)
Zoom in
Zoom out
Play list of destinations
stored with
“voice identification” mode
Delete a destination (only with
“voice identification” mode)
Delete all the voice samples
associated to destinations
stored in directory
Page 133 of 166

CONNECT Nav+
132
“Telephone” function
VOICE COMMANDS - KEYWORDS
1
stLEVEL
KEYWORDS
Call (*)
Dial (**)
Redial
PIN code (***)
Address book
Once a command has been pronounced and executed, second level “keywords” and all first level keywords will remain available for further commands.
(*) After this command the system will ask: “The name, please”. (**) After this command the system will ask: “The number, please”.
(***) After this command the system will ask: “The PIN code, please”.
2ndLEVEL
KEYWORDS
(0 …. 9)
Plus
Cancel
Delete
Abort
Repeat
Send
(0 …. 9)
Cancel
Delete
Abort
Repeat
Send
Read
Delete
3rdLEVEL
KEYWORDS
Name (*)
All
4thLEVEL
KEYWORDSREQUIRED FUNCTION
Call an address book number
(only with“voice identification” mode)
Call a number
Redial
Enter PIN code
Play all the voice samples associated to
the phone book with
“voice identification” mode
Delete an entry from the phone book
(only with “voice
identification” mode)
Delete all the voice samples associated
to the phone book
Page 138 of 166

CONNECT Nav+
137
Storing an entry in the address
book with voice identification
The user can insert into the tele-
phone book a voice sample associat-
ed to a number (only with “voice
identification” mode).
Recording stage cannot be per-
formed through voice commands (for
further details see section “Cellular
telephone with voice commands” at
paragraph “Directory function – Voice
recognition”).
User can stop the operation only by
pressing the front panel key
ô2-fig. 1or the steering wheel key ô3-fig. 2:
First example:
CONNECT: The name, please?
User: Barbara
CONNECT: Please, repeat
the name
User: Barbara
CONNECT: The name has been
stored.Second example:
CONNECT: The name, please?
User: Francesca
CONNECT: Please, repeat the
name
User: Maria
CONNECT: The name has not
been stored.
The name, please?
User: Francesca
CONNECT: Please, repeat
the name
User: Francesca
CONNECT: The name has been
stored.Calling an entry from the
address book
with voice recognition
Pronouncing 1st level keyword
“Call”, opens a dialogue enabling the
following keywords:
– Cancel
– Delete
– Abort
– Repeat
– Send.
First example:
User: Call
CONNECT: The name, please?
User: Paola
CONNECT: Paola
User: Send
CONNECT: The number is being
dialled.
Second example:
User: Call
CONNECT: The address book
is empty.
Page 143 of 166
CONNECT Nav+
142
First example:
CONNECT: The destination,
please?
User: Office
CONNECT: Office
User: Abort
CONNECT Abort. Fourth example:
User: Navigator -
List of destinations -
Delete -
Destination.
CONNECT: The destination,
please?
User: Office Milano
CONNECT: Do you wish to
delete
(Office Milano)?
User: Cancel
CONNECT: The destination,
please?
User: Paola’s house
CONNECT: Do you wish to
delete
(Paola’s house)?
User: Yes
CONNECT: The destination has
been deleted.Stopping the dialogue
To stop a dialogue, pronounce
“Abort” keyword. Keywords entered
before pronouncing “abort”, are delet-
ed.
“Abort” is recognized by the system
only in “voice recognition without
voice identification” mode.
Page 151 of 166

CONNECT Nav+
150
The SETUP mode enables to set dif-
ferent car and CONNECT Nav+ sys-
tem operating modes and parameters.
Parameters and operating modes
have been grouped in the following
four areas:
– LANGUAGE
– DATE & TEMP
– VEHICLE
– CONNECT.
Every above area is then divided in
different sub-areas. Read carefully
through this chapter to learn any fea-
tures offered by CONNECT Nav+
system.
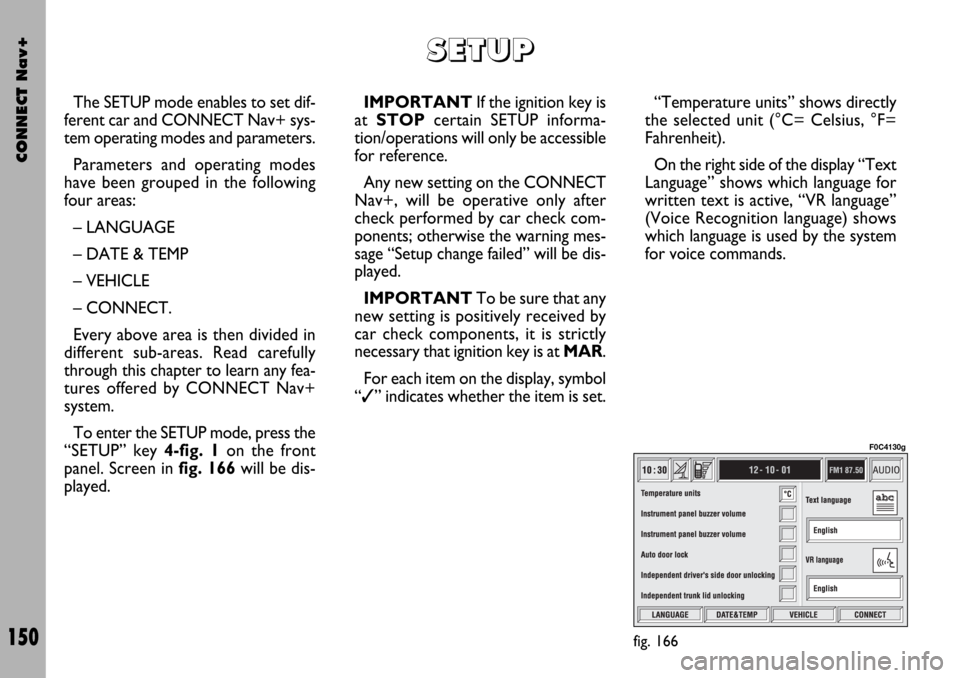
To enter the SETUP mode, press the
“SETUP” key 4-fig. 1on the front
panel. Screen in fig. 166will be dis-
played.IMPORTANTIf the ignition key is
at STOPcertain SETUP informa-
tion/operations will only be accessible
for reference.
Any new setting on the CONNECT
Nav+, will be operative only after
check performed by car check com-
ponents; otherwise the warning mes-
sage “Setup change failed” will be dis-
played.
IMPORTANTTo be sure that any
new setting is positively received by
car check components, it is strictly
necessary that ignition key is at MAR.
For each item on the display, symbol
“✓” indicates whether the item is set.“Temperature units” shows directly
the selected unit (°C= Celsius, °F=
Fahrenheit).
On the right side of the display “Text
Language” shows which language for
written text is active, “VR language”
(Voice Recognition language) shows
which language is used by the system
for voice commands.
S S
E E
T T
U U
P P
fig. 166
F0C4130g