Page 161 of 202

160
CONNECT NAV
NAVIGATOR
Displaying stored messages
To display stored messages, proceed
as follows:
1)press
•(7) to display the Tar-
ga Infomobilityservice menu fig.
125;
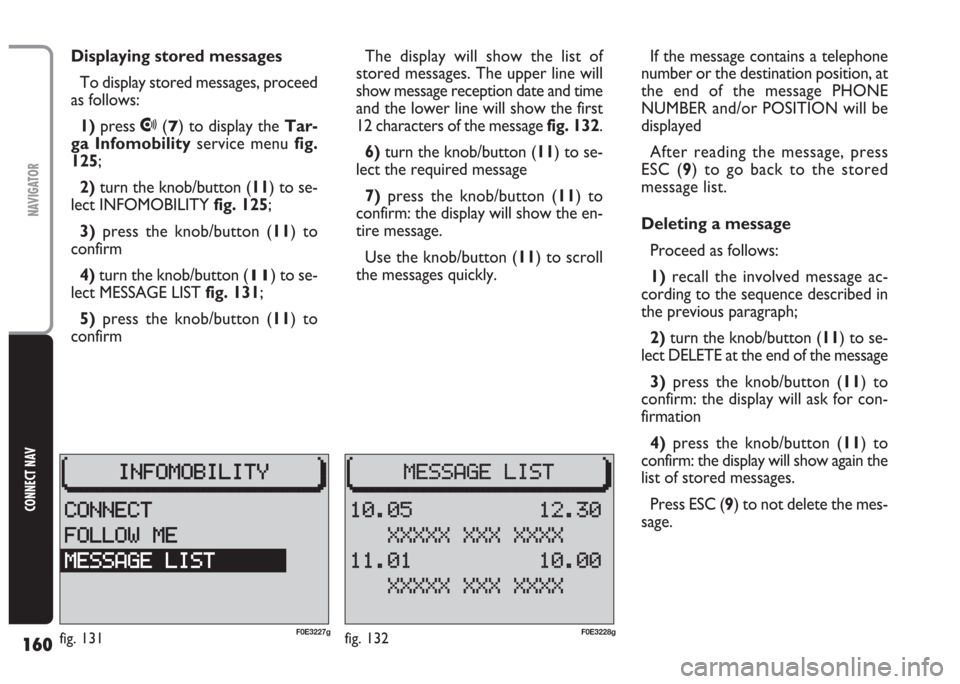
2)turn the knob/button (11) to se-
lect INFOMOBILITY fig. 125;
3)press the knob/button (11) to
confirm
4)turn the knob/button (
11) to se-
lect MESSAGE LIST fig. 131;
5)press the knob/button (11) to
confirmThe display will show the list of
stored messages. The upper line will
show message reception date and time
and the lower line will show the first
12 characters of the message fig. 132.
6) turn the knob/button (11) to se-
lect the required message
7)press the knob/button (11) to
confirm: the display will show the en-
tire message.
Use the knob/button (11) to scroll
the messages quickly.If the message contains a telephone
number or the destination position, at
the end of the message PHONE
NUMBER and/or POSITION will be
displayed
After reading the message, press
ESC (9) to go back to the stored
message list.
Deleting a message
Proceed as follows:
1)recall the involved message ac-
cording to the sequence described in
the previous paragraph;
2) turn the knob/button (11) to se-
lect DELETE at the end of the message
3)press the knob/button (11) to
confirm: the display will ask for con-
firmation
4)press the knob/button (11) to
confirm: the display will show again the
list of stored messages.
Press ESC (9) to not delete the mes-
sage.
fig. 132F0E3228gfig. 131F0E3227g
Page 163 of 202
162
CONNECT NAV
NAVIGATOR
RECALLING THE PHONE
CODE NUMBER (serial
number)
The phone serial number is essen-
tial to do the following:
– activate the phone;
– enable the SIM card.
To display the serial number, pro-
ceed as follows:
1)press
•(7) to display the Tar-
ga Infomobilityservice menu
fig. 125
2) press ESC (
9) and then MEN (10)3)turn the knob/button (11) to se-
lect CONNECT CODE fig. 134
4)press the knob/button (11) to
confirm: the display will show the se-
rial number fig. 135
Press the knob/button (11) or ESC
(9) to quit and go back to the Connect
menu fig. 134.RECALLING THE PHONE
“state” function
In order to know if your phone can
access the Targa Infomobilityser-
vices apply the following procedure:
1)press
•(7) to display the Tar-
ga Infomobilityservice menu
fig. 125
2)press ESC (9) and then MEN (10)
3)turn the knob/button (11) to se-
lect STATE fig. 136
fig. 135F0E3229gfig. 136F0E3182gfig. 134F0E3172g
Page 164 of 202
163
CONNECT NAV
NAVIGATOR
4) press the knob/button (11) to
confirm: the display will show the
phone state fig. 137:
ENABLED: phone enabled to ac-
cess Targa Infomobilityservices
DISABLED: phone not enabled to
access Targa Infomobilityservices.
Press the knob/button (11) or ESC
(9) to quit and go back to the Connect
menu fig. 134.DISPLAYING AVAILABLE
SIM PROFILES
It is possible to display SIM profiles
(max. 5) stored in the system and re-
lated SIM card numbers.
Proceed as follows:
1) press (
•) (7) to display the Tar-
ga Infomobilityservice menu
fig. 125
2)press ESC (9) and then MEN (10)3) turn the knob/button (11) to se-
lect SIM PROFILES fig. 138
4)press the knob/button (11) to
confirm: the display will show the
stored SIM profiles. The currently ac-
tive profile is indicated by the cursor
§fig. 139:
Press the knob/button (11) or ESC
(9) to quit and go back to the Connect
menu fig. 134.
fig. 139F0E3231gfig. 138F0E3183gfig. 137F0E3230g
Page 165 of 202

164
CONNECT NAV
NAVIGATOR
GENERAL INFORMATION
This telephone can be used to make
the same telephone connections of a
portable cellular phone. Therefore, to
make a telephone call you need a SIM
card and you must be in a place served
by the GSM 900/1800 network, with
enough signal intensity.
IMPORTANT The network ser-
vices described in this section (e.g. in-
coming call) are managed by the tele-
phone, but their availability depends
on the network and the type of con-
tract agreed with the network
provider.
IMPORTANT If power supply is
lower than the minimum preset
threshold, phone call quality is not as-
sured. For this reason, turning the en-
gine on during a telephone call might
interrupt it.TURNING THE phone on
To activate the phone, if a valid SIM
card has been inserted, press
£(15).
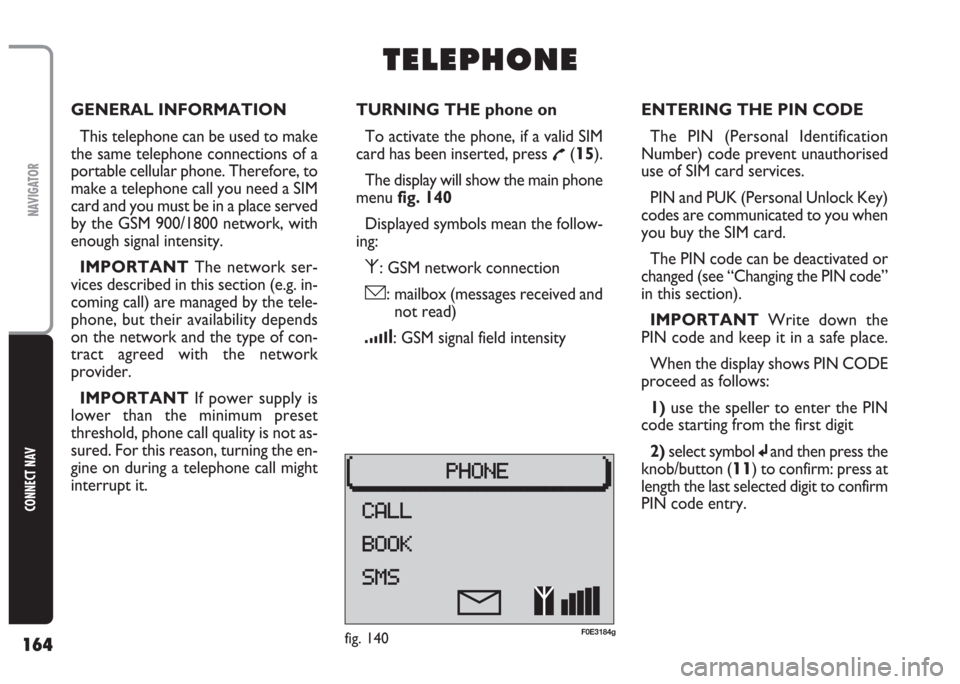
The display will show the main phone
menu fig. 140
Displayed symbols mean the follow-
ing:
⁄: GSM network connection
ó: mailbox (messages received and
not read)
¿: GSM signal field intensity
T T
E E
L L
E E
P P
H H
O O
N N
E E
ENTERING THE PIN CODE
The PIN (Personal Identification
Number) code prevent unauthorised
use of SIM card services.
PIN and PUK (Personal Unlock Key)
codes are communicated to you when
you buy the SIM card.
The PIN code can be deactivated or
changed (see “Changing the PIN code”
in this section).
IMPORTANT Write down the
PIN code and keep it in a safe place.
When the display shows PIN CODE
proceed as follows:
1) use the speller to enter the PIN
code starting from the first digit
2)select symbol
jand then press the
knob/button (
11) to confirm: press at
length the last selected digit to confirm
PIN code entry.
fig. 140F0E3184g
Page 169 of 202

168
CONNECT NAV
NAVIGATOR
2)turn the knob/button (11) to se-
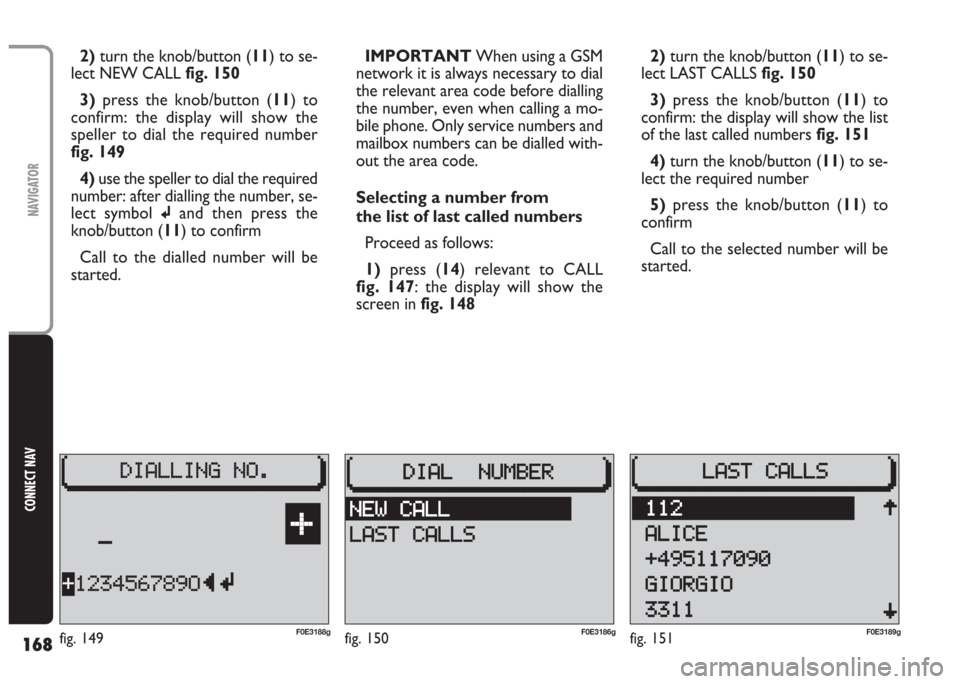
lect NEW CALL fig. 150
3) press the knob/button (11) to
confirm: the display will show the
speller to dial the required number
fig. 149
4) use the speller to dial the required
number: after dialling the number, se-
lect symbol
jand then press the
knob/button (11) to confirm
Call to the dialled number will be
started.IMPORTANT When using a GSM
network it is always necessary to dial
the relevant area code before dialling
the number, even when calling a mo-
bile phone. Only service numbers and
mailbox numbers can be dialled with-
out the area code.
Selecting a number from
the list of last called numbers
Proceed as follows:
1)press (14) relevant to CALL
fig. 147: the display will show the
screen in fig. 1482)turn the knob/button (11) to se-
lect LAST CALLS fig. 150
3) press the knob/button (11) to
confirm: the display will show the list
of the last called numbers fig. 151
4)turn the knob/button (11) to se-
lect the required number
5)press the knob/button (11) to
confirm
Call to the selected number will be
started.
fig. 150F0E3186gfig. 151F0E3189gF0E3188gfig. 149
Page 179 of 202
178
CONNECT NAV
NAVIGATOR
3)turn the knob/button (11) to se-
lect FREE SPACE fig. 172: the display
will show the free space left in the
phone book
4)press ESC (9) to go back to the
phone book menu fig. 166MESSAGES (SMS)
This system enables to send/receive
SMS messages (Short Message Service)
Reading a message
Received messages are shown on the
display by symbol
óand are accom-
panied by a beep (can be excluding).
When receiving a message, press the
knob/button (11) to display it.
To scroll the message, turn the
knob/button (11).
After reading the message, press ESC
(9) to store it.Sending a message
Proceed as follows:
1)press
£(15): the display will show
the main phone menu fig. 165
2) press (13) relevant to SMS: the
display will show the SMS menu
fig. 173
3)turn the knob/button (11) to se-
lect WRITE NEW fig. 173
fig. 173F0E3206gfig. 171F0E3195gfig. 172F0E3205g
Page 181 of 202
180
CONNECT NAV
NAVIGATOR
Entering the Provider service
number
To send messages, the Provider ser-
vice number shall be entered.
This number is usually stored on the
SIM card and is entered automatically.
To enter the Provider service num-
ber again or to change it, proceed as
follows:
1) press
£(15): the display will show
the main phone menu fig. 165
2)press (13) relevant to SMS:
the display will show the SMS menu
fig. 1733)turn the knob/button (
11) to se-
lect SETTINGS fig. 179
4) press the knob/button (11) to
confirm
5) turn the knob/button (11) to se-
lect SMSC NUMBER fig. 1806) press the knob/button (11) to
confirm: the display will show the
speller to enter the Provider service
number fig. 181
7) use the speller to enter the num-
ber. After entering the number select
symbol
jand then press the knob/but-
ton (11) to confirm.
The display will show again the SMS
menu fig. 179.
fig. 180F0E3220gfig. 181F0E3211gfig. 179F0E3209g
Page 199 of 202
198
CONNECT NAV
NAVIGATOR
AUDIO
– Separate bass/treble settings.
– Right/left and front/rear channel
balance.
– Automatic LOUDNESS function.SATELLITE NAVIGATION
– Voice messages for the route to be
followed.
– Driving advice, distance and esti-
mated time required to reach the des-
tination on the display.
– Possibility of entering special or dif-
ferent destinations.
– Possibility of storing destinations.
TARGA INFOMOBILITY
SERVICES
– Access to Targa infomobility
services:
•“Infomobility” services (Connect,
Follow me function, (Message list)
•“Medical advice” service
•“Road assistance” serviceTELEPHONE
– Handfree set (using the speakers
fitted on the car)
– Phone book
– Sending/receiving short text mes-
sages (SMS)
– Enabling SIM card reading
Multimedia CDs contain
sound and data tracks.
Playing these CDs can cause noise
loud enough to jeopardise road
safety and damage final stages and
speakers.
WARNING