2004 FIAT MULTIPLA navigation system
[x] Cancel search: navigation systemPage 38 of 202
37
CONNECT NAV
NAVIGATOR
6) confirm the selected character by
pressing the knob/button (11). The se-
lected character is displayed in the
editing field 3-fig. 36
7) repeat the procedure for the oth-
er letters in the name
8) when entering the name, the list
of destinations matching the entered
letters will appear in the editing list 2-
fig. 36
9) position the cursor on the symbol
jand press the knob/button (11) or
hold the knob/button (11) pressed for
longer than two seconds. The alpha-
betical list of destinations will appear
10) turn the knob/button (11) to
seek the required town destination
name in the editing list11) confirm the destination by press-
ing the knob/button (11).
Press ESC (9) to not confirm the
destination and return to the editing
menu (Speller) fig. 36.
After selecting the destination, the
sound/navigation system offers the fol-
lowing options: VIA (STREET), CEN-
TRO (CENTRE), DINTORNI DEST.
(DEST. SURROUND)
IMPORTANT Only the options
for which data is available on the nav-
igation CD are offered. A lock symbol
Swill appear next to the unavailable
options.
“VIA” (STREET) The destination
street can be entered. This option de-
pends on the size of the town and da-
ta stored on the navigation CD.Confirm the street. The entering
procedure will continue with the fol-
lowing options:
– CONTINUA (CONTINUE): select
this item to continue;
– INCROCIO (INTERSECTION):
select this item to define an intersec-
tion with the previously selected
street as a destination. In this case, an
alphabetical list where to select the re-
quired intersection will be displayed;
– NUMERO CIVICO (HOUSE
NUMBER): select this item to define a
house number on the previously se-
lected street as a destination.
“CENTRO” (CENTRE) The town
centre or district (for larger cities) can
be entered as a destination.
Page 39 of 202
38
CONNECT NAV
NAVIGATOR
“DINTORNI DEST.” (DEST.
SURROUND) Special destinations can
be directly selected, such as motor-
ways, railway stations, shopping cen-
tres, etc. in the surroundings of the
town
The system will automatically return
to the main navigation menu after the
entry.
Select AVVIA NAVIGAZ. (ROUTE
GUIDANCE) and confirm by pressing
the knob/button (11).
The system will calculate the route
in a few seconds and start providing
visual instructions (drawings) and
voice messages to guide you to your
destination.
Press ESC (9) to return to the pre-
vious menu.“VIA” (STREET) destination
entry
You can specify a street as a desti-
nation in the previously selected town
as follows:
1) select INS. DEST. (DEST. ENTRY)
in the main navigation menu with the
knob/button (11)
2) confirm the selection by pressing
the knob/button (11)
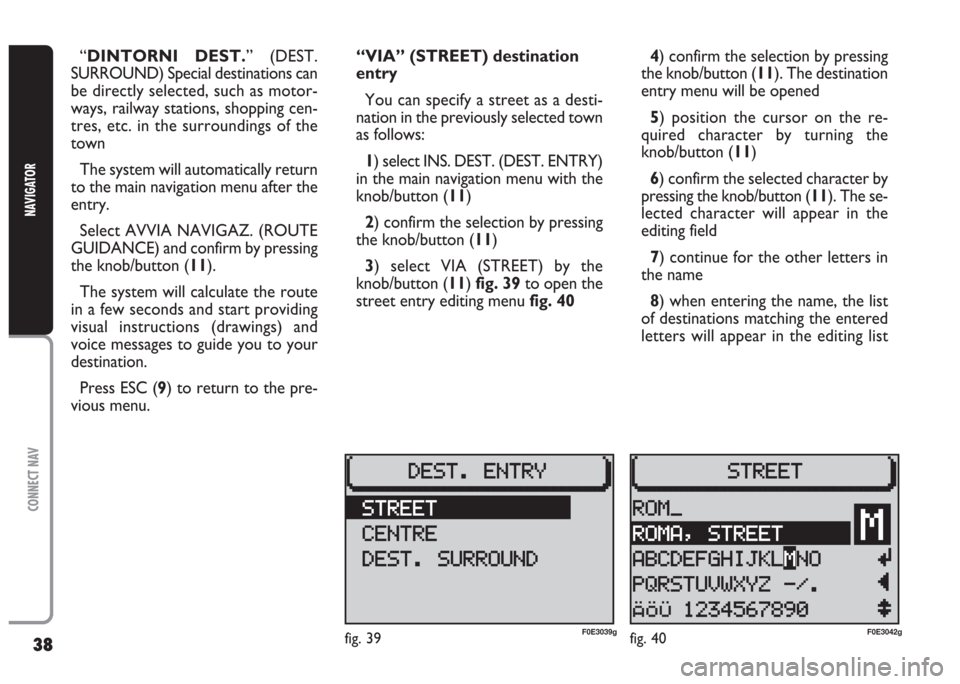
3) select VIA (STREET) by the
knob/button (11) fig. 39to open the
street entry editing menu fig. 404) confirm the selection by pressing
the knob/button (11). The destination
entry menu will be opened
5) position the cursor on the re-
quired character by turning the
knob/button (11)
6) confirm the selected character by
pressing the knob/button (11). The se-
lected character will appear in the
editing field
7) continue for the other letters in
the name
8) when entering the name, the list
of destinations matching the entered
letters will appear in the editing list
fig. 39F0E3039gfig. 40F0E3042g
Page 47 of 202
46
CONNECT NAV
NAVIGATOR
A A
C C
T T
I I
V V
E E
N N
A A
V V
I I
G G
A A
T T
I I
O O
N N
ROUTE GUIDANCE
Active navigation requires an entered
destination (see
DESTINATION ENTRYin
the
SATELLITE NAVIGATIONchapter) and
route operations settings.
Proceed as follows:
1) press the NAV button (12). The
main navigation menu will appear on
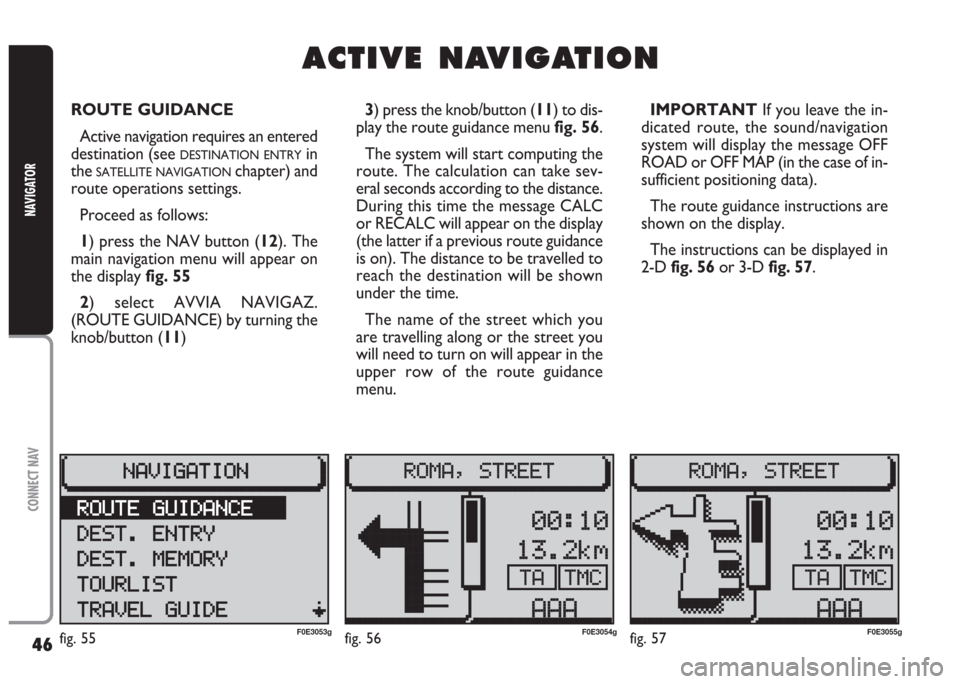
the display fig. 55
2) select AVVIA NAVIGAZ.
(ROUTE GUIDANCE) by turning the
knob/button (11) 3) press the knob/button (11) to dis-
play the route guidance menu fig. 56.
The system will start computing the
route. The calculation can take sev-
eral seconds according to the distance.
During this time the message CALC
or RECALC will appear on the display
(the latter if a previous route guidance
is on). The distance to be travelled to
reach the destination will be shown
under the time.
The name of the street which you
are travelling along or the street you
will need to turn on will appear in the
upper row of the route guidance
menu.IMPORTANT If you leave the in-
dicated route, the sound/navigation
system will display the message OFF
ROAD or OFF MAP (in the case of in-
sufficient positioning data).
The route guidance instructions are
shown on the display.
The instructions can be displayed in
2-D fig. 56or 3-D fig. 57.
fig. 55F0E3053gfig. 56F0E3054gfig. 57F0E3055g
Page 48 of 202
47
CONNECT NAV
NAVIGATOR
When the CD CHANGER(where fit-
ted) is on, the number of the current
CD, the track name or number and
the track playing time are shown on
the display.
The message “PHONE” will appear
on the display when the telephone
Mute function is on.INTERRUPTING
NAVIGATION
Proceed as follows to interrupt nav-
igation:
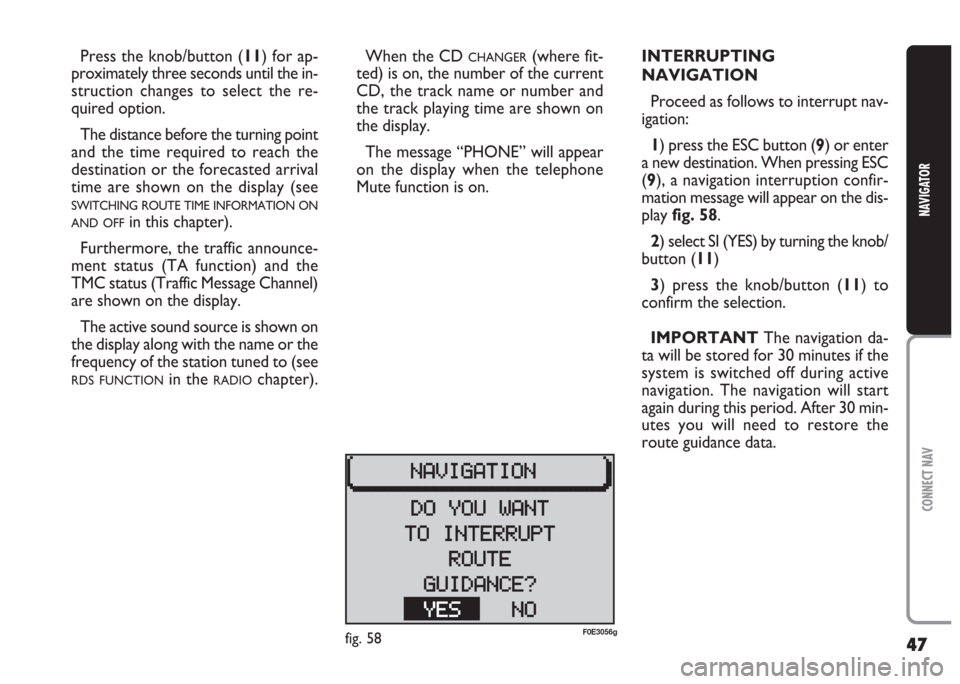
1) press the ESC button (9) or enter
a new destination. When pressing ESC
(9), a navigation interruption confir-
mation message will appear on the dis-
play fig. 58.
2) select SI (YES) by turning the knob/
button (11)
3) press the knob/button (11) to
confirm the selection.
IMPORTANT The navigation da-
ta will be stored for 30 minutes if the
system is switched off during active
navigation. The navigation will start
again during this period. After 30 min-
utes you will need to restore the
route guidance data. Press the knob/button (11) for ap-
proximately three seconds until the in-
struction changes to select the re-
quired option.
The distance before the turning point
and the time required to reach the
destination or the forecasted arrival
time are shown on the display (see
SWITCHING ROUTE TIME INFORMATION ON
AND OFF
in this chapter).
Furthermore, the traffic announce-
ment status (TA function) and the
TMC status (Traffic Message Channel)
are shown on the display.
The active sound source is shown on
the display along with the name or the
frequency of the station tuned to (see
RDS FUNCTIONin the RADIOchapter).
fig. 58F0E3056g
Page 49 of 202
48
CONNECT NAV
NAVIGATOR
TUNING THE RADIO
You can tune the radio directly dur-
ing active navigation by pressing one
of the buttons (13or 14).
IMPORTANT You need to have
stored stations under the multiple
function buttons (13or 14) in order
to do this (see
STORING STATIONin the
RADIOchapter). CHANGING THE
SOUND SOURCE
You can change the sound source
during active navigation in any moment
by pressing the TU button (17) or the
CD-C button (15). The main radio,
CD or CD
CHANGER(where fitted)
menu will appear on the display, ac-
cordingly.
Press NAV (12) to return to active
navigation.NO MAP NAVIGATION
NO MAP navigation is carried out
when the navigation CD is removed
after entering the destination and
starting navigation. The internal CD
player can be used during NO MAP
navigation for sound playback.
The message NO MAP will appear
when the NO MAP function is on
along with the straight distance to the
destination.
IMPORTANT It may take the
sound/navigation system several min-
utes to correctly restore the car po-
sitioning data when the navigation CD
is reinerted. During this time, the mes-
sage OFF ROAD or OFF MAP will ap-
pear on the display (the latter for in-
sufficient positioning data).
Page 50 of 202
49
CONNECT NAV
NAVIGATOR
DYNAMIC TRAVEL GUIDE
(where fitted)
When the “DYnamic travel guide”
function is on, the satellite sound/nav-
igation system analyses and process-
es the traffic messages to compute the
route.
Traffic messages are broadcast by
RDS stations with TMC service (Traf-
fic Message Channel).
Proceed as follows to activate the
“Dynamic travel guide” function:
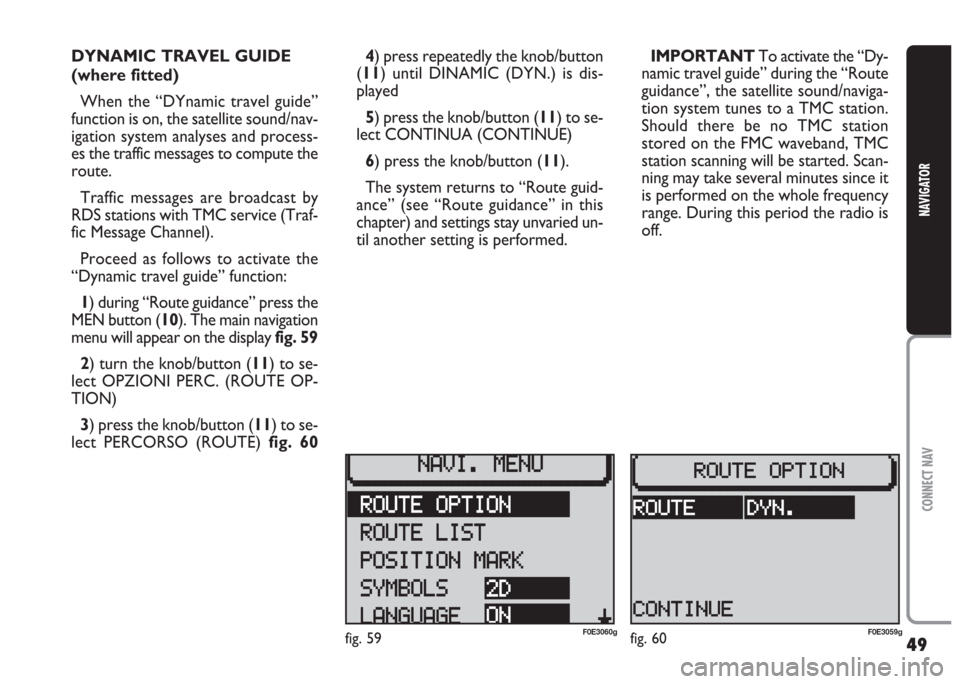
1) during “Route guidance” press the
MEN button (10). The main navigation
menu will appear on the display fig. 59
2) turn the knob/button (11) to se-
lect OPZIONI PERC. (ROUTE OP-
TION)
3) press the knob/button (11) to se-
lect PERCORSO (ROUTE) fig. 604) press repeatedly the knob/button
(11) until DINAMIC (DYN.) is dis-
played
5) press the knob/button (11) to se-
lect CONTINUA (CONTINUE)
6) press the knob/button (11).
The system returns to “Route guid-
ance” (see “Route guidance” in this
chapter) and settings stay unvaried un-
til another setting is performed.IMPORTANT To activate the “Dy-
namic travel guide” during the “Route
guidance”, the satellite sound/naviga-
tion system tunes to a TMC station.
Should there be no TMC station
stored on the FMC waveband, TMC
station scanning will be started. Scan-
ning may take several minutes since it
is performed on the whole frequency
range. During this period the radio is
off.
fig. 59F0E3060gfig. 60F0E3059g
Page 52 of 202
51
CONNECT NAV
NAVIGATOR
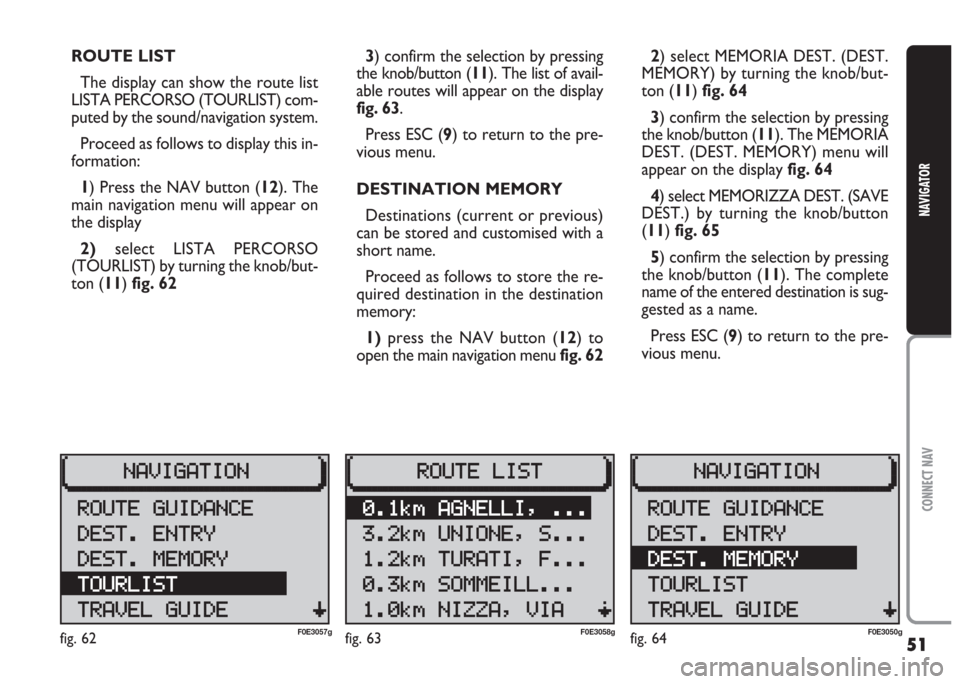
2) select MEMORIA DEST. (DEST.
MEMORY) by turning the knob/but-
ton (11) fig. 64
3) confirm the selection by pressing
the knob/button (11). The MEMORIA
DEST. (DEST. MEMORY) menu will
appear on the display fig. 64
4) select MEMORIZZA DEST. (SAVE
DEST.) by turning the knob/button
(11) fig. 65
5) confirm the selection by pressing
the knob/button (11). The complete
name of the entered destination is sug-
gested as a name.
Press ESC (9) to return to the pre-
vious menu. ROUTE LIST
The display can show the route list
LISTA PERCORSO (TOURLIST) com-
puted by the sound/navigation system.
Proceed as follows to display this in-
formation:
1) Press the NAV button (12). The
main navigation menu will appear on
the display
2)select LISTA PERCORSO
(TOURLIST) by turning the knob/but-
ton (11) fig. 623) confirm the selection by pressing
the knob/button (11). The list of avail-
able routes will appear on the display
fig. 63.
Press ESC (9) to return to the pre-
vious menu.
DESTINATION MEMORY
Destinations (current or previous)
can be stored and customised with a
short name.
Proceed as follows to store the re-
quired destination in the destination
memory:
1)press the NAV button (12) to
open the main navigation menu fig. 62
fig. 62F0E3057gfig. 63F0E3058gfig. 64F0E3050g
Page 56 of 202

55
CONNECT NAV
NAVIGATOR
GPS STATUS AND POSITION
INFORMATION
Proceed as follows to display infor-
mation concerning the number of GPS
satellites which can be received and
the car position:
1) press the NAV button (12). The
main navigation menu will be displayed
2) select INFO GPS (GPS STATUS)
by turning the knob/button (11)
3) confirm the selection by pressing
the knob/button (11).
Press ESC (9) to return to the pre-
vious menu.AVOIDING TAILBACKS
DURING NAVIGATION
The sound/navigation system can de-
tour tailbacks or road interruptions
during navigation.
IMPORTANT Only the options
for which data is available on the nav-
igation CD are offered. A lock symbol
Swill appear next to the unavailable
options.
Proceed as follows:
1) press the
kbutton (7). The IM-
POSTAZIONI (SETTINGS) menu will
appear on the displayfig. 712) position the cursor on INGOR-
GO DAVANT (TRAFFIC AHEAD)
with the knob/ button (11). The IN-
GORGO DAVANTI (TRAFFIC
AHEAD) menu will appear and the
cursor moves next to FINO (TO)
fig. 72
3) press the knob/button (11)
4) position the cursor on DA
(FROM) with the knob/button (11)
5) indicate from which distance with
respect to your position to start the
detour with the knob/button (11)
6) position the cursor on FINO (TO)
with the knob/button (11)
fig. 71F0E3064gfig. 72F0E3065g