Page 5 of 300

WARNINGS AND CAUTIONS
This manual containsWARNINGSagainst operating
procedures which could result in an accident or bodily
injury. It also containsCAUTIONSagainst procedures
which could result in damage to your vehicle. If you do
not read this entire manual you may miss important
information. Observe all Warnings and Cautions.
VEHICLE IDENTIFICATION NUMBER
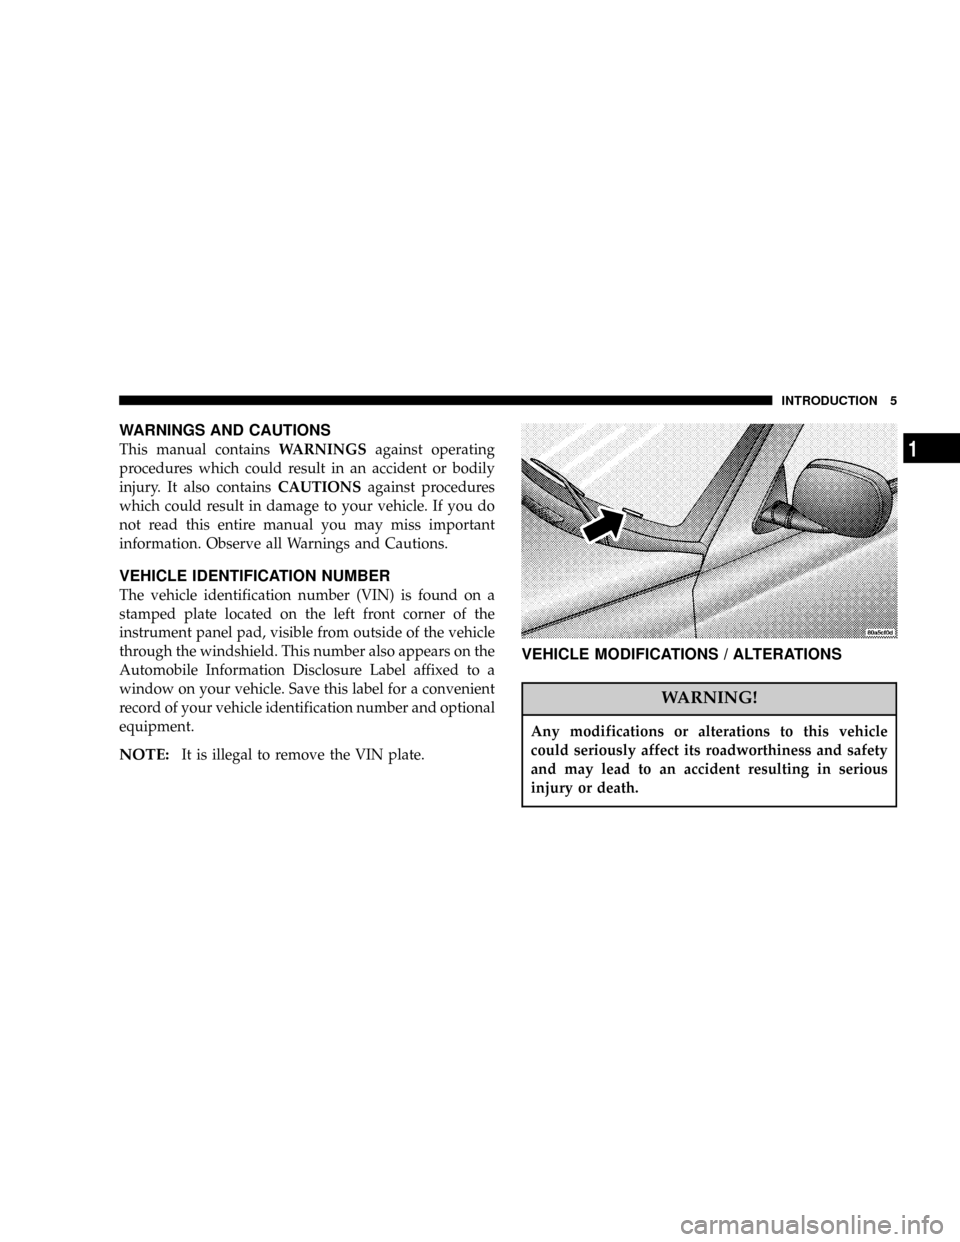
The vehicle identification number (VIN) is found on a
stamped plate located on the left front corner of the
instrument panel pad, visible from outside of the vehicle
through the windshield. This number also appears on the
Automobile Information Disclosure Label affixed to a
window on your vehicle. Save this label for a convenient
record of your vehicle identification number and optional
equipment.
NOTE:It is illegal to remove the VIN plate.
VEHICLE MODIFICATIONS / ALTERATIONS
WARNING!
Any modifications or alterations to this vehicle
could seriously affect its roadworthiness and safety
and may lead to an accident resulting in serious
injury or death.
INTRODUCTION 5
1
Page 8 of 300

mWindows.............................22
NPower Windows Ð If Equipped............22
NSliding Rear WindowÐIf Equipped.........23
NClub Cab Vented Quarter Window..........24
NWind Buffeting........................24
mOccupant Restraints.....................24
NLap/Shoulder Belts.....................25
NAdjustable Upper Shoulder Belt Anchorage....29
NSeat Belt PretensionersÐQuad Cab Only......29
NFront Lap Belts........................30
NSeat Belts And Pregnant Women............30NSeat Belt Extender......................31
NDriver And Right Front Passenger Supplemental
Restraint SystemÐAirbag................31
NChild Restraint........................38
mEngine Break-In Recommendations..........52
mSafety Tips............................53
NExhaust System.......................53
NSafety Checks You Should Make Inside The
Vehicle..............................54
NSafety Checks You Should Make Outside The
Vehicle..............................54
8 THINGS TO KNOW BEFORE STARTING YOUR VEHICLE
Page 22 of 300

arming. The security light in the instrument panel cluster
will flash rapidly for about 15 seconds to indicate that the
alarm is being set. After the alarm is set, the security light
will flash at a slower rate to indicate that the system is
armed.
NOTE:If the SECURITY light stays on continuously
during vehicle operation, have the system checked by
your dealer.
To Disarm the System:
Use the Keyless Entry transmitter or the key to turn the
door locks to the unlock position. If something has
triggered the system in your absence, the horn will sound
three times when you unlock the doors. Check the
vehicle for tampering.
The Security system will also disarm, if the vehicle is
started with a programmed Sentry Key. If an unpro-
grammed Sentry Key is used to start a vehicle, the engine
will run for 2 seconds and then the security alarm will be
initiated. To exit alarming mode, press the RKE Unlock
button, unlock the doors using the key cylinder, or start
the vehicle with a programmed Sentry Key.The Security Alarm System is designed to protect your
vehicle; however, you can create conditions where the
system will arm unexpectedly. If you remain in the
vehicle and lock the doors with the transmitter, the alarm
will sound when you pull the door handle to exit. You
may also accidentally disarm the system by unlocking
any door with the door key and then locking it. The door
will be locked but the Security Alarm will not arm.
WINDOWS
Power Windows Ð IF Equipped
22 THINGS TO KNOW BEFORE STARTING YOUR VEHICLE
Page 23 of 300

The control on the left front door panel has up-down
switches that give you fingertip control of all power
windows. There is a single opening and closing switch on
the front passenger door for passenger window control
and on the rear doors of Quad Cab models. The windows
will operate only when the ignition switch is turned to
the ON position.
Auto Down
The driver's window switch has an Auto Down feature.
Press the window switch past the detent, release, and the
window will go down automatically.
Window Lockout Switch
The window lockout switch on the driver's door allows
you to disable the window control on the other doors. To
disable the window controls on the other doors, press the
window lock button. To enable the window controls,
press the window control button again.
Sliding Rear WindowÐIf Equipped
A locking device in the center of the window helps to
prevent entry from the rear of the vehicle. Squeeze the
lock to release the window.
THINGS TO KNOW BEFORE STARTING YOUR VEHICLE 23
2
Page 24 of 300

Club Cab Vented Quarter Window
The Club Cab is equipped with rear quarter windows
that open out. Pull the window latch toward you to
unlock, and push out on the window. Press the latch
straight to secure the window in an open position.
WIND BUFFETING
Wind buffeting can be described as the perception of
pressure on the ears or a helicopter type sound in the
ears. Your vehicle may exhibit wind buffeting with the
windows down, or the sunroof (if so equipped) in certain
open or partially open positions. This is a normal occur-
rence and can be minimized. If the buffeting occurs with
the rear windows open, open the front and rear windows
together to minimize the buffeting. If the buffeting occurs
with the sunroof open, adjust the sunroof opening to
minimize the buffeting.
OCCUPANT RESTRAINTS
Some of the most important safety features in your
vehicle are the restraint systems. These include the front
and rear seat belts for the driver and all passengers, and
front airbags for both the driver and front passenger. If
you will be carrying children too small for adult-size
belts, your seat belts also can be used to hold infant and
child restraint systems.
Please pay close attention to the information in this
section. It tells you how to use your restraint system
properly to keep you and your passengers as safe as
possible.
WARNING!
In a collision, you and your passengers can suffer
much greater injuries if you are not properly buck-
led up. You can strike the interior of your vehicle or
other passengers, or you can be thrown out of the
vehicle. Always be sure you and others in your
vehicle are buckled up properly.
24 THINGS TO KNOW BEFORE STARTING YOUR VEHICLE
Page 58 of 300
MIRRORS
Inside Day/Night Mirror
The mirror should be adjusted to center on the view
through the rear window. A two-point pivot system
allows for horizontal and vertical adjustment of the
mirror.Annoying headlight glare can be reduced by moving the
small control under the mirror to the night position
(toward rear of truck). The mirror should be adjusted
while set in the day position (toward windshield).
58 UNDERSTANDING THE FEATURES OF YOUR VEHICLE
Page 61 of 300
WARNING!
Vehicles and other objects seen in the right side
convex mirror will look smaller and farther away
than they really are. Relying too much on your right
side mirror could cause you to collide with another
vehicle or other object. Use your inside mirror when
judging the size or distance of a vehicle seen in the
right side mirror.
Heated Mirrors Ð If Equipped
Heated mirrors are automatically activated when you
depress the rear window defroster switch located on the
instrument panel. The light will illuminate to indicate
that the heating elements are ON. Turning OFF the
ignition will deactivate the heated mirrors.
SEATS
Seat Adjustment
The adjusting lever is at the front of the seat, near the
floor. Lift the lever and move the seat to the desired
position.
Using body pressure, move forward and rearward on the
seat to be sure the seat adjusters have latched.
UNDERSTANDING THE FEATURES OF YOUR VEHICLE 61
3
Page 95 of 300

NSeek..............................120
NTune ..............................120
NTo Set The Push-Button Memory..........120
NBalance............................121
NFade..............................121
NBass And Treble Tone Control............121
NAM/FM Selection.....................121
NMode Button........................121
NCassette Player Features................121
NCD Changer Control Capability Ð If
Equipped...........................122
NRadio Display Messages................124
mSales Code RBQÐAM/FM Stereo Radio
With 6 - Disc CD Changer
...............124
NRadio Operation......................124
NCD Player Operation...................126
mRemote Sound System Controls Ð If
Equipped
............................130
NRadio Operation......................130
NTape Player.........................131
NCD Player..........................131
mCassette Tape And Player Maintenance......131
mCompact Disc Maintenance...............132
mRadio Operation And Cellular Phones.......132
mClimate Controls......................133
NHeater Only.........................133
NAir Conditioning.....................134
NOperating Tips.......................137
NOperation Tips Chart...................139
mRear Window Defroster ± Quad-Cab Only....140
INSTRUMENT PANEL AND CONTROLS 95
4