2004 DAEWOO NUBIRA steering
[x] Cancel search: steeringPage 2205 of 2643

SUPPLEMENTAL INFLATABLE RESTRAINTS (SIR) 8B – 101
DAEWOO V–121 BL4
FRONT SEAT BELT
PRETENSIONERS
CAUTION : Tempering with seat belt pretensioner
creates the risk of an injury from unexpected deploy-
ment. Therefore, the driver airbag module should
never be disassembled.
The seat belt pretensioners(with load limiter for some ve-
hicles) are assembled with each front seat belt retractors
to retract the seat belt webbing when accounted frontal
collision. The seat belt pretensioners are controlled by
sensing and diagnostic module(SDM). The seat belt pre-
tensioner contains an igniter charge and a gas generator
to pull the seat belt webbing. The seat belt pretensioner
must be replaced after an accident that causes its activa-
tion.
The seat belt pretensioner also contains a shorting bar to
prevent current from travelling through the seat belt pre-
tensioner during servicing. The shorting bar is disengaged
when the connector is connected.
SENSING AND DIAGNOSTIC
MODULE (SDM)
CAUTION : During the service procedures, be careful
when handling the SDM. Never shake or jar the SDM.
Never apply power to SIR when the SDM is not rigidly
attached to the vehicle. All SDM mounting bolts and
grounding nuts must be fully tightened. Failure to fol-
low these precautions could cause deployment and
result in personal injury.
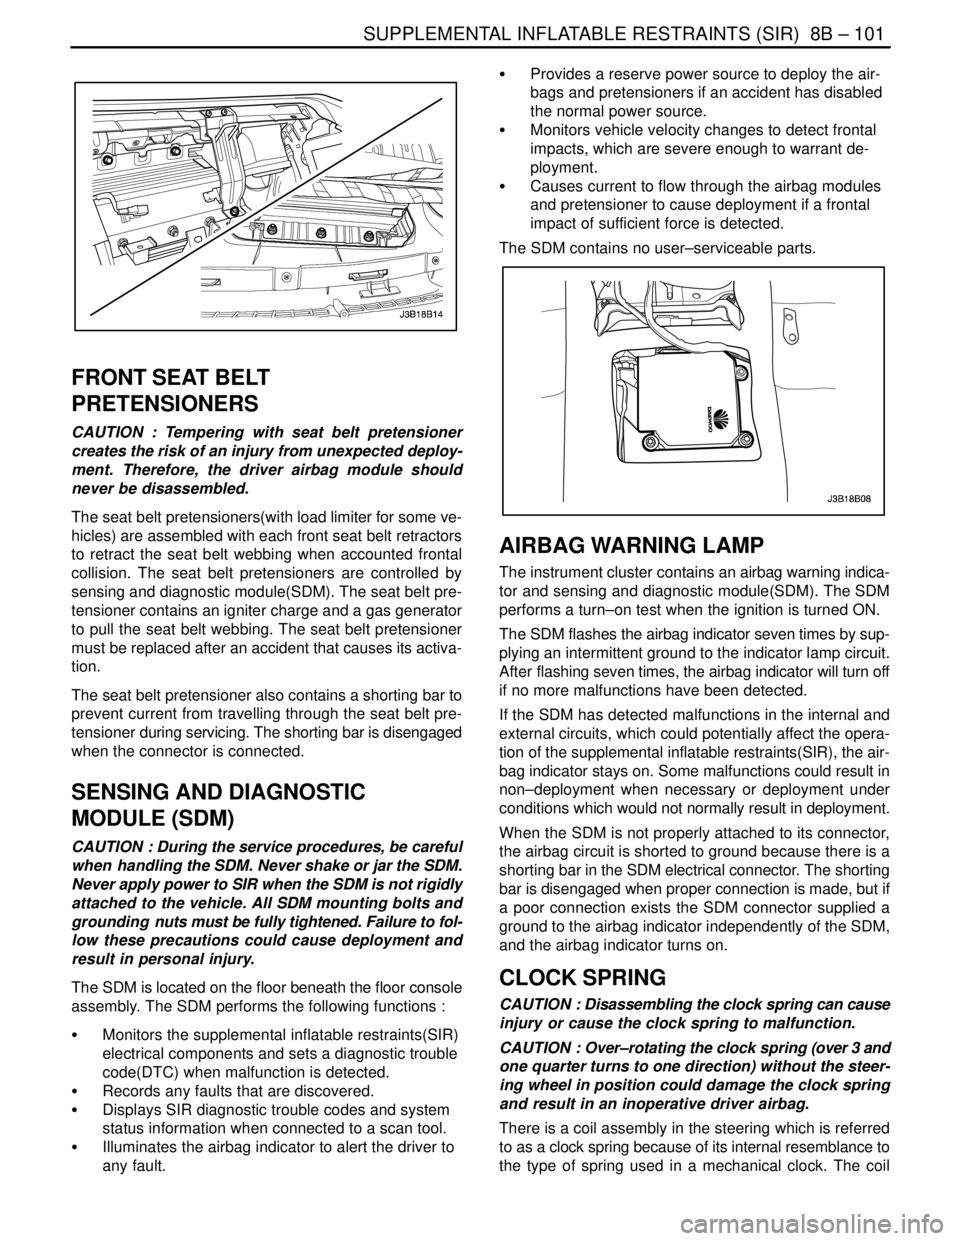
The SDM is located on the floor beneath the floor console
assembly. The SDM performs the following functions :
S Monitors the supplemental inflatable restraints(SIR)
electrical components and sets a diagnostic trouble
code(DTC) when malfunction is detected.
S Records any faults that are discovered.
S Displays SIR diagnostic trouble codes and system
status information when connected to a scan tool.
S Illuminates the airbag indicator to alert the driver to
any fault.S Provides a reserve power source to deploy the air-
bags and pretensioners if an accident has disabled
the normal power source.
S Monitors vehicle velocity changes to detect frontal
impacts, which are severe enough to warrant de-
ployment.
S Causes current to flow through the airbag modules
and pretensioner to cause deployment if a frontal
impact of sufficient force is detected.
The SDM contains no user–serviceable parts.
AIRBAG WARNING LAMP
The instrument cluster contains an airbag warning indica-
tor and sensing and diagnostic module(SDM). The SDM
performs a turn–on test when the ignition is turned ON.
The SDM flashes the airbag indicator seven times by sup-
plying an intermittent ground to the indicator lamp circuit.
After flashing seven times, the airbag indicator will turn off
if no more malfunctions have been detected.
If the SDM has detected malfunctions in the internal and
external circuits, which could potentially affect the opera-
tion of the supplemental inflatable restraints(SIR), the air-
bag indicator stays on. Some malfunctions could result in
non–deployment when necessary or deployment under
conditions which would not normally result in deployment.
When the SDM is not properly attached to its connector,
the airbag circuit is shorted to ground because there is a
shorting bar in the SDM electrical connector. The shorting
bar is disengaged when proper connection is made, but if
a poor connection exists the SDM connector supplied a
ground to the airbag indicator independently of the SDM,
and the airbag indicator turns on.
CLOCK SPRING
CAUTION : Disassembling the clock spring can cause
injury or cause the clock spring to malfunction.
CAUTION : Over–rotating the clock spring (over 3 and
one quarter turns to one direction) without the steer-
ing wheel in position could damage the clock spring
and result in an inoperative driver airbag.
There is a coil assembly in the steering which is referred
to as a clock spring because of its internal resemblance to
the type of spring used in a mechanical clock. The coil
Page 2206 of 2643

8B – 102ISUPPLEMENTAL INFLATABLE RESTRAINTS (SIR)
DAEWOO V–121 BL4
spring should never be disassembled, and there is no
timekeeping function. The clock spring contains two or
three current–carrying coils. One of the current–carrying
coils maintains continuous contact within the driver de-
ployment loop while the steering wheel is rotated. The
clock spring also contains coils that maintain continuous
contact for horn and remote audio control switch circuit.
Turning the steering wheel in one direction tightens the
coil, and turning the steering wheel in the opposite direc-
tion loosens the coil. Do not turn the clock spring when the
steering wheel is not attached. Refer to ”Clock Spring” in
this section for proper installation of the clock spring.
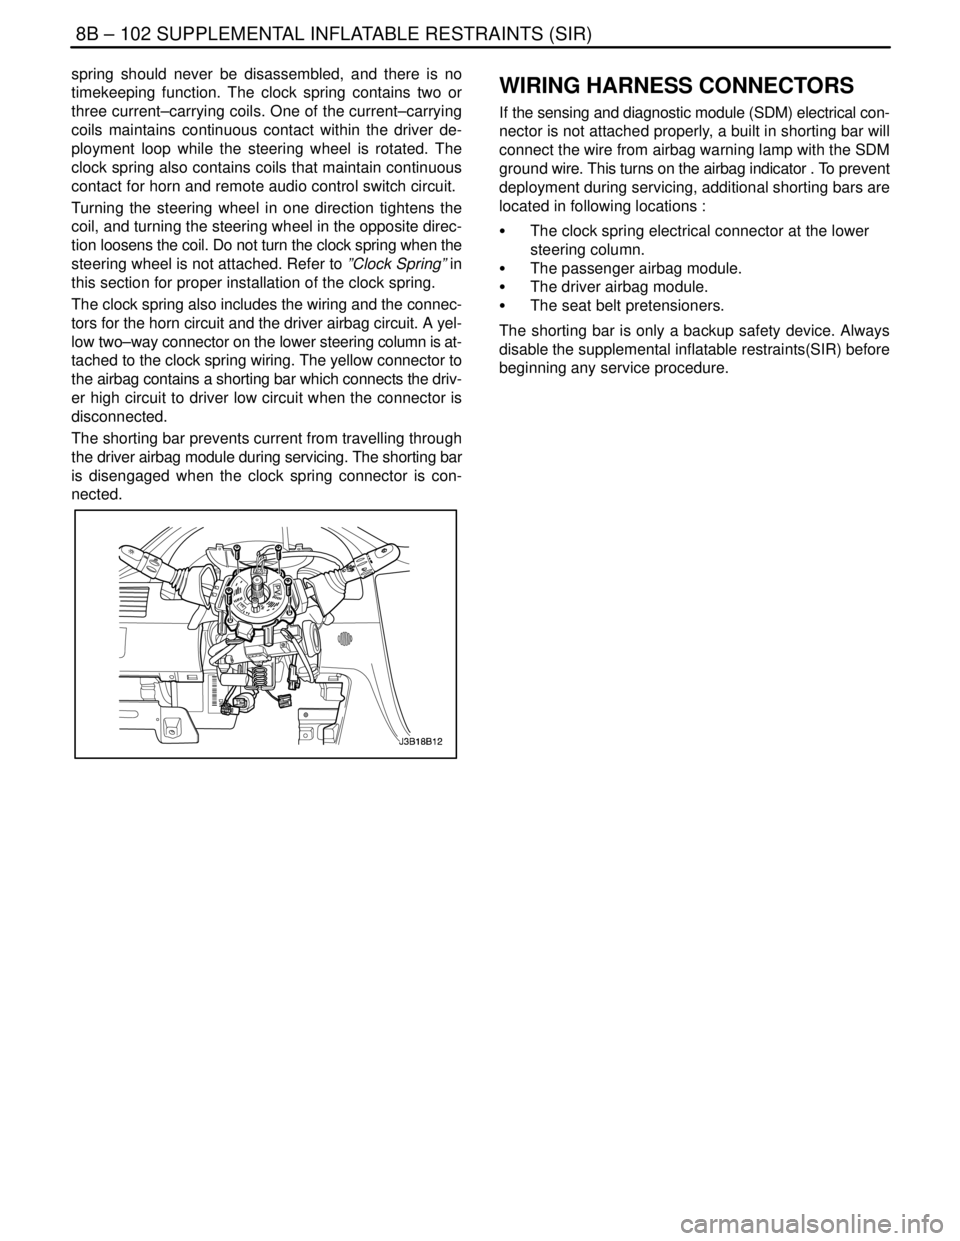
The clock spring also includes the wiring and the connec-
tors for the horn circuit and the driver airbag circuit. A yel-
low two–way connector on the lower steering column is at-
tached to the clock spring wiring. The yellow connector to
the airbag contains a shorting bar which connects the driv-
er high circuit to driver low circuit when the connector is
disconnected.
The shorting bar prevents current from travelling through
the driver airbag module during servicing. The shorting bar
is disengaged when the clock spring connector is con-
nected.WIRING HARNESS CONNECTORS
If the sensing and diagnostic module (SDM) electrical con-
nector is not attached properly, a built in shorting bar will
connect the wire from airbag warning lamp with the SDM
ground wire. This turns on the airbag indicator . To prevent
deployment during servicing, additional shorting bars are
located in following locations :
S The clock spring electrical connector at the lower
steering column.
S The passenger airbag module.
S The driver airbag module.
S The seat belt pretensioners.
The shorting bar is only a backup safety device. Always
disable the supplemental inflatable restraints(SIR) before
beginning any service procedure.
Page 2272 of 2643

9B – 46ILITHING SYSTEMS
DAEWOO V–121 BL4
GENERAL DESCRIPTION
AND SYSTEM OPERATION
HEADLAMPS–ON REMINDER CHIME
When the headlamp switch is in the headlamps–on or
parking lamps–on position, voltage is applied to the chime
module. When the ignition is in ON, ACC or START, volt-
age is applied through the fuse block to the module. These
two voltages are sensed, and the chime module is not
sounded.
When the ignition is not in ON, ACC or START, the module
loses voltage. The chime module senses change. If the
voltage is still available, it is applied to sound the chime.
The chime can be turned off by turning the headlamp
switch off. The module no longer senses voltage from the
headlamp switch, so the chime module does not sound.
HEADLAMPS
The headlamps are controlled by the multifunction lever
located on the left side of the steering column. They will
come on with the ignition switch in any position. Turning
the headlamp switch to the first position turns on the park-
ing lamps, the license plate lamps and the instrument pan-
el illumination. Turning the switch to the second position
turns on all of the previous lamps and the headlamps.
Turning the switch to the OFF position turns off all the
lamps.
Headlamp high beams and low beams are also controlled
by this lever. When the headlamps are on, pushing the le-
ver away from the driver until the switch clicks changes the
lamp from low beam to high beam. An indicator lamp on
the instrument cluster assembly will come on when the
high beam headlamps are on. To return the headlamps to
low beam, pull the lever toward the driver.
The headlamps must be aimed for proper illumination of
the road. Headlamp aim should be checked whenever a
new headlamp assembly is installed, or whenever service
repairs to the front end area may have disturbed the head-
lamp assembly or its mountings.
DAYTIME RUNNING LAMPS
The Daytime Running Lamps (DRL) will come on when:
S The ignition is ON.
S The light is OFF.
S The parking brake is released.
When the exterior lights are on, the DRL will turn off. To
turn the DRL off when idling, apply the parking brake.
PARKING AND TURN SIGNAL LAMPS
The parking lamps can be turned on by turning the lighting
switch to the first position. The parking lamps can be
turned off by turning the switch to the OFF position.When the turn signals are activated, the front and rear turn
signal lamps flash to signal a turn. The turn signals work
only when the ignition is ON.
The turn signals are controlled by the light switch on the
left side of the steering column. Moving the lever all the
way up or down (past the detent) will turn on the front and
rear turn signals. When the turn is completed, the lever will
return to horizontal and the turn signals will stop flashing.
For changing lanes, or for shallow turns in which the steer-
ing wheel does not turn far enough to cancel the signal,
move the signal lever only to the first detent and hold it
there. When the lever is released, it will return to horizontal
and the turn signals will cancel.
FOG LAMPS
The fog lamp switch is on the instrument panel to the right
of the steering column. To use the fog lamps, first turn on
the headlamps or the parking lamps. Then push the fog
lamp switch. The indicator light in the switch will illuminate
to indicate that the fog lamps are on. Push the switch again
to turn off the fog lamps. The indicator light will then go off.
The fog lamps should not be used as a substitute for the
headlamps.
The fog lamps must be aimed for proper illumination of the
road. Fog lamp aim should be checked when a new bulb
is installed or if service or repairs in the front end area may
have disturbed the fog lamp mountings.
REAR COMBINATION LAMPS
The taillamps, stoplamps, turn signal lamps and backup
lamp are one assembly.
Turning on either the headlamps or the parking lamps will
also turn on the taillamps. When the brake pedal is
pushed, the taillamps will glow brighter to serve as sto-
plamps.
The center high–mounted stoplamp is located in the rear
window and will come on when the brake pedal is pressed.
LICENSE PLATE LAMP
The license plate lamps will come on when the headlamps
or the parking lamps are on. The license plate lamps are
mounted above the license plate.
INTERIOR COURTESY LAMP
The courtesy lamp is located on the headliner just behind
the front seats. The lamp switch has three positions. If the
switch is left in the center position, the lamp will go on
whenever a door is opened and go off when it is closed.
In the ON position, the lamp will stay on until it is turned off.
In the OFF position, the lamp will not come on, even when
a door is opened.
LUGGAGE COMPARTMENT LAMP
The luggage compartment lamp is located under the deck
lid sill plate on the notchback. The lamp is located on the
left–side wheelhouse trim panel on the hatchback. It will
come on whenever the luggage compartment is opened.
Page 2277 of 2643

9C – 4IHORN(S)
DAEWOO V–121 BL4
GENERAL DESCRIPTION
AND SYSTEM OPERATION
HORN(S)
The horns are located under the hood. They are attached
near the radiator at the front of the vehicle. The horns are
actuated by pressing the steering wheel pad, which
grounds the horns’ electrical circuit.
Page 2299 of 2643

9D – 22IWIPERS/WASHER SYSTEMS
DAEWOO V–121 BL4
GENERAL DESCRIPTION
AND SYSTEM OPERATION
WINDSHIELD WIPER SYSTEM
The windshield wiper system consists of a wiper motor, a
linkage, a wiper arm and a blade, and a wiper/washer
switch. The windshield wiper circuit incorporates a self–
parking device which consists of a worm gear and a cam
plate in order to keep the circuit engaged temporarily when
the switch is turned off. The wiper system is driven by a
permanent magnet–type motor. The windshield wiper mo-
tor is mounted on the dash panel and is directly connected
to the windshield wiper linkage.
The windshield wiper motor has two speeds, LO and HI,
and also has intermittent wiper capability. The wiper
switch is an integral part of the wiper/washer switch. Wind-
shield wiper operation is actuated through the lever on the
right side of the steering column.
WINDSHIELD WASHER SYSTEM
The windshield washer system is equipped with a washerfluid reservoir, a washer fluid pump, hoses, nozzles, and
a wiper/washer switch. The windshield washer reservoir
is mounted behind the front left wheel well splash shield.
Attached to the reservoir is a washer pump, which pumps
fluid through the hoses to the two nozzles mounted on the
hood. The washer switch is an integral part of the wiper/
washer switch. Windshield washer operation is actuated
through the lever on the right side of the steering column.
REAR WINDOW WIPER/WASHER
SYSTEM
The rear window wiper system consists of a wiper motor,
a wiper arm, and a blade. The rear window wiper motor is
located inside the hatchback/tailgate door and is directly
connected to the rear window wiper. The rear window
washer system is equipped with a separate washer fluid
pump and hose. The hatchback has a hatch–mounted
rear window washer nozzle and on the wagon, the washer
nozzle is incorporated into the rear wiper motor. The rear
window washer reservoir is mounted behind the front left
wheel well splash shield. Attached to the reservoir is a
washer pump, which pumps fluid through a hose to the
rear washer nozzle.
Page 2301 of 2643

9E – 2IINSTRUMENTATION/DRIVER INFORMATION
DAEWOO V–121 BL4
SPECIFICATIONS
FASTENER TIGHTENING SPECIFICATIONS
ApplicationNSmLb–FtLb–In
Air Deflector Screws2–18
Chime Module Screws4–35
Clock Screws2–18
Cupholder Screws2.5–22
Deposit Box Screws2.5–22
Driver Knee Bolster Bolts10–89
Floor Console Brace Bolts4–35
Floor Console Brace Nuts4–35
HVAC Controls Screws4–35
Instrument Cluster Screws4–35
Instrument Cluster Trim Panel Screws4–35
Instrument Panel End Bolts2015–
Instrument Panel End Screws4–35
Instrument Panel Nuts Above the Steering Column2015–
Instrument Panel Bolts Behind the HVAC Controls4–35
Steering Column Bracket Nut2216–
Steering Column Lower Trim Cover Screws2.5–22
Steering Column U–Clamp Nuts2216–
Steering Column Upper Trim Cover Screws3–27
INSTRUMENT CLUSTER INDICATOR LAMPS
SPECIFICATIONS
Indicator LampColorBulb
ABS WarningAmber14 v 1.4 W
Airbag WarningRed14 v 1.4 W
Battery Charge IndicatorRed14 v 1.4 W
Check EngineAmber14 v 1.4 W
Door Open WarningRed14 v 1.4 W
Engine OverheatRed14 v 1.4 W
Fasten Seat Belt WarningRed14 v 1.4 W
High Beam IndicatorBlue14 v 1.4 W
Low Fuel Level WarningAmber14 v 4 W
Oil Pressure WarningRed14 v 1.4 W
Parking Brake Indicator and Brake Fluid WarningRed14 v 1.4 W
Service Engine Soon WarningAmber14 v 1.4 W
Transaxle Power Mode IndicatorAmber14 v 1.4 W
Turn Signal IndicatorsGreen14 v 1.4 W
Page 2324 of 2643

INSTRUMENTATION/DRIVER INFORMATION 9E – 25
DAEWOO V–121 BL4
7. Remove the instrument cluster trim panel. Refer to
”Instrument Cluster Trim Panel” in this section.
8. Remove the instrument cluster. Refer to ”Instru-
ment Cluster” in this section.
9. Remove the glove box and the glove box housing.
Refer to ”Glove Box” in this section.
10. Remove the knee bolster. Refer to Section 9G, In-
terior Trim.
11. Remove the screws and the instrument panel side
covers.
12. Remove the screw and the instrument panel fuse
block.
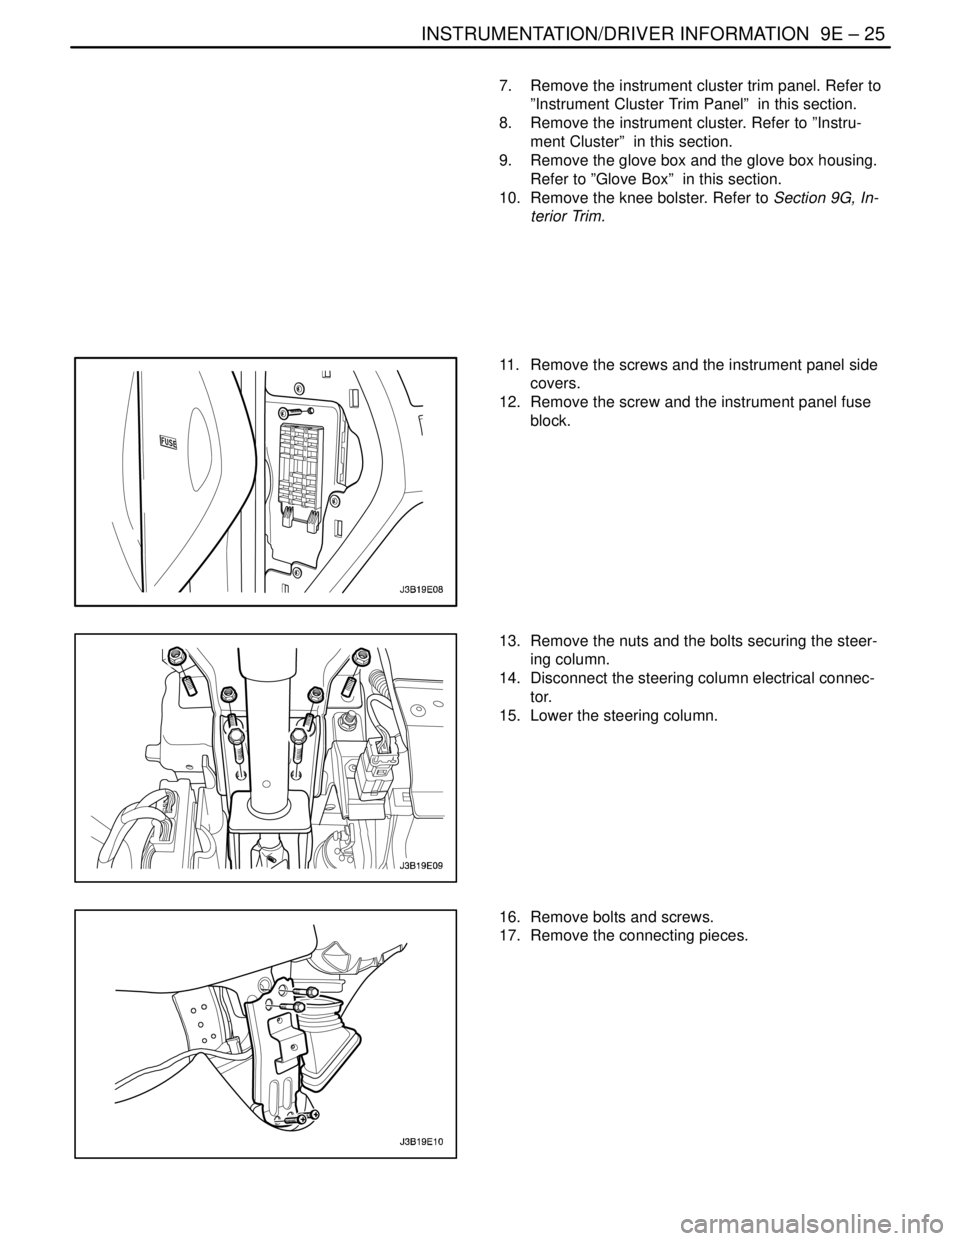
13. Remove the nuts and the bolts securing the steer-
ing column.
14. Disconnect the steering column electrical connec-
tor.
15. Lower the steering column.
16. Remove bolts and screws.
17. Remove the connecting pieces.
Page 2326 of 2643

INSTRUMENTATION/DRIVER INFORMATION 9E – 27
DAEWOO V–121 BL4
4. Install the instrument panel screws behind the glove
box brace.
5. Install the bolt securing the middle of the instrument
panel to the body.
Tighten
Tighten the instrument panel–to–body bolts to 22
NSm (16 lb–ft).
6. Install the connecting pieces with bolts and screws.
Tighten
Tighten the connecting pieces bolts to 22 NSm (16 lb–
ft).
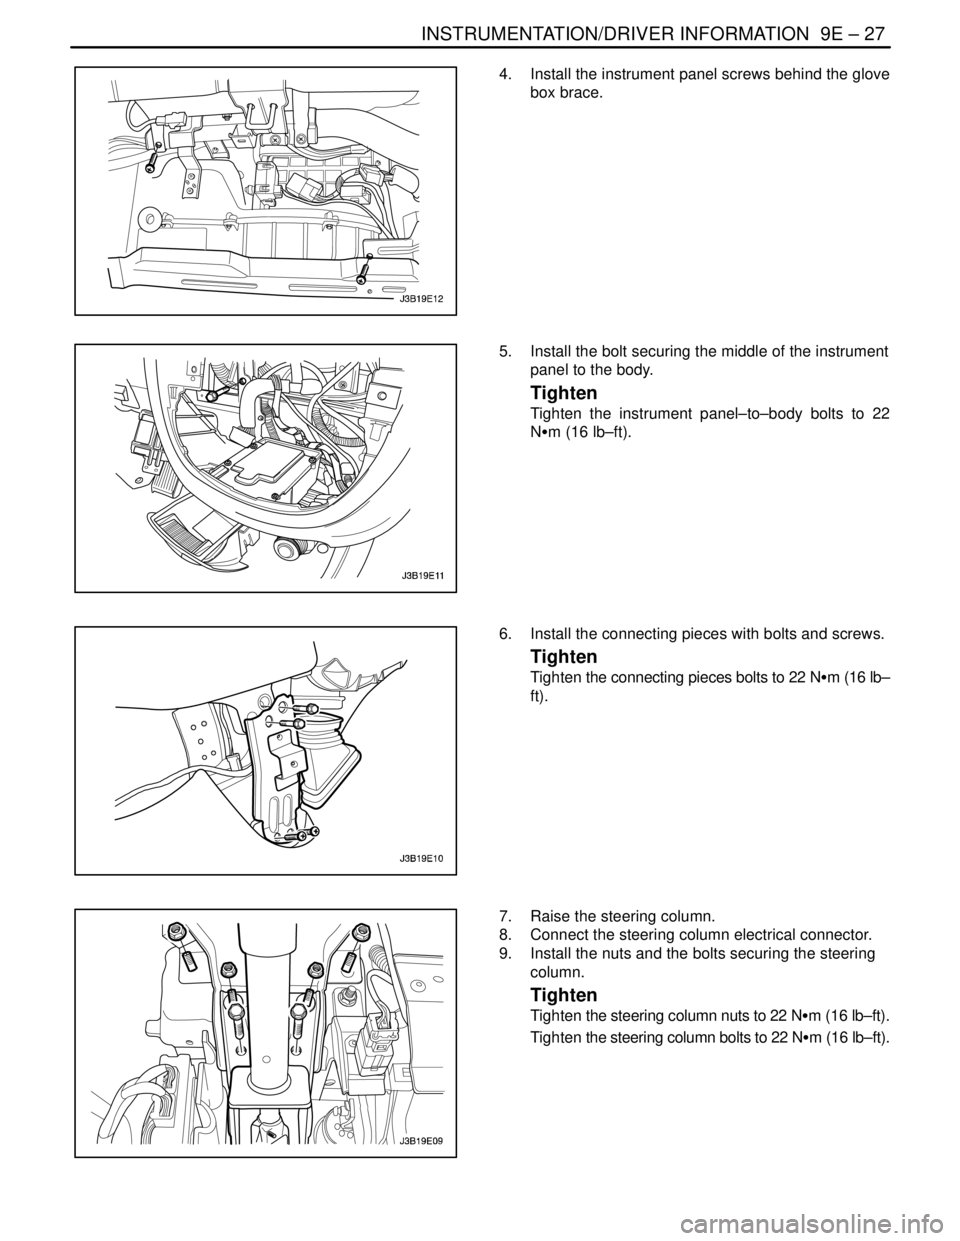
7. Raise the steering column.
8. Connect the steering column electrical connector.
9. Install the nuts and the bolts securing the steering
column.
Tighten
Tighten the steering column nuts to 22 NSm (16 lb–ft).
Tighten the steering column bolts to 22 NSm (16 lb–ft).