Page 2469 of 2643
9R – 8IBODY FRONT END
DAEWOO V–121 BL4
8. Reposition the cowl vent grille weatherstrip.
9. Remove the upper fender bolts and the fender.
Installation Procedure
Notice : Dissimilar metals in direct contact with each other
may corrode rapidly. Make sure to use the correct fasten-
ers to prevent premature corrosion.
1. Install the fender with the upper fender bolts.
Tighten
Tighten the upper fender bolts to 10 NSm (89 lb–in).
2. Reposition the cowl vent grille weatherstrip to its
original position.
3. Install the bolt at the base of the A–pillar.
Tighten
Tighten the A–pillar fender bolt to 10 NSm (89 lb–in).
4. Install the bolts at the base of the fender.
Tighten
Tighten the lower fender bolts to 10 NSm (89 lb–in).
5. Install the front fender bolts behind the front fascia.
Tighten
Tighten the front fender bolts to 10 NSm (89 lb–in).
Page 2470 of 2643
BODY FRONT END 9R – 9
DAEWOO V–121 BL4
6. Install the front fascia to its original position.
7. Install the bolts securing the front fascia to the
fender.
Tighten
Tighten the front fascia–to–fender bolts to 2.5 NSm
(22 lb–in).
8. Install the front headlamp to its original position.
9. Install the front wheel well splash shield. Refer to
”Front Wheel Well Splash Shield” in this section.
Page 2471 of 2643
9R – 10IBODY FRONT END
DAEWOO V–121 BL4
GENERAL DESCRIPTION
AND SYSTEM OPERATION
BODY FRONT END
This vehicle has a unitized body with a frame assembly
supporting the engine and the transaxle. The fender pan-
els and the radiator support are also integral parts of the
body.
Page 2524 of 2643

2–4 PREPARATIONS OF BODYWORK NUBIRA/LACETTI
2. CHECKPOINTS
S Accurate Inspection of Damaged Parts(Visual)
.
Seat Belts
Always replace the seat belt if :
1. The belt material is cut, punctured, burned or in any
way damaged.
2. The buckle or retractor does not work properly.
3. They were being worn at the time of a collision(also
check for damage at the seat belt anchor points).
4. Their condition is questionable.
.
Front Section :
1. Is there any bending, splitting, denting or other dam-
age to the suspension and its related parts?
2. Is there any deformation of the front panel or radiator
crossmember? Have any of the connected sections
come apart?
3. Are there any creases or distortion in the front wheel-
house or side frame? Have any of the connected sec-
tions come apart?
4. Is there any bending or twisting of the whole front
area?
5. Is there any deformation like creases, bulges, or dents
in the front pillar, dash panel, floor, etc.?
6. Is there any vertical twisting or misaligned clearance
in the door?
7. Is the windshield seal broken?
8. Is there any deformation in the vicinity of the top part
of the roof panel’s center pillar?
9. Is there any damage inside the automobile(is there
any twisting of the dash panel, or anything irregular with
the clearances or sheet–mounting parts)?
10. Is there any damage to the steering wheel? Is there
any deformation in the column and the column–mounted
parts?
11. Is there any oil or water leakage and damage to the en-
gine, transmission or brakes?
12. Is there any irregular noise in the gear changing opera-
tion, engine and transmission rotation?
13. Are there any traces of contact between the engine
block and the center crossmember ?
14. Is there any damage to brake or fuel lines, or wire har-
nesses?Rear Section :
1. Is there any twisting, bulging or denting of the rear floor
any rear bolsters? Have any of the connected sections
come apart?
2. Is there any irregular bulging or denting in the rear
fender?
3. Is there any distortion in the rear inner panel? Is there
any bending and denting in the vicinity of the rear pillar?
4. Is there any distortion or creasing is the rear wheel-
house and arch sections? Have any of the connected
sections come apart?
5. Is there anything irregular in the rear glass seal clear-
ance?
6. Is there any twisting or misalignment of the clearance
of the trunk lid opening section?
7. Is there any bending, splitting, denting or other dam-
age to the suspension and its related parts?
8. Is there any deformation of the rear floor crossmem-
ber, trunk floor panel and back panel? Have any of the
connected sections come apart?
.
Impact Beam :
Always replace the door assembly if :
1. The external force makes the impact beam of door in-
ner deform.
Always replace impact beam if :
2. The external force makes the impact beam of front
bumper and rear bumper deform.
Page 2537 of 2643

NUBIRA/LACETTIFRONT 4–3
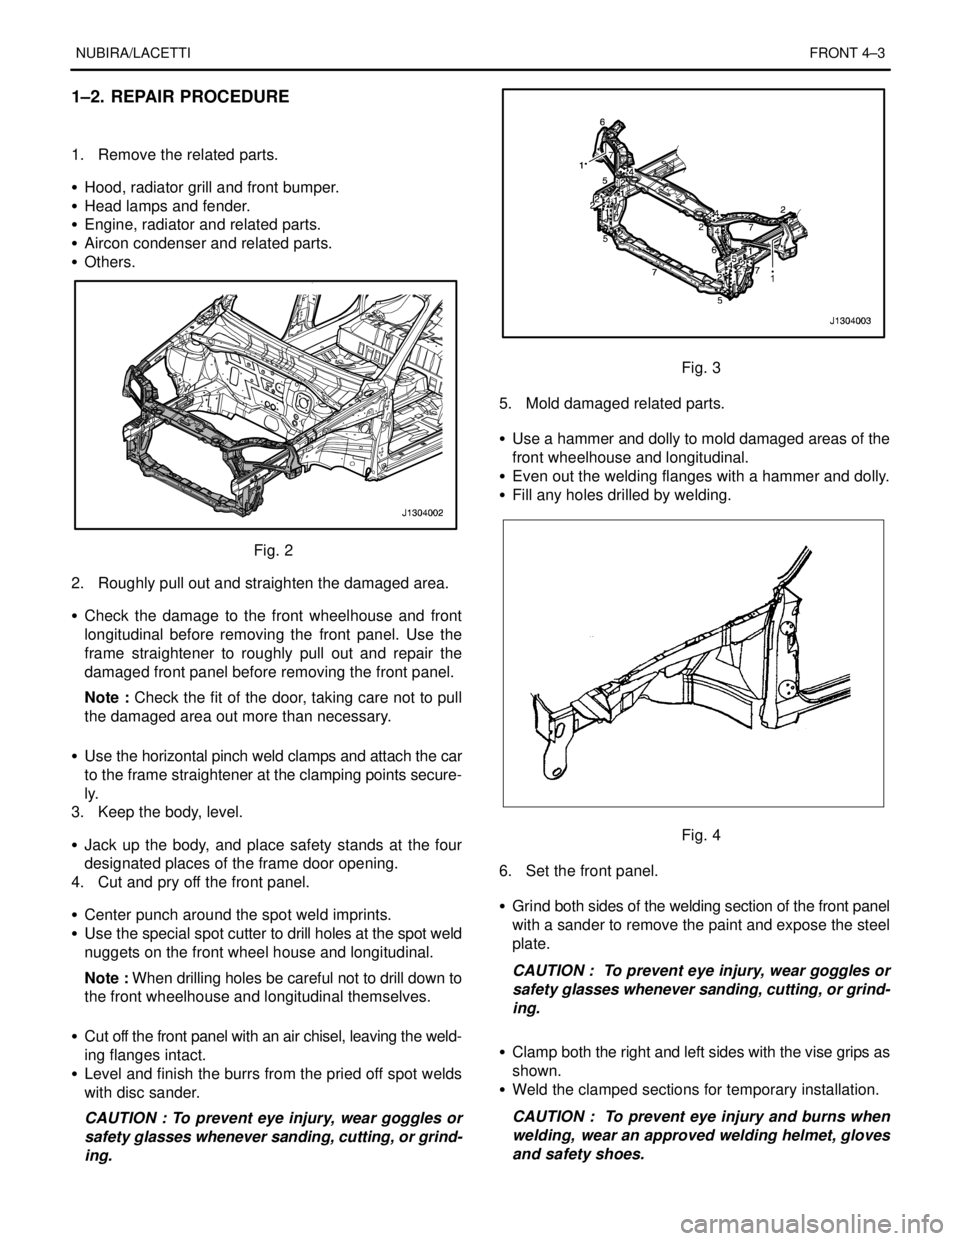
1–2. REPAIR PROCEDURE
1. Remove the related parts.
S Hood, radiator grill and front bumper.
S Head lamps and fender.
S Engine, radiator and related parts.
S Aircon condenser and related parts.
S Others.
Fig. 2
2. Roughly pull out and straighten the damaged area.
S Check the damage to the front wheelhouse and front
longitudinal before removing the front panel. Use the
frame straightener to roughly pull out and repair the
damaged front panel before removing the front panel.
Note : Check the fit of the door, taking care not to pull
the damaged area out more than necessary.
S Use the horizontal pinch weld clamps and attach the car
to the frame straightener at the clamping points secure-
ly.
3. Keep the body, level.
S Jack up the body, and place safety stands at the four
designated places of the frame door opening.
4. Cut and pry off the front panel.
S Center punch around the spot weld imprints.
S Use the special spot cutter to drill holes at the spot weld
nuggets on the front wheel house and longitudinal.
Note : When drilling holes be careful not to drill down to
the front wheelhouse and longitudinal themselves.
S Cut off the front panel with an air chisel, leaving the weld-
ing flanges intact.
S Level and finish the burrs from the pried off spot welds
with disc sander.
CAUTION : To prevent eye injury, wear goggles or
safety glasses whenever sanding, cutting, or grind-
ing.
Fig. 3
5. Mold damaged related parts.
S Use a hammer and dolly to mold damaged areas of the
front wheelhouse and longitudinal.
S Even out the welding flanges with a hammer and dolly.
S Fill any holes drilled by welding.
Fig. 4
6. Set the front panel.
S Grind both sides of the welding section of the front panel
with a sander to remove the paint and expose the steel
plate.
CAUTION : To prevent eye injury, wear goggles or
safety glasses whenever sanding, cutting, or grind-
ing.
S Clamp both the right and left sides with the vise grips as
shown.
S Weld the clamped sections for temporary installation.
CAUTION : To prevent eye injury and burns when
welding, wear an approved welding helmet, gloves
and safety shoes.
Page 2538 of 2643

4–4 FRONTNUBIRA/LACETTI
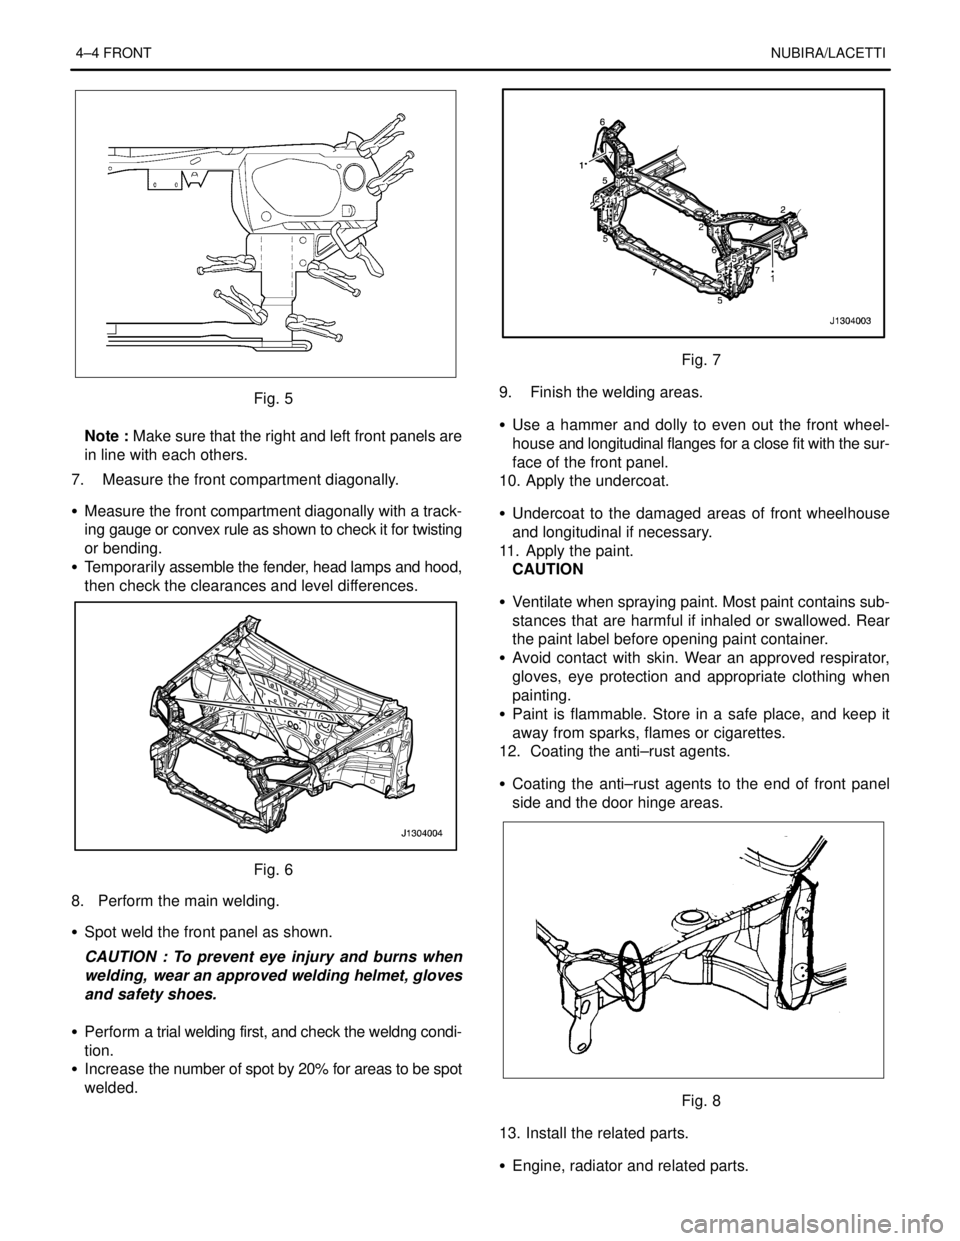
Fig. 5
Note : Make sure that the right and left front panels are
in line with each others.
7. Measure the front compartment diagonally.
S Measure the front compartment diagonally with a track-
ing gauge or convex rule as shown to check it for twisting
or bending.
S Temporarily assemble the fender, head lamps and hood,
then check the clearances and level differences.
Fig. 6
8. Perform the main welding.
S Spot weld the front panel as shown.
CAUTION : To prevent eye injury and burns when
welding, wear an approved welding helmet, gloves
and safety shoes.
S Perform a trial welding first, and check the weldng condi-
tion.
S Increase the number of spot by 20% for areas to be spot
welded.
Fig. 7
9. Finish the welding areas.
S Use a hammer and dolly to even out the front wheel-
house and longitudinal flanges for a close fit with the sur-
face of the front panel.
10. Apply the undercoat.
S Undercoat to the damaged areas of front wheelhouse
and longitudinal if necessary.
11. Apply the paint.
CAUTION
S Ventilate when spraying paint. Most paint contains sub-
stances that are harmful if inhaled or swallowed. Rear
the paint label before opening paint container.
S Avoid contact with skin. Wear an approved respirator,
gloves, eye protection and appropriate clothing when
painting.
S Paint is flammable. Store in a safe place, and keep it
away from sparks, flames or cigarettes.
12. Coating the anti–rust agents.
S Coating the anti–rust agents to the end of front panel
side and the door hinge areas.
Fig. 8
13. Install the related parts.
S Engine, radiator and related parts.
Page 2539 of 2643
NUBIRA/LACETTIFRONT 4–5
S Aircon condenser and related parts.
S Head lamps and fenders.
S Hood, radiator grill, and bumper.
S Others
S Install in the reverse order in which they were removed.
Note : After install the all related parts, rub in grease to
the moving parts and replenish cooling liquid, break oil,
aircon gas and others.
14. Check and adjust
S Check clearances and level differences.
S Check the hood locking and unlocking condition.
S Adjust the head lamp aim.
S Check all operation.
S Check for gas, oil and liquid leaks.
Note : Use specified check sheet for operation check
properly.
Page 2542 of 2643

4–8 FRONTNUBIRA/LACETTI
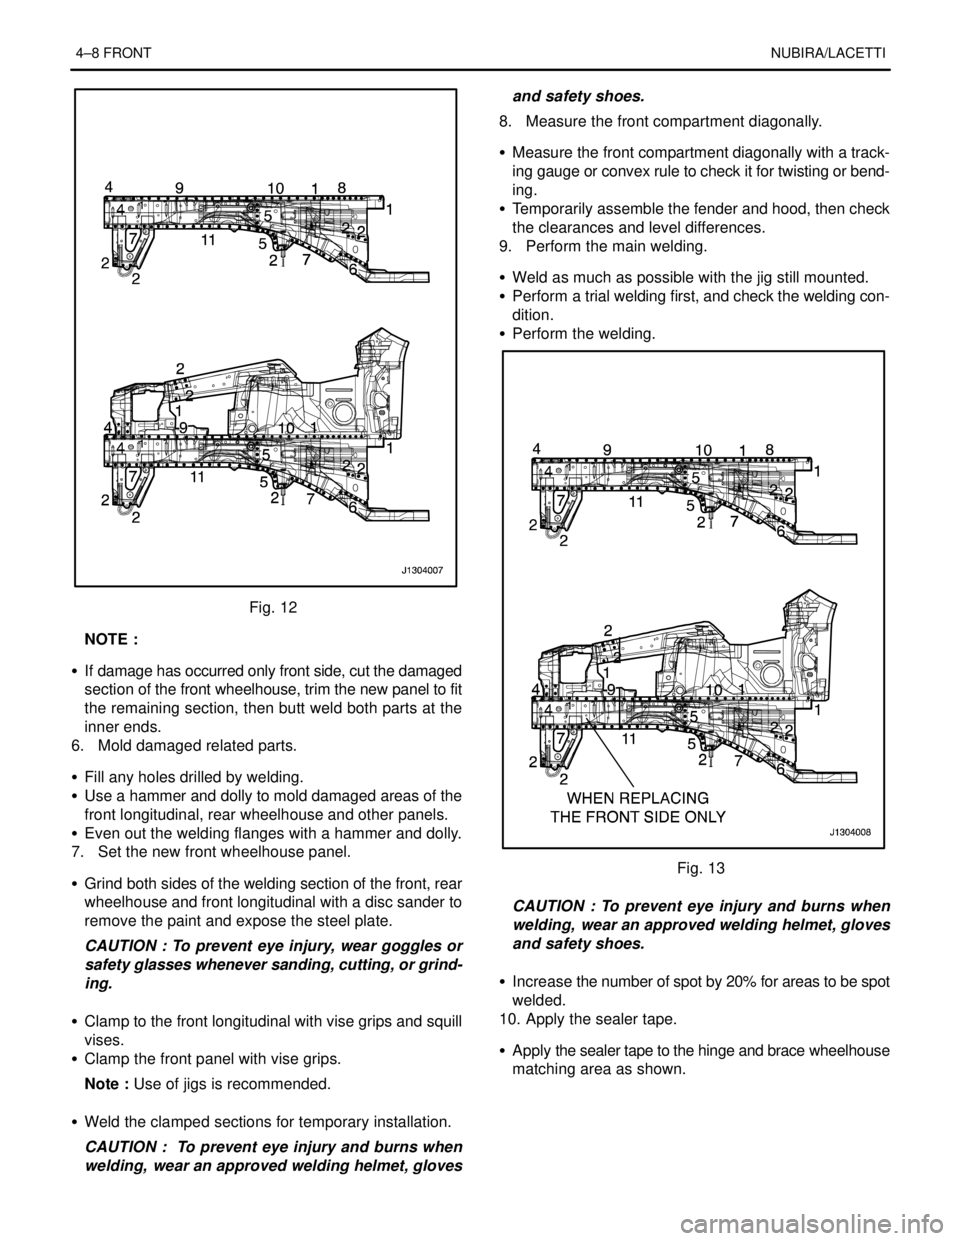
Fig. 12
NOTE :
S If damage has occurred only front side, cut the damaged
section of the front wheelhouse, trim the new panel to fit
the remaining section, then butt weld both parts at the
inner ends.
6. Mold damaged related parts.
S Fill any holes drilled by welding.
S Use a hammer and dolly to mold damaged areas of the
front longitudinal, rear wheelhouse and other panels.
S Even out the welding flanges with a hammer and dolly.
7. Set the new front wheelhouse panel.
S Grind both sides of the welding section of the front, rear
wheelhouse and front longitudinal with a disc sander to
remove the paint and expose the steel plate.
CAUTION : To prevent eye injury, wear goggles or
safety glasses whenever sanding, cutting, or grind-
ing.
S Clamp to the front longitudinal with vise grips and squill
vises.
S Clamp the front panel with vise grips.
Note : Use of jigs is recommended.
S Weld the clamped sections for temporary installation.
CAUTION : To prevent eye injury and burns when
welding, wear an approved welding helmet, glovesand safety shoes.
8. Measure the front compartment diagonally.
S Measure the front compartment diagonally with a track-
ing gauge or convex rule to check it for twisting or bend-
ing.
S Temporarily assemble the fender and hood, then check
the clearances and level differences.
9. Perform the main welding.
S Weld as much as possible with the jig still mounted.
S Perform a trial welding first, and check the welding con-
dition.
S Perform the welding.
Fig. 13
CAUTION : To prevent eye injury and burns when
welding, wear an approved welding helmet, gloves
and safety shoes.
S Increase the number of spot by 20% for areas to be spot
welded.
10. Apply the sealer tape.
S Apply the sealer tape to the hinge and brace wheelhouse
matching area as shown.