2004 DAEWOO LACETTI Section 6
[x] Cancel search: Section 6Page 113 of 2643
1C1 – 70I1.4L/1.6L DOHC ENGINE MECHANICAL
DAEWOO V–121 BL4
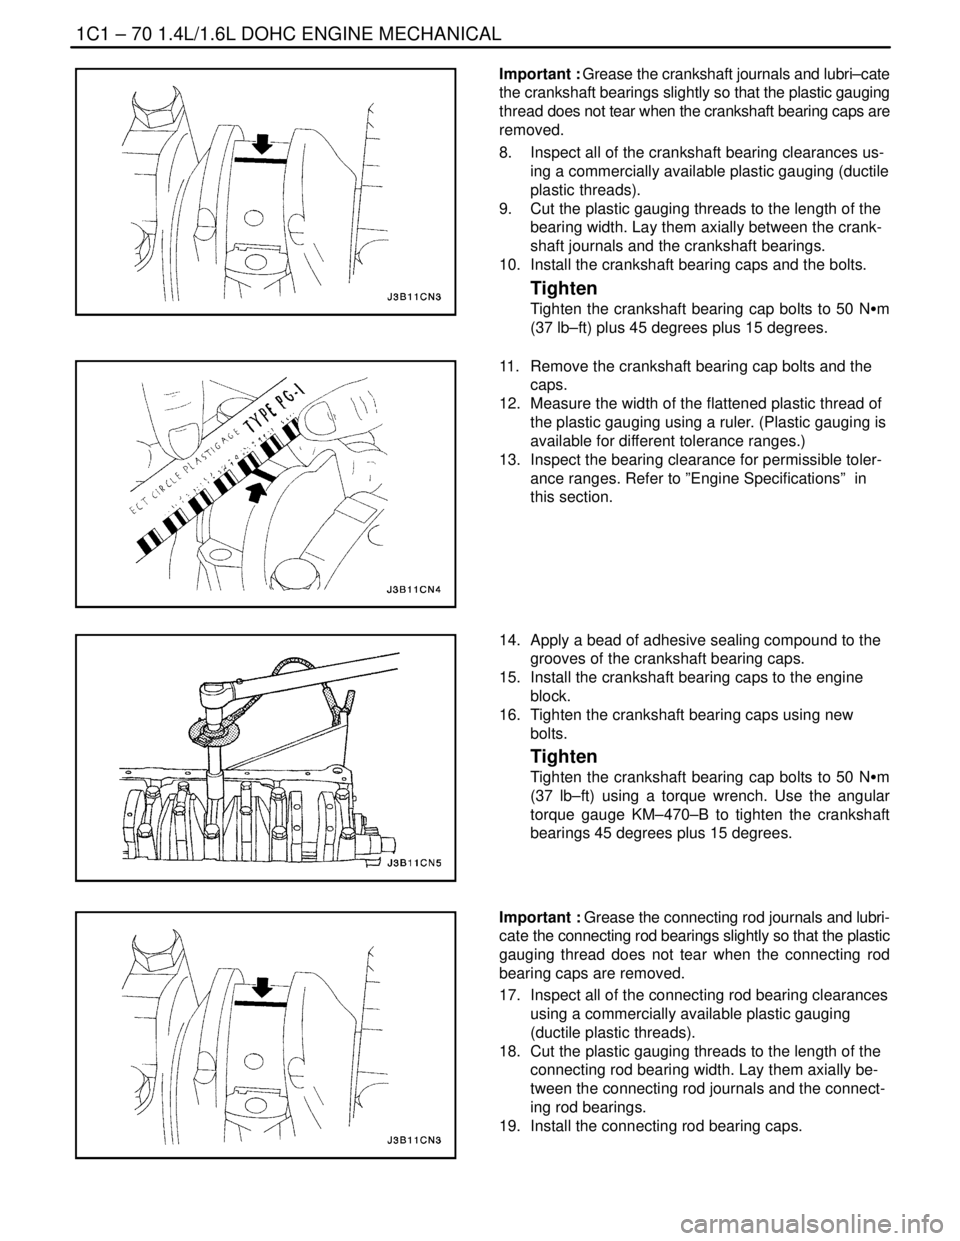
Important : Grease the crankshaft journals and lubri–cate
the crankshaft bearings slightly so that the plastic gauging
thread does not tear when the crankshaft bearing caps are
removed.
8. Inspect all of the crankshaft bearing clearances us-
ing a commercially available plastic gauging (ductile
plastic threads).
9. Cut the plastic gauging threads to the length of the
bearing width. Lay them axially between the crank-
shaft journals and the crankshaft bearings.
10. Install the crankshaft bearing caps and the bolts.
Tighten
Tighten the crankshaft bearing cap bolts to 50 NSm
(37 lb–ft) plus 45 degrees plus 15 degrees.
11. Remove the crankshaft bearing cap bolts and the
caps.
12. Measure the width of the flattened plastic thread of
the plastic gauging using a ruler. (Plastic gauging is
available for different tolerance ranges.)
13. Inspect the bearing clearance for permissible toler-
ance ranges. Refer to ”Engine Specifications” in
this section.
14. Apply a bead of adhesive sealing compound to the
grooves of the crankshaft bearing caps.
15. Install the crankshaft bearing caps to the engine
block.
16. Tighten the crankshaft bearing caps using new
bolts.
Tighten
Tighten the crankshaft bearing cap bolts to 50 NSm
(37 lb–ft) using a torque wrench. Use the angular
torque gauge KM–470–B to tighten the crankshaft
bearings 45 degrees plus 15 degrees.
Important : Grease the connecting rod journals and lubri-
cate the connecting rod bearings slightly so that the plastic
gauging thread does not tear when the connecting rod
bearing caps are removed.
17. Inspect all of the connecting rod bearing clearances
using a commercially available plastic gauging
(ductile plastic threads).
18. Cut the plastic gauging threads to the length of the
connecting rod bearing width. Lay them axially be-
tween the connecting rod journals and the connect-
ing rod bearings.
19. Install the connecting rod bearing caps.
Page 114 of 2643
1.4L/1.6L DOHC ENGINE MECHANICAL 1C1 – 71
DAEWOO V–121 BL4
Tighten
Tighten the connecting rod bearing cap bolts to 25
NSm (18 lb–ft) using a torque wrench. Use the angular
torque gauge KM–470–B to tighten the connecting
rod bearing cap bolts 30 degrees plus 15 degrees.
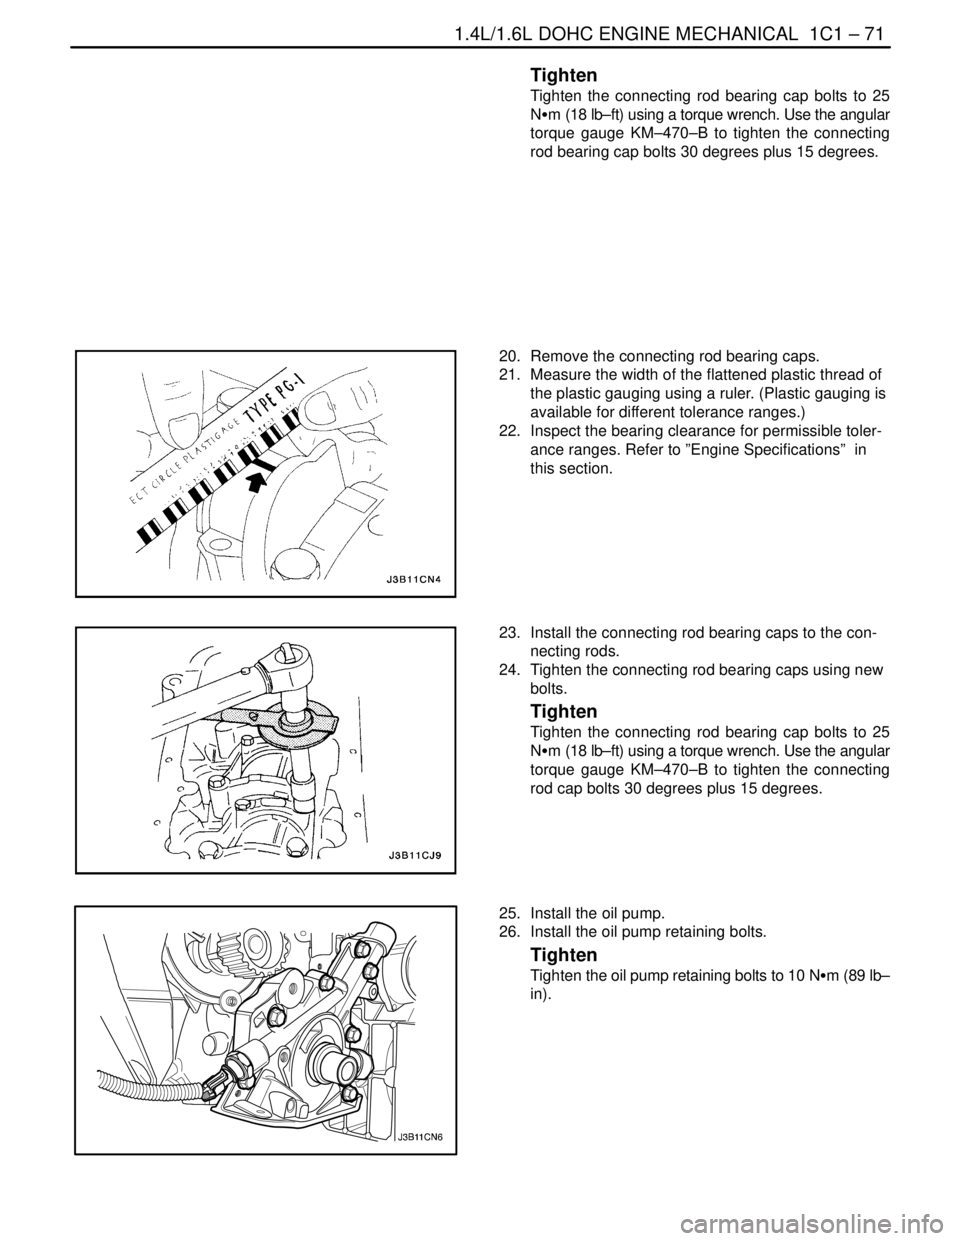
20. Remove the connecting rod bearing caps.
21. Measure the width of the flattened plastic thread of
the plastic gauging using a ruler. (Plastic gauging is
available for different tolerance ranges.)
22. Inspect the bearing clearance for permissible toler-
ance ranges. Refer to ”Engine Specifications” in
this section.
23. Install the connecting rod bearing caps to the con-
necting rods.
24. Tighten the connecting rod bearing caps using new
bolts.
Tighten
Tighten the connecting rod bearing cap bolts to 25
NSm (18 lb–ft) using a torque wrench. Use the angular
torque gauge KM–470–B to tighten the connecting
rod cap bolts 30 degrees plus 15 degrees.
25. Install the oil pump.
26. Install the oil pump retaining bolts.
Tighten
Tighten the oil pump retaining bolts to 10 NSm (89 lb–
in).
Page 116 of 2643
1.4L/1.6L DOHC ENGINE MECHANICAL 1C1 – 73
DAEWOO V–121 BL4
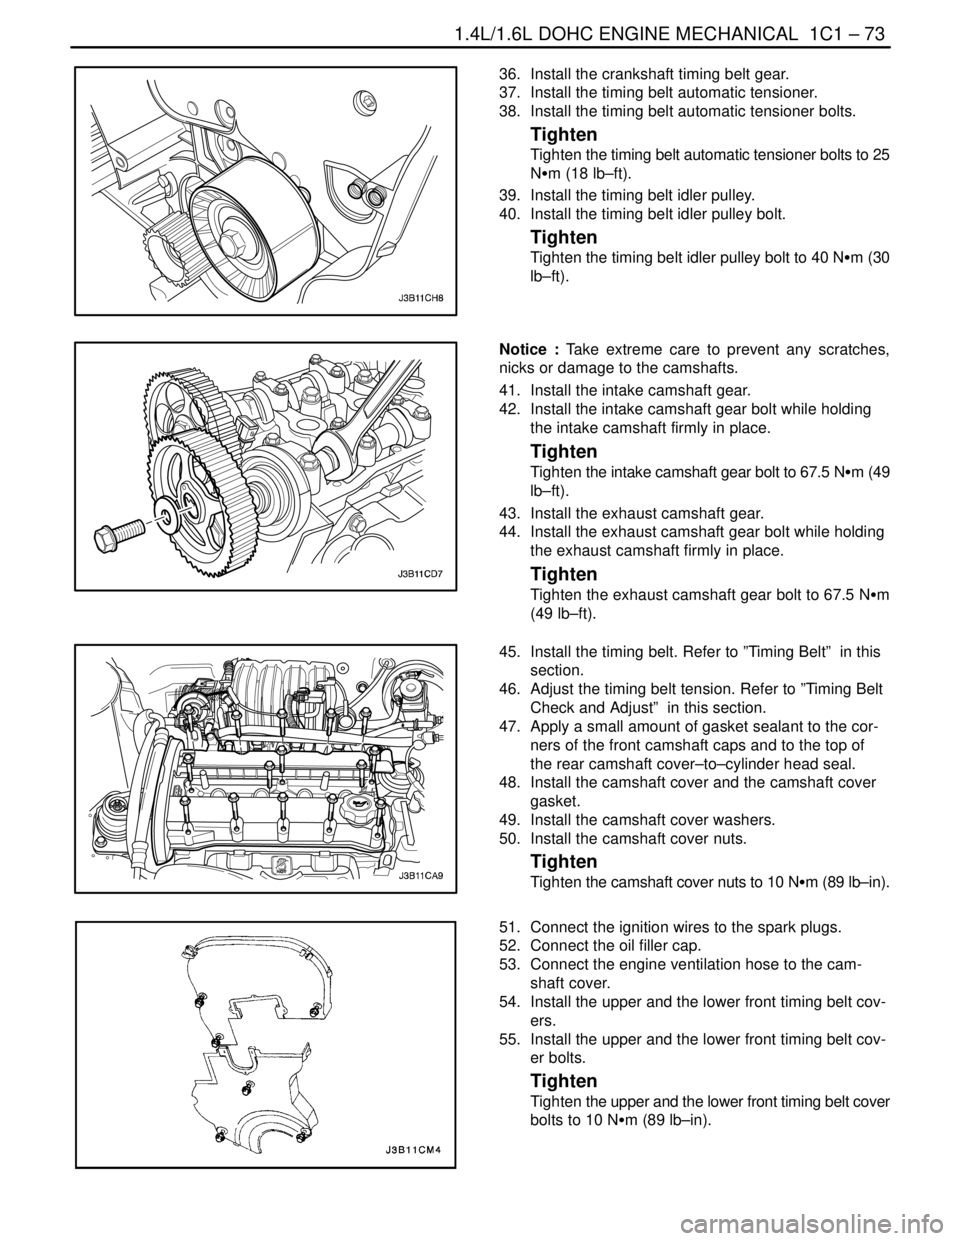
36. Install the crankshaft timing belt gear.
37. Install the timing belt automatic tensioner.
38. Install the timing belt automatic tensioner bolts.
Tighten
Tighten the timing belt automatic tensioner bolts to 25
NSm (18 lb–ft).
39. Install the timing belt idler pulley.
40. Install the timing belt idler pulley bolt.
Tighten
Tighten the timing belt idler pulley bolt to 40 NSm (30
lb–ft).
Notice : Take extreme care to prevent any scratches,
nicks or damage to the camshafts.
41. Install the intake camshaft gear.
42. Install the intake camshaft gear bolt while holding
the intake camshaft firmly in place.
Tighten
Tighten the intake camshaft gear bolt to 67.5 NSm (49
lb–ft).
43. Install the exhaust camshaft gear.
44. Install the exhaust camshaft gear bolt while holding
the exhaust camshaft firmly in place.
Tighten
Tighten the exhaust camshaft gear bolt to 67.5 NSm
(49 lb–ft).
45. Install the timing belt. Refer to ”Timing Belt” in this
section.
46. Adjust the timing belt tension. Refer to ”Timing Belt
Check and Adjust” in this section.
47. Apply a small amount of gasket sealant to the cor-
ners of the front camshaft caps and to the top of
the rear camshaft cover–to–cylinder head seal.
48. Install the camshaft cover and the camshaft cover
gasket.
49. Install the camshaft cover washers.
50. Install the camshaft cover nuts.
Tighten
Tighten the camshaft cover nuts to 10 NSm (89 lb–in).
51. Connect the ignition wires to the spark plugs.
52. Connect the oil filler cap.
53. Connect the engine ventilation hose to the cam-
shaft cover.
54. Install the upper and the lower front timing belt cov-
ers.
55. Install the upper and the lower front timing belt cov-
er bolts.
Tighten
Tighten the upper and the lower front timing belt cover
bolts to 10 NSm (89 lb–in).
Page 117 of 2643
1C1 – 74I1.4L/1.6L DOHC ENGINE MECHANICAL
DAEWOO V–121 BL4
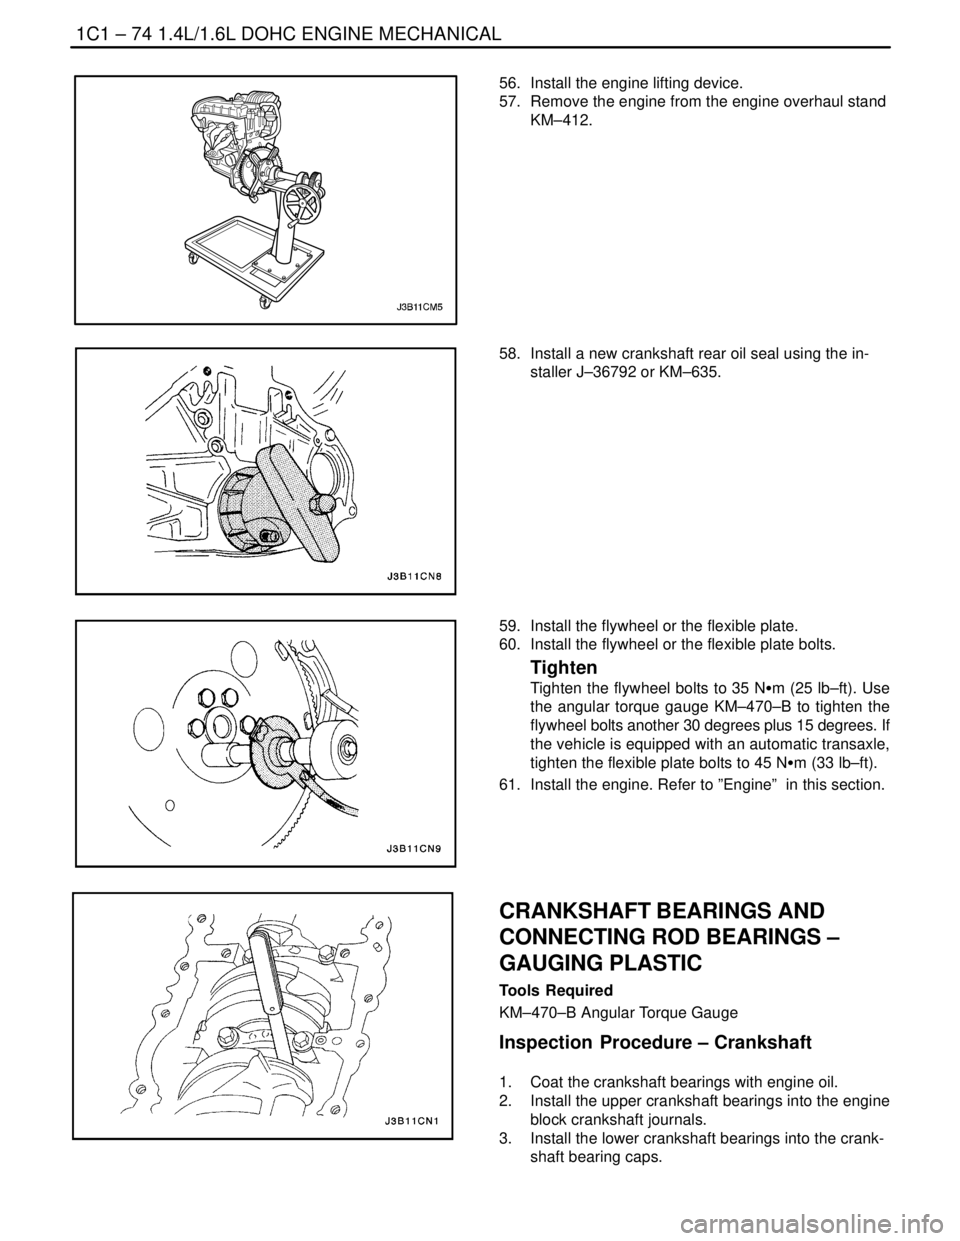
56. Install the engine lifting device.
57. Remove the engine from the engine overhaul stand
KM–412.
58. Install a new crankshaft rear oil seal using the in-
staller J–36792 or KM–635.
59. Install the flywheel or the flexible plate.
60. Install the flywheel or the flexible plate bolts.
Tighten
Tighten the flywheel bolts to 35 NSm (25 lb–ft). Use
the angular torque gauge KM–470–B to tighten the
flywheel bolts another 30 degrees plus 15 degrees. If
the vehicle is equipped with an automatic transaxle,
tighten the flexible plate bolts to 45 NSm (33 lb–ft).
61. Install the engine. Refer to ”Engine” in this section.
CRANKSHAFT BEARINGS AND
CONNECTING ROD BEARINGS –
GAUGING PLASTIC
Tools Required
KM–470–B Angular Torque Gauge
Inspection Procedure – Crankshaft
1. Coat the crankshaft bearings with engine oil.
2. Install the upper crankshaft bearings into the engine
block crankshaft journals.
3. Install the lower crankshaft bearings into the crank-
shaft bearing caps.
Page 118 of 2643
1.4L/1.6L DOHC ENGINE MECHANICAL 1C1 – 75
DAEWOO V–121 BL4
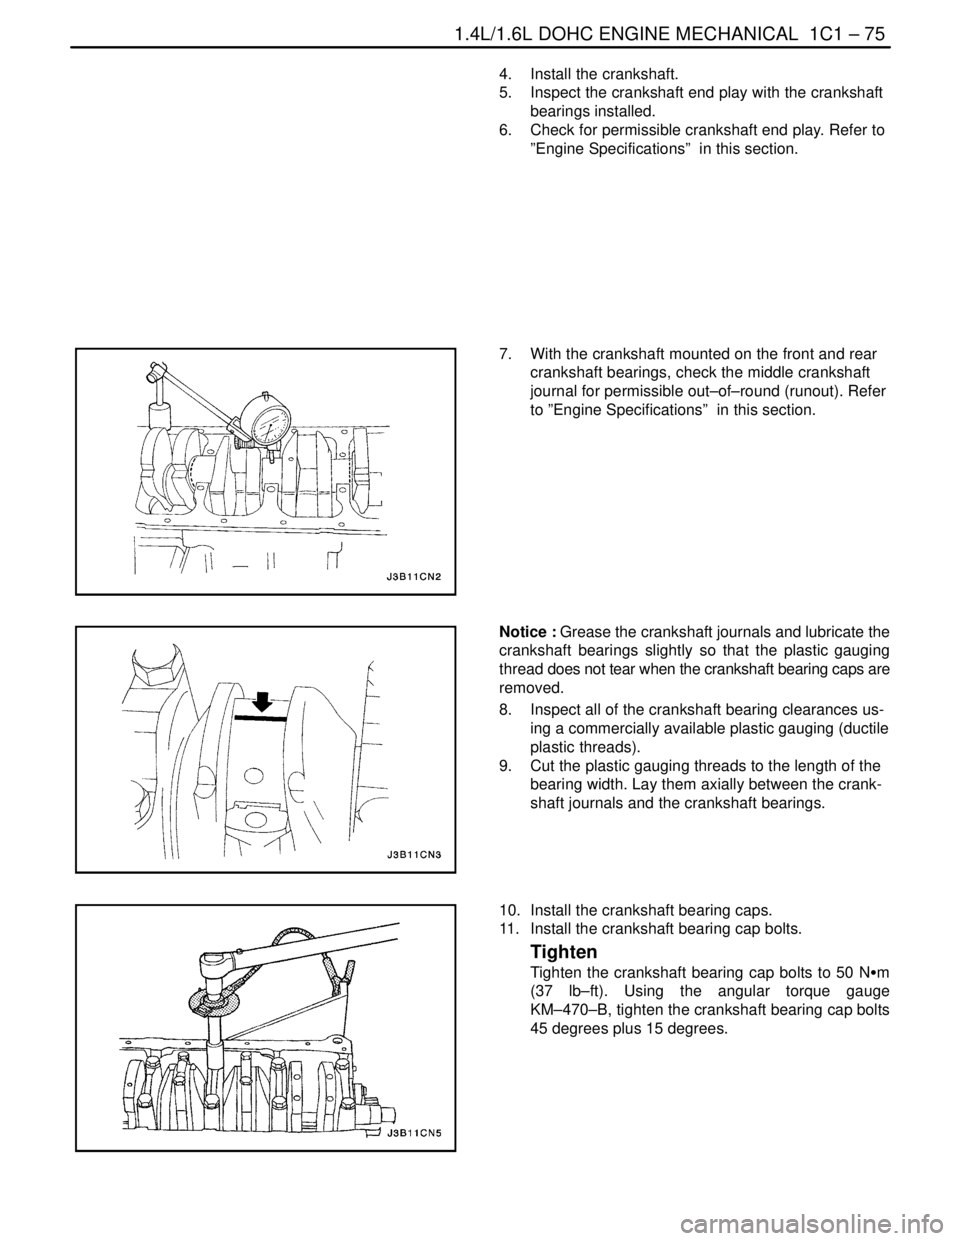
4. Install the crankshaft.
5. Inspect the crankshaft end play with the crankshaft
bearings installed.
6. Check for permissible crankshaft end play. Refer to
”Engine Specifications” in this section.
7. With the crankshaft mounted on the front and rear
crankshaft bearings, check the middle crankshaft
journal for permissible out–of–round (runout). Refer
to ”Engine Specifications” in this section.
Notice : Grease the crankshaft journals and lubricate the
crankshaft bearings slightly so that the plastic gauging
thread does not tear when the crankshaft bearing caps are
removed.
8. Inspect all of the crankshaft bearing clearances us-
ing a commercially available plastic gauging (ductile
plastic threads).
9. Cut the plastic gauging threads to the length of the
bearing width. Lay them axially between the crank-
shaft journals and the crankshaft bearings.
10. Install the crankshaft bearing caps.
11. Install the crankshaft bearing cap bolts.
Tighten
Tighten the crankshaft bearing cap bolts to 50 NSm
(37 lb–ft). Using the angular torque gauge
KM–470–B, tighten the crankshaft bearing cap bolts
45 degrees plus 15 degrees.
Page 119 of 2643
1C1 – 76I1.4L/1.6L DOHC ENGINE MECHANICAL
DAEWOO V–121 BL4
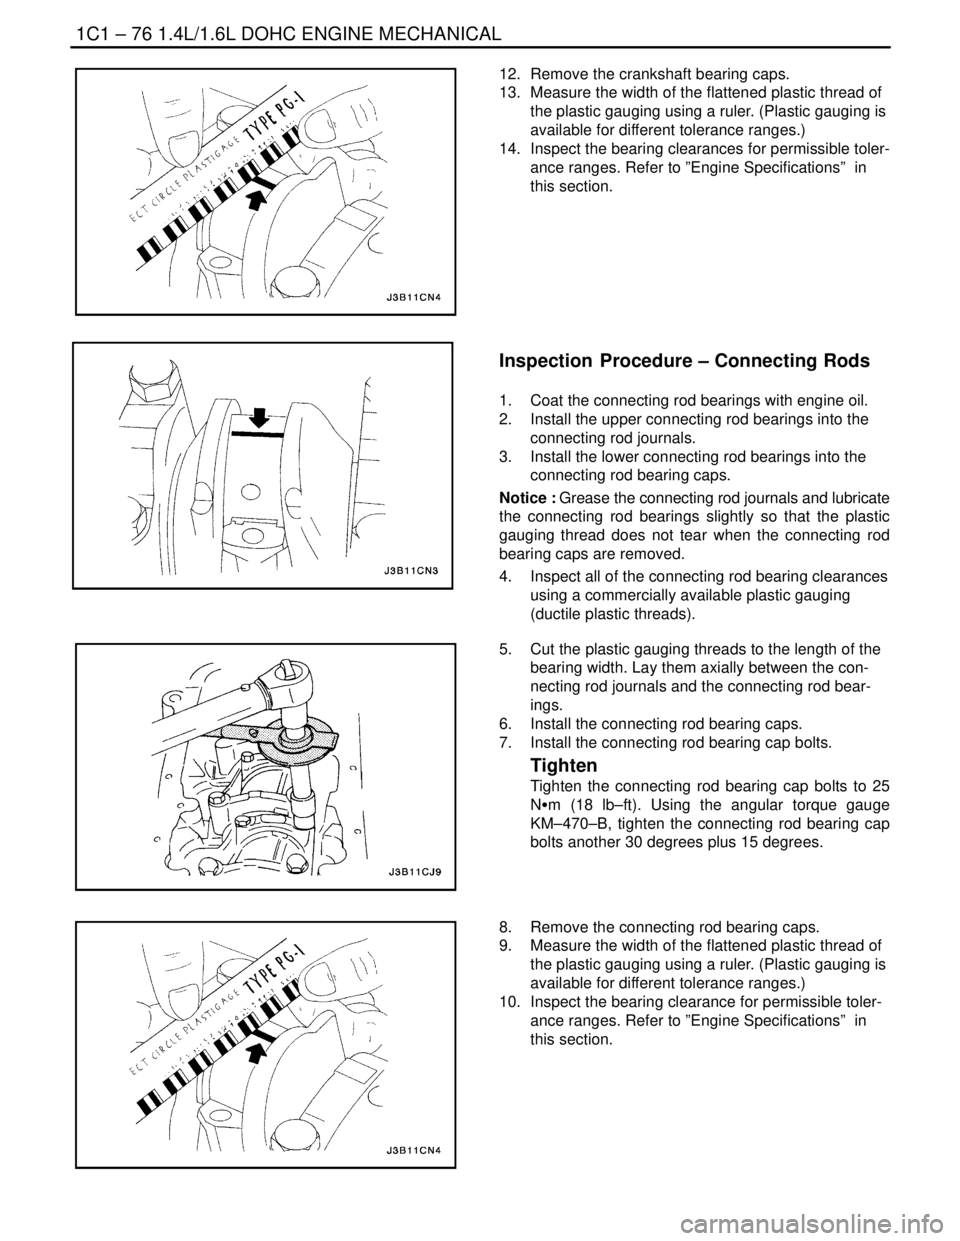
12. Remove the crankshaft bearing caps.
13. Measure the width of the flattened plastic thread of
the plastic gauging using a ruler. (Plastic gauging is
available for different tolerance ranges.)
14. Inspect the bearing clearances for permissible toler-
ance ranges. Refer to ”Engine Specifications” in
this section.
Inspection Procedure – Connecting Rods
1. Coat the connecting rod bearings with engine oil.
2. Install the upper connecting rod bearings into the
connecting rod journals.
3. Install the lower connecting rod bearings into the
connecting rod bearing caps.
Notice : Grease the connecting rod journals and lubricate
the connecting rod bearings slightly so that the plastic
gauging thread does not tear when the connecting rod
bearing caps are removed.
4. Inspect all of the connecting rod bearing clearances
using a commercially available plastic gauging
(ductile plastic threads).
5. Cut the plastic gauging threads to the length of the
bearing width. Lay them axially between the con-
necting rod journals and the connecting rod bear-
ings.
6. Install the connecting rod bearing caps.
7. Install the connecting rod bearing cap bolts.
Tighten
Tighten the connecting rod bearing cap bolts to 25
NSm (18 lb–ft). Using the angular torque gauge
KM–470–B, tighten the connecting rod bearing cap
bolts another 30 degrees plus 15 degrees.
8. Remove the connecting rod bearing caps.
9. Measure the width of the flattened plastic thread of
the plastic gauging using a ruler. (Plastic gauging is
available for different tolerance ranges.)
10. Inspect the bearing clearance for permissible toler-
ance ranges. Refer to ”Engine Specifications” in
this section.
Page 121 of 2643
SECTION : 1C2
1.8L DOHC ENGINE MECHANICAL
CAUTION : Disconnect the negative battery cable before removing or installing any electrical unit or when a tool
or equipment could easily come in contact with exposed electrical terminals. Disconnecting this cable will help
prevent personal injury and damage to the vehicle. The ignition must also be in LOCK unless otherwise noted.
TABLE OF CONTENTS
SPECIFICATIONS1C2–2 . . . . . . . . . . . . . . . . . . . . . . . . .
Engine Specifications 1C2–2. . . . . . . . . . . . . . . . . . . . .
Fastener Tightening Specifcations 1C2–4. . . . . . . . . .
SPECIAL TOOLS1C2–6 . . . . . . . . . . . . . . . . . . . . . . . . . .
Special Tools Table 1C2–6. . . . . . . . . . . . . . . . . . . . . . .
COMPONENT LOCATOR1C2–8 . . . . . . . . . . . . . . . . . . .
Upper End 1C2–8. . . . . . . . . . . . . . . . . . . . . . . . . . . . . . .
Lower End 1C2–10. . . . . . . . . . . . . . . . . . . . . . . . . . . . . .
MAINTENANCE AND REPAIR1C2–12 . . . . . . . . . . . . .
ON–VEHICLE SERVICE 1C2–12. . . . . . . . . . . . . . . . . . .
Camshaft Cover 1C2–12. . . . . . . . . . . . . . . . . . . . . . . . .
Cylinder Head and Gasket 1C2–13. . . . . . . . . . . . . . . .
Camshafts 1C2–22. . . . . . . . . . . . . . . . . . . . . . . . . . . . . .
Timing Belt Check and Adjust 1C2–24. . . . . . . . . . . . .
Timing Belt 1C2–28. . . . . . . . . . . . . . . . . . . . . . . . . . . . .
Oil Pan 1C2–32. . . . . . . . . . . . . . . . . . . . . . . . . . . . . . . . .
Oil Pump 1C2–33. . . . . . . . . . . . . . . . . . . . . . . . . . . . . . .
Engine Mount 1C2–37. . . . . . . . . . . . . . . . . . . . . . . . . . .
Intake Manifold 1C2–38. . . . . . . . . . . . . . . . . . . . . . . . . . Exhaust Manifold 1C2–41. . . . . . . . . . . . . . . . . . . . . . . .
Camshaft Gears 1C2–43. . . . . . . . . . . . . . . . . . . . . . . . .
Rear Timing Belt Cover 1C2–44. . . . . . . . . . . . . . . . . . .
Engine 1C2–46. . . . . . . . . . . . . . . . . . . . . . . . . . . . . . . . .
Pistions and Rods 1C2–51. . . . . . . . . . . . . . . . . . . . . . .
UNIT REPAIR 1C2–56. . . . . . . . . . . . . . . . . . . . . . . . . . . .
Cylinder Head and Valve Train Components 1C2–56.
Crankshaft 1C2–63. . . . . . . . . . . . . . . . . . . . . . . . . . . . . .
Crankshaft Bearing and Connecting Rod
Beadings – Gauging Plastics 1C2–72. . . . . . . . . . . .
GENERAL DESCRIPTION AND SYSTEM
OPERATION1C2–75 . . . . . . . . . . . . . . . . . . . . . . . . . . . .
Cylinder Head and Gasket 1C2–75. . . . . . . . . . . . . . . .
Crankshaft 1C2–75. . . . . . . . . . . . . . . . . . . . . . . . . . . . . .
Timing Belt 1C2–75. . . . . . . . . . . . . . . . . . . . . . . . . . . . .
Oil Pump 1C2–75. . . . . . . . . . . . . . . . . . . . . . . . . . . . . . .
Oil Pan 1C2–75. . . . . . . . . . . . . . . . . . . . . . . . . . . . . . . . .
Exhaust Manifold 1C2–75. . . . . . . . . . . . . . . . . . . . . . . .
Intake Manifold 1C2–75. . . . . . . . . . . . . . . . . . . . . . . . . .
Camshaft 1C2–75. . . . . . . . . . . . . . . . . . . . . . . . . . . . . . .
Page 133 of 2643
1.8L DOHC ENGINE MECHANICAL 1C2 – 13
DAEWOO V–121 BL4
Installation Procedure
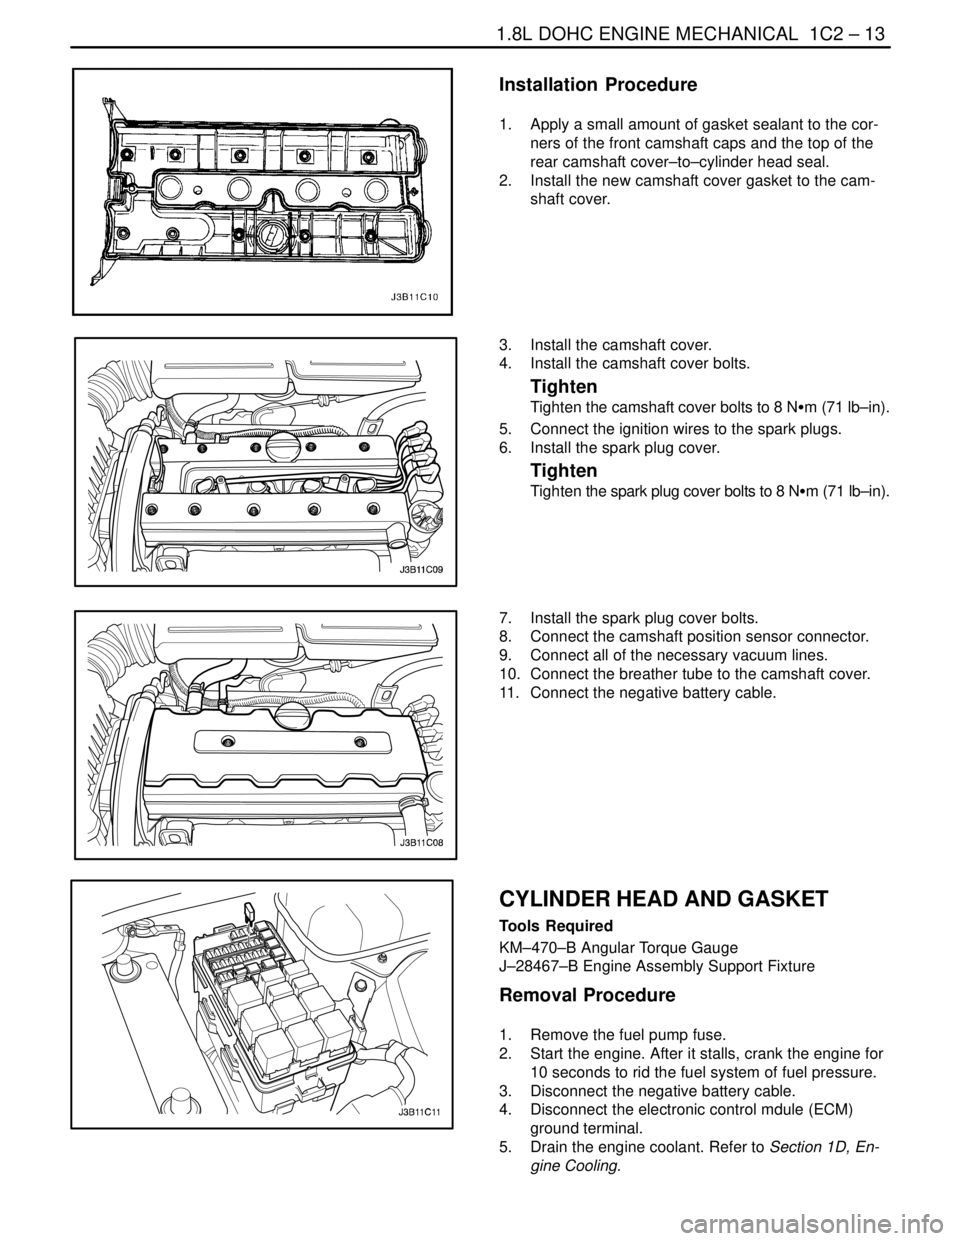
1. Apply a small amount of gasket sealant to the cor-
ners of the front camshaft caps and the top of the
rear camshaft cover–to–cylinder head seal.
2. Install the new camshaft cover gasket to the cam-
shaft cover.
3. Install the camshaft cover.
4. Install the camshaft cover bolts.
Tighten
Tighten the camshaft cover bolts to 8 NSm (71 lb–in).
5. Connect the ignition wires to the spark plugs.
6. Install the spark plug cover.
Tighten
Tighten the spark plug cover bolts to 8 NSm (71 lb–in).
7. Install the spark plug cover bolts.
8. Connect the camshaft position sensor connector.
9. Connect all of the necessary vacuum lines.
10. Connect the breather tube to the camshaft cover.
11. Connect the negative battery cable.
CYLINDER HEAD AND GASKET
Tools Required
KM–470–B Angular Torque Gauge
J–28467–B Engine Assembly Support Fixture
Removal Procedure
1. Remove the fuel pump fuse.
2. Start the engine. After it stalls, crank the engine for
10 seconds to rid the fuel system of fuel pressure.
3. Disconnect the negative battery cable.
4. Disconnect the electronic control mdule (ECM)
ground terminal.
5. Drain the engine coolant. Refer to Section 1D, En-
gine Cooling.