Page 1674 of 2643

5A2 – 84IAISIN AUTOMATIC TRANSAXLE
DAEWOO V–121 BL4
StepNo Yes Value(s) Action
61. Replace the master TCM.
2. Perform the reproducing test under user condi-
tion after confirming no DTC.
Is DTC displayed?–Repair the tem-
porary connec-
tion failure of
connector (Re-
fer to ”Wiring
Harness and
Connector In-
spection” in this
section.)Replace the
TCM
71. Estimate the failure of the vehicle wiring har-
ness or between connectors.
2. Inspect continuity and short circuit for the ve-
hicle wiring harness and inspect the connection
condition between connectors (C–3). Refer to
”Wiring Harness and Connector Inspection” in
this section.
Is the condition OK?–Repair the tem-
porary connec-
tion failure of
connectorReplace the ve-
hicle harness
or adjustment
between con-
nectors
81. Estimate the failure of T/M wire or between
connectors of SS2.
2. Inspect the SS2. Refer to ”Unit Inspection” in
this section.
Is the problem found?–Replace the
SS2 solenoidGo to Step 9
91. Estimate the failure of T/M wire.
3. Inspect continuity and short circuit for the T/M
wire and inspect the connection condition be-
tween connectors (C–6). Refer to ”Wiring Har-
ness and Connector Inspection” in this section.
Is the condition OK?–Repair the tem-
porary connec-
tion failure of
connectorReplace the
T/M wire or ad-
justment be-
tween connec-
tors
Page 1676 of 2643

5A2 – 86IAISIN AUTOMATIC TRANSAXLE
DAEWOO V–121 BL4
DTC P0785 Timing Solenoid (ST) Electrical
StepActionValue(s)YesNo
11. Turn the ignition OFF.
2. Install the Scan tool.
3. With the engine OFF, turn the ignition switch to
the ON position.
4. Select Store Freeze Frame/Failure Records
from the Diagnostic Trouble Codes Information
menu.
5. Store Freeze Frame/Failure Records.
6. Select Clear DTC Information from the Diag-
nostic Trouble Codes Information menu.
7. Clear DTC Information.
8. Perform one vehicle drive cycle.
Is the Malfunction Indicator Lamp (MIL) ON?–Go to Step 2Repair the tem-
porary connec-
tion failure of
connector (Re-
fer to ”Wiring
Harness and
Connector In-
spection” in this
section.)
21. Select Request DTC by Status from the Diag-
nostic Trouble Codes Information menu.
2. Request DTC by Status.
Is DTC P0785 displayed?–Go to Step 3Repair the tem-
porary connec-
tion failure of
connector (Re-
fer to ”Wiring
Harness and
Connector In-
spection” in this
section.)
31. Turn the ignition OFF.
2. Inspect the resistance between the vehicle har-
ness and Timing Solenoid (ST). Refer to ”Unit
Inspection” in this section.
3. Disconnect the TCM connector (X–1) and in-
spect the resistance between the terminal A24
and A23.
Is the measurement within the specified value?20°C (68°F)
11–16 WGo to Step 4Go to Step 5
41. Estimate the failure of between the vehicle wir-
ing harness connector and TCM.
2. Inspect the connector. Refer to ”Wiring Har-
ness and Connector Inspection” in this section.
3. Inspect the connection condition between the
connectors (C–1).
Is the connection condition OK?–Go to Step 6Repair the wir-
ing harness
connectors.
51. Estimate the failure of between the vehicle har-
ness and ST.
2. Disconnect the connector (X–3) of T/M wire
and inspect the resistance between ST con-
nector terminal 2 and ground.
Is the measurement within the specified value?20°C (68°F)
11–16 WGo to Step 7Go to Step 8
61. Replace the master TCM.
2. Perform the reproducing test under user condi-
tion after confirming no DTC.
Is DTC displayed?–Repair the tem-
porary connec-
tion failure of
connector (Re-
fer to ”Wiring
Harness and
Connector In-
spection” in this
section.)Replace the
TCM
Page 1677 of 2643

AISIN AUTOMATIC TRANSAXLE 5A2 – 87
DAEWOO V–121 BL4
StepNo Yes Value(s) Action
71. Estimate the failure of the vehicle wiring har-
ness or between connectors.
2. Inspect continuity and short circuit for the ve-
hicle wiring harness and inspect the connection
condition between connectors (C–3). Refer to
”Wiring Harness and Connector Inspection” in
this section.
Is the condition OK?–Repair the tem-
porary connec-
tion failure of
connectorReplace the ve-
hicle harness
or adjustment
between con-
nectors
81. Estimate the failure of T/M wire or between
connectors of ST.
2. Inspect the ST. Refer to ”Unit Inspection” in
this section.
Is the problem found?–Replace the STGo to Step 9
91. Estimate the failure of T/M wire.
Inspect continuity and short circuit for the T/M wire
and inspect the connection condition between con-
nectors (C–6). Refer to ”Wiring Harness and Con-
nector Inspection” in this section.
Is the condition OK?–Repair the tem-
porary connec-
tion failure of
connectorReplace the
T/M wire or ad-
justment be-
tween connec-
tors
Page 1679 of 2643

AISIN AUTOMATIC TRANSAXLE 5A2 – 89
DAEWOO V–121 BL4
DTC P1781 Engine Torque Signal Error
StepActionValue(s)YesNo
11. Turn the ignition OFF.
2. Install the Scan tool.
3. With the engine OFF, turn the ignition switch to
the ON position.
4. Select Store Freeze Frame/Failure Records
from the Diagnostic Trouble Codes Information
menu.
5. Store Freeze Frame/Failure Records.
6. Select Clear DTC Information from the Diag-
nostic Trouble Codes Information menu.
7. Clear DTC Information.
8. Perform one vehicle drive cycles.
Is the Malfunction Indicator Lamp (MIL) ON?–Go to Step 2Repair the tem-
porary connec-
tion failure of
connector.
21. Select Request DTC by Status from the Diag-
nostic Trouble Codes Information menu.
2. Request DTC by Status.
Is DTC P1781 displayed?–Go to Step 3Repair the tem-
porary connec-
tion failure of
connector.
31. Turn the ignition OFF.
2. Disconnect the TCM wiring connector and
ECM wiring connector.
3. Measure the resistance between terminal A17
of the TCM wiring connector and terminal 88 of
the ECM wiring connector.
4. Measure the resistance between terminal A7 of
the TCM wiring connector and terminal 57 of
the ECM wiring connector.
Is the resistance within the values shown?0 WGo to Step 5Go to Step 4
4Repair the malfunctioning terminals as necessary.
Is the action complete?–System OK–
51. Turn the ignition ON.
2. Measure the voltage of terminal A17.
3. Measure the voltage of terminal A7.
Is the voltage within the values shown?11–14 vGo to Step 6Go to Step 7
6Repair the malfunctioning terminals as necessary.
Is the action complete?–System OK–
71. Inspect the ”Engine Speed”. Refer to Section
1F, Diagnosis.
Was a problem found?–Refer to Sec-
tion 1F, Diagno-
sis.Go to Step 8
81. Replace the TCM.
2. Turn the ignition OFF.
3. Turn the ignition ON.
4. Check if P1781 DTC is set.
Is the DTC set?–Go to Step 9Go to Step 10
Page 1687 of 2643

AISIN AUTOMATIC TRANSAXLE 5A2 – 97
DAEWOO V–121 BL4
MAINTENANCE AND REPAIR
ON–VEHICLE SERVICE
TRANSAXLE FLUID LEVEL
CHECKING PROCEDURE
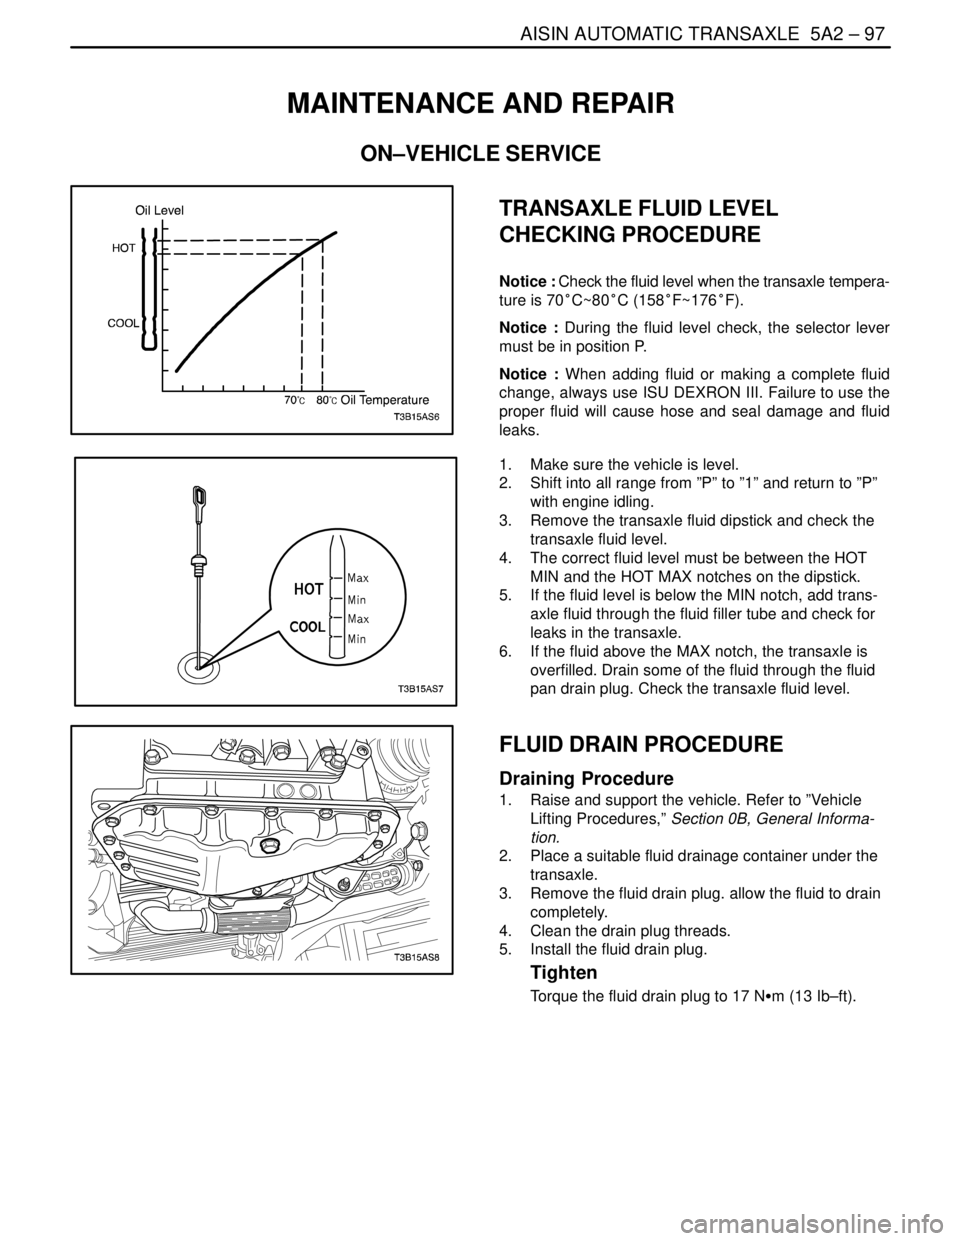
Notice : Check the fluid level when the transaxle tempera-
ture is 70°C~80°C (158°F~176°F).
Notice : During the fluid level check, the selector lever
must be in position P.
Notice : When adding fluid or making a complete fluid
change, always use ISU DEXRON III. Failure to use the
proper fluid will cause hose and seal damage and fluid
leaks.
1. Make sure the vehicle is level.
2. Shift into all range from ”P” to ”1” and return to ”P”
with engine idling.
3. Remove the transaxle fluid dipstick and check the
transaxle fluid level.
4. The correct fluid level must be between the HOT
MIN and the HOT MAX notches on the dipstick.
5. If the fluid level is below the MIN notch, add trans-
axle fluid through the fluid filler tube and check for
leaks in the transaxle.
6. If the fluid above the MAX notch, the transaxle is
overfilled. Drain some of the fluid through the fluid
pan drain plug. Check the transaxle fluid level.
FLUID DRAIN PROCEDURE
Draining Procedure
1. Raise and support the vehicle. Refer to ”Vehicle
Lifting Procedures,” Section 0B, General Informa-
tion.
2. Place a suitable fluid drainage container under the
transaxle.
3. Remove the fluid drain plug. allow the fluid to drain
completely.
4. Clean the drain plug threads.
5. Install the fluid drain plug.
Tighten
Torque the fluid drain plug to 17 NSm (13 Ib–ft).
Page 1688 of 2643

5A2 – 98IAISIN AUTOMATIC TRANSAXLE
DAEWOO V–121 BL4
Filling Procedure
1. Remove the drainage container and lower the ve-
hicle.
2. Add three–fourths of the recommended amount of
ISU DEXRON III.
3. Start the engine and allow it to reach normal oper-
ating temperature.
4. Shift the gear selector through all positions.
5. Check the fluid level and add fluid until the dipstick
indicates a safe level.
LOCATING FLUID LEAKS
General Method
1. Verify that the material leaking is transaxle fluid.
2. Thoroughly clean the suspected leak area.
3. Allow the transaxle to reach the normal operating
temperature of 176–194°F (80–90°C).
4. Park the vehicle over a clean paper or a clean card-
board.
5. Turn the engine OFF and look for fluid spots on the
paper.
6. Make the necessary repairs to correct that leak.
Powder Method
1. Thoroughly clean the suspected leak area.
2. Apply an aerosol type powder, such as foot powder,
to the suspected leak area.
3. Allow the transaxle to reach the normal operating
temperature of 176–194°F (80–90°C).
4. Turn the engine OFF.
5. Inspect the suspected leak area and trace the leak
path through the powder to find the source of the
leak.
6. Make the necessary repairs to correct the leak.
Once the leak point is found, the source of the leak must
be determined and repaired.
CASE PORSITY REPAIR
1. Determine the leak area. Refer to ”Locating Fluid
Leaks” in this section.
2. Clean the leak area with the solvent. Air dry.
CAUTION : Epoxy cement may cause skin irritations
and eye damage. Read and follow all information on
the container label as provided by the manufacturer.
3. Mix a sufficient amount of epoxy cement following
the manufacturer’s recommendations.
4. While the transaxle case is hot, apply epoxy ce-
ment with a clean, dry soldering acid brush.
5. Allow the epoxy cement to dry for 3 hours before
starting the engine.
Page 1689 of 2643

AISIN AUTOMATIC TRANSAXLE 5A2 – 99
DAEWOO V–121 BL4
FLUID COOLER FLUSHING
Flushing Procedure
1. Drain the fluid from the transaxle and refill the
transaxle with new transaxle fluid. Refer to ”Fluid
Drain Procedure” in this section.
2. Let the engine idle for 5 minutes.
3. Drain the fluid from the transaxle and refill the
transaxle with new transaxle fluid. Refer to ”Fluid
Drain Procedure” in this section.
CONTROL CABLE ADJUSTMENT
Adjustment Procedure
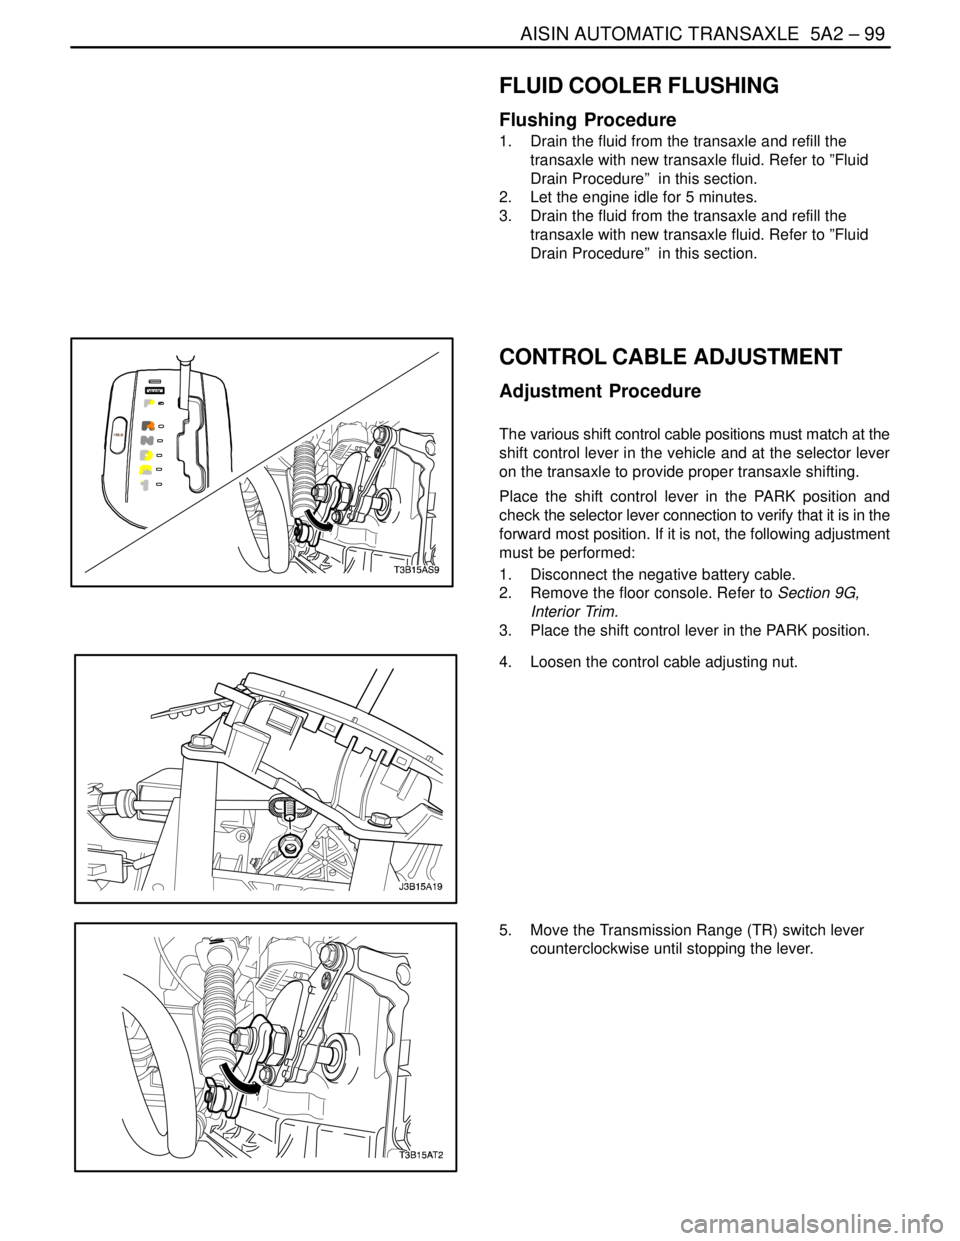
The various shift control cable positions must match at the
shift control lever in the vehicle and at the selector lever
on the transaxle to provide proper transaxle shifting.
Place the shift control lever in the PARK position and
check the selector lever connection to verify that it is in the
forward most position. If it is not, the following adjustment
must be performed:
1. Disconnect the negative battery cable.
2. Remove the floor console. Refer to Section 9G,
Interior Trim.
3. Place the shift control lever in the PARK position.
4. Loosen the control cable adjusting nut.
5. Move the Transmission Range (TR) switch lever
counterclockwise until stopping the lever.
Page 1690 of 2643
5A2 – 100IAISIN AUTOMATIC TRANSAXLE
DAEWOO V–121 BL4
6. Pull the shift control cable until it is tight and tighten
the control cable adjusting nut.
Tighten
Tighten the control cable adjusting nut to 8 NSm (71
Ib–in).
7. Install the floor console. Refer to Section 9G, Interi-
or Trim.
8. Connect the negative battery cable.
SHIFT CONTROL LEVER ASSEMBLY
Removal Procedure
1. Disconnect the negative battery cable.
2. Remove the floor console. Refer to Section 9G,
Interior Trim.
3. Disconnect the wiring harness connectors from the
shift control lever.
4. Loosen the control cable adjusting nut.
5. Disconnect the control cable from the shift control
lever assembly.
6. Remove the shift control lever assembly mounting
bolts and nuts.
7. Remove the shift control lever assembly.