2004 DAEWOO LACETTI tire pressure
[x] Cancel search: tire pressurePage 967 of 2643
TIRES AND WHEELS 2E – 5
DAEWOO V–121 BL4
UNIT REPAIR
ALLOY WHEEL POROSITY
Wheel repairs that use welding, heating or peening are not
approved.
1. Raise and suitably support the vehicle.
2. Remove the wheel. Refer to ”Wheel” in this sec-
tion.
CAUTION : To avoid serious injury, do not stand over
the tire when inflating, because the bead may break
when it snaps over the safety hump. Do not exceed
275 kPa (40 psi) of air pressure in any tire if the beads
are not seated. If 275 kPa (40 psi) of air pressure will
not seat the beads, deflate the tire. Relubricate the
beads. Reinflate the tire. Overinflation may cause the
bead to break and cause serious injury.
3. Locate leaking areas by inflating the tire to 345 kPa
(50 psi) and dipping the tire and wheel assembly
into a water bath.
4. Mark the leak areas and remove the tire from the
wheel.
5. Scuff the inside wheel surface at the leak area with
80–grit sandpaper. Clean the leak area with a gen-
eral–purpose cleaner.
6. Apply a 3.3 mm (0.13 inch) thick layer of adhesive/
sealant to the leak area. Allow it to dry for 12 hours.
7. Install the tire on the wheel. Inflate the tire to 345
kPa (50 psi) and check for leaks as in step 3.
8. Adjust the tire pressure to meet specifications. Re-
fer to ”Tire Size and Pressure Specifications” in
this section.
9. Balance the wheel. Refer to ”Tire and Wheel Bal-
ancing” in this section.
10. Install the wheel. Refer to ”Wheel” in this section.
11. Lower the vehicle.
ALLOY WHEEL REFINISHING
A protective clear or color coating is applied to the surface
of the original equipment cast alloy wheels. Surface deg-
radation can develop if this clear coating is damaged or re-
moved. This can happen at some automatic car wash fa-
cilities that use silicon carbide–tipped tire brushes to clean
white walls and tires. Once the protective coating is dam-
aged, exposure to caustic cleaners or road salt causes fur-
ther surface degradation. The following procedure details
how to strip, clean and recoat alloy wheels.
CAUTION : To avoid serious personal injury, follow
the manufacturer’s recommendations and cautions
when using these materials.
Required materials:
S Amchem Alumi Prep No. 33. Stock No. DX533 or
equivalent cleaning and conditioning chemical for
alloys.
Page 970 of 2643
2E – 8ITIRES AND WHEELS
DAEWOO V–121 BL4
TIRE AND WHEEL
MATCH–MOUNTING
The tires and wheels are match–mounted at the assembly
plant. Match–mounting aligns the radially stiffest part of
the tire, or high spot, to the smallest radius, or low spot, of
the wheel.
The high spot of the tire is originally marked by a red paint
mark or an adhesive label on the outboard sidewall.
The low spot of the wheel will be at the location of the valve
stem.
Before dismounting a tire from its wheel, scribe a line on
the tire at the valve stem to assure that it is remounted in
the same position.
Replacement tires that are of original equipment quality
will have their high and low spot marked in the same man-
ner.
TIRE MOUNTING AND DISMOUNTING
Notice : Use a tire–changing machine to mount or dis-
mount the tires. Follow the equipment manufacturer’s in-
structions. Do not use hand tools or tire irons to change
tires. These tools may damage the beads or the wheel rim.
1. Clean the rim bead seats with a wire brush or
coarse steel wool to remove lubricants, old rubber,
and light rust. Before mounting or dismounting a
tire, lubricate the bead area well with an approved
tire lubricant.
CAUTION : To avoid serious injury, do not stand over
the tire when inflating it, because the bead may break
when it snaps over the safety hump. Do not exceed
275 kPa (40 psi) of air pressure in any tire if the beads
are not seated. If 275 kPa (40 psi) of air pressure will
not seat the beads, deflate the tire. Relubricate the
bead and reinflate the tire. Overinflation may cause
the bead to break and cause serious injury.
2. fter mounting the tire, inflate it until the beads are
seated. Never exceed 275 kPa (40 psi) to seat the
beads.
3. Install the valve core and inflate the tire to the prop-
er pressure. Make sure the locating ring outside of
the bead of the tire shows around the rim flanges of
the wheel on both sides. This positioning of the tire
will insure that the bead of the tire is seated.
Page 971 of 2643
TIRES AND WHEELS 2E – 9
DAEWOO V–121 BL4
GENERAL DESCRIPTION
AND SYSTEM OPERATION
TIRE AND WHEEL BALANCING
There are two types of tire and wheel balancing: static and
dynamic.
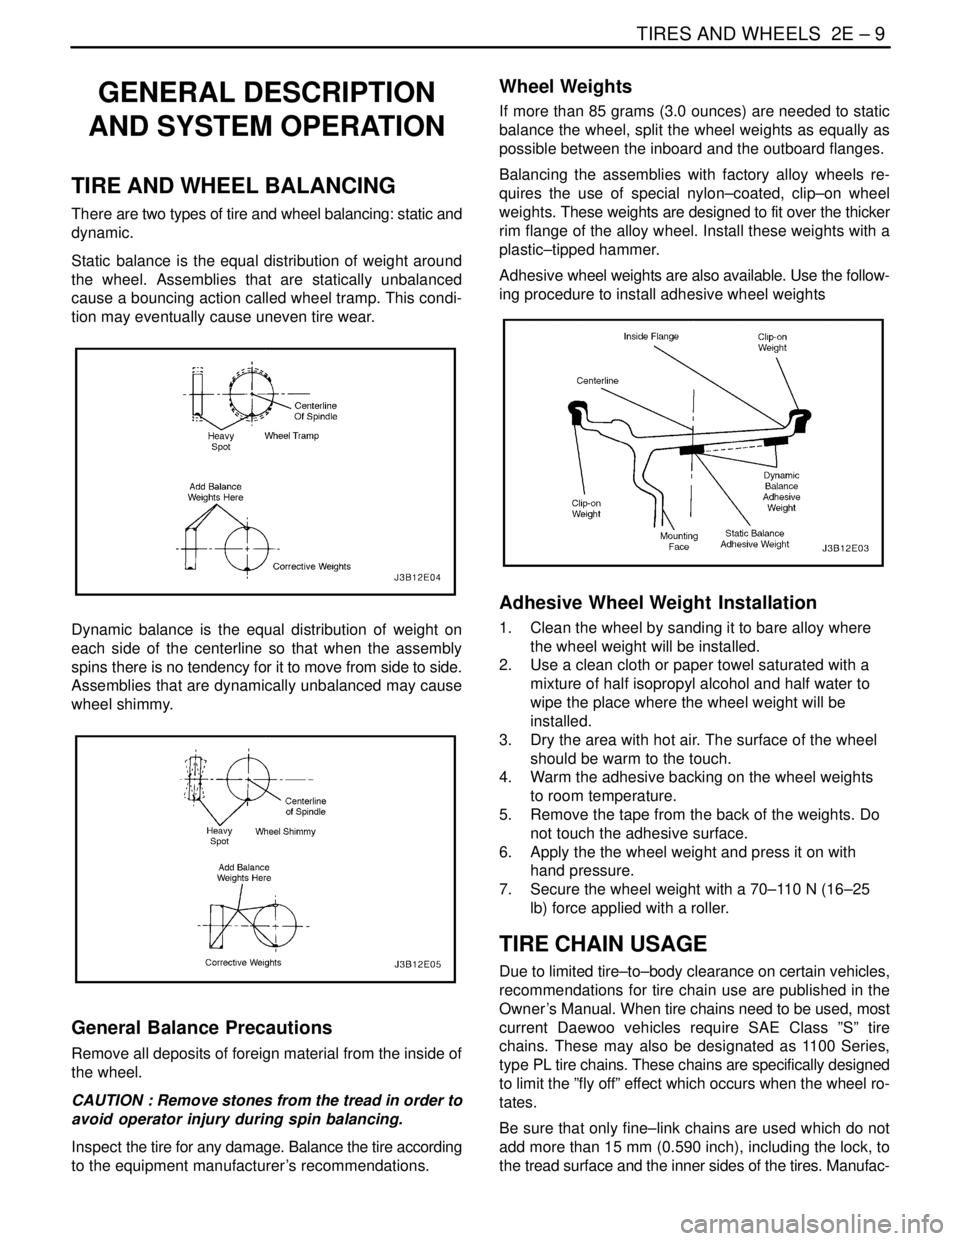
Static balance is the equal distribution of weight around
the wheel. Assemblies that are statically unbalanced
cause a bouncing action called wheel tramp. This condi-
tion may eventually cause uneven tire wear.
Dynamic balance is the equal distribution of weight on
each side of the centerline so that when the assembly
spins there is no tendency for it to move from side to side.
Assemblies that are dynamically unbalanced may cause
wheel shimmy.
General Balance Precautions
Remove all deposits of foreign material from the inside of
the wheel.
CAUTION : Remove stones from the tread in order to
avoid operator injury during spin balancing.
Inspect the tire for any damage. Balance the tire according
to the equipment manufacturer’s recommendations.
Wheel Weights
If more than 85 grams (3.0 ounces) are needed to static
balance the wheel, split the wheel weights as equally as
possible between the inboard and the outboard flanges.
Balancing the assemblies with factory alloy wheels re-
quires the use of special nylon–coated, clip–on wheel
weights. These weights are designed to fit over the thicker
rim flange of the alloy wheel. Install these weights with a
plastic–tipped hammer.
Adhesive wheel weights are also available. Use the follow-
ing procedure to install adhesive wheel weights
Adhesive Wheel Weight Installation
1. Clean the wheel by sanding it to bare alloy where
the wheel weight will be installed.
2. Use a clean cloth or paper towel saturated with a
mixture of half isopropyl alcohol and half water to
wipe the place where the wheel weight will be
installed.
3. Dry the area with hot air. The surface of the wheel
should be warm to the touch.
4. Warm the adhesive backing on the wheel weights
to room temperature.
5. Remove the tape from the back of the weights. Do
not touch the adhesive surface.
6. Apply the the wheel weight and press it on with
hand pressure.
7. Secure the wheel weight with a 70–110 N (16–25
lb) force applied with a roller.
TIRE CHAIN USAGE
Due to limited tire–to–body clearance on certain vehicles,
recommendations for tire chain use are published in the
Owner ’s Manual. When tire chains need to be used, most
current Daewoo vehicles require SAE Class ”S” tire
chains. These may also be designated as 1100 Series,
type PL tire chains. These chains are specifically designed
to limit the ”fly off” effect which occurs when the wheel ro-
tates.
Be sure that only fine–link chains are used which do not
add more than 15 mm (0.590 inch), including the lock, to
the tread surface and the inner sides of the tires. Manufac-
Page 972 of 2643
2E – 10ITIRES AND WHEELS
DAEWOO V–121 BL4
turers of tire chains have a specific chain size for each tire
size to ensure a proper fit when the chain is installed. Be
sure to purchase the correct chains for the tires on which
they are to be used. Use rubber adjusters to take up any
slack or clearance in loose chains.
Use of chains may adversely affect vehicle handling.
When tire chains are installed, follow these precautions:
S Adjust speed to road conditions.
S Avoid sharp turns.
S Avoid locked–wheel braking.
To prevent chain damage to the vehicle, install the chains
on the front tires as tightly as possible. Tighten them again
after driving 0.4 to 0.8 kilometer (0.3 to 0.5 mile). The use
of chains on the rear tires is not recommended because
they may contact the vehicle and possibly damage it. If
chains must be used on the rear tires, be sure there is suffi-
cient clearance between the chains and the body. Do not
exceed 70 km/h (45 mph) or the chain manufacturer’s
speed limit, if lower. Avoid large bumps, potholes, severe
turns and any other maneuvers which could cause the
tires to bounce. Follow any other instructions of the chain
manufacturer which do not disagree with the above in-
structions.
REPLACEMENT TIRES
A tire performance criteria (TPC) specification number is
molded in the sidewall near the tire size of all original
equipment tires. This specification number assures that
the tire meets performance standards for traction, endur-
ance, dimensions, noise, handling and rolling resis–tance.
Usually a specific TPC number is assigned to each tire
size.
CAUTION : Do not mix different types of tires on the
same vehicle such as radial, bias and bias–belted
tires except in emergencies, because vehicle han-
dling may be seriously affected and may result in loss
of control.
Use only replacement tires with the same size, load range,
and construction as the original. The use of any other tire
size or construction type may seriously affect ride, han-
dling, speedometer/odometer calibration, vehicle ground
clearance, and tire clearance to the body and the chassis.
This does not apply to the spare tire furnished with the ve-
hicle.
It is recommended that new tires be installed in pairs on
the same axle.
If it is necessary to replace only one tire, pair it with the tire
having the most tread to equalize the braking action.
Although they may appear different in tread design, tires
built by different manufacturers with identical TPC specifi-
cations may be used on the same vehicle.
ALL SEASON TIRES
Most vehicles are now equipped with steel–belted all sea-
son radial tires as standard equipment. These tires qualify
as snow tires, with a 37 percent higher average rating for
snow traction than the non–all season radial tires pre-
viously used. Other performance areas, such as wet trac-
tion, rolling resistance, tread life, and air retention, have
also been improved. This was done by improvements in
both tread design and tread compounds. These tires are
identified by an ”M + S” molded in the tire sidewall following
the size number. The suffix ”MS” is also molded in the side-
wall after the TPC specification number.
The optional handling tires used on some vehicles are not
all season tires. These will not have the ”MS” marking after
the tire size or the TPC specification number.
PASSENGER METRIC SIZED TIRES
All Daewoo vehicles now use Passenger (P) metric sized
tires. P–metric tires are available in two load ranges: stan-
dard load (35 psi maximum) and extra load (41 psi maxi-
mum). Most passenger vehicle tires are standard load.
Most P–metric tire sizes do not have exact corresponding
alphanumeric tire sizes. For example, a P175/70R13 is
not exactly equal in size and load–carrying capacity to an
FR70–13. For this reason, replacement tires should be of
the same TPC specification number as the originals. If P–
metric tires must be replaced with other sizes, consult a
tire dealer. Tire companies can best recommend the clos-
est match of alphanumeric to P–metric sizes within their
own tire lines.
The metric term for measuring tire inflation pressure is the
kilopascal (kPa). Tire pressure may be printed in both kPa
and psi. One psi equals 6.895 kPa.
See the tire label or refer to ”Tire Size and Pressure Speci-
fications” in this section for tire inflation pressures.
TIRE LABEL
The tire label is permanently located on the rear face of the
driver’s door and should be referred to for tire information.
It lists the maximum vehicle load, the tire size (including
the spare tire), and the cold inflation pressure (including
the spare tire).
SPARE TIRE
The notchback and the wagon come equipped with a full–
sized tire on a steel wheel. The hatchback comes
equipped with a reduced–sized temporary tire on a steel
wheel.
WHEELS
Wheels must be replaced if they are bent, dented, have
excessive lateral or radial runout, leak air through welds,
have elongated bolt holes, or if the wheel bolts won’t stay
tight or are heavily rusted. Wheels with excessive runout
may cause vehicle vibration. Replacement wheels must
be equivalent to the original equipment wheels in load ca-
Page 973 of 2643
TIRES AND WHEELS 2E – 11
DAEWOO V–121 BL4
pacity, diameter, rim width, offset, and mounting configu-
ration. A wheel of improper size or type may affect wheel
and bearing life, brake cooling, speedometer/odometer
calibration, vehicle ground clearance, and tire clearance
to the body and the chassis. The wheel offset is 49 ± 1 mm
(1.93 ± 0.04 inches). Steel wheels may be identified by a
two– or three–letter code stamped into the rim near the
valve stem. Alloy wheels should have the code, the part
number, and the manufacturer ID cast into the back side.
INFLATION O TIRES
The pressure recommended for any vehicle line is careful-
ly calculated to give a satisfactory ride, handling, tread life,
and load–carrying capacity.
Tire pressure should be checked monthly or before any
extended trip. Check the tires when they are cold, after the
vehicle has sat for 3 hours or more, or has been driven less
than 1 mile. Set the tire pressure to the specifications on
the tire label located on the rear face of the driver’s door.
Tire inflation pressure is also given under ”Tire Size and
Pressure Specifications” in this section.
Valve caps or extensions should be on the valves to keep
dust and water out.
For sustained driving at speeds up to 140 km/h (85 mph),
inflate the tires to the pressure recommended on the tire.
Sustained driving at speeds faster than 140 km/h (85mph), even if permitted by law, is not advised unless the
vehicle has special high–speed tires available from many
tire dealers. Tire pressures may increase as much as 41
kPa (6 psi) when the tires are hot.
Higher than recommended tire pressure can cause
S Hard ride.
S Tire bruising or damage.
S Rapid tread wear at the center of the tire.
Lower than recommended pressure can cause
S Tire squeal on turns.
S Hard steering.
S Rapid and uneven wear on the edges of the tread.
S Tire rim bruises and rupture.
S Tire cord breakage.
S High tire temperatures.
Unequal tire pressures on same axle can cause
S Uneven braking.
S Steering lead.
S Reduced handling.
S Swerve on acceleration.
S Torque steer.
Page 1021 of 2643
HYDRAULIC BRAKES 4A – 5
DAEWOO V–121 BL4
DIAGNOSIS
BRAKE SYSTEM TESTING
Brakes should be tested on a dry, clean, reasonably
smooth and level roadway. A true test of brake perfor-
mance cannot be made if the roadway is wet, greasy, or
covered with loose dirt whereby all tires do not grip the
road equally. Testing will also be adversely affected if the
roadway is crowned so as to throw the weight so roughly
that the wheels tend to bounce.
Test the brakes at different vehicle speeds with both light
and heavy pedal pressure; however, avoid locking the
brakes and sliding the tires. Locked brakes and sliding
tires do not indicate brake efficiency since heavily braked,
but turning, wheels will stop the vehicle in less distance
than locked brakes. More tire–to–road friction is present
with a heavily–braked, turning tire than with a sliding tire.
Because of the high deceleration capability, a firmer pedal
may be felt at higher deceleration levels.
There are three major external conditions that affect brake
performance:
S Tires having unequal contact and grip of the road
will cause unequal braking. Tires must be equally
inflated, and the tread pattern of the right and the
left tires must be approximately equal.
S Unequal loading of the vehicle can affect the brake
performance since the most heavily loaded wheels
require more braking power, and thus more braking
effort, than the others.
S Misalignment of the wheels, particularly conditions
of excessive camber and caster, will cause the
brakes to pull to one side.
To check for brake fluid leaks, hold constant foot pressure
on the pedal with the engine running at idle and the shift
lever in NEUTRAL. If the pedal gradually falls away with
the constant pressure, the hydraulic system may be leak-
ing. Perform a visual check to confirm any suspected
leaks.
Check the master cylinder fluid level. While a slight drop
in the reservoir level results from normal lining wear, an ab-
normally low level indicates a leak in the system. The hy-
draulic system may be leaking either internally or external-
ly. Refer to the procedure below to check the master
cylinder. Also, the system may appear to pass this test
while still having a slight leak. If the fluid level is normal,
check the vacuum booster pushrod length. If an incorrect
pushrod length is found, adjust or replace the rod.
Check the master cylinder using the following procedure:
S Check for a cracked master cylinder casting or
brake fluid leaking around the master cylinder.
Leaks are indicated only if there is at least one drop
of fluid. A damp condition is not abnormal.S Check for a binding pedal linkage and for an incor-
rect pushrod length. If both of these parts are in
satisfactory condition, disassemble the master cyl-
inder and check for an elongated or swollen primary
cylinder or piston seals. If swollen seals are found,
substandard or contaminated brake fluid should be
suspected. If contaminated brake fluid is found, all
the components should be disassembled and
cleaned, and all the rubber components should be
replaced. All of the pipes must also be flushed.
Improper brake fluid, or mineral oil or water in the fluid,
may cause the brake fluid to boil or cause deterioration of
the rubber components. If the primary piston cups in the
master cylinder are swollen, then the rubber parts have
deteriorated. This deterioration may also be evidenced by
swollen wheel cylinder piston seals on the drum brake
wheels.
If deterioration of rubber is evident, disassemble all the hy-
draulic parts and wash the parts with alcohol. Dry these
parts with compressed air before reassembly to keep alco-
hol out of the system. Replace all the rubber parts in the
system, including the hoses. Also, when working on the
brake mechanisms, check for fluid on the linings. If exces-
sive fluid is found, replace the linings.
If the master cylinder piston seals are in satisfactory condi-
tion, check for leaks or excessive heat conditions. If these
conditions are not found, drain the fluid, flush the master
cylinder with brake fluid, refill the master cylinder, and
bleed the system. Refer to ”Manual Bleeding the Brakes”
or”Pressure Bleeding the Brakes” in this section.
BRAKE HOSE INSPECTION
The hydraulic brake hoses should be inspected at least
twice a year. The brake hose assembly should be checked
for road hazard damage, cracks, chafing of the outer cov-
er, and for leaks or blisters. Inspect the hoses for proper
routing and mounting. A brake hose that rubs on a suspen-
sion component will wear and eventually fail. A light and
a mirror may be needed for an adequate inspection. If any
of the above conditions are observed on the brake hose,
adjust or replace the hose as necessary.
WARNING LAMP OPERATION
This brake system uses a BRAKE warning lamp located
in the instrument panel cluster. When the ignition switch
is in the START position, the BRAKE warning lamp should
glow and go OFF when the ignition switch returns to the
RUN position.
The following conditions will activate the BRAKE lamp:
S Parking brake applied. The light should be ON
whenever the parking brake is applied and the igni-
tion switch is ON.
S Low fluid level. A low fluid level in the master cylin-
der will turn the BRAKE lamp ON.
S EBD system is disabled. The light should be ON
when the EBD system is malfunctioning.
Page 1028 of 2643
4A – 12IHYDRAULIC BRAKES
DAEWOO V–121 BL4
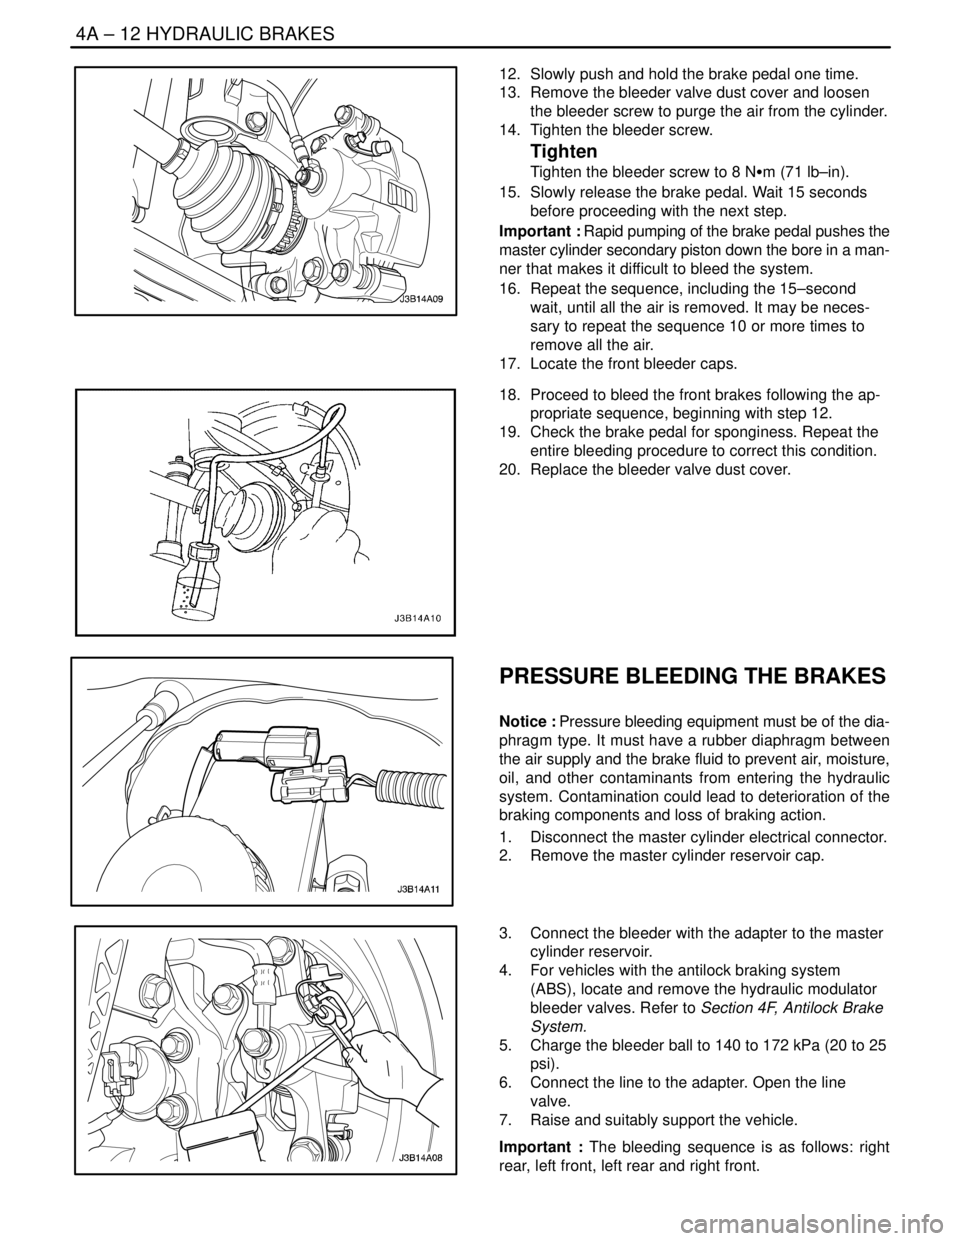
12. Slowly push and hold the brake pedal one time.
13. Remove the bleeder valve dust cover and loosen
the bleeder screw to purge the air from the cylinder.
14. Tighten the bleeder screw.
Tighten
Tighten the bleeder screw to 8 NSm (71 lb–in).
15. Slowly release the brake pedal. Wait 15 seconds
before proceeding with the next step.
Important : Rapid pumping of the brake pedal pushes the
master cylinder secondary piston down the bore in a man-
ner that makes it difficult to bleed the system.
16. Repeat the sequence, including the 15–second
wait, until all the air is removed. It may be neces-
sary to repeat the sequence 10 or more times to
remove all the air.
17. Locate the front bleeder caps.
18. Proceed to bleed the front brakes following the ap-
propriate sequence, beginning with step 12.
19. Check the brake pedal for sponginess. Repeat the
entire bleeding procedure to correct this condition.
20. Replace the bleeder valve dust cover.
PRESSURE BLEEDING THE BRAKES
Notice : Pressure bleeding equipment must be of the dia-
phragm type. It must have a rubber diaphragm between
the air supply and the brake fluid to prevent air, moisture,
oil, and other contaminants from entering the hydraulic
system. Contamination could lead to deterioration of the
braking components and loss of braking action.
1. Disconnect the master cylinder electrical connector.
2. Remove the master cylinder reservoir cap.
3. Connect the bleeder with the adapter to the master
cylinder reservoir.
4. For vehicles with the antilock braking system
(ABS), locate and remove the hydraulic modulator
bleeder valves. Refer to Section 4F, Antilock Brake
System.
5. Charge the bleeder ball to 140 to 172 kPa (20 to 25
psi).
6. Connect the line to the adapter. Open the line
valve.
7. Raise and suitably support the vehicle.
Important : The bleeding sequence is as follows: right
rear, left front, left rear and right front.
Page 1146 of 2643
ANTILOCK BRAKE SYSTEM 4F – 65
DAEWOO V–121 BL4
GENERAL DESCRIPTION AND SYSTEM
OPERATION
BASIC KNOWLEDGE REQUIRED
Before using this section, it is important that you have a ba-
sic knowledge of the following items. Without this knowl-
edge, it will be difficult to use the diagnostic procedures
contained in this section.
S Basic Electrical Circuits : You should understand
the basic theory of electricity and know the mean-
ing of voltage, current (amps), and resistance
(ohms). You should understand what happens in a
circuit with an open or shorted wire. You should be
able to read and understand a wiring diagram.
S Use of Circuit Testing Tools : You should know how
to use a test light and how to bypass components
to test circuits using fused jumper wires. You should
be familiar with a digital multimeter. You should be
able to measure voltage, resistance, and current,
and be familiar with the controls and how to use
them correctly.
ABS SYSTEM COMPONENTS
The ABS 5.3 Antilock Braking System (ABS) consists of
a conventional hydraulic brake system plus antilock com-
ponents. The conventional brake system includes a vacu-
um booster, master cylinder, front disc brakes, rear lead-
ing/trailing drum brakes, interconnecting hydraulic brake
pipes and hoses, brake fluid level sensor and the BRAKE
indicator.
The ABS components include a hydraulic unit, an elec-
tronic brake control module (EBCM), two system fuses,
four wheel speed sensors (one at each wheel), intercon-
necting wiring, the ABS indicator, the EBD indicator (which
is connected to the parking lamp) and the rear disk brakes.
See “ABS Component Locator” in this section for the gen-
eral layout of this system.
The hydraulic unit with the attached EBCM is located be-
tween the surge tank and the fire wall on the left side of the
vehicle.
The basic hydraulic unit configuration consists of hydraulic
check valves, two solenoid valves for each wheel, a hy-
draulic pump, two accumulators, and two damper. The hy-
draulic unit controls hydraulic pressure to the front calipers
and rear wheel cylinders by modulating hydraulic pressure
to prevent wheel lockup.
Nothing in the hydraulic unit or the EBCM is serviceable.
In the event of any failure, the entire ABS unit with at-
tached EBCM must be replaced. For more information, re-
fer to ”Base Braking Mode” and ”Antilock Braking Mode”
in this section.
BASE BRAKING MODE
The baseline braking mode of the ABS 5.3 system used
in this vehicle is a diagonal split system. In this system,
one master cylinder circuit supplies pressure to the right
front and the left rear brakes; the other circuit supplies
pressure to the left front and the right rear brakes. All
valves in the hydraulic modulator are in their normal, non–
energized positions as shown in the drawings found in
”ABS System Components” in this section.