Page 49 of 2643
1C1 – 6I1.4L/1.6L DOHC ENGINE MECHANICAL
DAEWOO V–121 BL4
Application Lb–InLb–Ft NSm
Oil Pump Bolts10–89
Oil Pump Rear Cover Bolts8–71
Oil Pump Retaining Bolts10–89
Oil Suction Pipe or Support Bracket Bolts10–89
Rear Timing Belt Cover Bolts10–89
Safety Relief Valve Bolt303022–
Spark Plugs2518–
Thermostat Housing Mounting Bolts2015–
Timing Belt Automatic Tensioner Bolts2518–
Timing Belt Idler Pulley Bolt4030–
Transaxle Bell Housing Bolts7555–
Transaxle Torque Converter Bolts4533–
Upper Front Timing Belt Cover Bolts10–89
Water Pump Retaining Bolts10–89
Page 50 of 2643
1.4L/1.6L DOHC ENGINE MECHANICAL 1C1 – 7
DAEWOO V–121 BL4
SPECIAL TOOLS
SPECIAL TOOLS TABLE
J–42492
Timing Belt
Adjuster
KM–470–B
Angular Torque
Gauge
J–28467–B
Engine Assembly
Support Fixture
KM–427
Piston Pin
Service Set
KM–571–B
Gauge
KM–340–0
Cutter Set
Includes: KM–340–7
Guide Drift
KM–340–13
Cutters
KM–340–26
Cutters
KM–348
Valve Spring
Compressor
KM–653
Adapter
Page 56 of 2643
1.4L/1.6L DOHC ENGINE MECHANICAL 1C1 – 13
DAEWOO V–121 BL4
TIMING BELT
1. Water Pump Sealing
2. Water Pump
3. Timing Belt Rear Cover
4. Camshaft Position Sensor
5. Auto Temsioner
6. Camshaft Gear
7. Idler pulley8. Crankshaft Gear
9. Torque Roll Axis Support
10. Timing Belt
11. Timing Belt Front Upper Cover
12. Timing Belt Front Lower Cover
13. Crankshaft Pulley
14. Crankshaft Position Sensor
Page 64 of 2643

1.4L/1.6L DOHC ENGINE MECHANICAL 1C1 – 21
DAEWOO V–121 BL4
Installation Procedure
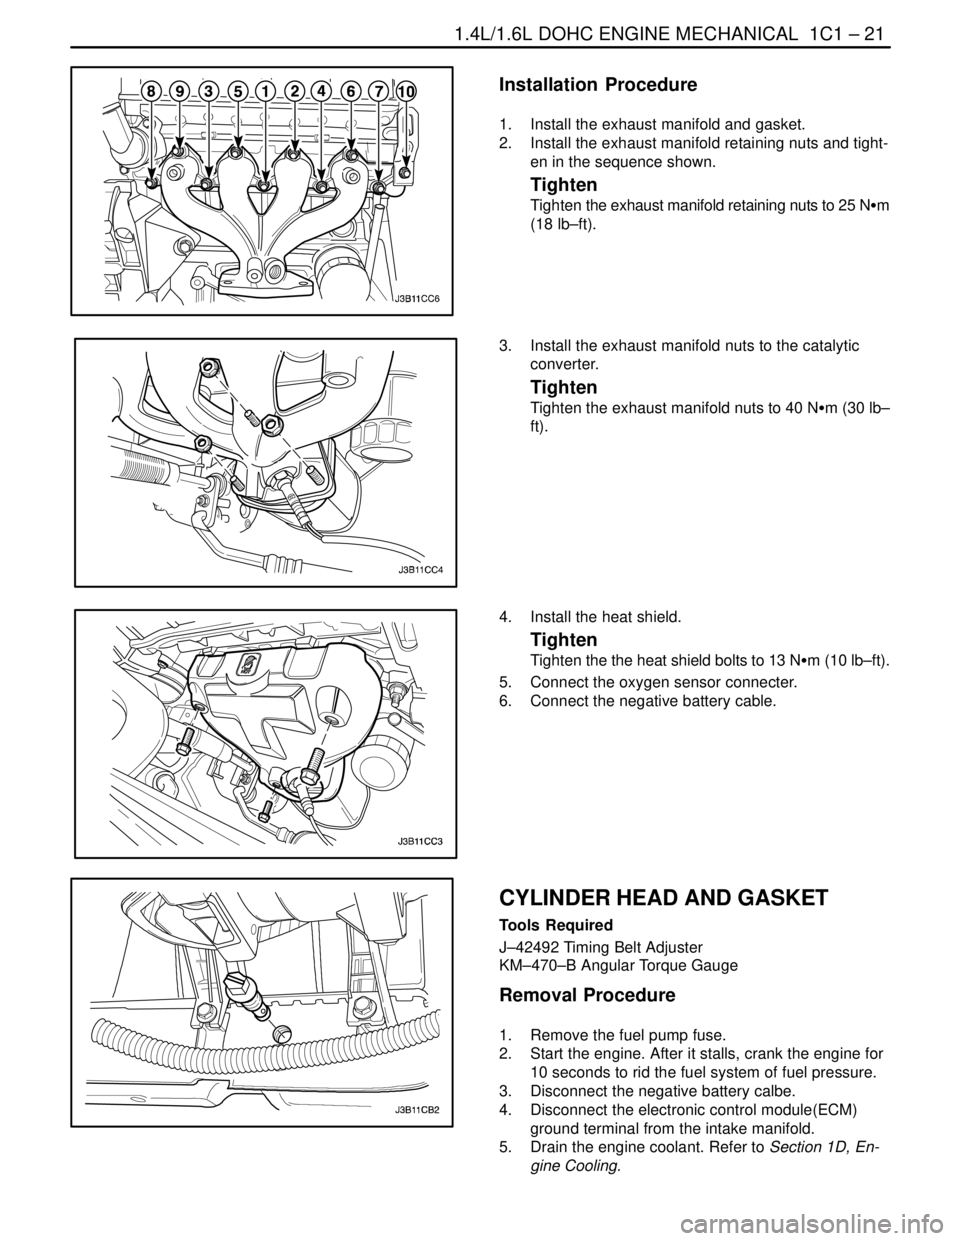
1. Install the exhaust manifold and gasket.
2. Install the exhaust manifold retaining nuts and tight-
en in the sequence shown.
Tighten
Tighten the exhaust manifold retaining nuts to 25 NSm
(18 lb–ft).
3. Install the exhaust manifold nuts to the catalytic
converter.
Tighten
Tighten the exhaust manifold nuts to 40 NSm (30 lb–
ft).
4. Install the heat shield.
Tighten
Tighten the the heat shield bolts to 13 NSm (10 lb–ft).
5. Connect the oxygen sensor connecter.
6. Connect the negative battery cable.
CYLINDER HEAD AND GASKET
Tools Required
J–42492 Timing Belt Adjuster
KM–470–B Angular Torque Gauge
Removal Procedure
1. Remove the fuel pump fuse.
2. Start the engine. After it stalls, crank the engine for
10 seconds to rid the fuel system of fuel pressure.
3. Disconnect the negative battery calbe.
4. Disconnect the electronic control module(ECM)
ground terminal from the intake manifold.
5. Drain the engine coolant. Refer to Section 1D, En-
gine Cooling.
Page 68 of 2643

1.4L/1.6L DOHC ENGINE MECHANICAL 1C1 – 25
DAEWOO V–121 BL4
34. Remove the intake/exhaust manifold. Refer to ”In-
take/Exhaust Manifold” in the section.
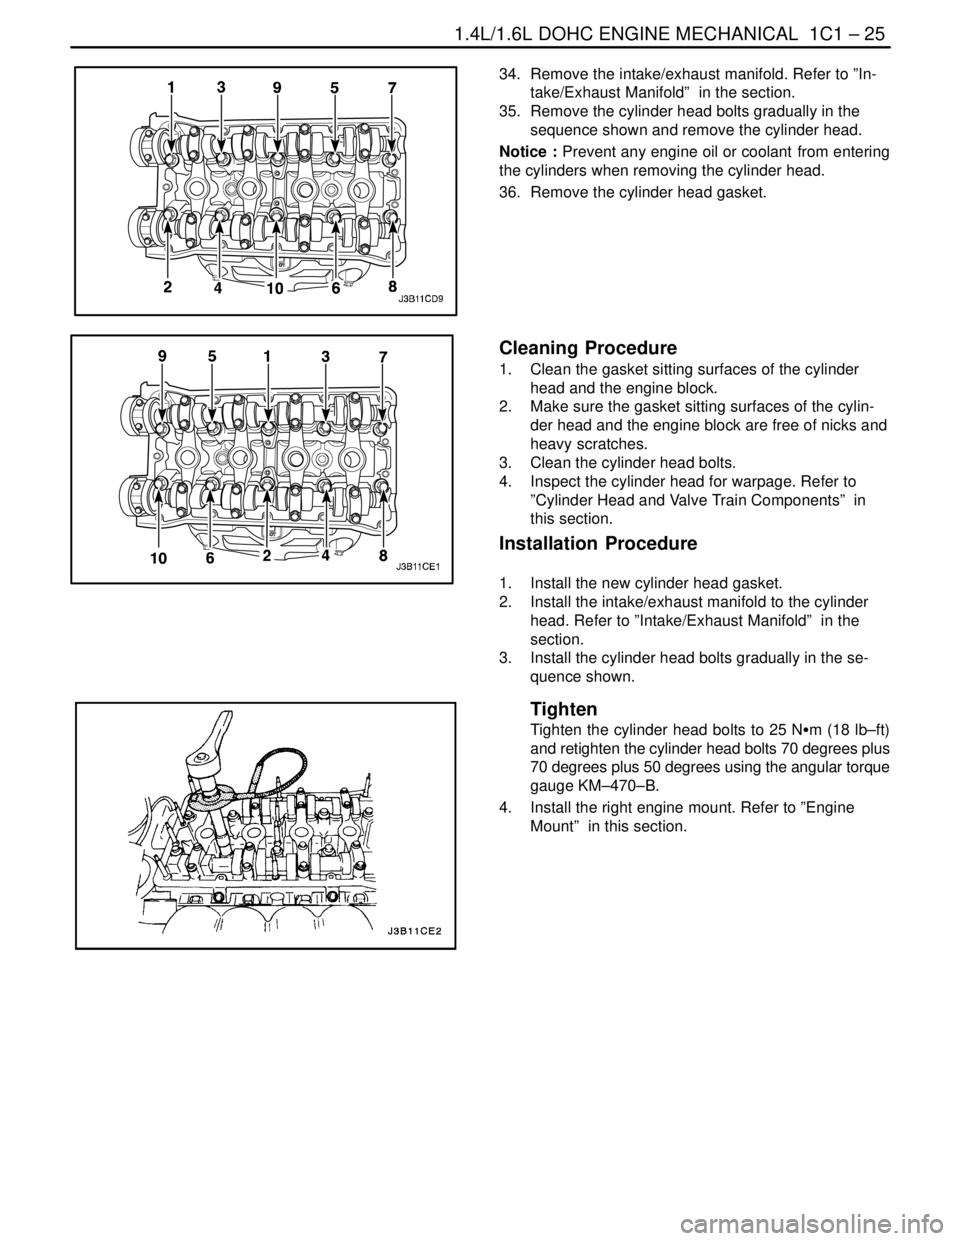
35. Remove the cylinder head bolts gradually in the
sequence shown and remove the cylinder head.
Notice : Prevent any engine oil or coolant from entering
the cylinders when removing the cylinder head.
36. Remove the cylinder head gasket.
Cleaning Procedure
1. Clean the gasket sitting surfaces of the cylinder
head and the engine block.
2. Make sure the gasket sitting surfaces of the cylin-
der head and the engine block are free of nicks and
heavy scratches.
3. Clean the cylinder head bolts.
4. Inspect the cylinder head for warpage. Refer to
”Cylinder Head and Valve Train Components” in
this section.
Installation Procedure
1. Install the new cylinder head gasket.
2. Install the intake/exhaust manifold to the cylinder
head. Refer to ”Intake/Exhaust Manifold” in the
section.
3. Install the cylinder head bolts gradually in the se-
quence shown.
Tighten
Tighten the cylinder head bolts to 25 NSm (18 lb–ft)
and retighten the cylinder head bolts 70 degrees plus
70 degrees plus 50 degrees using the angular torque
gauge KM–470–B.
4. Install the right engine mount. Refer to ”Engine
Mount” in this section.
Page 74 of 2643
1.4L/1.6L DOHC ENGINE MECHANICAL 1C1 – 31
DAEWOO V–121 BL4
TIMING BELT CHECK AND ADJUST
Tools Required
J–42492 Timing Belt Adjuster
KM–470–B Angular Torque Gauge
Adjustment Procedure
1. Disconnect the negative battery cable.
2. Remove the air cleaner outlet hose from the throttle
body.
3. Remove the breather tube from the camshaft cover.
4. Remove the air cleaner housing bolts.
5. Remove the air cleaner housing.
6. Remove the right front wheel. Refer to Section 2E,
Tires and Wheels.
7. Remove the right front wheel well splash shield.
8. Remove the serpentine accessory drive belt. Refer
to Section 6B, Power Steering Pump.
9. Remove the crankshaft pulley bolt.
10. Remove the crankshaft pulley.
11. Remove the upper front timing belt cover bolts.
12. Remove the upper front timing belt cover.
13. Remove the lower front timing belt cover bolts.
14. Remove the lower front timing belt cover.
15. Install the crankshaft pulley bolt.
Page 77 of 2643
1C1 – 34I1.4L/1.6L DOHC ENGINE MECHANICAL
DAEWOO V–121 BL4
37. Connect the air cleaner outlet hose to the throttle
body.
38. Connect the breather tube to the camshaft cover.
39. Connect the negative battery cable.
TIMING BELT
Tools Required
J–42492 Timing Belt Adjuster
KM–470–B Angular Torque Gauge
Removal Procedure
1. Disconnect the negative battery cable.
2. Disconnect the air cleaner outlet hose from the
throttle body.
3. Disconnect the breather tube from the camshaft
cover.
4. Remove the air cleaner housing bolts.
5. Remove the air cleaner housing.
6. Remove the right front wheel. Refer to Section 2E,
Tires and Wheels.
7. Remove the right front wheel well splash shield.
8. Remove the serpentine accessory drive belt. Refer
to Section 6B, Power Steering Pump.
9. Remove the crankshaft pulley bolt.
10. Remove the crankshaft pulley.
Page 93 of 2643

1C1 – 50I1.4L/1.6L DOHC ENGINE MECHANICAL
DAEWOO V–121 BL4
33. Remove the crankshaft pulley bolt.
34. Remove the crankshaft pulley.
35. Disconnect the vacuum lines at the charcoal canis-
ter purge solenoid.
36. Disconnect the electrical connector at the charcoal
canister purge (CCP) solenoid and at the knock
sensor.
37. Disconnect the electrical connector at the oil pres-
sure switch and at the exhaust gas recirculation
(EGR) solenoid.
38. Disconnect the crankshaft position sensor (CPS)
connector.
39. Remove the transaxle torque converter bolts, if au-
tomatic transaxle equipped.
40. Remove the stater motor. Refer to Section 1E, En-
gine Electrical.
41. Remove the transaxle bell housing bolts.
42. Support the transaxle with a floor jack.
43. Install the engine lifting device.
44. Disconnect the right engine mount bracket from the
engine mount and the engine by removing the at-
taching bolts and the nuts.
45. Remove the right engine mount from the engine
block. Refer to ”Engine Mount” in this section.
46. Separate the engine block from the transaxle.
47. Remove the engine.
Installation Procedure
1. Install the engine into the engine compartment.
2. Align the engine alignment pins to the transaxle.
3. Install the transaxle bell housing bolts.
Tighten
Tighten the transaxle bell housing bolts to 75 NSm (55
lb–ft).
4. Install the right engine mount to the engine block.
Refer to ”Engine Mount” in this section.