2004 DAEWOO LACETTI seat
[x] Cancel search: seatPage 2555 of 2643
NUBIRA/LACETTI ROOF, BACK PANEL AND REAR FLOOR PANEL 5–3
1–2. REPAIR PROCEDURE
1. Remove the related parts.
S Room lamp, door weatherstrip and pillar trims.
S Headlining and wiring harness.
S Wiper, cowl and windshield.
S Rear glass and others.
2. Pull out and straighten the damaged area to approxi-
mately the original shape.
Note : Use heat–resistant protective cover for protect
painting areas, seats, carpets and other parts.
S Attach the car to the frame straightener by tightening the
underbody clamps at the horizontal pinch welds.
S Before cutting off the roof panel, pull them out so that
they are restored to the original shape.
S Do not pull out more than necessary.
S Pull out and straighten the related damaged parts to
approximately their original shape.
Note : Make sure that the right and left pillars are parallel
with the windshield surface. Check the door for proper
opening and closing.
3. Keep the body, level.
S Jack up the body, and place safety stands at the four
designated places of the frame door opening.
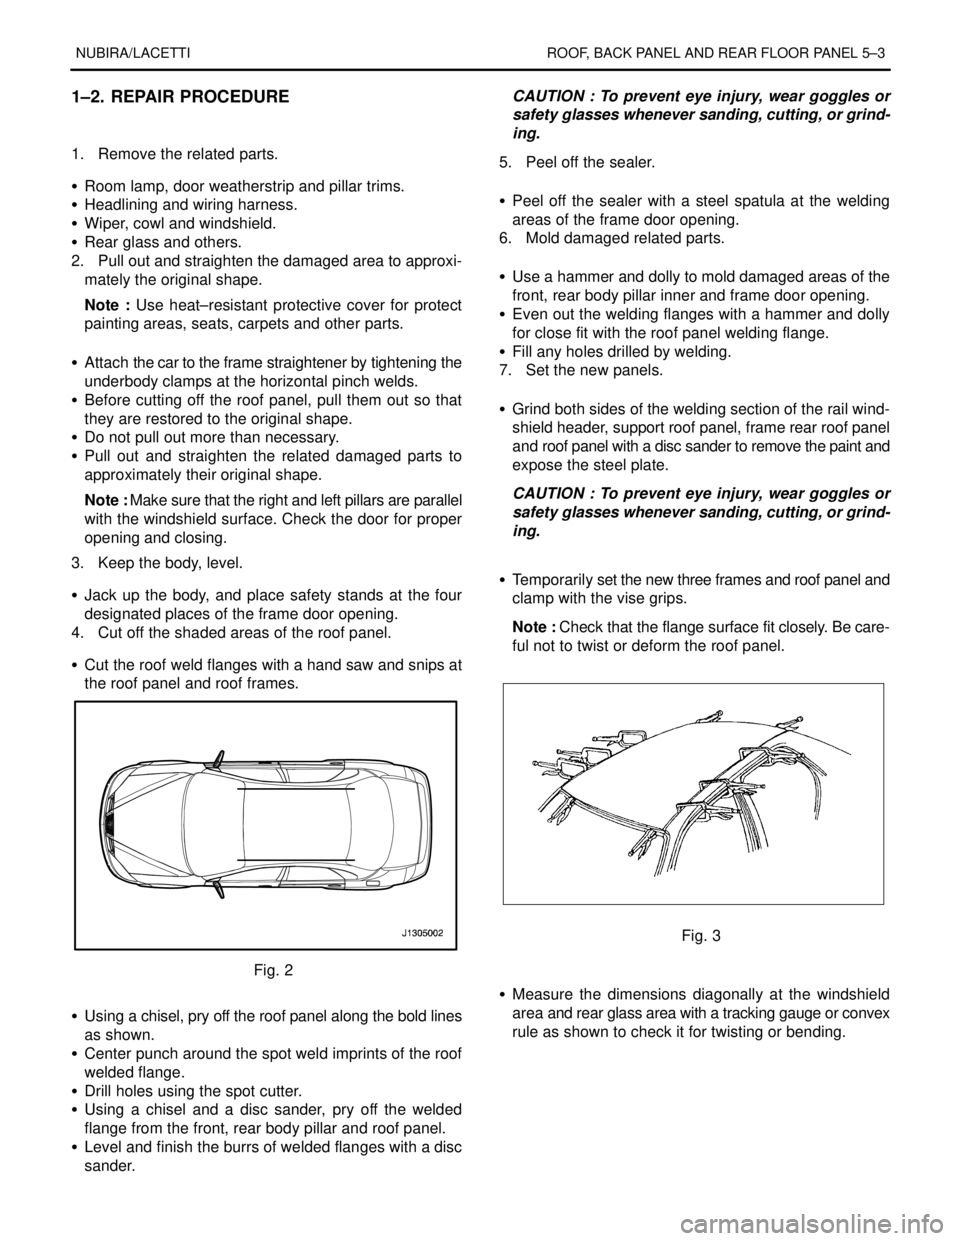
4. Cut off the shaded areas of the roof panel.
S Cut the roof weld flanges with a hand saw and snips at
the roof panel and roof frames.
Fig. 2
S Using a chisel, pry off the roof panel along the bold lines
as shown.
S Center punch around the spot weld imprints of the roof
welded flange.
S Drill holes using the spot cutter.
S Using a chisel and a disc sander, pry off the welded
flange from the front, rear body pillar and roof panel.
S Level and finish the burrs of welded flanges with a disc
sander.CAUTION : To prevent eye injury, wear goggles or
safety glasses whenever sanding, cutting, or grind-
ing.
5. Peel off the sealer.
S Peel off the sealer with a steel spatula at the welding
areas of the frame door opening.
6. Mold damaged related parts.
S Use a hammer and dolly to mold damaged areas of the
front, rear body pillar inner and frame door opening.
S Even out the welding flanges with a hammer and dolly
for close fit with the roof panel welding flange.
S Fill any holes drilled by welding.
7. Set the new panels.
S Grind both sides of the welding section of the rail wind-
shield header, support roof panel, frame rear roof panel
and roof panel with a disc sander to remove the paint and
expose the steel plate.
CAUTION : To prevent eye injury, wear goggles or
safety glasses whenever sanding, cutting, or grind-
ing.
S Temporarily set the new three frames and roof panel and
clamp with the vise grips.
Note : Check that the flange surface fit closely. Be care-
ful not to twist or deform the roof panel.
Fig. 3
S Measure the dimensions diagonally at the windshield
area and rear glass area with a tracking gauge or convex
rule as shown to check it for twisting or bending.
Page 2563 of 2643
NUBIRA/LACETTI ROOF, BACK PANEL AND REAR FLOOR PANEL 5–11
3–2. REPAIR PROCEDURE
1. Remove the related parts.
S Parts to be removed when removing the back panel.
S Rear seat belt and rear seat.
S Muffler, fuel tank and related parts.
S Chassis parts.
S Other related parts.
CAUTION : Do not smoke while working near the
fuel system. Keep open flame away from the fuel
system. If necessary, remove the fuel tank and off
lines.
2. Roughly pull out and straighten the damaged area.
S Check the damage and roughly pull out and re pair the
related back panel, side panel, wheel house inner, rear
longitudinal and other damaged parts with the frame
straightener before remov ing the extension rear floor
panel, rear floor pane and back panel.
S Attach the car to the frame straightener by tightening the
underbody clamps located at the jack up designated
points on the bottom of the frame door opening.
Note : Measure in reference to the dimensions on the
body repair chart.
3. Cut and pry off the back panel.
S The back panel to be cut and pried off when removing
the back panel.
4. Cut and pry off the rear floor and extension rear floor
panel.
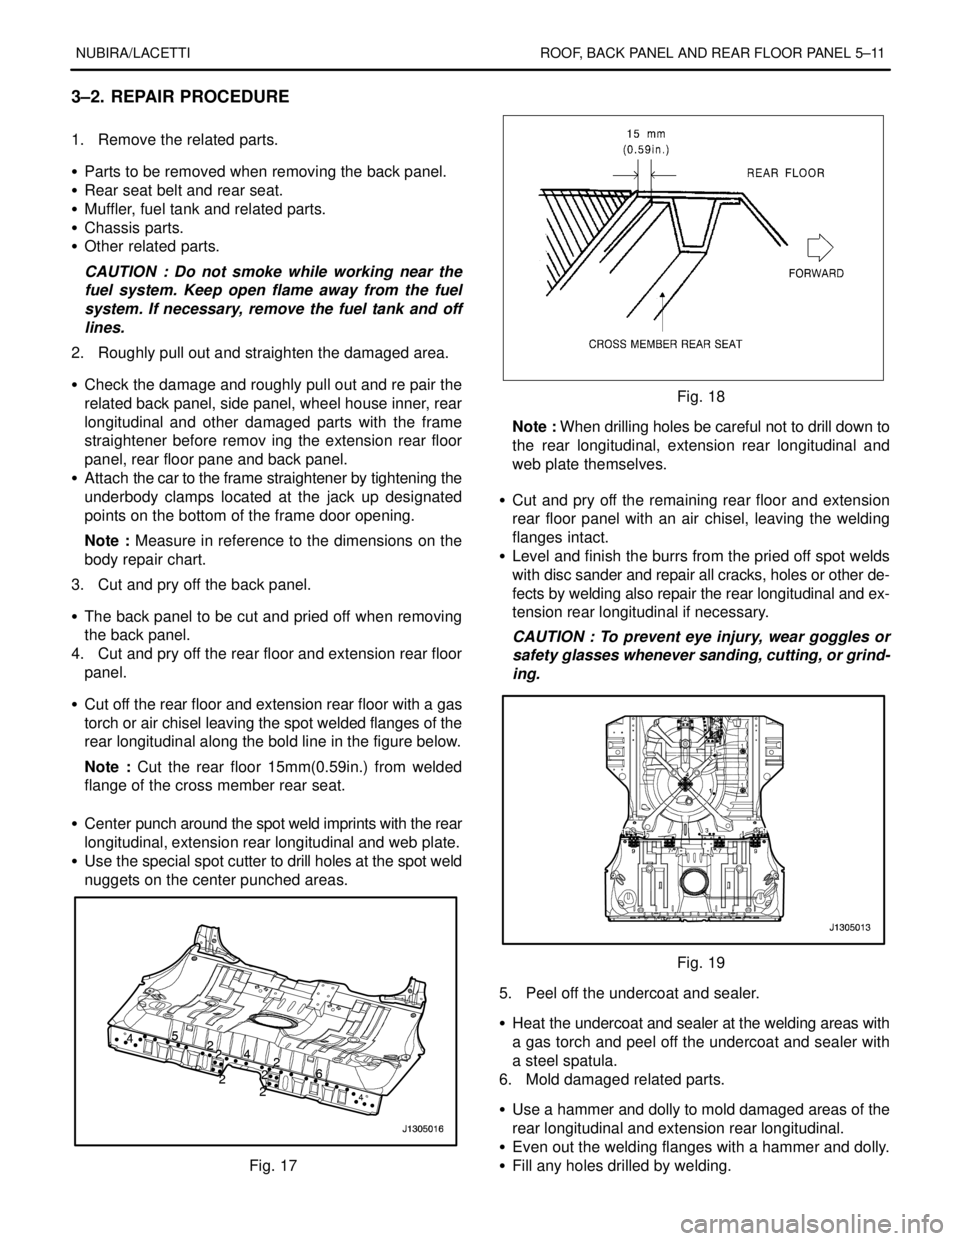
S Cut off the rear floor and extension rear floor with a gas
torch or air chisel leaving the spot welded flanges of the
rear longitudinal along the bold line in the figure below.
Note : Cut the rear floor 15mm(0.59in.) from welded
flange of the cross member rear seat.
S Center punch around the spot weld imprints with the rear
longitudinal, extension rear longitudinal and web plate.
S Use the special spot cutter to drill holes at the spot weld
nuggets on the center punched areas.
Fig. 17
Fig. 18
Note : When drilling holes be careful not to drill down to
the rear longitudinal, extension rear longitudinal and
web plate themselves.
S Cut and pry off the remaining rear floor and extension
rear floor panel with an air chisel, leaving the welding
flanges intact.
S Level and finish the burrs from the pried off spot welds
with disc sander and repair all cracks, holes or other de-
fects by welding also repair the rear longitudinal and ex-
tension rear longitudinal if necessary.
CAUTION : To prevent eye injury, wear goggles or
safety glasses whenever sanding, cutting, or grind-
ing.
Fig. 19
5. Peel off the undercoat and sealer.
S Heat the undercoat and sealer at the welding areas with
a gas torch and peel off the undercoat and sealer with
a steel spatula.
6. Mold damaged related parts.
S Use a hammer and dolly to mold damaged areas of the
rear longitudinal and extension rear longitudinal.
S Even out the welding flanges with a hammer and dolly.
S Fill any holes drilled by welding.
Page 2564 of 2643
5–12 ROOF, BACK PANEL AND REAR FLOOR PANEL NUBIRA/LACETTI
CAUTION : To prevent eye injury and burns when
welding, wear an approved welding helmet, gloves
and safety shoes.
S Level and finish the burrs from the pried off spot welds
with disc sander.
S Sand off the paint and undercoat from both sides of the
flange to be welded.
7. Cut the new rear floor to align it with the body, then set
the new rear floor and extension rear floor.
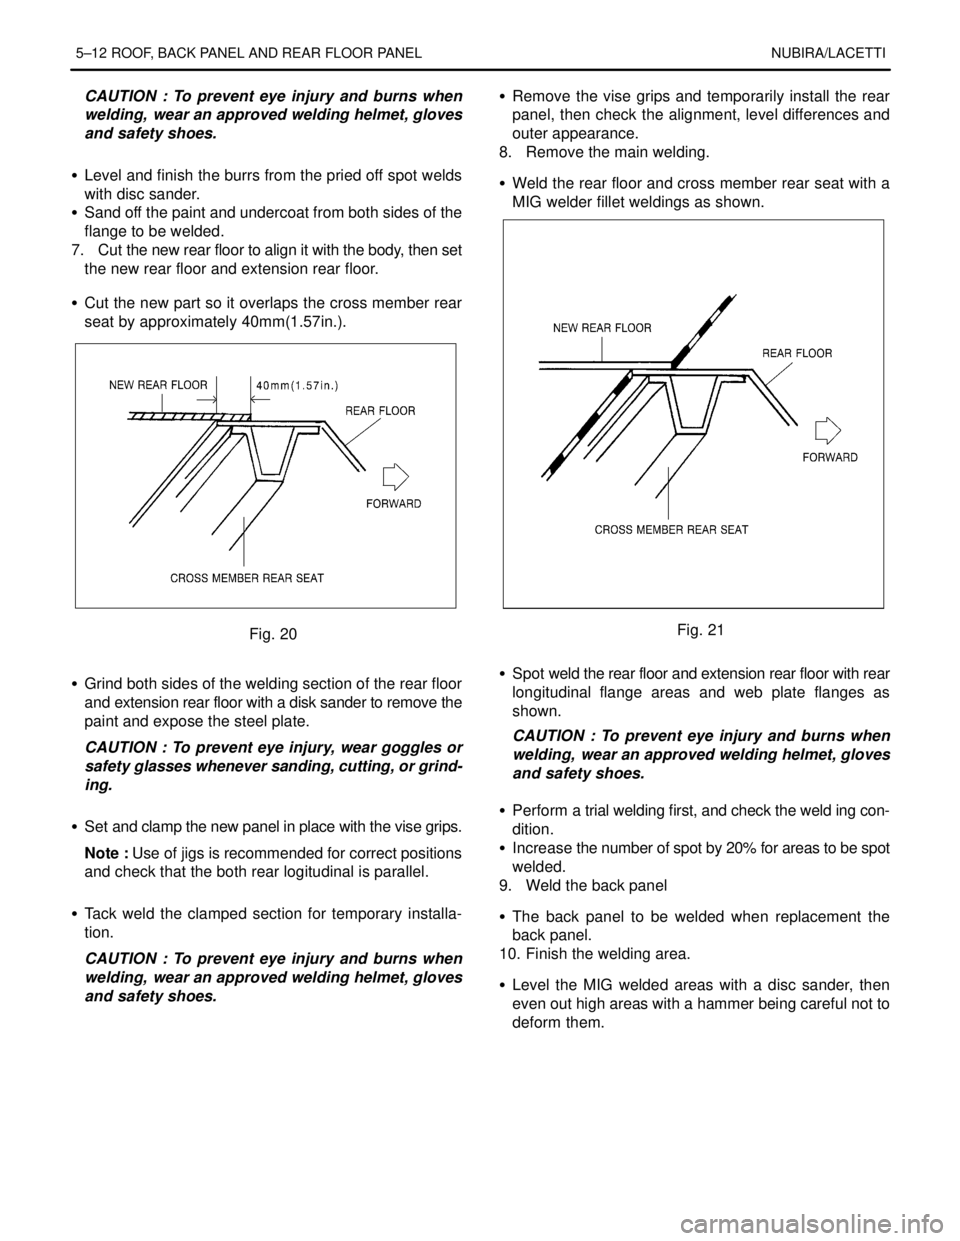
S Cut the new part so it overlaps the cross member rear
seat by approximately 40mm(1.57in.).
Fig. 20
S Grind both sides of the welding section of the rear floor
and extension rear floor with a disk sander to remove the
paint and expose the steel plate.
CAUTION : To prevent eye injury, wear goggles or
safety glasses whenever sanding, cutting, or grind-
ing.
S Set and clamp the new panel in place with the vise grips.
Note : Use of jigs is recommended for correct positions
and check that the both rear logitudinal is parallel.
S Tack weld the clamped section for temporary installa-
tion.
CAUTION : To prevent eye injury and burns when
welding, wear an approved welding helmet, gloves
and safety shoes.S Remove the vise grips and temporarily install the rear
panel, then check the alignment, level differences and
outer appearance.
8. Remove the main welding.
S Weld the rear floor and cross member rear seat with a
MIG welder fillet weldings as shown.Fig. 21
S Spot weld the rear floor and extension rear floor with rear
longitudinal flange areas and web plate flanges as
shown.
CAUTION : To prevent eye injury and burns when
welding, wear an approved welding helmet, gloves
and safety shoes.
S Perform a trial welding first, and check the weld ing con-
dition.
S Increase the number of spot by 20% for areas to be spot
welded.
9. Weld the back panel
S The back panel to be welded when replacement the
back panel.
10. Finish the welding area.
S Level the MIG welded areas with a disc sander, then
even out high areas with a hammer being careful not to
deform them.
Page 2568 of 2643
NUBIRA/LACETTI FRAME DOOR OPENING, DOOR AND SIDE PANEL OUTER 6–3
1–2. REPAIR PROCEDURE
1. Remove the related parts.
S Doors.
S Weather strips, pillar trims and related parts.
S Carpet.
S Seat belt assembly
S Door switch and wiring harness.
S Fuel pipe and brake oil pipe.
S Other related parts.
Note : Pull out and straighten the damaged area to
approximately the original shape.
2. Remove the related parts.
S Damage may extend to the inner roof frame, the inner
frame door opening and the floor. Determine the extent
of the damage first, so the frame can be pulled out prop-
erly.
Note : Use heat–resistant protective cover for protect
painting areas, seats, carpets and other parts.
S Pull out and straighten the damaged areas.
S Do not pull out more than necessary.
3. Cut and pry off the frame door opening.
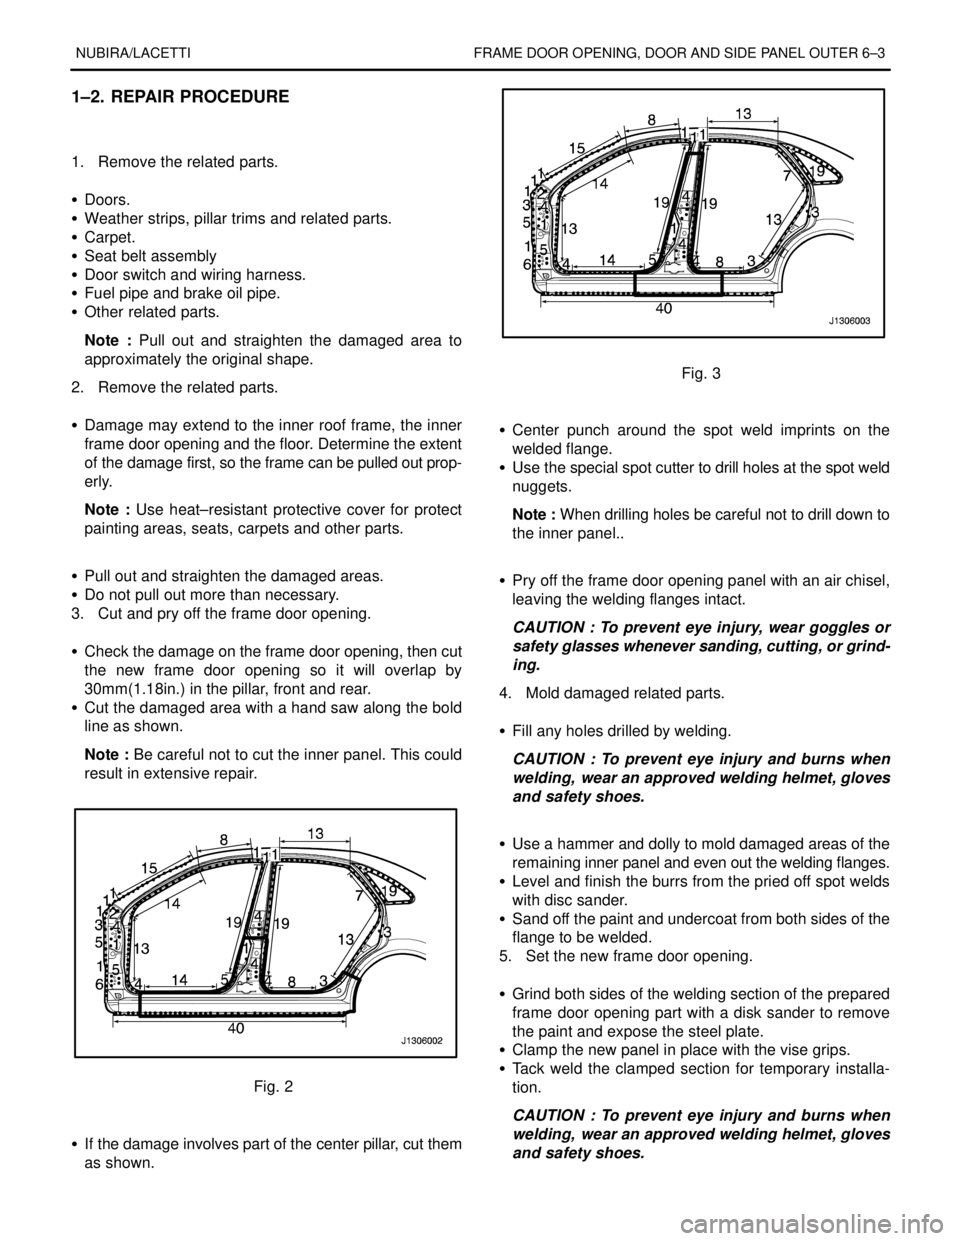
S Check the damage on the frame door opening, then cut
the new frame door opening so it will overlap by
30mm(1.18in.) in the pillar, front and rear.
S Cut the damaged area with a hand saw along the bold
line as shown.
Note : Be careful not to cut the inner panel. This could
result in extensive repair.
Fig. 2
S If the damage involves part of the center pillar, cut them
as shown.
Fig. 3
S Center punch around the spot weld imprints on the
welded flange.
S Use the special spot cutter to drill holes at the spot weld
nuggets.
Note : When drilling holes be careful not to drill down to
the inner panel..
S Pry off the frame door opening panel with an air chisel,
leaving the welding flanges intact.
CAUTION : To prevent eye injury, wear goggles or
safety glasses whenever sanding, cutting, or grind-
ing.
4. Mold damaged related parts.
S Fill any holes drilled by welding.
CAUTION : To prevent eye injury and burns when
welding, wear an approved welding helmet, gloves
and safety shoes.
S Use a hammer and dolly to mold damaged areas of the
remaining inner panel and even out the welding flanges.
S Level and finish the burrs from the pried off spot welds
with disc sander.
S Sand off the paint and undercoat from both sides of the
flange to be welded.
5. Set the new frame door opening.
S Grind both sides of the welding section of the prepared
frame door opening part with a disk sander to remove
the paint and expose the steel plate.
S Clamp the new panel in place with the vise grips.
S Tack weld the clamped section for temporary installa-
tion.
CAUTION : To prevent eye injury and burns when
welding, wear an approved welding helmet, gloves
and safety shoes.
Page 2570 of 2643

NUBIRA/LACETTI FRAME DOOR OPENING, DOOR AND SIDE PANEL OUTER 6–5
painting.
S Paint is flammable. Store in a safe place, and keep it
away from sparks, flames or cigarettes.
11. Coating the anti–rust agents.
S Coating the anti–rust agents to the inside of frame door
opening areas sufficiently.
Fig. 6
12. Install the related parts.
S Clean the passenger compartment.
S Wiring harness and related parts.
S Seat belt assembly and carpet.
S Trims and weather strips.
S Door and others.
S Install in the reverse order in which they were removed.
13. Check and adjust.
S Check clearances and level differences.
S Check the door locking and unlocking condition.
S Check for water leaks in the passenger compartment.
Page 2575 of 2643
6–10 FRAME DOOR OPENING, DOOR AND SIDE PANEL OUTER NUBIRA/LACETTI
3–2. REPAIR PROCEDURE
1. Remove the related parts.
S Rear and trunk trims.
S Rear combination lamps and wiring harness.
S Rear bumper and related parts.
S Rear seat and rear seat belt.
S Chassis and fuel parts.
S Other related parts.
CAUTION : Do not smoke while working near the
fuel system. Keep open flame away from the fuel
system. If necessary, remove the fuel tank and off
lines.
2. Pull out and straighten the damaged area to approxi-
mately the original shape.
S Attach the car to the frame straightener by tightening the
underbody clamps at the four designated support points.
S Before cutting off the damaged sections, pull them out
so that they are restored to the original shape.
S Do not pull out more than necessary.
S Pull out and straighten the damaged areas of the rear
side outer panel, side inner panel and wheelhouse inner.
Note : Check the rear door locking and unlocking condi-
tion.
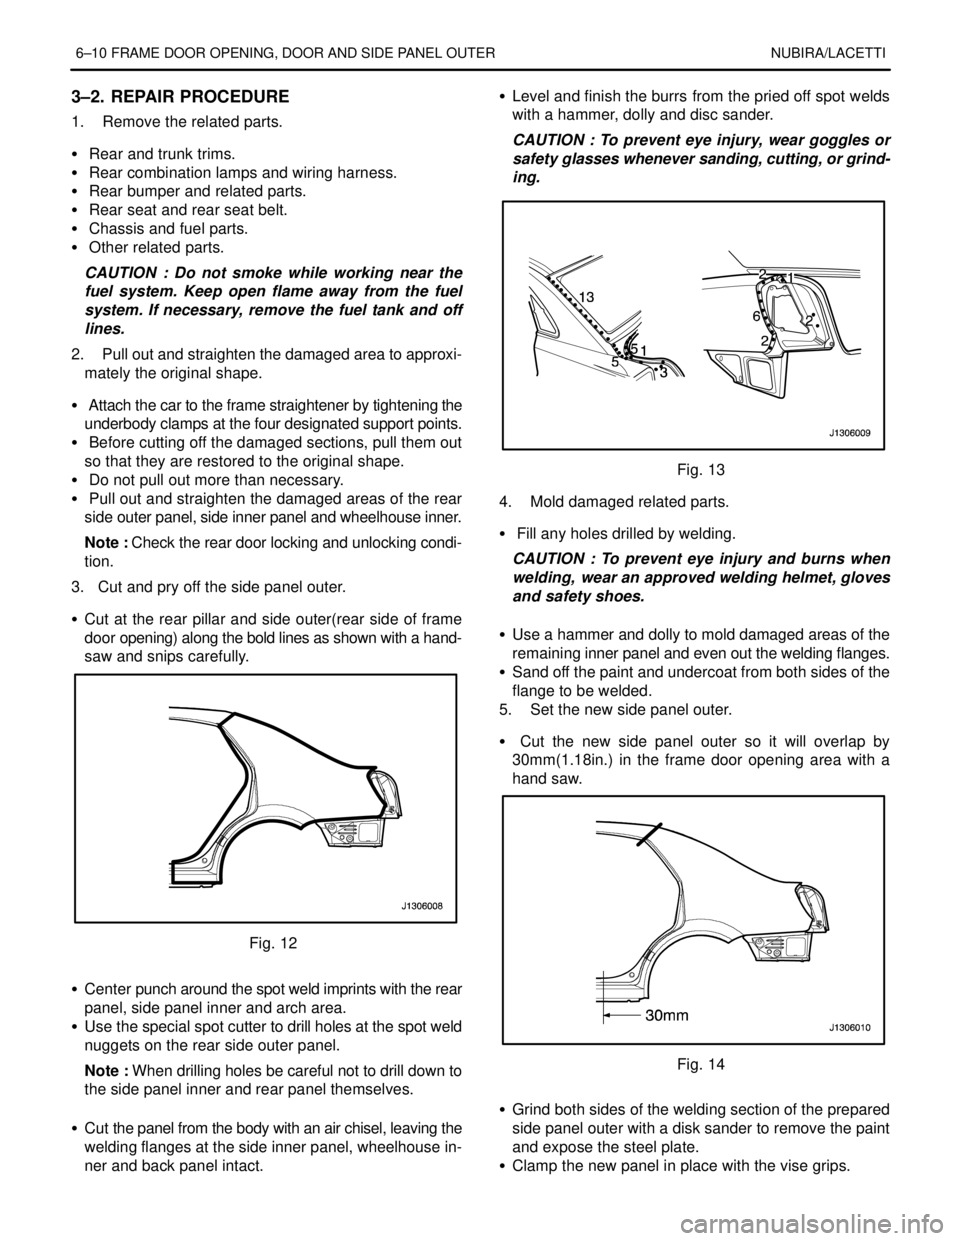
3. Cut and pry off the side panel outer.
S Cut at the rear pillar and side outer(rear side of frame
door opening) along the bold lines as shown with a hand-
saw and snips carefully.
Fig. 12
S Center punch around the spot weld imprints with the rear
panel, side panel inner and arch area.
S Use the special spot cutter to drill holes at the spot weld
nuggets on the rear side outer panel.
Note : When drilling holes be careful not to drill down to
the side panel inner and rear panel themselves.
S Cut the panel from the body with an air chisel, leaving the
welding flanges at the side inner panel, wheelhouse in-
ner and back panel intact.S Level and finish the burrs from the pried off spot welds
with a hammer, dolly and disc sander.
CAUTION : To prevent eye injury, wear goggles or
safety glasses whenever sanding, cutting, or grind-
ing.
Fig. 13
4. Mold damaged related parts.
S Fill any holes drilled by welding.
CAUTION : To prevent eye injury and burns when
welding, wear an approved welding helmet, gloves
and safety shoes.
S Use a hammer and dolly to mold damaged areas of the
remaining inner panel and even out the welding flanges.
S Sand off the paint and undercoat from both sides of the
flange to be welded.
5. Set the new side panel outer.
S Cut the new side panel outer so it will overlap by
30mm(1.18in.) in the frame door opening area with a
hand saw.
Fig. 14
S Grind both sides of the welding section of the prepared
side panel outer with a disk sander to remove the paint
and expose the steel plate.
S Clamp the new panel in place with the vise grips.
Page 2577 of 2643
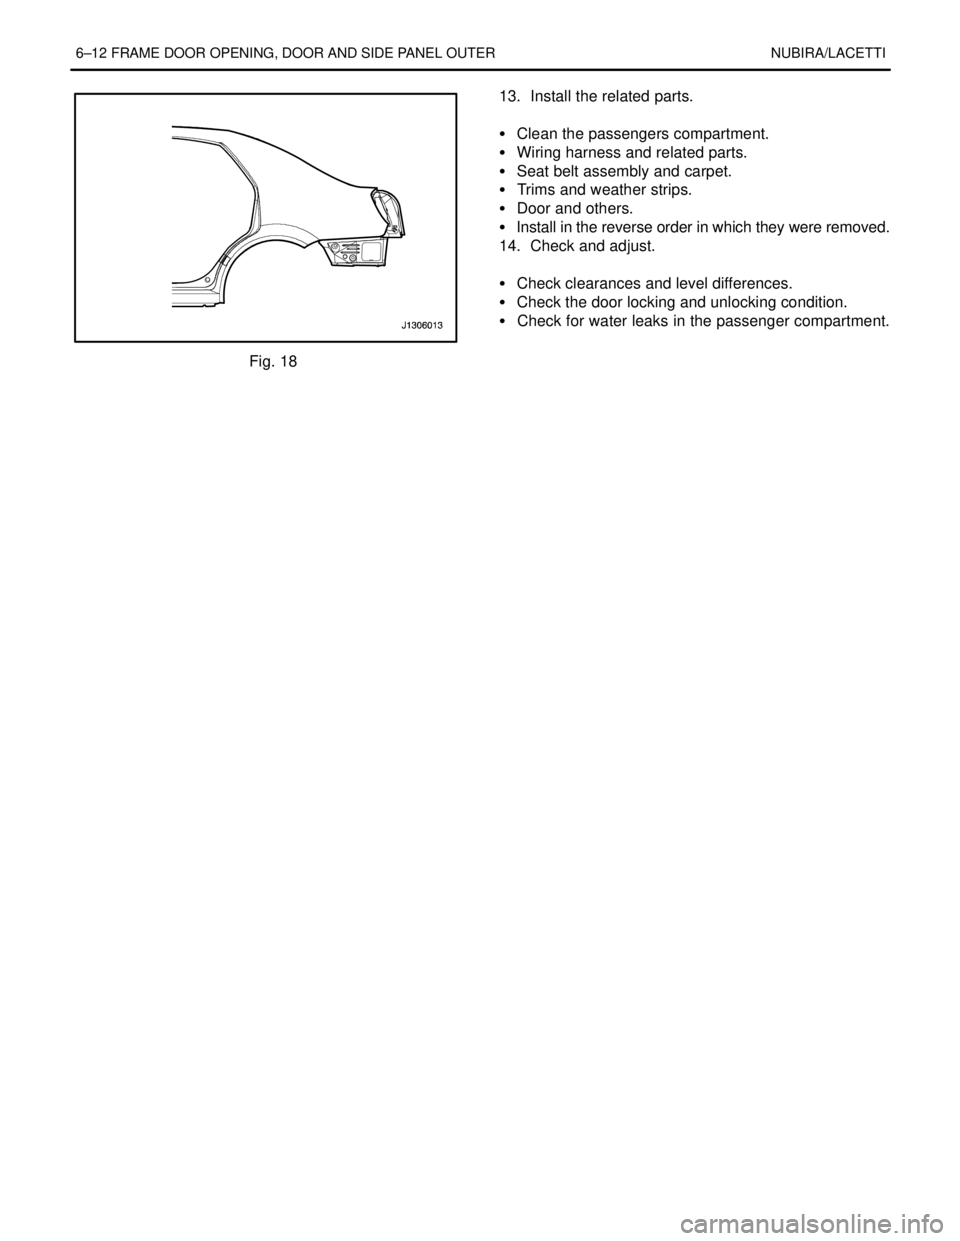
6–12 FRAME DOOR OPENING, DOOR AND SIDE PANEL OUTER NUBIRA/LACETTI
Fig. 1813. Install the related parts.
S Clean the passengers compartment.
S Wiring harness and related parts.
S Seat belt assembly and carpet.
S Trims and weather strips.
S Door and others.
S Install in the reverse order in which they were removed.
14. Check and adjust.
S Check clearances and level differences.
S Check the door locking and unlocking condition.
S Check for water leaks in the passenger compartment.
Page 2617 of 2643
9–14 SEALING, CAULKING AND DEADNER NUBIRA/LACETTI
2. DEADNER
2–1. GENERAL DESCRIPTION
.
Deadner is properly designed and applied for reduce the
vibration and noise. Also, it plays in maintaining the
structural rigidity of the panel.
.
2–2. REPAIR PROCEDURE
.
1. Remove the related parts.
S Seats, carpet.
S Trims, others.
.
2. Removal of the damaged deadner.
S Peel off the damaged deadner with a steel spatula, care-
fully.
.
3. Clean and dry.
S Before applying the deadner, thoroughly clean and dry
the areas to be applied.
.
4. Prelocation the new deadner on the panels to be ap-
plied.
.
Note : Avoid the parts mounting holes and service holes.
.
5. Adhension of deadner.
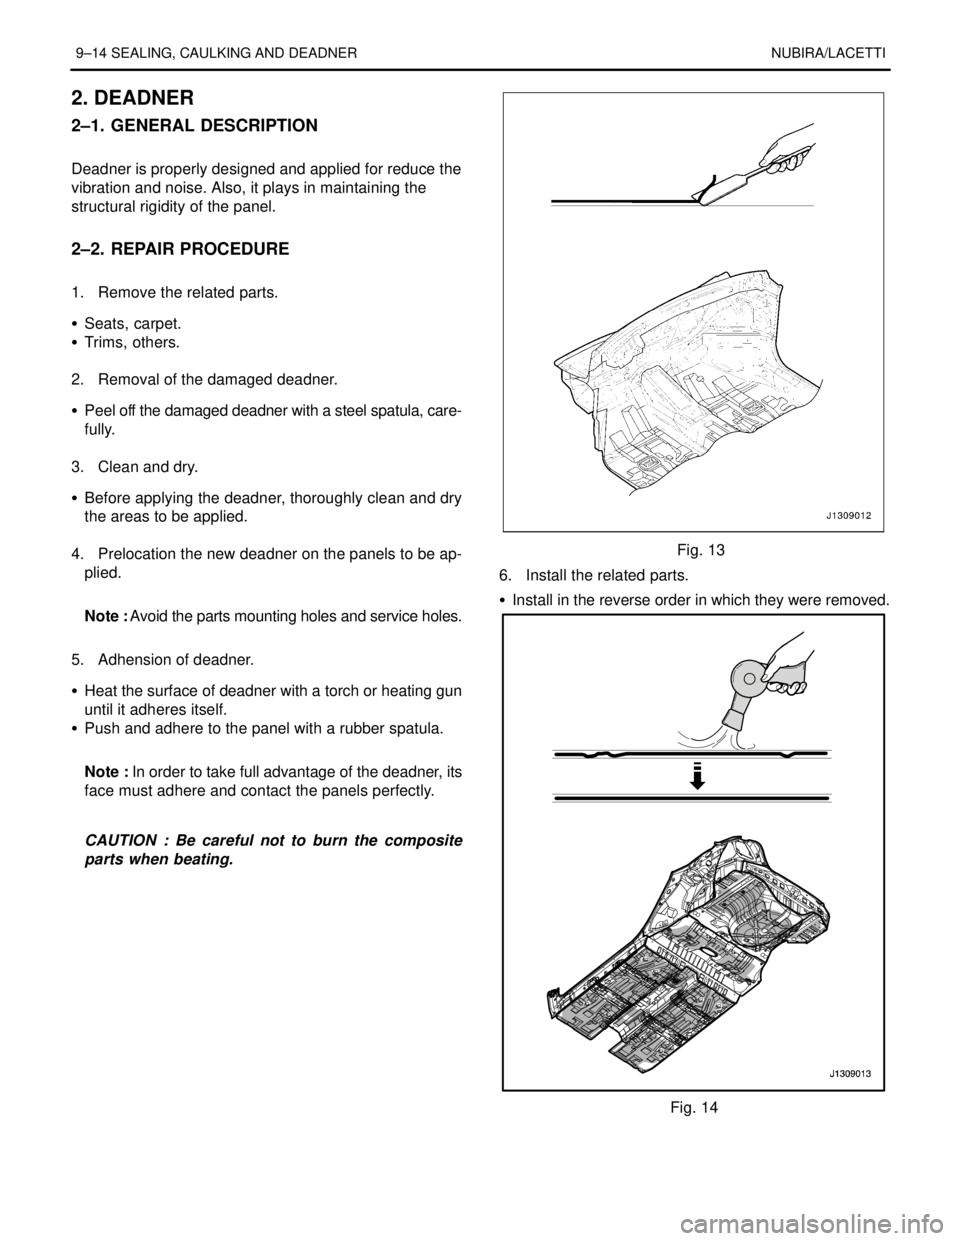
S Heat the surface of deadner with a torch or heating gun
until it adheres itself.
S Push and adhere to the panel with a rubber spatula.
.
Note : In order to take full advantage of the deadner, its
face must adhere and contact the panels perfectly.
.
CAUTION : Be careful not to burn the composite
parts when beating.
Fig. 13
6. Install the related parts.
S Install in the reverse order in which they were removed.
Fig. 14