Page 2520 of 2643

1–12 GENERAL INFORMATIONNUBIRA/LACETTI
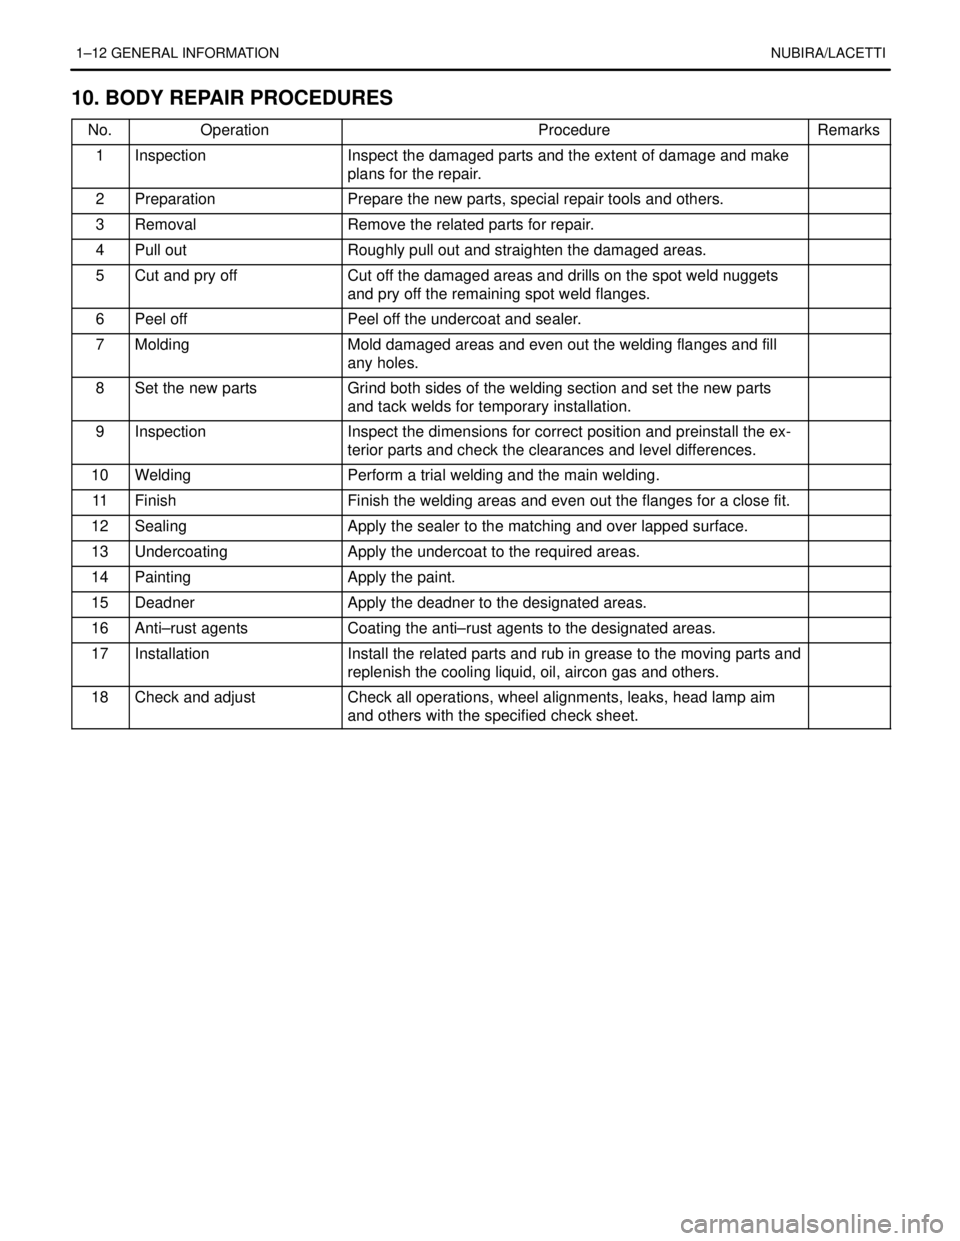
10. BODY REPAIR PROCEDURES
No.OperationProcedureRemarks
1InspectionInspect the damaged parts and the extent of damage and make
plans for the repair..
2PreparationPrepare the new parts, special repair tools and others..
3RemovalRemove the related parts for repair..
4Pull outRoughly pull out and straighten the damaged areas..
5Cut and pry offCut off the damaged areas and drills on the spot weld nuggets
and pry off the remaining spot weld flanges..
6Peel offPeel off the undercoat and sealer..
7MoldingMold damaged areas and even out the welding flanges and fill
any holes..
8Set the new partsGrind both sides of the welding section and set the new parts
and tack welds for temporary installation..
9InspectionInspect the dimensions for correct position and preinstall the ex-
terior parts and check the clearances and level differences..
10WeldingPerform a trial welding and the main welding..
11FinishFinish the welding areas and even out the flanges for a close fit..
12SealingApply the sealer to the matching and over lapped surface..
13UndercoatingApply the undercoat to the required areas..
14PaintingApply the paint..
15DeadnerApply the deadner to the designated areas..
16Anti–rust agentsCoating the anti–rust agents to the designated areas..
17InstallationInstall the related parts and rub in grease to the moving parts and
replenish the cooling liquid, oil, aircon gas and others..
18Check and adjustCheck all operations, wheel alignments, leaks, head lamp aim
and others with the specified check sheet..
Page 2539 of 2643
NUBIRA/LACETTIFRONT 4–5
S Aircon condenser and related parts.
S Head lamps and fenders.
S Hood, radiator grill, and bumper.
S Others
S Install in the reverse order in which they were removed.
Note : After install the all related parts, rub in grease to
the moving parts and replenish cooling liquid, break oil,
aircon gas and others.
14. Check and adjust
S Check clearances and level differences.
S Check the hood locking and unlocking condition.
S Adjust the head lamp aim.
S Check all operation.
S Check for gas, oil and liquid leaks.
Note : Use specified check sheet for operation check
properly.
Page 2543 of 2643

NUBIRA/LACETTIFRONT 4–9
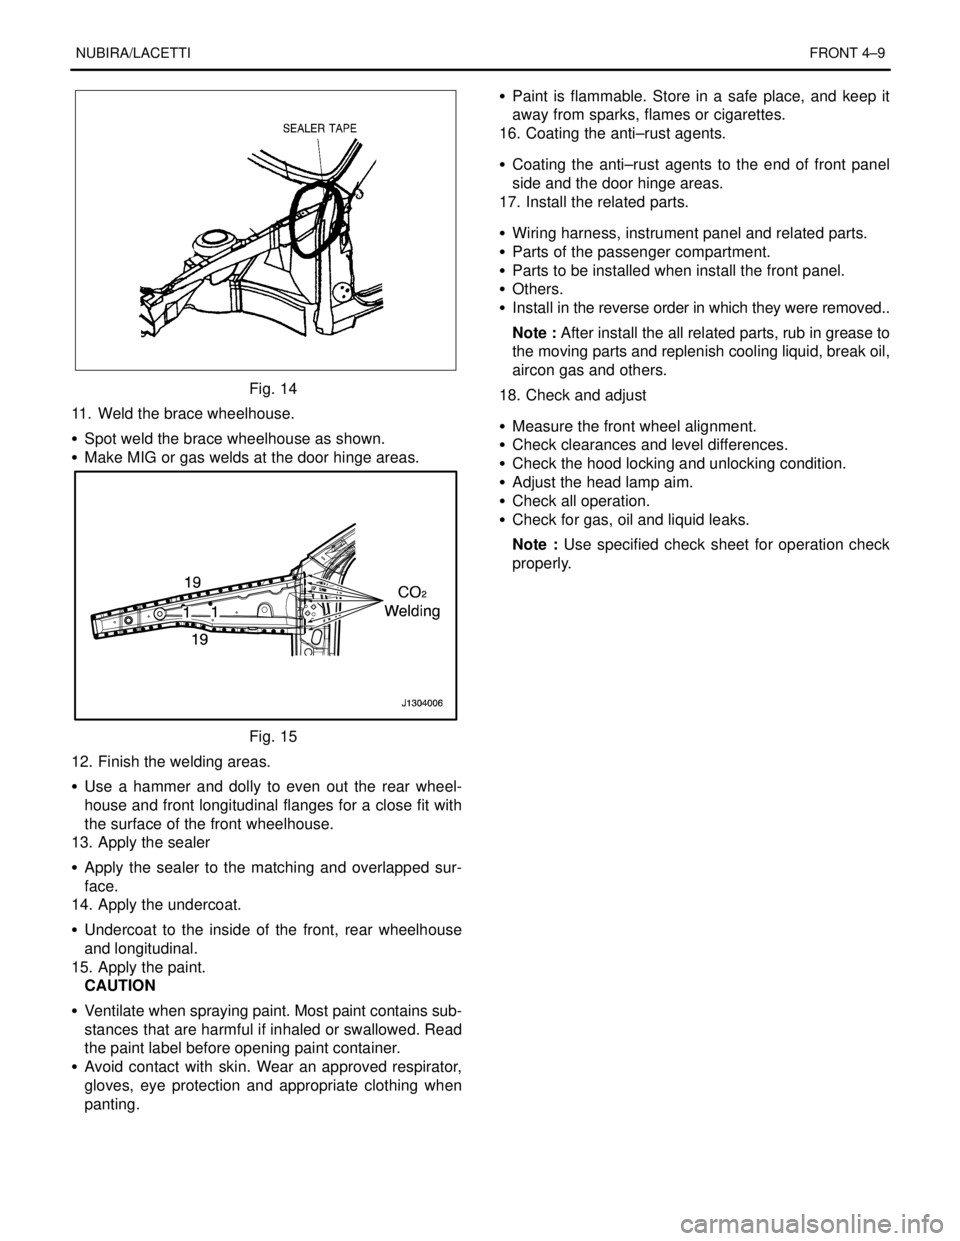
Fig. 14
11. Weld the brace wheelhouse.
S Spot weld the brace wheelhouse as shown.
S Make MIG or gas welds at the door hinge areas.
Fig. 15
12. Finish the welding areas.
S Use a hammer and dolly to even out the rear wheel-
house and front longitudinal flanges for a close fit with
the surface of the front wheelhouse.
13. Apply the sealer
S Apply the sealer to the matching and overlapped sur-
face.
14. Apply the undercoat.
S Undercoat to the inside of the front, rear wheelhouse
and longitudinal.
15. Apply the paint.
CAUTION
S Ventilate when spraying paint. Most paint contains sub-
stances that are harmful if inhaled or swallowed. Read
the paint label before opening paint container.
S Avoid contact with skin. Wear an approved respirator,
gloves, eye protection and appropriate clothing when
panting.S Paint is flammable. Store in a safe place, and keep it
away from sparks, flames or cigarettes.
16. Coating the anti–rust agents.
S Coating the anti–rust agents to the end of front panel
side and the door hinge areas.
17. Install the related parts.
S Wiring harness, instrument panel and related parts.
S Parts of the passenger compartment.
S Parts to be installed when install the front panel.
S Others.
S Install in the reverse order in which they were removed..
Note : After install the all related parts, rub in grease to
the moving parts and replenish cooling liquid, break oil,
aircon gas and others.
18. Check and adjust
S Measure the front wheel alignment.
S Check clearances and level differences.
S Check the hood locking and unlocking condition.
S Adjust the head lamp aim.
S Check all operation.
S Check for gas, oil and liquid leaks.
Note : Use specified check sheet for operation check
properly.
Page 2547 of 2643
NUBIRA/LACETTIFRONT 4–13
Note : After install the all related parts, rub in grease o
the moving parts and replenish cooling liquid, break oil,
aircon gas and others.
14. Check and adjust
S Check clearances and level differences.
S Check the hood locking and unlocking condition.
S Adjust the head lamp aim.
S Check all operation.
S Check for gas, oil and liquid leaks.
S Check for water leaks in the passenger compartment.
Note : Use specified check sheet for operation check
properly.