Page 48 of 277

must remain open, close all windows. Adjust the
heating or cooling system to force outside air into the
vehicle. Set the blower at high speed.
Safety Checks You Should Make Inside the
Vehicle
Seat Belts
Inspect the belt system periodically, checking for cuts,
frays and loose parts. Damaged parts must be replaced
immediately. Do not disassemble or modify the system.
Safety belt assemblies must be replaced after an accident
if they have been damaged (bent retractor, torn webbing,
etc.). If there is any question regarding belt or retractor
condition, replace the belt.
Airbag Light
The light should come on and remain on for 6 to
8 seconds as a bulb check when the ignition
switch is first turned ON. If the bulb is not lit
during starting, have it replaced. If the light stays on or
comes on while driving, have the system checked by an
authorized dealer.
Defrosters
Check operation by selecting the defrost mode and place
the blower control on high speed. You should be able to
feel the air directed against the windshield.
Periodic Safety Checks You Should Make Outside
the Vehicle
Tires
Examine tires for excessive tread wear or uneven wear
patterns. Check for stones, nails, glass, or other objects
lodged in the tread. Inspect for tread cuts or sidewall
cracks. Check wheel nuts for tightness and tires (includ-
ing spare) for proper pressure.
Lights
Have someone observe the operation of exterior lights
while you work the controls. Check turn signal and high
beam indicator lights on the instrument panel.
Fluid Leaks
Check area under vehicle after overnight parking for
brake fluid, fuel, water, oil, or other fluid leaks. Also, if
gasoline fumes are present, the cause should be corrected
immediately.
48 THINGS TO KNOW BEFORE STARTING YOUR VEHICLE
Page 68 of 277

Daytime Running Lights (Canada Only)
The headlights are on at a dimmer level whenever the
vehicle is started and the parking brake is released. The
lights remain on until the ignition switch is turned OFF.
MULTIFUNCTION CONTROL LEVERTurn Signals
The arrows on each side of the instrument cluster flash to
show operation of the front and rear turn signal lights. If
either light flashes at an extremely fast rate, check for a
defective outside light bulb. If both of the indicators fail
to light when the lever is moved, it would suggest that
the fuse or indicator bulbs are defective.
Headlight Dimmer Switch
Pull the multi-function control lever toward the steering
wheel to switch the headlights from high or low beam.
Passing Light
You can signal another vehicle with your headlights by
lightly pulling the multi-function lever toward the steer-
ing wheel. This will cause the headlights to turn on at
high beam and remain on until the lever is released.
68 UNDERSTANDING THE FEATURES OF YOUR VEHICLE
Page 196 of 277
�Replacement Light Bulbs................230
�Bulb Replacement......................230
▫Headlight And Parking Light Removal......230
▫Front Park, Turn Signal And Front Sidemarker
Light..............................233
▫Fog Light...........................233
▫Center Stop Light.....................234
▫Tail, Stop, Back Up, And Turn Signal Lights . . 234▫License Plate Light....................235�Specifications.........................235
�Fluid Capacities.......................236
�Recommended Fluids, Lubricants And Genuine
Parts
...............................237
▫Engine.............................237
▫Chassis............................237
▫Body..............................238
196 MAINTAINING YOUR VEHICLE
Page 230 of 277

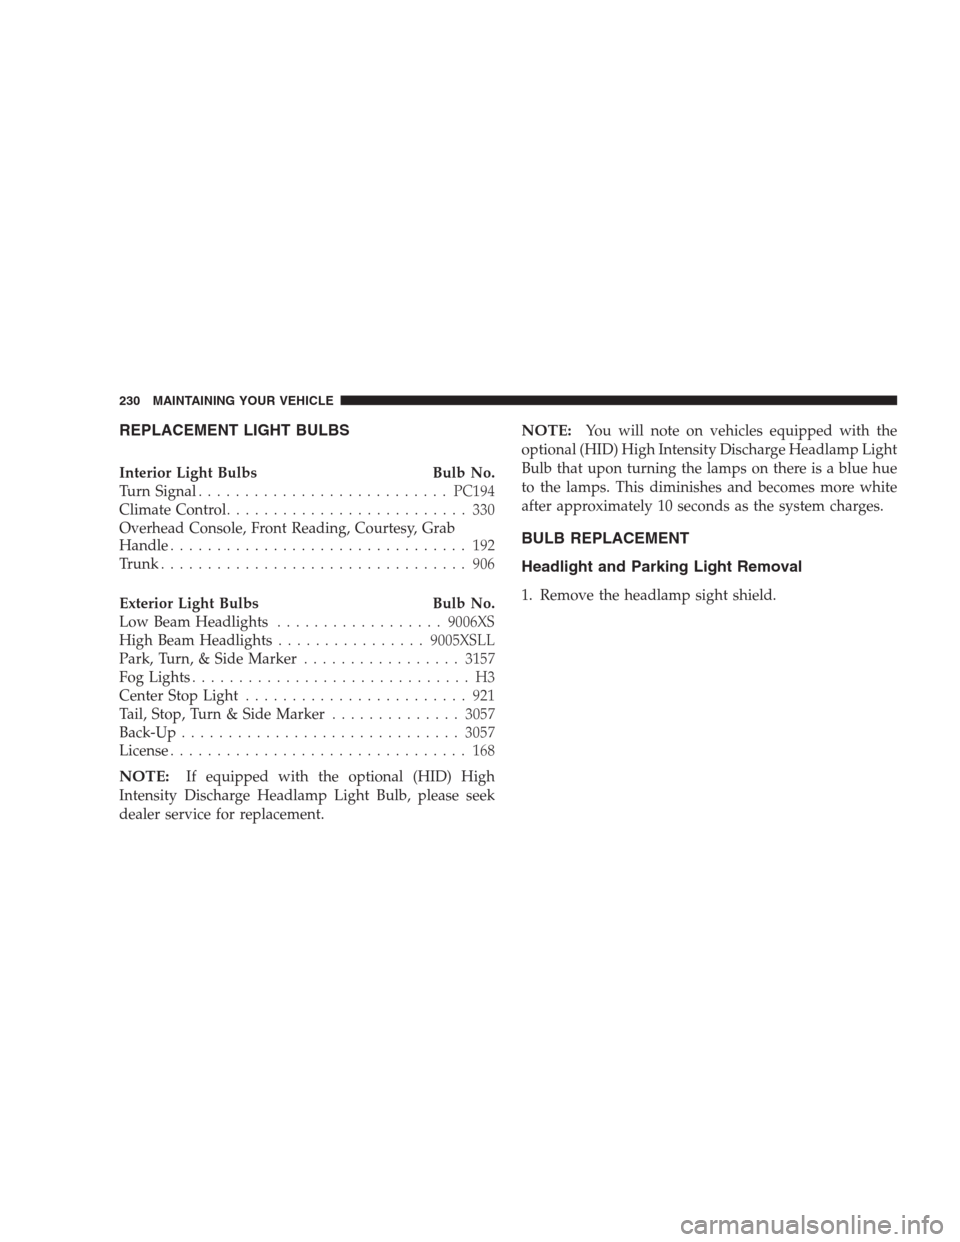
REPLACEMENT LIGHT BULBS
Interior Light Bulbs Bulb No.
Turn Signal...........................PC194
Climate Control.......................... 330
Overhead Console, Front Reading, Courtesy, Grab
Handle................................ 192
Trunk................................. 906
Exterior Light Bulbs Bulb No.
Low Beam Headlights..................9006XS
High Beam Headlights................9005XSLL
Park, Turn, & Side Marker.................3157
Fog Lights.............................. H3
Center Stop Light........................ 921
Tail, Stop, Turn & Side Marker..............3057
Back-Up..............................3057
License................................ 168
NOTE:If equipped with the optional (HID) High
Intensity Discharge Headlamp Light Bulb, please seek
dealer service for replacement.
NOTE:You will note on vehicles equipped with the
optional (HID) High Intensity Discharge Headlamp Light
Bulb that upon turning the lamps on there is a blue hue
to the lamps. This diminishes and becomes more white
after approximately 10 seconds as the system charges.
BULB REPLACEMENT
Headlight and Parking Light Removal
1. Remove the headlamp sight shield.
230 MAINTAINING YOUR VEHICLE
Page 233 of 277

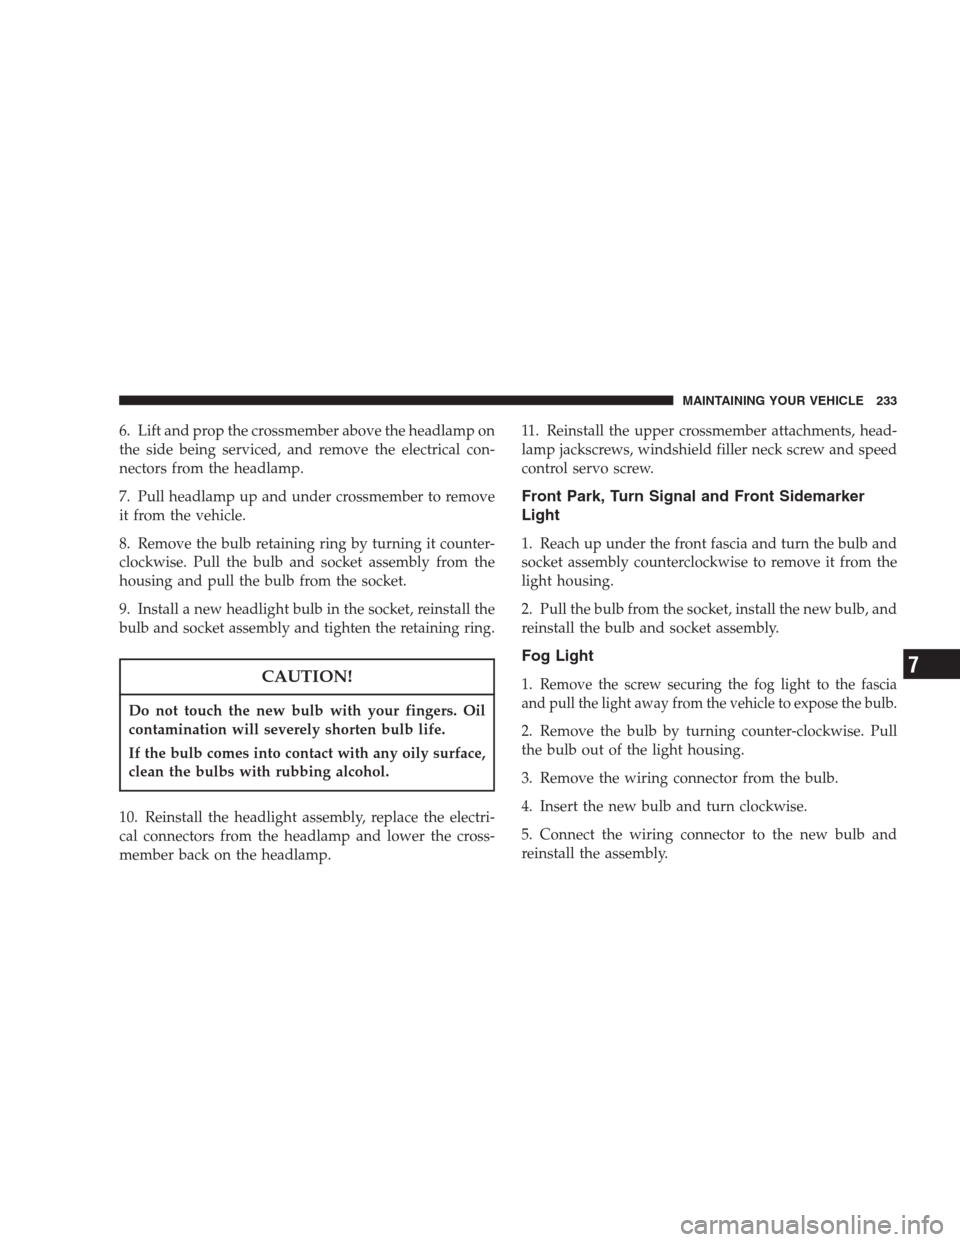
6. Lift and prop the crossmember above the headlamp on
the side being serviced, and remove the electrical con-
nectors from the headlamp.
7. Pull headlamp up and under crossmember to remove
it from the vehicle.
8. Remove the bulb retaining ring by turning it counter-
clockwise. Pull the bulb and socket assembly from the
housing and pull the bulb from the socket.
9. Install a new headlight bulb in the socket, reinstall the
bulb and socket assembly and tighten the retaining ring.
CAUTION!
Do not touch the new bulb with your fingers. Oil
contamination will severely shorten bulb life.
If the bulb comes into contact with any oily surface,
clean the bulbs with rubbing alcohol.
10. Reinstall the headlight assembly, replace the electri-
cal connectors from the headlamp and lower the cross-
member back on the headlamp.11. Reinstall the upper crossmember attachments, head-
lamp jackscrews, windshield filler neck screw and speed
control servo screw.
Front Park, Turn Signal and Front Sidemarker
Light
1. Reach up under the front fascia and turn the bulb and
socket assembly counterclockwise to remove it from the
light housing.
2. Pull the bulb from the socket, install the new bulb, and
reinstall the bulb and socket assembly.
Fog Light
1.Remove the screw securing the fog light to the fascia
and pull the light away from the vehicle to expose the bulb.
2. Remove the bulb by turning counter-clockwise. Pull
the bulb out of the light housing.
3. Remove the wiring connector from the bulb.
4. Insert the new bulb and turn clockwise.
5. Connect the wiring connector to the new bulb and
reinstall the assembly.
MAINTAINING YOUR VEHICLE 233
7
Page 234 of 277
Center Stop Light
1. Open the trunk and remove the trunk lid cover.
2. Turn the bulb socket counterclockwise and remove it
from the housing.
3. Pull the bulb from the socket and replace the bulb.
4. Reinstall the bulb and socket assembly.
Tail, Stop, Back Up, and Turn Signal Lights
1. Open the trunk and remove the fasteners securing the
light housing to the body.
2. Pull the light housing from the body to expose the
wiring socket.
3. Turn the bulb socket counterclockwise to remove from
the housing. Pull the bulb out of the socket and remove
the bulb.
4. Replace the bulb, reinstall the bulb and socket assem-
bly and reattach the light housing.
234 MAINTAINING YOUR VEHICLE