2004 CHRYSLER 300 M check engine light
[x] Cancel search: check engine lightPage 9 of 277

A WORD ABOUT YOUR KEYS
You can insert the double sided keys into the locks with
either side up.
The dealer that sold you your new vehicle has the key
code numbers for your vehicle locks. These numbers can
be used to order duplicate keys only from your dealer.
Ask your dealer for these numbers and keep them in a
safe place.
CAUTION!
An unlocked car is an invitation to thieves. Always
remove the key from the ignition and lock all the
doors when leaving the vehicle unattended.
Sentry Key Engine Immobilizer — If Equipped
The Sentry Key Immobilizer System prevents unautho-
rized operation of the vehicle by disabling the engine.
The system will shut the engine down after 2 seconds of
running if an invalid key is used to start the vehicle. This
system utilizes ignition keys which have an electronic
chip (transponder) embedded into them. Only keys thathave been programmed to the vehicle can be used to start
and operate the vehicle for more than the two second
validation time period.
The Sentry Key Immobilizer System does not need to be
armed or activated. Operation of the system is automatic
regardless of whether or not the vehicle is locked or
unlocked. During normal operation, the Sentry Key
Indicator light, located on the instrument panel upper
cover, will come on for 3 seconds immediately after the
ignition is turned on for a bulb check. Afterwards, if the
bulb remains on solid, this indicates a problem with the
electronics. If the bulb begins to flash after the bulb check,
this indicates that an invalid key has been used to start
the vehicle or there is a communication failure between
the transponder and the Sentry Key Immobilizer module.
Both of these lamp conditions will result in the engine
being shut down after 2 seconds of running. Keep in
mind that a key which has not been programmed is also
considered an invalid key even if it is cut to fit the
ignition for that vehicle. All of the keys provided with
your new vehicle have been programmed to the vehicle
electronics.
THINGS TO KNOW BEFORE STARTING YOUR VEHICLE 9
2
Page 113 of 277

INSTRUMENT CLUSTER DESCRIPTION
1. Fuel Gauge
When the ignition is in the ON position, the
pointer will show the level of fuel remaining in
the tank.
2. Low Fuel Warning Light
When the fuel level drops to about 2 gallons (8
liters), the Low Fuel symbol will light and re-
main lit until fuel is added. A warning chime will
sound when the light comes on.
3. Low Oil Pressure Light
This light indicates low engine oil pressure. The
light should come on briefly as a bulb check
when the engine is first started. If the light stays on or
comes on while driving, stop the vehicle and shut off
the engine. DO NOT operate the vehicle until the
cause is corrected.This light does not show how
much oil is in the engine.The engine oil level must be
checked under the hood.4. TRAC ON/OFF Lights
The Traction Control On light (TRAC ON) will come on
momentarily as a bulb check when the ignition switch is
first turned ON. If the light does not come on, have the
bulb replaced.
The TRAC ON light will also come on when the system
is controlling traction.
The Traction Control Off light (TRAC OFF) will come on
momentarily as a bulb check when the ignition switch is
first turned ON. If the light does not come on, have the
bulb checked.
The TRAC OFF light will come on when the Traction
Control switch has been used to turn the system off.
5. Trunk Ajar Light
This light indicates that the trunk is not latched
6. Tachometer
Measures engine revolutions-per-minute (R.P.M.). The
red numbers at the end on the scale show the maximum
permissible R.P.M. Ease off on the accelerator before
reaching the red area.
UNDERSTANDING YOUR INSTRUMENT PANEL 113
4
Page 115 of 277

If the pointer rises to the “H” mark, stop the vehicle and
turn off the engine until the problem is corrected.
CAUTION!
Continuing to drive with an overheated engine cool-
ing system can cause damage to the engine or other
components.
There are steps that you can take to slow down an
impending overheat condition. If your air conditioning is
on, turn it off. The air conditioning system adds heat to
the engine cooling system and turning off the A/C
removes this heat. You can also turn the Temperature
control to maximum heat, the Mode control to Floor and
the Fan control to High. This allows the heater core to act
as a supplement to the radiator and aids in removing heat
from the engine cooling system.
16. Malfunction Indicator Light
This light is part of an onboard diagnostic
system called OBD that monitors engine and
automatic transmission control systems. Thelight will illuminate when the key is in the ON
position before engine start. If the bulb does not come
on when turning the key from OFF to ON, have the
condition checked promptly.
Certain conditions such as a loose or missing gas cap or
poor fuel quality may illuminate the light after engine
start. The vehicle should be serviced if the light stays on
through several of your typical driving cycles. In most
situations the vehicle will drive normally and will not
require towing.
The Malfunction Indicator Light flashes to alert to serious
conditions that could lead to immediate loss of power or
severe catalytic converter damage. The vehicle should be
serviced as soon as possible if this occurs.
17. Trip Odometer Reset Knob
To reset the trip odometer, push the reset knob for about
two seconds.
18. Airbag Light
The light will come on and remain on for 6 to 8
seconds as a bulb check when the ignition switch
is first turned ON. If the bulb is not lit during starting,
UNDERSTANDING YOUR INSTRUMENT PANEL 115
4
Page 180 of 277

adequate performance. For Example, choose “4” if the
desired speed can be maintained. Choose “3” or “2” if
needed to maintain the desired speed.
Extended driving at high RPM’s should be avoided to
prevent excess heat generation. A reduction in vehicle
speed may be necessary to avoid extended driving at
high RPMs. Return to a higher gear range or vehicle
speed when road conditions and RPM level allow.
•
The trailer tongue load must be considered as part of
the tow vehicle load capacity when loading the ve-
hicle.
•If the trailer weighs more than 1,000 lbs. (450 kg), it
should have its own brakes.
WARNING!
Connecting trailer brakes to your vehicle’s hydraulic
brake lines can overload your brake system and
cause it to fail. You might not have brakes when you
need them and could have an accident.
•Whenever you pull a trailer, regardless of the trailer
size, stop lights and turn signals on the trailer are
recommended for motoring safety.
•The automatic transmission fluid, filter, and hypoid
differential fluid should be changed per Maintenance
Schedule “B” if you tow a trailer.
•If your Engine Coolant Light comes on, see the para-
graph on Overheating in Section 6 of this manual.
NOTE:Check the automatic transmission fluid level
before all towing. Fluid discoloration, or a burnt odor,
shows the need for a transmission fluid and filter change.
180 STARTING AND OPERATING
Page 190 of 277

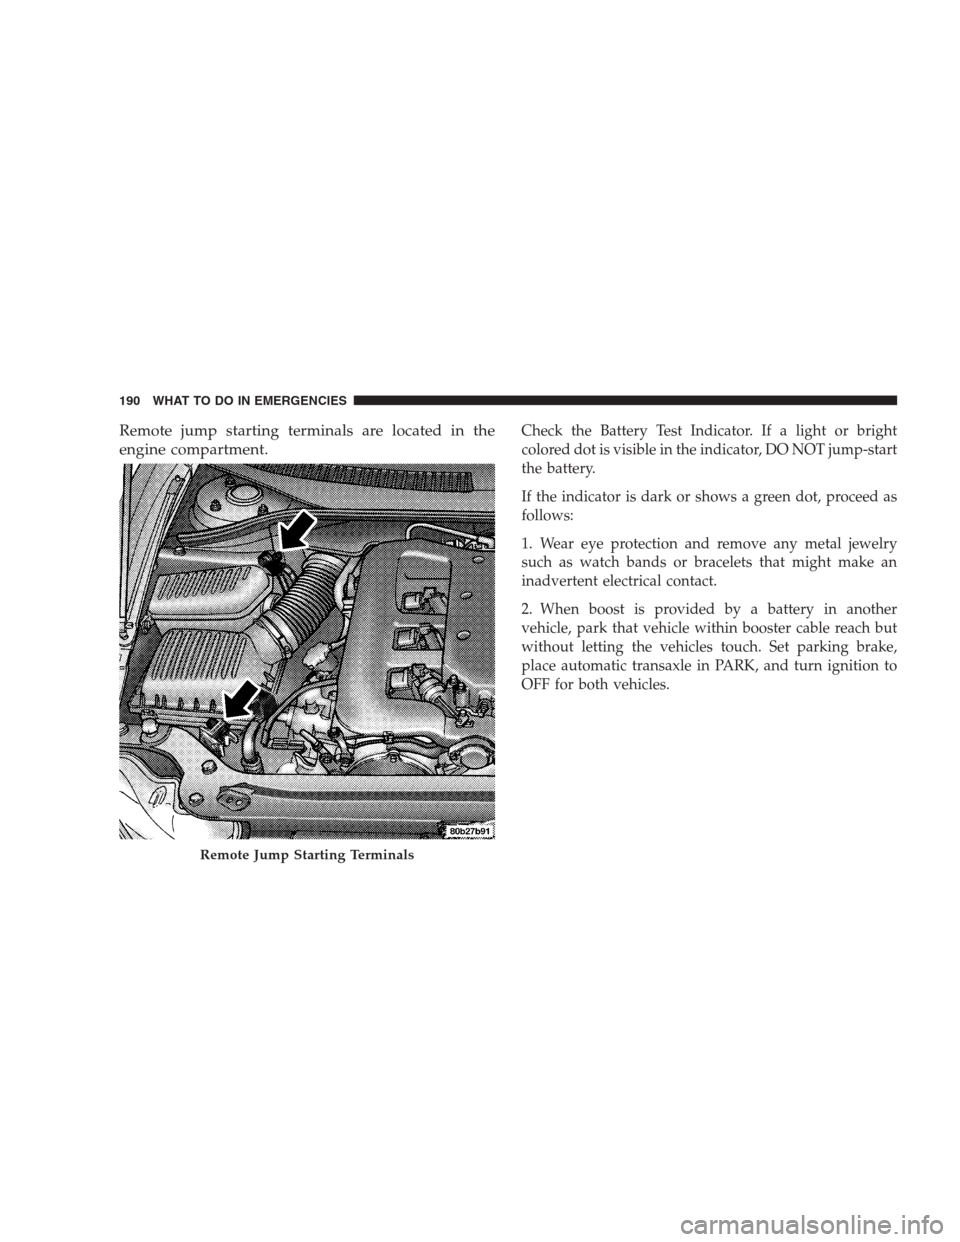
Remote jump starting terminals are located in the
engine compartment.Check the Battery Test Indicator. If a light or bright
colored dot is visible in the indicator, DO NOT jump-start
the battery.
If the indicator is dark or shows a green dot, proceed as
follows:
1. Wear eye protection and remove any metal jewelry
such as watch bands or bracelets that might make an
inadvertent electrical contact.
2. When boost is provided by a battery in another
vehicle, park that vehicle within booster cable reach but
without letting the vehicles touch. Set parking brake,
place automatic transaxle in PARK, and turn ignition to
OFF for both vehicles.
Remote Jump Starting Terminals
190 WHAT TO DO IN EMERGENCIES
Page 242 of 277

Once a Month
•
Check tire pressure and look for unusual wear or
damage.
•Inspect the battery and clean and tighten the terminals
as required.
•Check the fluid levels of coolant reservoir, brake
master cylinder, power steering and transaxle and add
as needed.
•Check all lights and all other electrical items for correct
operation.
•Check rubber seals on each side of the radiator for
proper fit.
At Each Oil Change
•
Change the engine oil filter.
•Inspect the exhaust system.
•Inspect the brake hoses.
•Inspect the CV joints and front and rear suspension
components.
•Check the automatic transmission fluid level.
•Check the coolant level, hoses, and clamps.
•Rotate the tires at each oil change interval shown on
Schedule “A” 6,000 miles (10 000 km) or every other
interval shown on Schedule “B” 6,000 miles (10 000
km).
242 MAINTENANCE SCHEDULES
8
M
A
I
N
T
E
N
A
N
C
E
S
C
H
E
D
U
L
E
S
Page 266 of 277

About Your Brakes...................162,163
ABS (Anti-Lock Brake) System............. 116
Accident Damage....................... 225
Adding Engine Coolant (Antifreeze)......... 215
Adding Fuel.......................... 177
Air Conditioning....................... 146
Air Conditioning Controls................ 146
Air Conditioning, Operating Tips........... 151
Air Conditioning Refrigerant.............. 209
Air Conditioning System................. 209
Air Pressure, Tires...................164,165
Airbag................................ 33
Airbag Deployment....................36,37
Airbag Light....................37,40,48,115
Airbag Maintenance...................... 39
Alarm System.......................... 23
Alignment and Balance.................. 174
Antenna, Satellite Radio.................. 139
Antifreeze Disposal..................... 215
Antifreeze (Engine Coolant)............... 215
Anti-Lock Brake System.................. 163
Anti-Lock Warning Light................. 116
Anti-Theft Security Alarm................. 23Appearance Care....................... 223
Auto Down Power Windows............... 25
Automatic Dimming Mirror................ 54
Automatic Door Locks.................... 16
Automatic Headlights.................... 66
Automatic Off, Interior Lights.............. 64
Automatic Temperature Control............ 146
Automatic Transaxle..................157,221
Fluid and Filter Changes................ 223
Fluid Level Check..................... 222
Reset Mode......................... 158
Selection Of Lubricant................. 221
Shifting............................ 158
Special Additives..................... 223
Autostick............................. 159
Ball Joints............................ 210
Battery............................189,208
Emergency Starting.................... 189
Gas Caution......................189,208
Jump Starting........................ 189
Keyless Transmitter Replacement.......... 23
Location.........................189,208
266 INDEX
Page 267 of 277

Saving Feature....................64,65,67
Belts, Drive........................... 205
Belts, Engine.......................... 207
Body Mechanism Lubrication.............. 211
Brake, Parking......................... 161
Brake System.......................162,218
Anti-Lock........................... 163
Fluid Check......................... 219
Hoses.............................. 219
Master Cylinder...................... 219
Warning Light....................... 117
Brake/Transmission Interlock...........157,158
Break-In Recommendations, New Vehicle...... 47
Brightness, Interior Lights................. 65
Bulb Replacement...................... 230
Bulbs, Light........................... 230
Calibration, Compass.................... 104
Capacities, Fluid....................... 236
Capacity, Cargo Weight.................. 179
Caps, Filler
Fuel............................... 177
Car Washes........................... 225Cargo Compartment
Capacity............................ 179
Luggage Carrier...................... 179
Carpeting............................. 225
Cassette Tape and Player Maintenance....... 144
Cassette Tape Player............... 119,126,144
Catalytic Converter..................... 206
CD Changer........................130,135
CD Player...................124,132,134,143
Central Door Locks...................... 15
Chains, Tire........................... 170
Changing A Flat Tire.................... 183
Charging System Light................... 116
Checking Your Vehicle For Safety............ 47
Child Restraint...................40,42,44,45
Child Restraint Tether Anchors...........43,44
Child Safety Locks....................... 16
Circuit Breakers........................ 228
Clean Air Gasoline...................... 175
Cleaning
Carpets............................. 225
Cloth.............................. 225
Glass.............................. 226
INDEX 267
10