Page 59 of 277
NOTE:On vehicles equipped with an EVIC (Electronic
Vehicle Information Center), these functions can be se-
lected at the EVIC using the Customer Programmable
Features. Refer to EVIC-Customer Programmable Fea-
tures for details.
Lumbar Support
This feature allows you to increase or decrease the
amount of lumbar support. Turn the control lever for-
ward to increase and rearward to decrease the desired
amount of lumbar support.
Heated Seats
The front driver’s and passenger seats are heated. The
control for the heater is located on the outboard side of
each seat. After turning on the ignition, you can choose
from High, Off, or Low heat settings. An indicator on the
switch shows which setting has been chosen.
Press the switch once to select a heat setting (high or low)
and press the switch a second time to turn the heated seat
off.
NOTE:Once a heat setting is selected, heat will be felt
within 2 to 3 minutes.
UNDERSTANDING THE FEATURES OF YOUR VEHICLE 59
3
Page 115 of 277

If the pointer rises to the “H” mark, stop the vehicle and
turn off the engine until the problem is corrected.
CAUTION!
Continuing to drive with an overheated engine cool-
ing system can cause damage to the engine or other
components.
There are steps that you can take to slow down an
impending overheat condition. If your air conditioning is
on, turn it off. The air conditioning system adds heat to
the engine cooling system and turning off the A/C
removes this heat. You can also turn the Temperature
control to maximum heat, the Mode control to Floor and
the Fan control to High. This allows the heater core to act
as a supplement to the radiator and aids in removing heat
from the engine cooling system.
16. Malfunction Indicator Light
This light is part of an onboard diagnostic
system called OBD that monitors engine and
automatic transmission control systems. Thelight will illuminate when the key is in the ON
position before engine start. If the bulb does not come
on when turning the key from OFF to ON, have the
condition checked promptly.
Certain conditions such as a loose or missing gas cap or
poor fuel quality may illuminate the light after engine
start. The vehicle should be serviced if the light stays on
through several of your typical driving cycles. In most
situations the vehicle will drive normally and will not
require towing.
The Malfunction Indicator Light flashes to alert to serious
conditions that could lead to immediate loss of power or
severe catalytic converter damage. The vehicle should be
serviced as soon as possible if this occurs.
17. Trip Odometer Reset Knob
To reset the trip odometer, push the reset knob for about
two seconds.
18. Airbag Light
The light will come on and remain on for 6 to 8
seconds as a bulb check when the ignition switch
is first turned ON. If the bulb is not lit during starting,
UNDERSTANDING YOUR INSTRUMENT PANEL 115
4
Page 153 of 277

STARTING AND OPERATING
CONTENTS
�Starting Procedures....................155
▫Normal Starting......................155
▫Extremely Cold Weather
(Below -20°F Or -29°C).................155
▫If Engine Fails To Start.................156
▫After Starting........................157
�Engine Block Heater — Optional U.S. And
Standard Canada
......................157
�Automatic Transaxle....................157
▫Brake/Transmission Interlock.............157
▫Transaxle Reset Mode..................158
▫Gear Ranges.........................158
�Autostick............................159
▫Autostick Operation...................159
▫Autostick General Information............160
�Parking Brake.........................161
�Brake System.........................162
▫Anti-Lock Brake System (ABS)............163
�Power Steering........................163
�Traction Control.......................163
�Ti re s................................164
▫Tire Inflation Pressures.................165
▫Tire Pressure Monitor System — If Equipped . . 166
▫High Speed Operation..................168
5
Page 155 of 277

STARTING PROCEDURES
WARNING!
Do not leave children or animals inside parked
vehicles in hot weather. Interior heat build up may
cause serious injury or death.
The gear selector must be in the NEUTRAL or PARK
position before you can start the engine. Apply the brakes
before shifting to any driving gear.
Normal Starting
Normal Starting of either a cold or a warm engine does
not require pumping or depressing the accelerator pedal.
Simply turn the key to the “START” position and release
when the engine starts. If the engine has not started
within 3 seconds, slightly depress the accelerator pedal
while continuing to crank. If the engine fails to start
within 15 seconds, turn the key to the “OFF” position,
wait 10 to 15 seconds, then repeat the normal starting
procedure.
Extremely Cold Weather (below -20°F or -29°C)
For reliable starting at these temperatures, use externally
powered battery and electric engine block heaters that
are available from your dealer.
STARTING AND OPERATING 155
5
Page 157 of 277

After Starting
The idle speed will automatically decrease as the engine
warms up.
ENGINE BLOCK HEATER — Optional U.S. and
Standard Canada
These heaters use a common power cord which is stored
under the hood, behind the Air Cleaner housing. Plug the
cord into any 110 volt AC outlet and both heaters will be
energized. Use the heaters when temperatures below 0°F
(-18°C) are expected to last for several days.
AUTOMATIC TRANSAXLE
Brake/Transmission Interlock
This interlock system prevents you from moving the gear
selector out of the Park position unless the brake pedal is
pressed. This system is active only while the key is in the
RUN position.
CAUTION!
Damage to the transaxle may occur if the following
precautions are not observed:
•Shift into PARK only after the vehicle has come to a
complete stop.
•Shift into or out of REVERSE only after the vehicle has
come to a complete stop and the engine is at idle
speed.
•Do not shift from REVERSE, PARK or NEUTRAL into
any forward gear when the engine is above idle speed.
•Before shifting into any gear, make sure your foot is
firmly on the brake pedal.
The electronically controlled transaxle provides a precise
shift schedule. The transaxle electronics are self-
calibrating. Therefore, the first few shifts on a new
vehicle may be somewhat abrupt. This is a normal
condition, and precision shifts will develop within a few
shift cycles.
STARTING AND OPERATING 157
5
Page 183 of 277

the fan control to High. This allows the heater core to act
as a supplement to the radiator and aids in removing heat
from the engine cooling system.
CAUTION!
Driving with a hot cooling system could damage
your vehicle. If temperature gauge reads “H”, pull
over and stop the vehicle. Idle the vehicle with the
air conditioner turned off until the pointer drops
back into the normal range. If the pointer remains on
the “H”, turn the engine off immediately, and call for
service.
WARNING!
A hot engine cooling system is dangerous. You or
others could be badly burned by steam or boiling
coolant. You may want to call a service center if your
vehicle overheats. If you decide to look under the
hood yourself, see Section 7, Maintenance, of this
manual. Follow the warnings under the Cooling
System Pressure Cap paragraph.
JACKING AND TIRE CHANGING
WARNING!
Getting under a jacked-up vehicle is dangerous. The
vehicle could slip off the jack and fall on you. You
could be crushed. Never get any part of your body
under a vehicle that is on a jack. Never start or run
the engine while the vehicle is on a jack. If you need
to get under a raised vehicle, take it to a service
center where it can be raised on a lift.
WHAT TO DO IN EMERGENCIES 183
6
Page 191 of 277

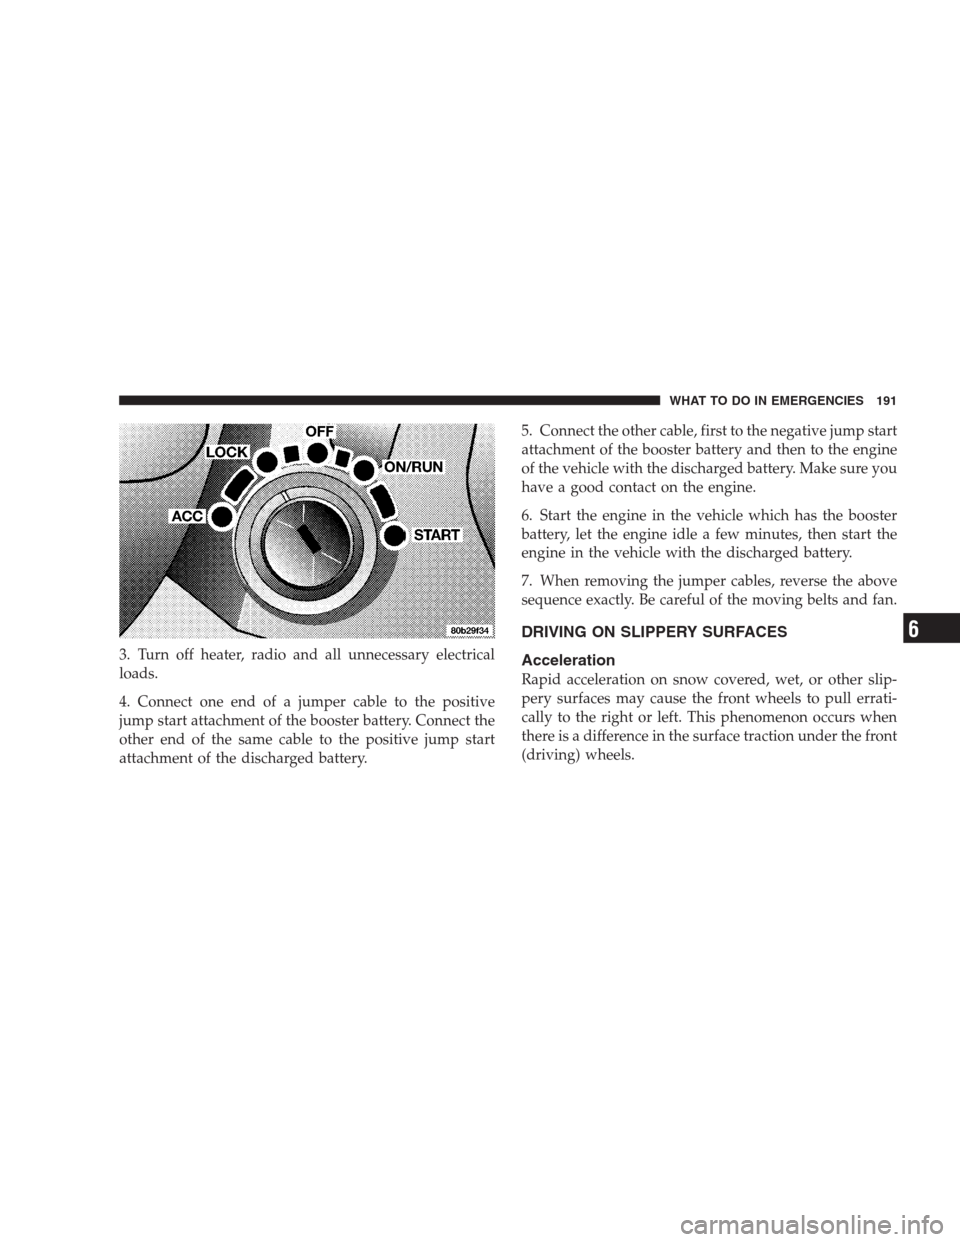
3. Turn off heater, radio and all unnecessary electrical
loads.
4. Connect one end of a jumper cable to the positive
jump start attachment of the booster battery. Connect the
other end of the same cable to the positive jump start
attachment of the discharged battery.5. Connect the other cable, first to the negative jump start
attachment of the booster battery and then to the engine
of the vehicle with the discharged battery. Make sure you
have a good contact on the engine.
6. Start the engine in the vehicle which has the booster
battery, let the engine idle a few minutes, then start the
engine in the vehicle with the discharged battery.
7. When removing the jumper cables, reverse the above
sequence exactly. Be careful of the moving belts and fan.
DRIVING ON SLIPPERY SURFACES
Acceleration
Rapid acceleration on snow covered, wet, or other slip-
pery surfaces may cause the front wheels to pull errati-
cally to the right or left. This phenomenon occurs when
there is a difference in the surface traction under the front
(driving) wheels.
WHAT TO DO IN EMERGENCIES 191
6
Page 229 of 277

Cavity Fuse Circuits
7 20 Amp
YellowTail, License, Parking, Illumina-
tion Lights, Instrument Cluster
8 10 Amp
RedAirbag
9 10 Amp
RedTurn Signal Lights, Turn Signal/
Hazard Indicator
10 15 Amp
Lt. BlueRight Low Beam
11 20 Amp
YellowHigh Beam Relay, High Beam
Indicator, High Beam Switch
12 15 Amp
Lt. BlueLeft Low Beam Headlight
13 10 Amp
RedFuel Pump Relay, Power Train
Control Module
14 10 Amp
RedCluster, Day/Night Mirror, Sun-
roof, Overhead Console, Garage
Door Opener, Body Control Mod-
ule
15 10 Amp
RedDaytime Running Light Module
(Canada)
16 20 Amp
YellowFog Light IndicatorCavity Fuse Circuits
17 10 Amp
RedABS Control, Back Up Lights,
Daytime Running Lights, A/C
Heater Control,
18 20 Amp
YellowPower Amplifier, Horn
19 15 Amp
Lt. BlueOverhead Console, Garage Door
Opener, Trunk, Overhead, Rear
Reading, and Visor Vanity Lights,
Trunk Release Solenoid, Power
Mirrors, Power Door Locks, Body
Control Module, Aspirator Motor
20 20 Amp
YellowBrake Lights
21 10 Amp
RedLeak Detection Pump, Low Rad
Relay, High Rad Relay, A/C
Clutch Relay
22 10 Amp
RedAirbag
23 30 Amp
GreenBlower Motor, ATC Power Mod-
ule
24 20 Amp
C/BRKRPower Window Motors
25 20 Amp
C/BRKRPower Door Lock Motors, Power
Seats
MAINTAINING YOUR VEHICLE 229
7