Page 22 of 277

2. Press and release the Set (S) button on the memory
seat switch, then press and release memory button 1 or 2.
3. Within ten seconds of completing step 2, press and
release the Lock button on the transmitter. This will link
the transmitter to the desired memory setting.
NOTE:Your transmitters may be unlinked to your
memory settings by following the procedure above ex-
cept pressing the Unlock button on the transmitter in step
3 above. On vehicles equipped with an EVIC (Electronic
Vehicle Information Center), these functions can be se-
lected at the EVIC using the Customer Programmable
Features. Refer to EVIC-Customer Programmable Fea-
tures for details. When newly purchased (or replacement)
transmitters are programmed into the vehicle, the first
transmitter trained will be associated with memory set-
ting 1, and the second transmitter trained will be associ-
ated with memory setting 2. Additional transmitters will
not be associated with a memory setting.
General Information
This transmitter complies with FCC rules part 15 and
with RS-210 of Industry Canada. Operation is subject to
the following two conditions: (1) this device may not
cause harmful interference and (2) This device must
accept any interference that may be received, including
interference that may cause undesired operation.
If your Remote Lock Control fails to operate from a
normal distance, check for these two conditions:
1. Weak batteries in transmitter. The expected life of
batteries is from one to two years.
2. Closeness to a radio transmitter such as a radio station
tower, airport transmitter, and some mobile or CB radios.
22 THINGS TO KNOW BEFORE STARTING YOUR VEHICLE
Page 49 of 277

UNDERSTANDING THE FEATURES OF YOUR VEHICLE
CONTENTS
�Console Features.......................53
�Cup Holders..........................53
▫Front Seat Cupholders...................53
�Coat Hook............................54
�Mirrors..............................54
▫Adjusting The Inside Day/Night Mirror......54
▫Automatic Dimming Mirror Feature.........54
▫Heated Remote Control Mirrors............55
▫Electric Remote Control Mirrors............55
▫Supplemental Indicators — 300M Special Only .56
▫Mirror Adjustment.....................56
�Seats................................57▫Power Seats..........................57
▫Power Reclining Seats...................58
▫Driver’s Seat Glide –To – Exit Feature........58
▫Lumbar Support.......................59
▫Heated Seats.........................59
▫Memory Feature.......................60
▫Programming The Remote Keyless Transmitter
For The Memory Feature.................61
▫Head Restraints.......................62
▫Folding Rear Seat......................62
�To Open And Close The Hood.............63
�Interior Lights.........................64
3
Page 55 of 277
NOTE:This feature is most effective when left in the
ON position.
Heated Remote Control Mirrors
These mirrors are heated to melt frost or ice. This
feature is activated whenever you turn on the rear
window defrost.
NOTE:On vehicles equipped with the automatic dim-
ming mirror feature, and when the dimming feature is
activated, the heated remote control mirrors will be
automatically dimmed as well.
Electric Remote Control Mirrors
NOTE:
Pre selected power mirror positions (for the
driver seat only) can be controlled by the Memory Seat
Feature. Refer to the Seats section which follows.
Press the L or R button located on the driver’s door panel
for Left or Right mirror selection.
Tilt the mirror control up or down, or side to side to
adjust the view in the mirror.
UNDERSTANDING THE FEATURES OF YOUR VEHICLE 55
3
Page 75 of 277

The dome/reading lights illuminate when a door is
opened or when the interior lights are turned on by
rotating the dimmer control located on the multi-function
lever.
The reading lights are activated by pressing on the
recessed area of the corresponding lens.
NOTE:The dome/reading lights will remain on until
the switch is pressed a second time, so be sure they have
been turned off before leaving the vehicle.
GARAGE DOOR OPENER — IF EQUIPPED
Equipped in vehicles that have the optional Overhead
Travel Information System (OTIS)
The HomeLink�Universal Transceiver replaces up to
three remote controls (hand held transmitters) that oper-
ate devices such as garage door openers, motorized
gates, or home lighting. It triggers these devices at the
push of a button. The Universal Transceiver operates off
your vehicle’s battery and charging system; no batteries
are needed.For additional information on HomeLink�, call
1–800–355–3515, or on the internet at
www.homelink.com.
UNDERSTANDING THE FEATURES OF YOUR VEHICLE 75
3
Page 80 of 277

Security
If you sell your vehicle, be sure to erase the frequencies.
To erase all of the previously trained frequencies, hold
down both outside buttons until the green light begins to
flash.
This device complies with part 15 of FCC rules and with
RS-210 of Industry Canada. Operation is subject to the
following conditions:
1. This device may not cause harmful interference.
2. This device must accept any interference that may be
received including interference that may cause undesired
operation.
NOTE:Changes or modifications not expressly ap-
proved by the party responsible for compliance could
void the user’s authority to operate the equipment.
HomeLink�is a trademark owned by Johnson Controls,
Inc.
GARAGE DOOR OPENER — IF EQUIPPED
Equipped in vehicles that have the optional Electronic
Vehicle Information Center (EVIC)
The HomeLink�Universal Transceiver replaces up to
three remote controls (hand-held transmitters) that oper-
ate devices such as garage door openers, motorized
gates, or home lighting. It triggers these devices at the
push of a button, located on the overhead console. The
universal transceiver operates off your vehicle’s battery
and charging system; no batteries are needed.
80 UNDERSTANDING THE FEATURES OF YOUR VEHICLE
Page 110 of 277

▫Loading The CD Changer...............140
▫Playing Discs........................140
▫Seek Button.........................141
▫FF/Tune/RW........................141
▫Mode Button........................141
▫Program Button 1.....................141
▫Program Button 4 (Random Play)..........141
▫Program Button 5.....................141
▫Time Button.........................141
▫Changing Modes......................141
▫Removing Discs From The CD Changer.....142
▫CD Changer Operation With The Changer
Off ...............................142�Remote Sound System Controls —
If Equipped
..........................142
▫Radio Operation......................143
▫Tape Player.........................143
▫CD Player — Single Disc In Radio.........143
▫CD Player — 6 Disc CD Changer..........143
�Cassette Tape And Player Maintenance......144
�Compact Disc Maintenance...............145
�Radio Operation And Cellular Phones.......145
�Climate Controls......................146
▫Automatic Temperature Control (ATC)......146
110 UNDERSTANDING YOUR INSTRUMENT PANEL
Page 130 of 277

display. Each time a tape is inserted the Dolby will turn
ON.
* “Dolby” noise reduction manufactured under license
from Dolby Laboratories Licensing Corporation. Dolby
and the double-D symbol are trademarks of Dolby Labo-
ratories Licensing Corporation.
CD Changer Control Capability — If Equipped
This radio is compatible with a remote mounted CD
changer available through Mopar Accessories. The fol-
lowing instructions are for the radio controls that operate
this CD changer.
Mode Button
To activate the CD changer, press the MODE button until
CD information appears on the display.
Push-Button
While the CD changer is playing, press the NUMBER 1
push-button or the NUMBER 5 push-button to select a
disc numbered higher or lower than the one currently
being played.
Seek Button
Press the SEEK up or down to select another track on the
same disc. A SEEK symbol will appear on the display.
Fast Forward And Rewind Buttons
Press and hold the FF button for fast forward. Press and
hold the RW button for fast reverse.
The audio output can be heard when fast forward and
fast reverse are activated.
Random Play (RND)
Press the Random button to play the tracks on the disc in
random order for an interesting change of pace.
Random can be cancelled by pressing the button a second
time or by ejecting the CD from the changer.
CD Diagnostic Indicators
When driving over a very rough road, the CD player may
skip momentarily. Skipping will not damage the disc or
the player, and play will resume automatically.
As a safeguard and to protect your CD player, one of the
following warning symbols may appear on your display.
A CD HOT symbol indicates the player is too hot.
130 UNDERSTANDING YOUR INSTRUMENT PANEL
Page 142 of 277

•Pressing the AM/FM button while in the tape or CD
mode will select the radio mode.
•If in the CD mode and the last CD is ejected, the radio
will tune to the last station selected.
Removing Discs from the CD Changer
If there is a single CD in the changer, press the EJT button
and the CD will eject. If the CD is not removed within 15
seconds, it will automatically reload into the CD changer.
To eject additional CDs from the changer, first select the
numbered button where the CD is located and then press
the EJT button.
CD Changer Operation with the Changer Off
The CD changer is able to load and eject discs with the
ignition power off. However, while the ignition is off, one
of the six numbered buttons must be pressed first.
REMOTE SOUND SYSTEM CONTROLS — IF
EQUIPPED
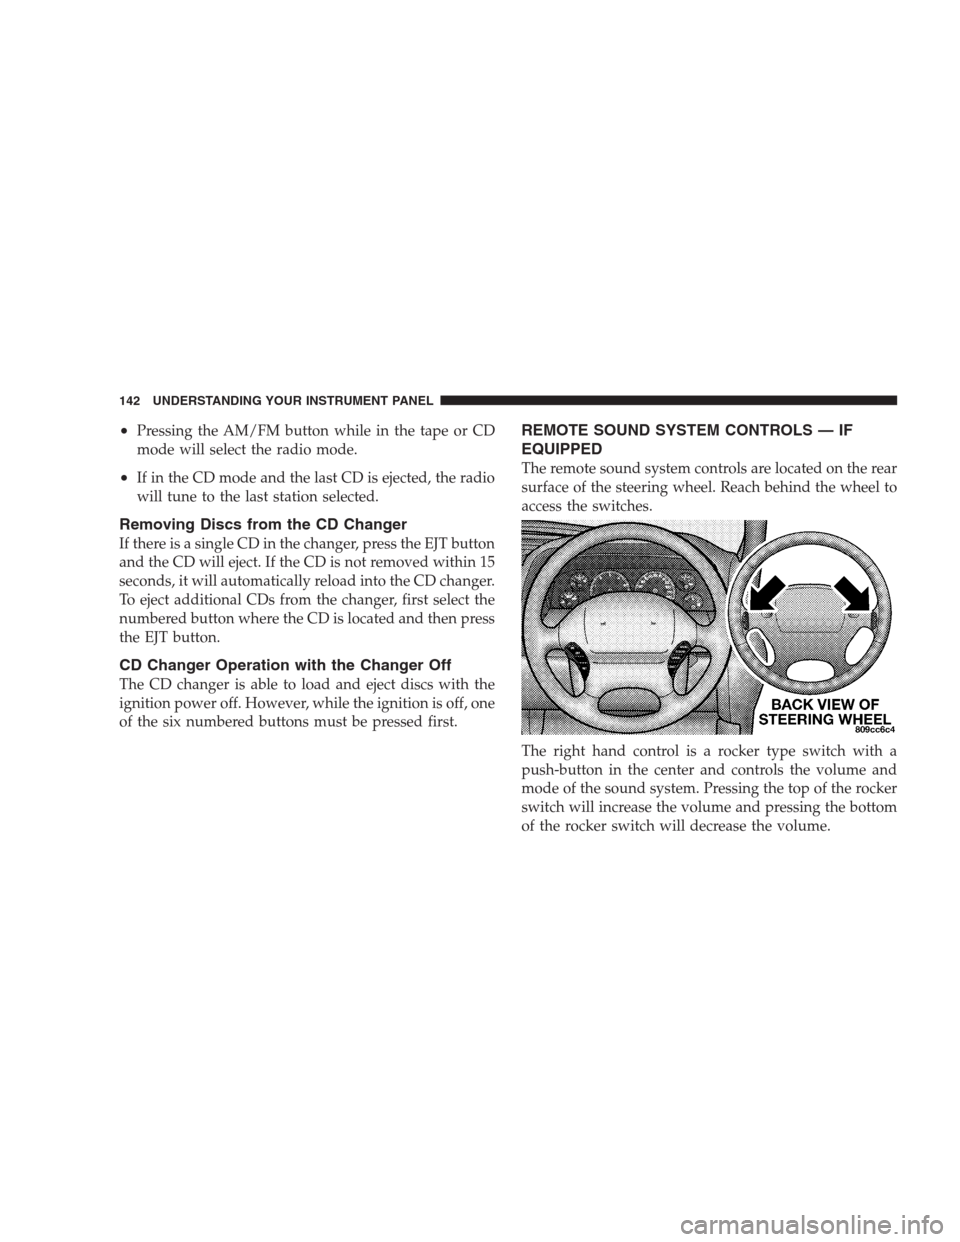
The remote sound system controls are located on the rear
surface of the steering wheel. Reach behind the wheel to
access the switches.
The right hand control is a rocker type switch with a
push-button in the center and controls the volume and
mode of the sound system. Pressing the top of the rocker
switch will increase the volume and pressing the bottom
of the rocker switch will decrease the volume.
142 UNDERSTANDING YOUR INSTRUMENT PANEL