Page 97 of 374
{CAUTION:
Four-wheel drive vehicles with the transfer
case in NEUTRAL will allow the vehicle to roll,
even if your shift lever is in PARK (P). So, be
sure the transfer case is in a drive gear Ð not
in NEUTRAL. Always set your parking brake.
Follow the proper steps to be sure your vehicle will not
move. See
Shifting Into Park (P) on page 2-25.
If you are pulling a trailer, see
Towing a Trailer on
page 4-57.
Mirrors
Manual Rearview Mirror
An inside rearview mirror is attached to your
windshield. The mirror can be adjusted up and
down or side to side.
The mirror may also be equipped with reading lamps.
The mirror can also be adjusted for day or night driving.
Pull the tab for night driving to reduce glare. Push
the tab for daytime driving.
2-31
Page 98 of 374
Outside Manual Mirrors
Adjust these mirrors by hand so that you can see a little
of the side of your vehicle when you are sitting in a
comfortable driving position.
Outside Power Mirrors
If your vehicle has power
mirrors, the selector switch
is located on the lower
left side of the instrument
panel.You can only adjust the mirrors when the ignition switch
is in ON or ACC.
To adjust the mirrors do the following:
1. Move the selector switch to the L (left) or R (right)
to select the mirror you wish to adjust.
2. Press the outer part of the four-way control pad,
located below the selector switch, that coincides
with the direction you want the mirror to go.
3. Return the selector switch to the center position to
help prevent moving the mirror accidentally.
2-32
Page 99 of 374
Outside Convex Mirror
Your passenger's side mirror is convex. A convex
mirror's surface is curved so you can see more from the
driver's seat.
{CAUTION:
A convex mirror can make things (like other
vehicles) look farther away than they really are.
If you cut too sharply into the right lane, you
could hit a vehicle on your right. Check your
inside mirror or glance over your shoulder
before changing lanes.
Storage Areas
Glove Box
Use your key to lock and unlock the glove box. To open
the glove box, pull the latch toward you.
The glove box may have a two-position detent for
opening the door. Lower the door to the ®rst detent for
access to the glove box. Pull it to the next detent
for further access.
Cupholder(s)
Two cupholders are on the center console next to the
parking brake lever.
Coinholder(s)
Your instrument panel may have two coinholders
located to the left of the steering wheel.
2-33
Page 100 of 374

Luggage Carrier
{CAUTION:
If you try to carry something on top of your
vehicle that is longer or wider than the luggage
carrier Ð like paneling, plywood, a mattress
and so forth Ð the wind can catch it as you
drive along. This can cause you to lose
control. What you are carrying could be
violently torn off, and this could cause you or
other drivers to have a collision, and of course
damage your vehicle. You may be able to carry
something like this inside. But, never carry
something longer or wider than the luggage
carrier on top of your vehicle.Your vehicle's luggage carrier has side rails and may be
equipped with crossrails attached to the roof to secure
cargo.
Use GM accessory racks that are compatible with your
luggage carrier for transporting sports equipment.
These are available through your GM dealer.
The crossrails, if equipped, are adjustable, but are only
designed to move a limited amount. The front and
rear crossrails are not interchangeable. If you do remove
the crossrails, make sure to mark them with front or
rear. When replacing the front and rear crossrails, make
sure to but them back in the same position they
came from as the front rail is slightly longer than the
rear rail.
Just loosen the slider knobs at each end of the crossrail
to move them.
·The front crossrail has limited movement when
traveling rearward.
·The back crossrail has limited movement when
traveling forward.
After adjusting them, make sure both sides of the
crossrails are even, then tighten the slider knobs.
2-34
Page 101 of 374

Be sure the cargo is properly loaded. Follow these
guidelines:
·Carrying small, heavy loads on the roof is not
recommended.
·Do not load cargo directly on the roof panel.
·Tie the load to the tie down loops at both ends of
the crossrails to keep loads from shifting.
·If you need to carry long items, move the crossrails
as far apart as possible. Tie the load to the tie
downs provided. Do not tie the load so tightly that
the crossrails and side rails are damaged.
Notice:Loading cargo on the luggage carrier that
weighs more than 100 lbs. (45 kg) or hangs over the
rear or sides of the vehicle may damage your
vehicle. Load cargo so that it rests on the slats as
far forward as possible and against the side
rails, making sure to fasten it securely.
Don't exceed the maximum vehicle capacity when
loading your vehicle. For more information on vehicle
capacity and loading, see
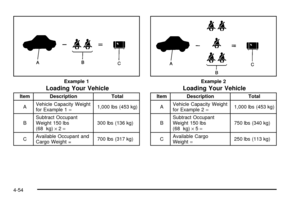
Loading Your Vehicle on
page 4-51.
To prevent damage or loss of cargo as you're driving,
check now and then to make sure the luggage
carrier and cargo are still securely fastened.
2-35
Page 102 of 374
Convenience Net
You may have a convenience net in the rear of your
vehicle. The net is not designed to store items during
off-road use. The net is not for larger, heavier items.
Attach the loops to the hooks located along the sides of
the rear cargo area. You may attach the convenience
net loops to either the forward or the rear hooks.
Cargo Cover
Luggage or other cargo placed in the luggage
compartment can be hidden from view by a luggage
compartment cover, if your vehicle has this feature.
However, the luggage compartment covers are
not designed to support items loaded on top of them,
and should not be used as a shelf.Use the anchors in the rear of the vehicle to hook the
cargo cover in place.
See
Loading Your Vehicle on page 4-51for more
information.
2-36
Page 103 of 374

Instrument Panel Overview...............................3-2
Hazard Warning Flashers................................3-4
Other Warning Devices...................................3-5
Horn.............................................................3-5
Tilt Wheel.....................................................3-5
Turn Signal/Multifunction Lever.........................3-6
Exterior Lamps.............................................3-13
Interior Lamps..............................................3-16
Accessory Power Outlets...............................3-18
Ashtrays and Cigarette Lighter........................3-19
Climate Controls............................................3-19
Climate Control System.................................3-19
Outlet Adjustment.........................................3-22
Passenger Compartment Air Filter...................3-23
Warning Lights, Gages and Indicators.............3-26
Warning Lights, Gages, and Indicators.............3-26
Instrument Panel Cluster................................3-27
Speedometer and Odometer...........................3-28
Tachometer.................................................3-28Safety Belt Reminder Light.............................3-28
Air Bag Readiness Light................................3-29
Charging System Light..................................3-30
Brake System Warning Light..........................3-30
Anti-Lock Brake System Warning Light.............3-31
Engine Coolant Temperature Gage..................3-32
Malfunction Indicator Lamp.............................3-33
Oil Pressure Light.........................................3-36
Overdrive Off Light........................................3-37
Four-Wheel-Drive Light..................................3-37
Power Indicator Light.....................................3-37
Fuel Gage...................................................3-38
Audio System(s).............................................3-39
Setting the Time...........................................3-39
Radio with CD..............................................3-40
Radio Reception...........................................3-45
Care of Your CDs.........................................3-45
Care of Your CD Player................................3-45
Fixed Mast Antenna......................................3-45
Section 3 Instrument Panel
3-1
Page 104 of 374
Instrument Panel Overview
3-2