2004 CHEVROLET MALIBU transmission
[x] Cancel search: transmissionPage 109 of 426

Programming the HomeLink®
Transmitter
Do not use the HomeLink®Transmitter with any garage
door opener that does not have the “stop and reverse”
feature. This includes any garage door opener model
manufactured before April 1, 1982. If you have a newer
garage door opener with rolling codes, please be
sure to follow steps 6 through 8 to complete the
programming of your HomeLink
®Transmitter.
Read the instructions completely before attempting to
program the HomeLink
®Transmitter. Because of
the steps involved, it may be helpful to have another
person available to assist you in programming the
transmitter.
Keep the original transmitter for use in other vehicles as
well as for future HomeLink
®programming. It is also
recommended that upon the sale of the vehicle,
the programmed HomeLink
®buttons should be erased
for security purposes. Refer to “Erasing HomeLink®
Buttons” or, for assistance, contact HomeLink®on the
internet at: www.homelink.com or by calling
1-800-355-3515.Be sure that people and objects are clear of the garage
door or gate operator you are programming. When
programming a garage door, it is advised to park outside
of the garage.
It is recommended that a new battery be installed in
your hand-held transmitter for quicker and more
accurate transmission of the radio frequency.
Your vehicle’s engine should be turned off while
programming the transmitter. Follow these steps to
program up to three channels:
1. Press and hold down the two outside buttons,
releasing only when the indicator light begins to
�ash, after 20 seconds. Do not hold down the
buttons for longer than 30 seconds and do not
repeat this step to program a second and/or third
transmitter to the remaining two HomeLink
®buttons.
2. Position the end of your hand-held transmitter about
1 to 3 inches (3 to 8 cm) away from the HomeLink
®
buttons while keeping the indicator light in view.
3. Simultaneously press and hold both the desired
button on HomeLink
®and the hand-held transmitter
button. Do not release the buttons until Step 4
has been completed.
Some entry gates and garage door openers may
require you to substitute Step 3 with the procedure
noted in “Gate Operator and Canadian
Programming” later in this section.
2-41
Page 111 of 426

Gate Operator and Canadian
Programming
Canadian radio-frequency laws require transmitter
signals to “time out” or quit after several seconds of
transmission. This may not be long enough for
HomeLink
®to pick up the signal during programming.
Similarly, some U.S. gate operators are manufactured to
“time out” in the same manner.
If you live in Canada, or you are having difficulty
programming a gate operator by using the
“Programming HomeLink
®” procedures (regardless of
where you live), replace Step 3 under “Programming
HomeLink
®” with the following:
Continue to press and hold the HomeLink
®button while
you press and release every two seconds (cycle)
your hand-held transmitter until the frequency signal has
been successfully accepted by HomeLink
®. The
indicator light will �ash slowly at �rst and then rapidly.
Proceed with Step 4 under “Programming HomeLink
®”
to complete.
Using HomeLink®
Press and hold the appropriate HomeLink®button for at
least half of a second. The indicator light will come
on while the signal is being transmitted.
Erasing HomeLink®Buttons
To erase programming from the three buttons do the
following:
1. Press and hold down the two outside buttons until
the indicator light begins to �ash, after 20 seconds.
2. Release both buttons. Do not hold for longer than
30 seconds.
HomeLink
®is now in the train (learning) mode and can
be programmed at any time beginning with Step 2
under “Programming HomeLink
®.”
Individual buttons can not be erased, but they can be
reprogrammed. See “Reprogramming a Single
HomeLink
®Button” next.
2-43
Page 131 of 426

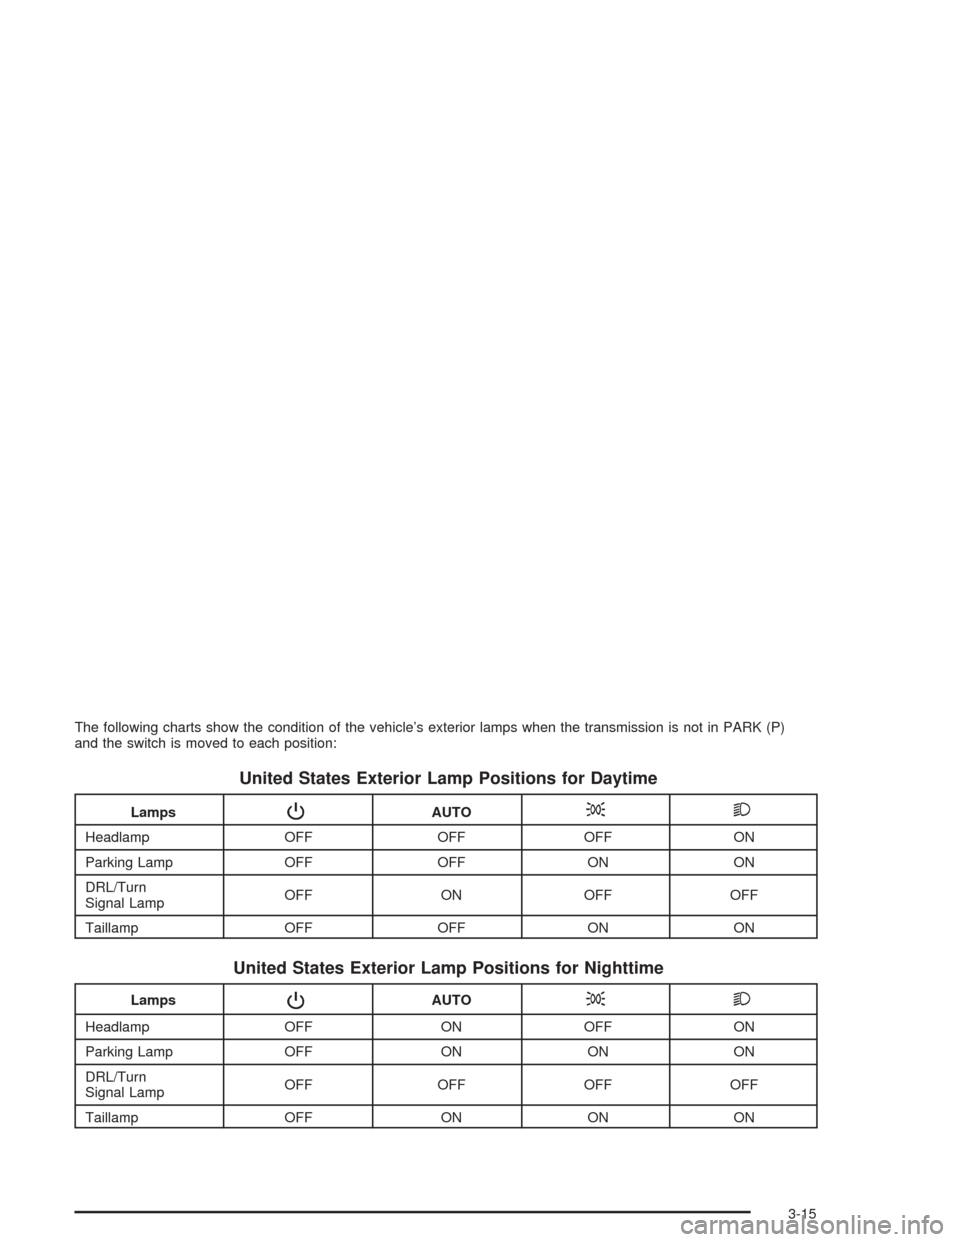
The following charts show the condition of the vehicle’s exterior lamps when the transmission is not in PARK (P)
and the switch is moved to each position:
United States Exterior Lamp Positions for Daytime
LampsPAUTO;2
Headlamp OFF OFF OFF ON
Parking Lamp OFF OFF ON ON
DRL/Turn
Signal LampOFF ON OFF OFF
Taillamp OFF OFF ON ON
United States Exterior Lamp Positions for Nighttime
LampsPAUTO;2
Headlamp OFF ON OFF ON
Parking Lamp OFF ON ON ON
DRL/Turn
Signal LampOFF OFF OFF OFF
Taillamp OFF ON ON ON
3-15
Page 134 of 426

During that delay, your instrument panel cluster may
not be as bright as usual. Make sure your instrument
panel brightness control is in the full bright position.
See “Instrument Panel Brightness Control” underInterior
Lamps on page 3-19.
To idle your vehicle with the system off, turn the
ignition on and rotate the exterior light switch to the
Off/On position. For Canadian vehicles, the transmission
must stay in PARK (P) for this function.
As with any vehicle, you should turn on the regular
headlamps when you need them.
Headlamps Off in Park (P)
This feature works when the ignition is on and it is
dark outside. To turn the headlamps off when it is
dark outside but keep other exterior lights on, turn
the exterior lamp control to the parking lamp position.
In this position, the parking lamps, sidemarker
lamps, taillamps, license plate lamps and instrument
panel lights will be on, but the headlamps will be off.
To turn on the headlamps along with the other
lamps when it is dark outside, turn the exterior lamp
control to the AUTO or headlamp position.
This feature will work for Canadian vehicles if the
vehicle is in PARK (P).
Delayed Headlamps
The delayed headlamps feature will continue to illuminate
the headlamps for 20 seconds after the key is turned to
OFF at night. Then the headlamps will automatically
turn off.
To override the 20 second delayed headlamp feature
while it is active turn the switch at the end of the
turn signal/multifunction lever to the Off/On position.
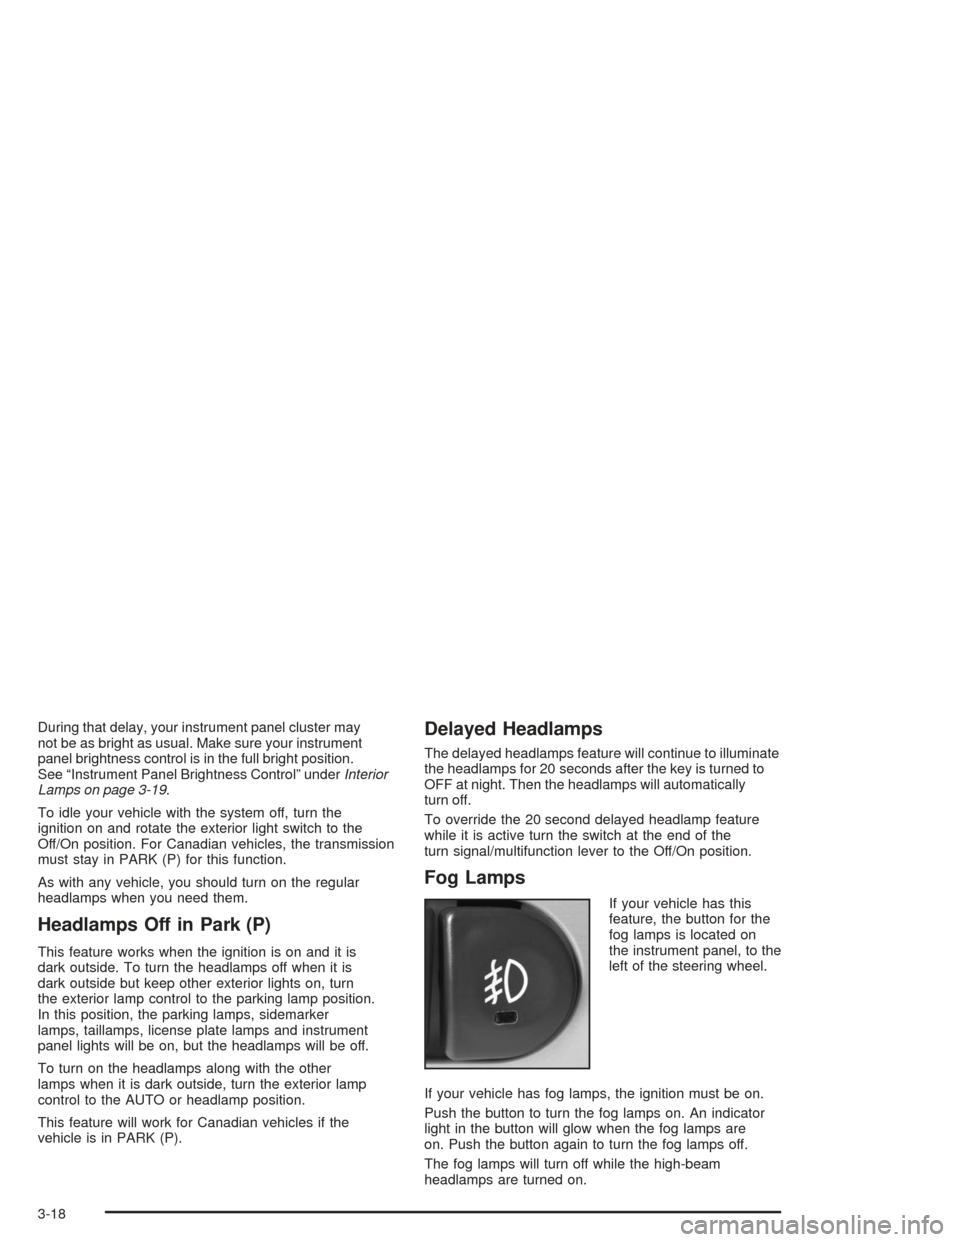
Fog Lamps
If your vehicle has this
feature, the button for the
fog lamps is located on
the instrument panel, to the
left of the steering wheel.
If your vehicle has fog lamps, the ignition must be on.
Push the button to turn the fog lamps on. An indicator
light in the button will glow when the fog lamps are
on. Push the button again to turn the fog lamps off.
The fog lamps will turn off while the high-beam
headlamps are turned on.
3-18
Page 337 of 426

Tire Terminology and De�nitions
Air Pressure:The amount of air inside the tire pressing
outward on each square inch of the tire. Air pressure
is expressed in pounds per square inch (psi) or
kilopascal (kPa).
Accessory Weight:This means the combined weight
of optional accessories. Some examples of optional
accessories are, automatic transmission, power steering,
power brakes, power windows, power seats, and air
conditioning.
Aspect Ratio:The relationship of a tire’s height to
its width.
Belt:A rubber coated layer of cords that is located
between the plies and the tread. Cords may be made
from steel or other reinforcing materials.
Bead:The tire bead contains steel wires wrapped by
steel cords that hold the tire onto the rim.
Bias Ply Tire:A pneumatic tire in which the plies are
laid at alternate angles less than 90 degrees to the
centerline of the tread.
Cold In�ation Pressure:The amount of air pressure
in a tire, measured in pounds per square inch (psi)
before a tire has built up heat from driving.
SeeIn�ation - Tire Pressure on page 5-57.Curb Weight:This means the weight of a motor
vehicle with standard and optional equipment including
the maximum capacity of fuel, oil and coolant, but
without passengers and cargo.
DOT Markings:A code molded into the sidewall of a
tire signifying that the tire is in compliance with the
U.S. Department of Transportation motor vehicle safety
standards. The DOT code includes the Tire Identi�cation
Number (TIN), an alphanumeric designator which can
also identify the tire manufacturer, production plant,
brand and date of production.
GVWR:Gross Vehicle Weight Rating, seeLoading
Your Vehicle on page 4-34.
GAWR FRT:Gross Axle Weight Rating for the front
axle, seeLoading Your Vehicle on page 4-34.
GAWR RR:Gross Axle Weight Rating for the rear axle,
seeLoading Your Vehicle on page 4-34.
Intended Outboard Sidewall:The side of an
asymmetrical tire that must always face outward when
mounted on a vehicle.
Kilopascal (kPa):The metric unit for air pressure.
There are 6.9 kPa’s to one psi.
Light Truck (LT-Metric) Tire:A tire used on light duty
trucks and some multipurpose passenger vehicles.
5-55
Page 373 of 426

Engine Compartment Fuse Block
The engine compartment fuse block is located on the driver’s side of the vehicle, near the battery.
SeeEngine Compartment Overview on page 5-14for more information on location.
Fuses Usage
1 A/C CLU
2 Electronic Throttle Control
3 Ignition ModuleFuses Usage
4 Transmission
5 Fuel Injectors
6 EMISSION 1
5-91
Page 390 of 426

Recommended Fluids and
Lubricants
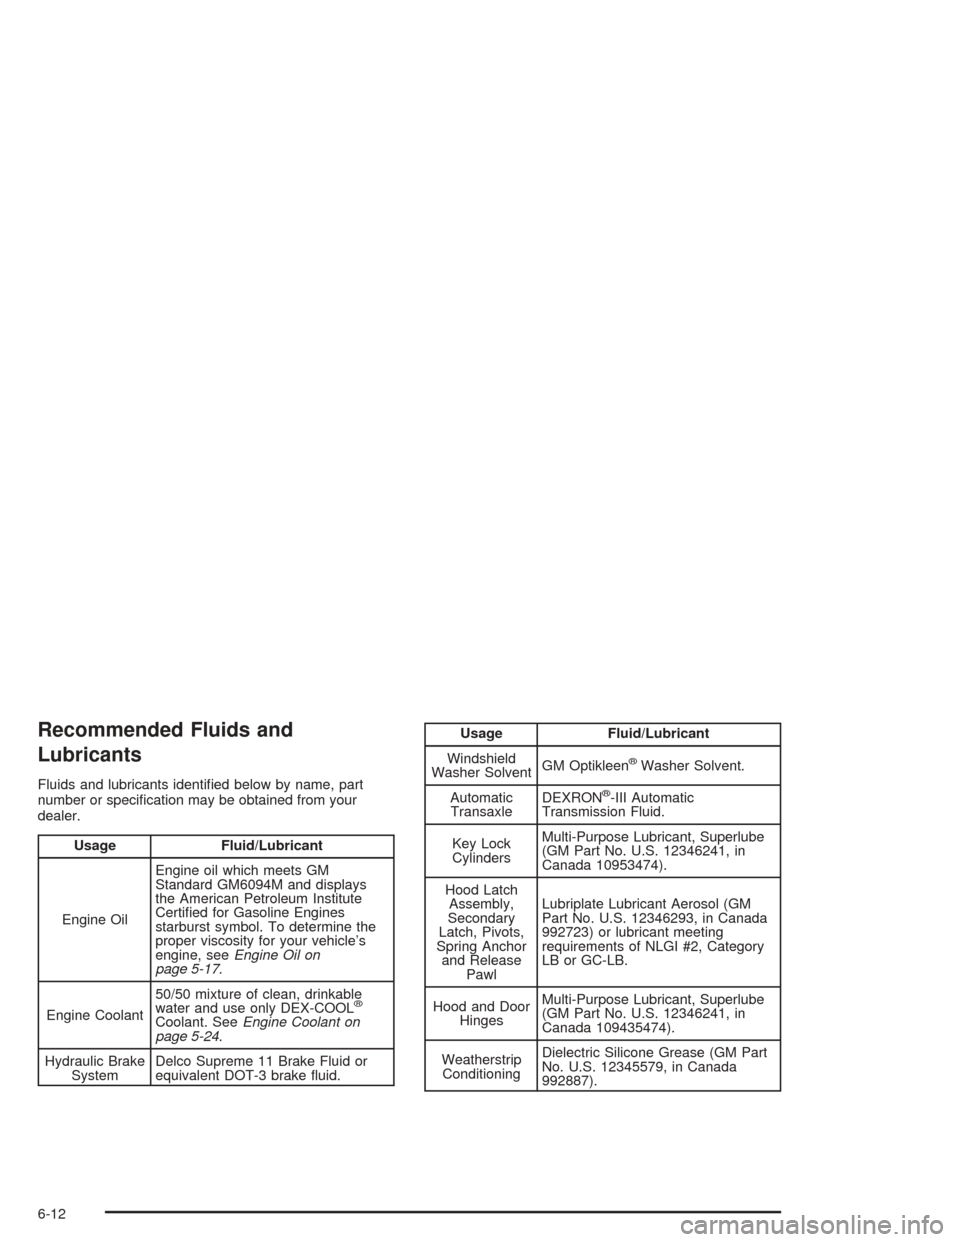
Fluids and lubricants identi�ed below by name, part
number or speci�cation may be obtained from your
dealer.
Usage Fluid/Lubricant
Engine OilEngine oil which meets GM
Standard GM6094M and displays
the American Petroleum Institute
Certi�ed for Gasoline Engines
starburst symbol. To determine the
proper viscosity for your vehicle’s
engine, seeEngine Oil on
page 5-17.
Engine Coolant50/50 mixture of clean, drinkable
water and use only DEX-COOL
®
Coolant. SeeEngine Coolant on
page 5-24.
Hydraulic Brake
SystemDelco Supreme 11 Brake Fluid or
equivalent DOT-3 brake �uid.
Usage Fluid/Lubricant
Windshield
Washer SolventGM Optikleen
®Washer Solvent.
Automatic
TransaxleDEXRON
®-III Automatic
Transmission Fluid.
Key Lock
CylindersMulti-Purpose Lubricant, Superlube
(GM Part No. U.S. 12346241, in
Canada 10953474).
Hood Latch
Assembly,
Secondary
Latch, Pivots,
Spring Anchor
and Release
PawlLubriplate Lubricant Aerosol (GM
Part No. U.S. 12346293, in Canada
992723) or lubricant meeting
requirements of NLGI #2, Category
LB or GC-LB.
Hood and Door
HingesMulti-Purpose Lubricant, Superlube
(GM Part No. U.S. 12346241, in
Canada 109435474).
Weatherstrip
ConditioningDielectric Silicone Grease (GM Part
No. U.S. 12345579, in Canada
992887).
6-12
Page 408 of 426

Reporting Safety Defects to the
Canadian Government
If you live in Canada, and you believe that your vehicle
has a safety defect, you should immediately notify
Transport Canada, in addition to notifying General
Motors of Canada Limited. You may write to:
Transport Canada
330 Sparks Street
Tower C
Ottawa, Ontario K1A 0N5
Reporting Safety Defects to
General Motors
In addition to notifying NHTSA (or Transport Canada) in
a situation like this, we certainly hope you’ll notify us.
Please call us at 1-800-222-1020, or write:
Chevrolet Motor Division
Chevrolet Customer Assistance Center
P.O. Box 33170
Detroit, MI 48232-5170
In Canada, please call us at 1-800-263-3777 (English)
or 1-800-263-7854 (French). Or, write:
General Motors of Canada Limited
Customer Communication Centre, 163-005
1908 Colonel Sam Drive
Oshawa, Ontario L1H 8P7
Service Publications Ordering
Information
Service Manuals
Service Manuals have the diagnosis and repair
information on engines, transmission, axle, suspension,
brakes, electrical, steering, body, etc.
RETAIL SELL PRICE: $120.00
Transmission, Transaxle, Transfer
Case Unit Repair Manual
This manual provides information on unit repair service
procedures, adjustments, and speci�cations for GM
transmissions, transaxles, and transfer cases.
RETAIL SELL PRICE: $50.00
7-12