2004 CHEVROLET KODIAK air conditioning
[x] Cancel search: air conditioningPage 129 of 366

Climate Controls
Climate Control System
With these systems, you can control the heating,
cooling and ventilation for your vehicle.
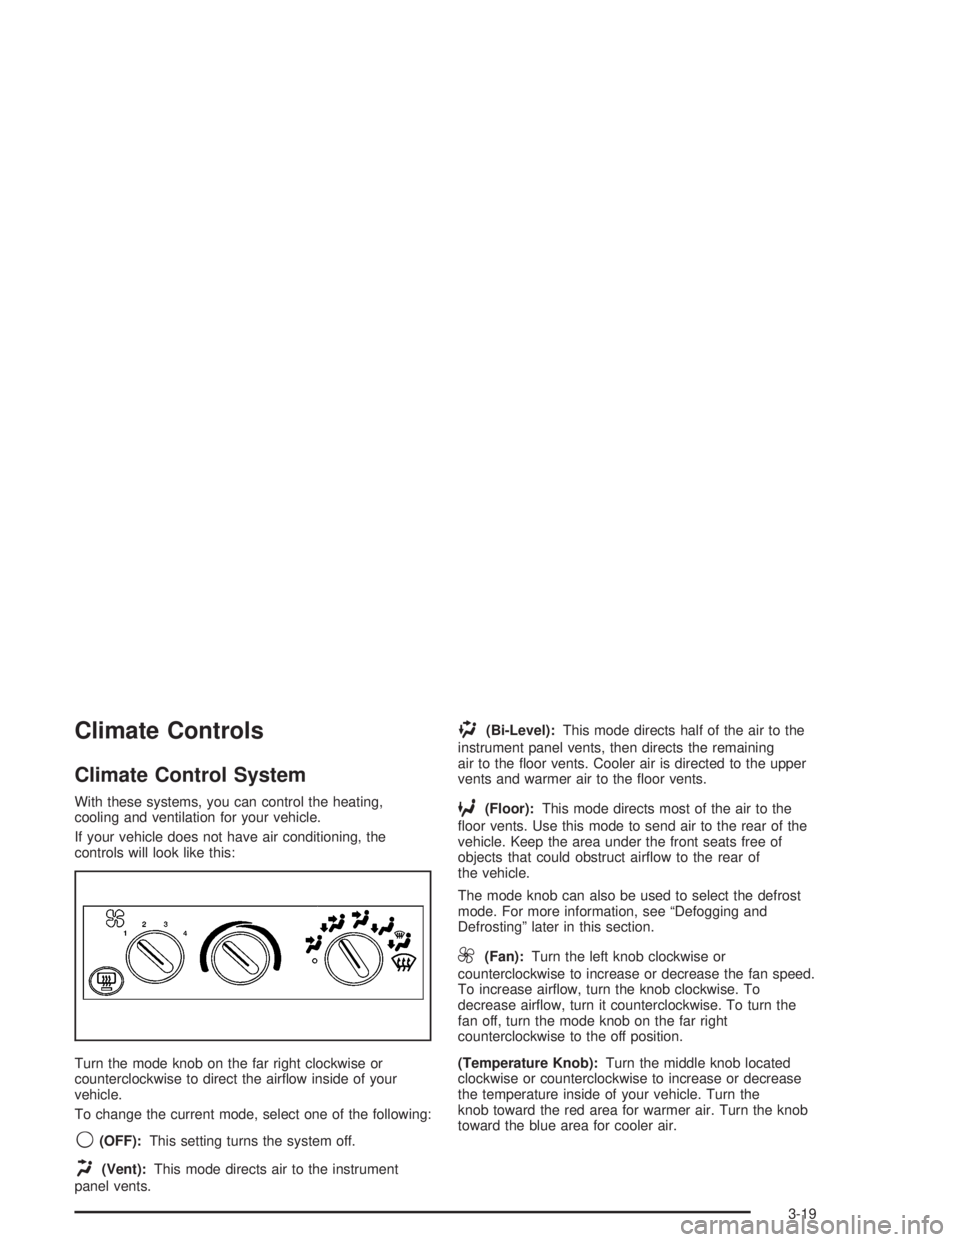
If your vehicle does not have air conditioning, the
controls will look like this:
Turn the mode knob on the far right clockwise or
counterclockwise to direct the airflow inside of your
vehicle.
To change the current mode, select one of the following:
9(OFF):This setting turns the system off.
H(Vent):This mode directs air to the instrument
panel vents.
)(Bi-Level):This mode directs half of the air to the
instrument panel vents, then directs the remaining
air to the floor vents. Cooler air is directed to the upper
vents and warmer air to the floor vents.
6(Floor):This mode directs most of the air to the
floor vents. Use this mode to send air to the rear of the
vehicle. Keep the area under the front seats free of
objects that could obstruct airflow to the rear of
the vehicle.
The mode knob can also be used to select the defrost
mode. For more information, see “Defogging and
Defrosting” later in this section.
9(Fan):Turn the left knob clockwise or
counterclockwise to increase or decrease the fan speed.
To increase airflow, turn the knob clockwise. To
decrease airflow, turn it counterclockwise. To turn the
fan off, turn the mode knob on the far right
counterclockwise to the off position.
(Temperature Knob):Turn the middle knob located
clockwise or counterclockwise to increase or decrease
the temperature inside of your vehicle. Turn the
knob toward the red area for warmer air. Turn the knob
toward the blue area for cooler air.
3-19
Page 130 of 366

If your vehicle has air conditioning, the controls will look
like this:
On hot days, open the windows to let hot inside air
escape; then close them. This helps to reduce the time
it takes for your vehicle to cool down. It also helps
the system to operate more efficiently.
<(Maximum Air Conditioning):Turn the right knob
to this setting for maximum cooling. This setting puts
the system in recirculation mode and helps to maximize
your air conditioner’s performance and your vehicle’s
fuel economy. This setting also cools the air the fastest.
Y(Air Conditioning):This setting is used for normal
cooling on hot days. It cools outside air and directs
it through the instrument panel vents.
)(Bi-Level Air Conditioning):This setting divides
airflow between the floor vents and instrument panel
vents. The air conditioning compressor will cycle
continuously in this setting as long as the outside
temperature is warm enough to activate the compressor.
Defogging and Defrosting
Fog on the inside of windows is a result of high humidity
(moisture) condensing on the cool window glass. This
can be minimized if the climate control is used properly.
There are two modes to clear fog or frost from your
windshield and side windows.
Use the defog mode to clear the windows of fog or
moisture and warm the passengers. Use the defrost
mode to remove fog or frost from the windshield more
quickly. For best results, clear all snow and ice from the
windshield before defrosting.
3-20
Page 131 of 366

Turn the mode knob on the right of the climate control
panel to select the defog or defrost mode.
-(Defog):With this setting, the outside air comes out
of both the floor and defroster outlets. Adjust the
temperature knob for warmer or cooler air. The air
conditioning compressor may operate in this setting to
dehumidify the air.
0(Defrost):This setting operates the defroster. Most
of the air comes out near the windshield, with some
going to the floor outlets and front side windows. The air
conditioning compressor may operate in this setting to
dehumidify the air.
The defog setting is useful for cold weather with a large
number of passengers or very humid conditions to
help keep the windshield clear. Use defrost to remove
fog or ice from the windshield quickly in extremely
cold conditions. The temperature knob should be in the
red area and the fan control toward high. Do not
drive the vehicle until all the windows are clear.
Rear Window Defogger
The rear window defogger uses a warming grid to
remove fog or frost from the rear window.Be sure to clear as much snow from the rear window as
possible.
Press this button which is
located near the fan
control to turn the rear
window defogger on or off.
An indicator light in the
button will come on when
the rear window defogger
is working.
The rear window defogger will only work when the
ignition is RUN.
The rear window defogger will turn off several minutes
after the button is pressed. The defogger can also
be turned off by pressing the button again or by turning
off the engine.
Notice:Don’t use anything sharp on the inside of
the rear window. If you do, you could cut or damage
the warming grid, and the repairs wouldn’t be
covered by your warranty. Do not attach a temporary
vehicle license, tape, a decal or anything similar
to the defogger grid.
3-21
Page 132 of 366

Outlet Adjustment
Your vehicle has air outlets
on the instrument panel
that allow you to adjust the
direction and amount of
airflow inside the vehicle.
Move the lever on the outlet up or down to direct the
airflow. Increase or reduce the amount of airflow
by opening and closing the louvers. The outlets can be
moved side-to-side to direct the airflow.
Operation Tips
•
Keep the hood and front air inlets free of ice, snow,
or any other obstruction (such as leaves). The
heater and defroster will work far better, reducing
the chance of fogging the inside of your windows.
•Keep the air path under the front seats clear
of objects. This helps air to circulate throughout
your vehicle.
•Adding outside equipment to the front of your
vehicle, such as hood-air deflectors, etc., may affect
the performance of the heating and air conditioning
system. Check with your dealer before adding
equipment to the outside of your vehicle.
3-22
Page 208 of 366

Automatic Ether Injection System....................5-66
Front Wheel Bearings with Oil-Filled Hubs........5-67
Air Conditioning System.................................5-67
Tires..............................................................5-68
Inflation - Tire Pressure.................................5-68
Rims and Wheels.........................................5-69
Dual Tire Operation.......................................5-69
When It Is Time for New Tires.......................5-70
Wheel Alignment and Tire Balance..................5-70
Tightening the Wheel Nuts.............................5-71
Wheel Replacement......................................5-74
If a Tire Goes Flat........................................5-75
Changing a Flat Tire.....................................5-76
Appearance Care............................................5-76
Cleaning the Inside of Your Vehicle.................5-77
Care of Safety Belts......................................5-79
Weatherstrips...............................................5-79
Cleaning the Outside of Your Vehicle..............5-80
Sheet Metal Damage.....................................5-82Finish Damage.............................................5-83
Underbody Maintenance................................5-83
Chemical Paint Spotting.................................5-83
Vehicle Care/Appearance Materials..................5-84
Vehicle Identi�cation......................................5-85
Vehicle Identification Number (VIN).................5-85
Service Statement.........................................5-85
Service Parts Identification Label.....................5-86
Electrical System............................................5-86
Add-On Electrical Equipment..........................5-86
Headlamp Wiring..........................................5-86
Windshield Wiper Fuses................................5-87
Fusible Links................................................5-87
Power Windows and Other Power Options.......5-87
Fuses and Circuit Breakers............................5-87
Capacities and Speci�cations..........................5-93
Normal Maintenance Replacement Parts.........5-100
Engine Drive Belt Routing............................5-103
Section 5 Service and Appearance Care
5-2
Page 273 of 366

6. Install a new gasket whenever you take out the
cylinder. Use only one gasket and spread a light
film of clean oil on it before installation.
7. Put in the new cylinder. Turn it clockwise until it just
starts to contact the gasket.
8. Tighten the cylinder another half turn (180 degrees).
Don’t over-tighten.
9. Retighten the cylinder clamp.
Front Wheel Bearings with
Oil-Filled Hubs
If your vehicle has oil-filled
hubs, occasionally check
to see if they have enough
oil. You can tell if there
is oil there by using
the circular gage on the
sight glass.If there isn’t, clean the rubber fill plug in the center of
the glass, and then remove it. Be careful not to
allow any dirt or water to get into the oil. Add enough of
the recommended oil to bring it up to the level mark
that you’ll see on the glass.
Refer to your Maintenance Schedule for the proper oil
to use.
When you fill the hub, check the glass again after
driving a short distance. It takes a while for the oil to
flow through the system, and you may find that you have
to add a little more to fill it to the proper level. Be sure
not to overfill the hub.Air Conditioning System
Every now and then, have your dealership check your
air conditioning system to be sure it has not lost
any cooling ability. If you think the system is not working
properly, have your GM dealer check it out as soon
as possible.
5-67
Page 296 of 366

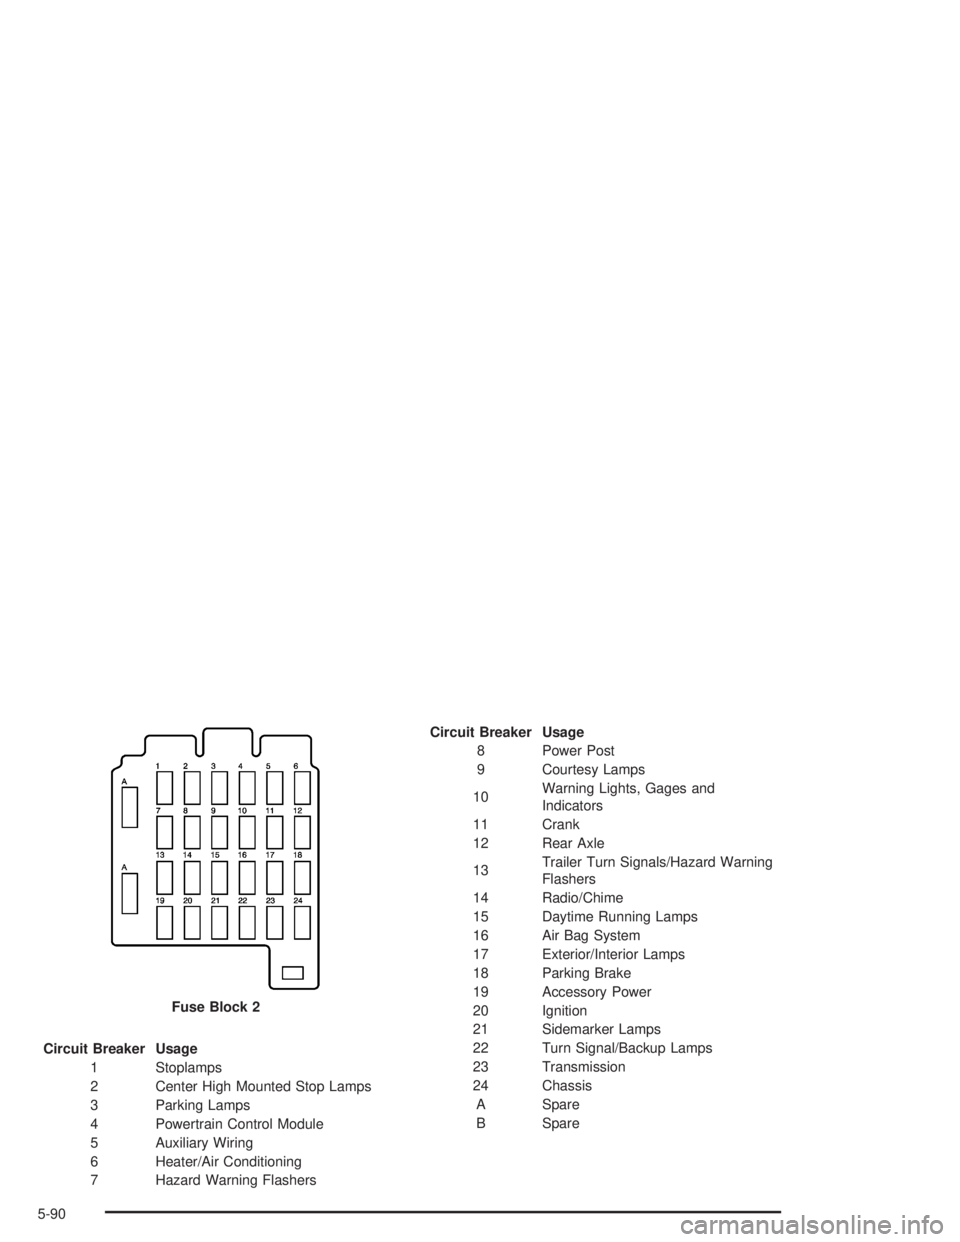
Circuit Breaker Usage
1 Stoplamps
2 Center High Mounted Stop Lamps
3 Parking Lamps
4 Powertrain Control Module
5 Auxiliary Wiring
6 Heater/Air Conditioning
7 Hazard Warning FlashersCircuit Breaker Usage
8 Power Post
9 Courtesy Lamps
10Warning Lights, Gages and
Indicators
11 Crank
12 Rear Axle
13Trailer Turn Signals/Hazard Warning
Flashers
14 Radio/Chime
15 Daytime Running Lamps
16 Air Bag System
17 Exterior/Interior Lamps
18 Parking Brake
19 Accessory Power
20 Ignition
21 Sidemarker Lamps
22 Turn Signal/Backup Lamps
23 Transmission
24 Chassis
A Spare
B Spare Fuse Block 2
5-90
Page 298 of 366

Relay Usage
PTO Power Take-Off
REVERSE Reverse
NEUTRAL
STARTNeutral Start
Fuse Usage
RR DEFOG Rear Defog
ENG 1 Engine 1
ENG 3 Engine 3
PCM-B Powertrain Control Module
BLANK Empty
ENG 4 Engine 4
ENG 2 Engine 2
HTD FUEL Heated Fuel
BLANK EmptyFuse Usage
BLANK Empty
BLANK Empty
A/C COMP Air Conditioning Compressor
ABS 1 Anti-Lock Brake System 1
ABS 2 Anti-Lock Brake System 2
ABS 3 Anti-Lock Brake System 3
ENGINE Engine
E/A PUMP Electronic/Automatic Pump
HORN Horn
NOTE 2L18/LB7 Fuel, LG4 Powertrain
Control Valve, LG5 Electronic
Control Module
BLANK Empty
STUD A Spare
STUD B Spare
5-92