2004 CADILLAC SEVILLE reset
[x] Cancel search: resetPage 196 of 410
Playing the Radio
PWR (Power):Press this knob to turn the system on
and off.
VOL (Volume):Turn this knob to increase or to
decrease volume.
AVC (Automatic Volume Control):With AVC, adjusts
automatically to make up for road or wind noise as
you drive.
To use AVC, press and hold the TONE button until
AUTO VOLUME CONTROL OFF appears on the
display. Then press the LEVEL plus symbol. AUTO
VOLUME CONTROL ON will appear on the display.
AVC VOLUME will appear on the display any time you
adjust the volume while AVC is on. To turn AVC off,
press and hold the TONE button until AUTO VOLUME
CONTROL ON appears on the display. Then press
the LEVEL minus symbol. AUTO VOLUME CONTROL
OFF will appear on the display.
Finding a Station
BAND:Press this button to select weather, FM1, FM2,
AM, or XM1 or XM2 (48 contiguous US states, if
equipped).
¦TUNE SEEK¥:This button can be pressed to two
positions. Press this button to the first position to
tune to the next or to the previous frequency. If this
button is held at the first position for a few seconds, the
radio will continue tuning until this button is released.
Press this button to the second position and release it to
go to the next or to the previous radio station and
stay there.
The radio will seek only to stations that are in the
selected band and only to those with a strong signal.
SCAN:Press this button for less than two seconds
to scan radio stations. The radio will go to a station, play
for five seconds, then go on to the next station. Press
this button again to stop scanning.
To scan preset stations, press and hold SCAN for more
than two seconds until you hear a beep. The radio will go
to the first preset station stored on your pushbuttons, play
for five seconds, then go on to the next preset station.
Press SCAN again to stop scanning presets.
The radio will scan only to the stations that are in the
selected band and only to those with a strong signal.
3-84
Page 197 of 410
Setting Preset Stations
The six numbered pushbuttons let you return to your
favorite stations and associated tone and DSP settings.
The RDS PTY mode must be off to set preset stations.
You can set up to 36 stations (six weather, six FM1,
six FM2, six AM, and six XM1 and six XM2 (48
contiguous US states, if equipped), by performing the
following steps:
1. Turn the radio on.
2. Press BAND to select weather, FM1, FM2, AM, or
XM1 or XM2.
3. Tune in the desired station.
4. Press and hold one of the six numbered
pushbuttons for more than two seconds until you
hear a beep. Whenever you press that numbered
pushbutton for less than two seconds, the
station you set will return.
5. Repeat the steps for each pushbutton.
When battery power is removed and later applied, you
will not have to reset your radio presets because
the radio remembers them.
Setting the Tone (Bass/Treble)
TONE:Press and release this button until BASS,
TREBLE, or MIDRANGE appears on the display. The
radio keeps separate tone settings for each band, preset
(except weather band presets) and source.
−LEVEL +:After selecting the desired tone control,
press the plus or minus button to select the desired
level.
To save the tone settings for your presets, press and
hold the numbered button for the desired preset for more
than two seconds until you hear a beep.
Adjusting the Speakers (Balance/Fade)
TONE:Press and release this button until BALANCE
or FADE appears on the display.
−LEVEL +:After selecting the desired control, press
the plus or minus button to select the desired level.
To save the tone settings for your presets, press and
hold the numbered pushbutton for the desired preset for
more than two seconds until you hear a beep.
3-85
Page 198 of 410
Using Digital Signal Processing (DSP)
DSP:This feature is used to provide a choice of
four different listening experiences: talk, front seat,
ambience and spacious. DSP can be used while
listening to the radio, cassette, CD, or XM™. Press this
button to turn DSP on. Press and release this button
until the desired selection appears on the display.
To turn DSP off, press and hold this button until DSP
OFF appears on the display. When DSP OFF appears
on the display, the system will provide the best
overall audio performance. The radio keeps separate
DSP settings for each band (except weather band,
which is always set to talk), preset, and source.
TALK:This setting should be used when listening to
non-musical material such as news, talk shows,
sports broadcasts, and books on tape. Talk makes
spoken words sound very clear.
FRONT SEAT:This setting adjusts the audio to give the
driver the best possible sound qualities. Front seat can be
used at any time for any material. Rear seat passengers
in the vehicle may not get the same effect.
AMBIENCE:This setting is used to enhance the
stereo effect.
SPACIOUS:This setting is used to make the listening
space seem larger.
Finding a Program Type (PTY) Station
(XM™ Only)
To select and find a desired PTY perform the following:
1. Press PTY to activate program type select mode.
PTY will appear on the display.
2. Press LEVEL to select a PTY.
3. Once the desired PTY is displayed, press either
TUNE SEEK arrow to select the PTY and take
you to the PTY’s first station.
4. If you want to go to another station within that PTY,
press TUNE SEEK once to display the PTY, then
press TUNE SEEK again to go to another station.
5. Press PTY to exit program type select mode.
If PTY times out and is no longer on the display, go
back to Step 1.
If both PTY and TA are on,
SCAN:You can scan the stations within a PTY by
performing the following:
1. Press PTY to activate program type select mode.
PTY will appear on the display.
2. Press LEVEL to select a PTY.
3. Once the desired PTY is displayed, press SCAN,
and the radio will begin scanning the stations in
the PTY.
4. Press SCAN to stop at a station.
3-86
Page 201 of 410
XM™ Radio Messages
Radio Display
MessageCondition Action Required
XL (Explicit Language
Channels)XL on the radio display,
after the channel name,
indicates content with
explicit language.These channels, or any others, can be blocked at a
customer’s request, by calling 1-800-852-XMXM (9696).
XM Updating Updating encryption
codeThe encryption code in your receiver is being updated, and
no action is required. This process should take no longer
than 30 seconds.
No XM signal Loss of signal Your system is functioning correctly, but you are in a
location that is blocking the XM signal. When you move
into an open area, the signal should return.
Loading XM Acquiring channel audio
(after 4 second delay)Your radio system is acquiring and processing audio and
text data. No action is needed. This message should
disappear shortly.
Channel Off Air Channel not in service This channel is not currently in service. Tune in to another
channel.
Channel Unavail Channel no longer
availableThis previously assigned channel is no longer assigned.
Tune to another station. If this station was one of your
presets, you may need to choose another station for that
preset button.
No Artist Info Artist Name/Feature not
availableNo artist information is available at this time on this
channel. Your system is working properly.
No Title Info Song/Program Title not
availableNo song title information is available at this time on this
channel. Your system is working properly.
3-89
Page 210 of 410
CD Messages
CD CHANGER ERROR:This message may appear on
the display for one of the following reasons:
•It is very hot. When the temperature returns to
normal, the CD should play.
•You are driving on a very rough road. When the
road becomes smoother, the CD should play.
•It is very hot. When the temperature returns to
normal, the CD should play.
•The CD is dirty, scratched, wet, or upside down.
•The air is very humid. If so, wait about an hour and
try again.
•There may have been a problem while burning
the CD.
•The label may be caught in the CD player.
If the CD is not playing correctly, for any other reason,
try a known good CD.
If any error occurs repeatedly or if an error cannot be
corrected, contact your dealer. If your radio display
an error message, write it down and provide it to your
dealer when reporting the problem.
Radio Personalization with Home
and Away Feature
If DRIVER 1 (HOME or AWAY) PRESETS or DRIVER 2
(HOME or AWAY) PRESETS appears in the display
when the radio is first turned on, your vehicle is
equipped with this feature.
This feature allows the driver to return to the last used
audio source: radio, cassette, or CD, using the
remote keyless entry transmitter. This feature can also
store and recall AM and FM presets, volume, tone,
and the last selected radio station. The number on the
back of each transmitter (1 or 2) corresponds to
driver 1 or 2. If transmitter 1 is used to enter the vehicle,
the last used audio source and/or settings set by
driver 1 will be recalled. If transmitter 2 is used to enter
the vehicle, the last used audio source and/or settings
set by driver 2 will be recalled. The settings can also be
recalled by pressing the MEMORY seat buttons 1 or 2
located on the driver’s door.
3-98
Page 211 of 410
Your radio can store home and away presets. Home
and away presets allow you to use one set of preset
radio settings in the area where you live, and another set
when you go out of town. You will not need to
reprogram your presets every time you travel. With the
radio off and the time displayed, use fast forward
and reverse to select home or away presets. To select
the away presets, press and hold FF for five seconds
until you hear a beep. The next time the radio comes on,
the away presets will be active. To select the home
presets, press and hold RW for five seconds until you
hear a beep. The next time the radio comes on,
the home presets will be active.
When battery power is removed and later applied, you
will not have to reset your home radio presets
because the radio remembers them. However, you will
have to reset your away radio presets.Theft-Deterrent Feature
THEFTLOCK®is designed to discourage theft of your
radio. Your vehicle has a “built in” theft-deterrent feature
on each radio that is automatic – there is no
programming required. The radio in your vehicle cannot
be used in any other vehicle. When the radio was
originally installed in your vehicle at the factory, it stored
the Vehicle Identification Number (VIN). Each time
the ignition is turned on, the VIN is verified. If the
vehicle’s VIN does not match the VIN stored in the
radio, THEFTLOCK
®will be activated and the audio
system will not play. If the radio is removed from your
vehicle, the original VIN in the radio can be used to trace
the radio back to your vehicle.
3-99
Page 212 of 410
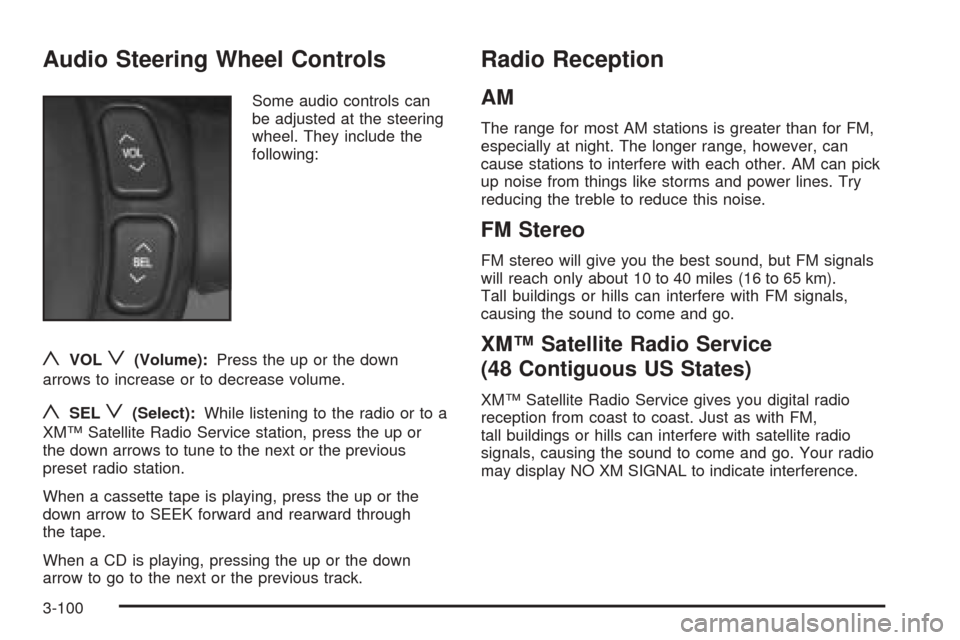
Audio Steering Wheel Controls
Some audio controls can
be adjusted at the steering
wheel. They include the
following:
yVOLz(Volume):Press the up or the down
arrows to increase or to decrease volume.
ySELz(Select):While listening to the radio or to a
XM™ Satellite Radio Service station, press the up or
the down arrows to tune to the next or the previous
preset radio station.
When a cassette tape is playing, press the up or the
down arrow to SEEK forward and rearward through
the tape.
When a CD is playing, pressing the up or the down
arrow to go to the next or the previous track.
Radio Reception
AM
The range for most AM stations is greater than for FM,
especially at night. The longer range, however, can
cause stations to interfere with each other. AM can pick
up noise from things like storms and power lines. Try
reducing the treble to reduce this noise.
FM Stereo
FM stereo will give you the best sound, but FM signals
will reach only about 10 to 40 miles (16 to 65 km).
Tall buildings or hills can interfere with FM signals,
causing the sound to come and go.
XM™ Satellite Radio Service
(48 Contiguous US States)
XM™ Satellite Radio Service gives you digital radio
reception from coast to coast. Just as with FM,
tall buildings or hills can interfere with satellite radio
signals, causing the sound to come and go. Your radio
may display NO XM SIGNAL to indicate interference.
3-100
Page 213 of 410
Cellular Phone Usage
Cellular phone usage may cause interference with your
vehicle’s radio. This interference may occur when making
or receiving phone calls, charging the phone’s battery, or
simply having the phone on. This interference is
described as an increased level of static while listening to
the radio. If you notice static while listening to the radio,
unplug the cellular phone and turn it off.
Weather Band
Weather band is restricted to speech and the audio
quality is not as good as with the AM or FM bands.
Depending on location, the radio should receive one or
two channels.
Care of Your Cassette Tape Player
A tape player that is not cleaned regularly can cause
reduced sound quality, ruined cassettes, or a damaged
mechanism. Cassette tapes should be stored in their
cases away from contaminants, direct sunlight, and
extreme heat. If they are not, they may not operate
properly or may cause failure of the tape player.Your tape player should be cleaned regularly after every
50 hours of use. Your radio may display CLEAN
TAPE to indicate that you have used your tape player
for 50 hours without resetting the tape clean timer. If this
message appears on the display, your cassette tape
player needs to be cleaned. It will still play tapes,
but you should clean it as soon as possible to prevent
damage to your tapes and player. If you notice a
reduction in sound quality, try a known good cassette to
see if the tape or the tape player is at fault. If this
other cassette has no improvement in sound quality,
clean the tape player.
For best results, use a scrubbing action, non-abrasive
cleaning cassette with pads which scrub the tape
head as the hubs of the cleaner cassette turn. The
recommended cleaning cassette is available through
your dealer.
3-101