Page 327 of 478

How to Inspect
Vehicles with an Air Filter Restriction
Indicator
Locate the air ®lter restriction indicator on the engine air
cleaner/®lter cover. When the indicator turns black or
is in the red/orange ªchangeº zone, replace the ®lter and
reset the indicator. See the steps following to replace
the engine air cleaner/®lter and to reset the air ®lter
restriction indicator.
Vehicles without an Air Filter Restriction
Indicator
To inspect the air cleaner/®lter, remove the engine air
cleaner/®lter from the vehicle using the steps following.
When you have the engine air cleaner/®lter removed,
lightly shake it to release loose dust and dirt. If the
engine air cleaner/®lter remains caked with dirt, a new
one is required.
Replacing the Engine Air Cleaner/Filter
and Resetting the Air Filter Restriction
Indicator
1. Locate the air cleaner/®lter assembly on the front
corner of the engine compartment on the
passenger's side of the vehicle.
2. Loosen the screws on the cover of the housing and
lift up the cover.
5-17
Page 328 of 478
3. Remove the engine air cleaner/®lter from the
housing. Care should be taken to dislodge as
little dirt as possible.
4. Clean the engine air cleaner/®lter sealing surfaces
and the housing.
5. Install the new engine air cleaner/®lter.
6. Reinstall the cover and tighten the screws.
7. Reset the air ®lter restriction indicator, if equipped,
by pressing the top button on the indicator.
{CAUTION:
Operating the engine with the air cleaner/®lter
off can cause you or others to be burned. The
air cleaner not only cleans the air, it helps to
stop ¯ame if the engine back®res. If it is not
there and the engine back®res, you could
be burned. Do not drive with it off, and be
careful working on the engine with the air
cleaner/®lter off.
5-18
Page 342 of 478
1. Park the vehicle on a level surface. You can
remove the coolant surge tank pressure cap
when the cooling system, including the coolant
surge tank pressure cap and upper radiator hose, is
no longer hot. Turn the pressure cap slowly
counterclockwise (left) about one full turn. If you
hear a hiss, wait for that to stop. A hiss means there
is still some pressure left.2. Then keep turning the pressure cap slowly, and
remove it.
5-32
Page 346 of 478

How to Check Power Steering Fluid
Turn the key off, let the engine compartment cool down,
Locate the cap with this
symbol. See
Engine
Compartment Overview on
page 5-10
for more
information on location.
Wipe the cap and the top of the reservoir clean, then
unscrew the cap and wipe the dipstick with a clean rag.
Replace the cap and completely tighten it. Then
remove the cap again and look at the ¯uid level on the
dipstick.
The level should be at the FULL COLD mark. If
necessary, add only enough ¯uid to bring the level up to
the mark.
What to Use
To determine what kind of ¯uid to use, seeRecommended Fluids and Lubricants on page 6-13.
Always use the proper ¯uid. Failure to use the proper
¯uid can cause leaks and damage hoses and seals.
Windshield Washer Fluid
What to Use
When you need windshield washer ¯uid, be sure to read
the manufacturer's instructions before use. If you will
be operating your vehicle in an area where the
temperature may fall below freezing, use a ¯uid that has
sufficient protection against freezing. See
Engine
Compartment Overview on page 5-10for reservoir
location.
5-36
Page 348 of 478

Brakes
Brake Fluid
Your brake master cylinder reservoir is ®lled with DOT-3
brake ¯uid. SeeEngine Compartment Overview on
page 5-10for the location of the reservoir.
There are only two reasons why the brake ¯uid level in
the reservoir might go down. The ®rst is that the
brake ¯uid goes down to an acceptable level during
normal brake lining wear. When new linings are put in,
the ¯uid level goes back up. The other reason is
that ¯uid is leaking out of the brake system. If it is, you
should have your brake system ®xed, since a leak
means that sooner or later your brakes will not work
well, or will not work at all.
So, it is not a good idea to ªtop offº your brake ¯uid.
Adding brake ¯uid will not correct a leak. If you add ¯uid
when your linings are worn, then you will have too
much ¯uid when you get new brake linings. You should
add (or remove) brake ¯uid, as necessary, only when
work is done on the brake hydraulic system.
{CAUTION:
If you have too much brake ¯uid, it can spill on
the engine. The ¯uid will burn if the engine is
hot enough. You or others could be burned,
and your vehicle could be damaged. Add brake
¯uid only when work is done on the brake
hydraulic system. See ªChecking Brake Fluidº
in this section.
Refer to the Maintenance Schedule to determine when
to check your brake ¯uid. See
Scheduled Maintenance
on page 6-4.
5-38
Page 352 of 478

Vehicle Storage
If you are not going to drive your vehicle for 25 days
or more, remove the black, negative (-) cable from
the battery. This will help keep your battery from
running down.
{CAUTION:
Batteries have acid that can burn you and gas
that can explode. You can be badly hurt if you
are not careful. See
Jump Starting on
page 5-42
for tips on working around a battery
without getting hurt.
Contact your dealer to learn how to prepare your
vehicle for longer storage periods.
Also, for your audio system, see
Theft-Deterrent
Feature on page 3-98.
To reprogram your sunroof (if equipped), see
Sunroof
on page 2-72.
Jump Starting
If your battery has run down, you may want to use
another vehicle and some jumper cables to start your
vehicle. But please use the following steps to do it
safely.
{CAUTION:
Batteries can hurt you. They can be dangerous
because:
·They contain acid that can burn you.
·They contain gas that can explode or
ignite.
·They contain enough electricity to
burn you.
If you do not follow these steps exactly, some
or all of these things can hurt you.
5-42
Page 357 of 478
Notice:If the jumper cables are removed in the
wrong order, electrical shorting may occur and
damage the vehicle. The repairs would not be
covered by your warranty. Remove the jumper
cables in the correct order, making sure that the
cables do not touch each other or other metal.
A. Heavy, Unpainted Metal Engine Part or Remote
Negative (-) Terminal.
B. Good Battery or Remote Positive (+) and
Negative (-) Terminals.
C. Dead Battery or Remote Positive (+) Terminal.To disconnect the jumper cables from both vehicles do
the following:
1. Disconnect the black negative (-) cable from the
vehicle that had the dead battery.
2. Disconnect the black negative (-) cable from the
vehicle with the good battery.
3. Disconnect the red positive (+) cable from the
vehicle with the good battery.
4. Disconnect the red positive (+) cable from the other
vehicle.
5. Return the positive (+) remote terminal cover to its
original position.
Jumper Cable Removal
5-47
Page 367 of 478
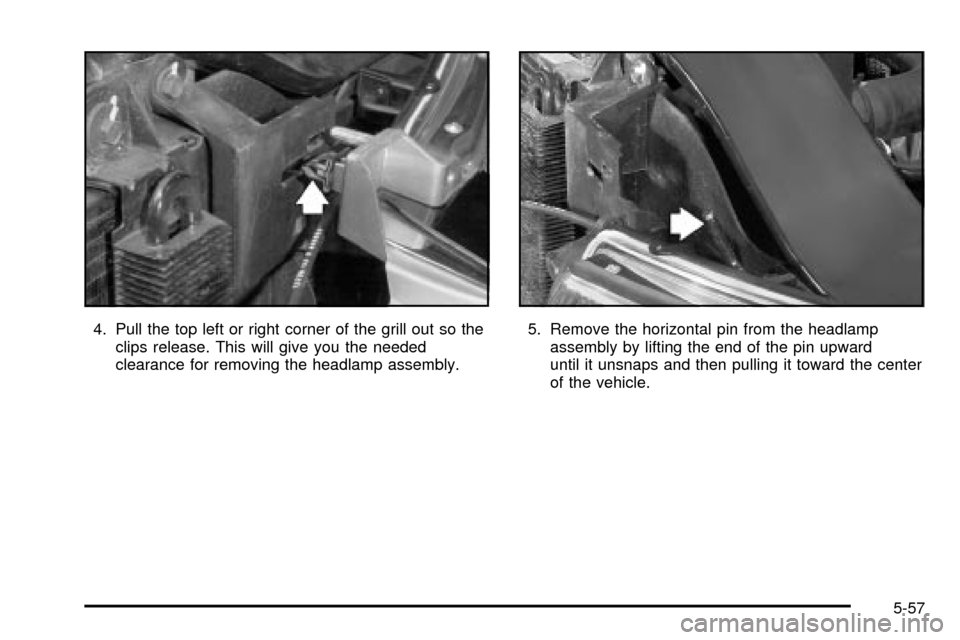
4. Pull the top left or right corner of the grill out so the
clips release. This will give you the needed
clearance for removing the headlamp assembly.5. Remove the horizontal pin from the headlamp
assembly by lifting the end of the pin upward
until it unsnaps and then pulling it toward the center
of the vehicle.
5-57