Page 79 of 478

Programmable Unlocking Feature
The following is the list of available programming
options:
Mode 1:Driver's door unlocks when the transmission is
shifted into PARK (P).
Mode 2:All doors unlock when the transmission is
shifted into PARK (P). This is the mode that is
pre-programmed in the factory for your vehicle.
Mode 3:All doors unlock when the key is removed
from the ignition.
Mode 4:No automatic door unlock.
The following instructions tell you how to change the
automatic door unlock mode. Choose one of the
four programming options listed above before entering
the program mode. To enter the program mode, do
the following:
1. Begin with the ignition off. Then pull the turn
signal/multifunction lever toward you and hold
it there while you perform the next step.2. Turn the key to RUN and LOCK twice. Then, with
the key in LOCK, release the turn
signal/multifunction lever. Once you do this, the
doors will lock and unlock, the horn will chirp twice,
and a 30-second timer will begin. You are now
ready to program the automatic door unlock feature.
3. Press the unlock side of the power lock switch once.
You will hear one, two, three, or four chimes. The
number of chimes tells you which unlock mode
is currently selected. Continue to press the
door unlock switch until the number of chimes that
you hear matches the number of the mode that
you want. If you take longer than 30 seconds, the
locks will automatically lock and unlock and the horn
will chirp twice to indicate that you have left the
program mode. If this occurs, you can repeat
the procedure beginning with Step 1 to re-enter the
programming mode.
You can exit the program mode any time by turning the
ignition to RUN (the doors will automatically lock and
unlock and the horn will chirp twice to indicate that you
are leaving the program mode). If the lock/unlock
switches are not pressed while in the programming
mode, the current automatic settings will not be
modi®ed.
See your dealer for more information.
2-11
Page 83 of 478

Rear Glass Removal and Storage
{CAUTION:
If the removable rear glass is not stored
properly, it could be thrown about the vehicle
in a crash or sudden maneuver. People in the
vehicle could be injured. Whenever you store
the rear glass in the vehicle, always be sure
that it is stored securely in the midgate
storage pocket.
Do not remove the rear glass when the rear defroster is
on. If you remove the rear glass with the rear defroster
on, you may see a discharge spark coming from
the latch area.
To remove the rear glass do the following:
1. Fold the rear seats. See
Rear Seat Operation on
page 1-6for more information. The front seats
may have to be moved forward slightly to allow the
rear seats to fold completely.
Although the rear glass can be removed without
folding the rear seats, you will not be able to access
the rear glass storage pocket. Be sure to fold the
seats
beforeremoving the rear glass.2. Squeeze and pull down the latch levers (A), located
near the upper corners of the rear glass, to unlatch.
Once unlatched, the glass-catch release button (C)
will catch the rear glass and prevent it from
falling forward. Follow the next step to release the
button and remove the rear glass.
2-15
Page 88 of 478
6. Push the rear glass ¯at against the window frame
and push each latch lever up until it locks. You
should hear a click when each latch lever locks
correctly.
Lowering the Midgate with the Rear Glass
in Place
The midgate can be lowered to allow the cargo area of
your vehicle to extend into the cab. The rear glass
can be either installed in its normal position, or it can be
removed and stored in the rear glass storage pocket.
To lower the midgate, do the following:
1. Fold the rear seats. The front seats might have to
be moved forward slightly to allow the rear seats to
fold. See
Rear Seat Operation on page 1-6for
more information.
2-20
Page 91 of 478
Raising the Midgate
To return the midgate to its normal position, raise the
midgate up with a ®rm swinging motion (this will help to
ensure that the midgate closes with enough force to
engage the latches) until it latches into place securely.
If the rear glass is removed and you would like to
put it back, do so using the instructions given previously.
Tailgate
Use the ignition/door key to unlock/lock the tailgate.
Open the tailgate by lifting up on its handle while pulling
the tailgate toward you.
To shut the tailgate, ®rmly push it upward until it
latches. Push and pull on the tailgate to be sure it is
latched securely.
2-23
Page 92 of 478
Tailgate Removal
The tailgate can be removed to allow for different
loading situations. Although the tailgate can be removed
without assistance, you may want someone to assist
you with the removal to avoid possible damage to
the vehicle.
To remove the tailgate, do the following:
1. Hold the tailgate up, slightly raised.
2. Release the retaining
cable clip by lifting the
cable so it is level
with the ground and
then push the cable clip
toward the vehicle.
3. Raise the tailgate at a slight upward angle, pull
back on the tailgate at the right edge so it
releases from the block hinge (arrow) and then
move the tailgate to the right to release the
left edge.
Reverse the above procedure to reinstall. Make sure the
tailgate is secure.
2-24
Page 98 of 478
Ignition Positions
With your key in the ignition switch you can turn it to
four different positions.
A (LOCK):This position locks your ignition and
transmission. It's a theft-deterrent feature. You will only
be able to remove your key when the ignition is
turned to LOCK.
Notice:If your key seems stuck in LOCK and you
can not turn it, be sure you are using the correct
key; if so, is it all the way in? Turn the key only with
your hand. Using a tool to force it could break the
key or the ignition switch. If none of these works,
then your vehicle needs service.
B (ACCESSORY):This position allows you to use
things like the radio, power windows and the windshield
wipers when the engine is off.
C (RUN):This position is for driving.
D (START):This position starts your engine.
Retained Accessory Power (RAP)
The Retained Accessory Power (RAP) feature will allow
certain features on your vehicle to continue to work
for up to 10 minutes after the ignition key is turned
to LOCK.
2-30
Page 107 of 478

·Move the lever up as far as it will go.
3. Turn the ignition key to LOCK.
4. Remove the key and take it with you. If you can
leave your vehicle with the ignition key in your
hand, your vehicle is in PARK (P).
Leaving Your Vehicle With the Engine
Running
{CAUTION:
It can be dangerous to leave your vehicle with
the engine running. Your vehicle could move
suddenly if the shift lever is not fully in
PARK (P) with the parking brake ®rmly set.
And, if you leave the vehicle with the engine
running, it could overheat and even catch ®re.
You or others could be injured. Do not leave
your vehicle with the engine running.
If you have to leave your vehicle with the engine
running, be sure your vehicle is in PARK (P) and the
parking brake is ®rmly set before you leave it. After you
move the shift lever into PARK (P), hold the regular
brake pedal down. Then, see if you can move the shift
lever away from PARK (P) without ®rst pulling it
toward you. If you can, it means that the shift lever
wasn't fully locked into PARK (P).
2-39
Page 124 of 478
Cargo Cover Panels
{CAUTION:
Improperly stored cargo cover panels could be
thrown about the vehicle during a collision or
sudden maneuver. You or others could be
injured. If you remove a panel, always store it
in the proper storage location. When you put it
back, always be sure that is securely
reattached.
Notice:Exceeding the weight limit of 250 lbs
(113 kg) can damage the cargo covers, and the
repairs would not be covered by your warranty. Do
not put anything on top of the cargo covers over
the weight limit.
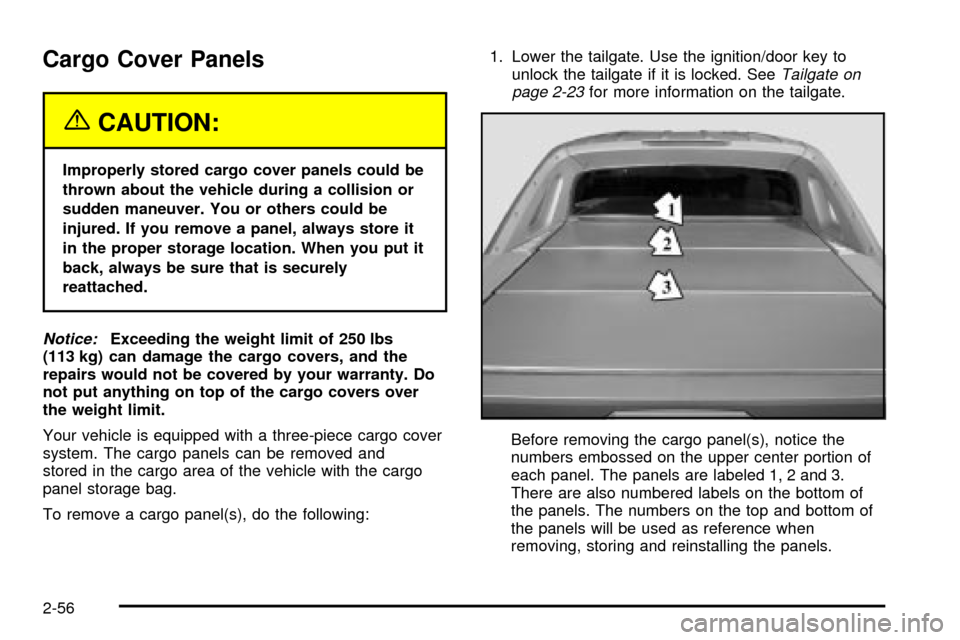
Your vehicle is equipped with a three-piece cargo cover
system. The cargo panels can be removed and
stored in the cargo area of the vehicle with the cargo
panel storage bag.
To remove a cargo panel(s), do the following:1. Lower the tailgate. Use the ignition/door key to
unlock the tailgate if it is locked. See
Tailgate on
page 2-23for more information on the tailgate.
Before removing the cargo panel(s), notice the
numbers embossed on the upper center portion of
each panel. The panels are labeled 1, 2 and 3.
There are also numbered labels on the bottom of
the panels. The numbers on the top and bottom of
the panels will be used as reference when
removing, storing and reinstalling the panels.
2-56


