2004 CADILLAC ESCALADE EXT remove
[x] Cancel search: removePage 232 of 478

Battery Replacement
To change the batteries, do the following:
1. Loosen the screw on the battery compartment door
located on the left side of the headphone earpiece.
2. Replace the two AAA batteries in the compartment.
Make sure that they are installed correctly, using
the diagram on the inside of the battery
compartment.
3. Tighten the screw to close the compartment door.
Notice:Do not store the headphones in heat or
direct sunlight. This could damage the headphones
and repairs would not be covered by your warranty.
Keep the headphones stored in a cool, dry place.
If the headphones are to be stored for a long period of
time, remove the batteries and keep them in a cool,
dry place.
Stereo RCA Jacks
The RCA jacks are located behind the video screen.
The RCA jacks allow you to connect audio and
video from an auxiliary device such as a camcorder or a
video game unit to your RSE system. Standard RCA
cables are needed to connect the auxiliary device to the
RCA jacks. The yellow connector inputs video and
the red and white connectors input right and left stereo
audio. Refer to the manufacturer's instructions for
proper connection of your auxiliary device.
To use the auxiliary inputs on the RSE system, connect
an external auxiliary device to the color-coded RCA
jacks and turn both the auxiliary device and the
RSE system power on. If the RSE system had been
previously in the DVD player mode, pressing the SRCE
button on the faceplate or the remote control will
toggle the RSE system between the auxiliary device
and the DVD player.
3-90
Page 235 of 478
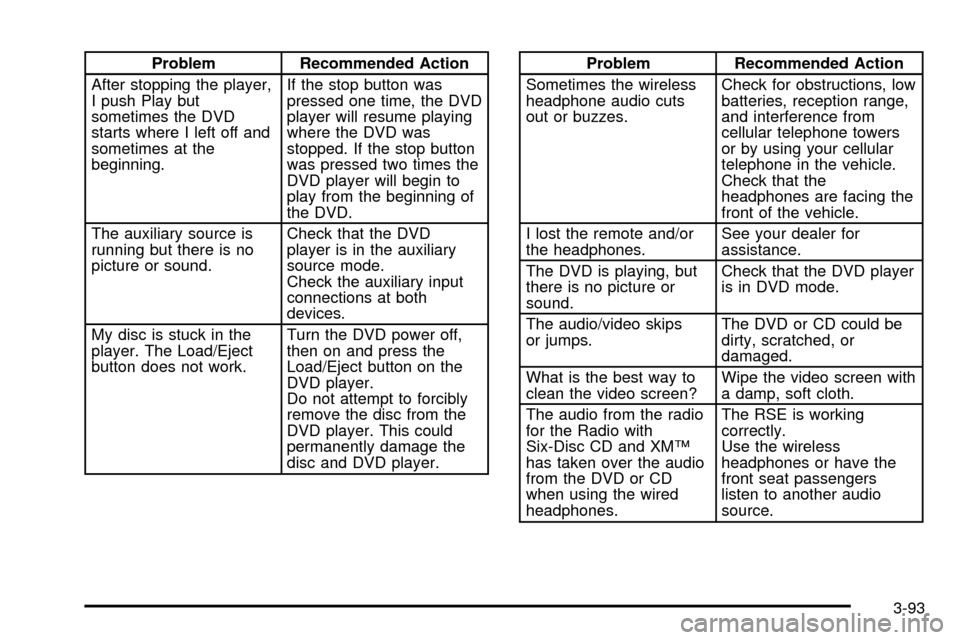
Problem Recommended Action
After stopping the player,
I push Play but
sometimes the DVD
starts where I left off and
sometimes at the
beginning.If the stop button was
pressed one time, the DVD
player will resume playing
where the DVD was
stopped. If the stop button
was pressed two times the
DVD player will begin to
play from the beginning of
the DVD.
The auxiliary source is
running but there is no
picture or sound.Check that the DVD
player is in the auxiliary
source mode.
Check the auxiliary input
connections at both
devices.
My disc is stuck in the
player. The Load/Eject
button does not work.Turn the DVD power off,
then on and press the
Load/Eject button on the
DVD player.
Do not attempt to forcibly
remove the disc from the
DVD player. This could
permanently damage the
disc and DVD player.Problem Recommended Action
Sometimes the wireless
headphone audio cuts
out or buzzes.Check for obstructions, low
batteries, reception range,
and interference from
cellular telephone towers
or by using your cellular
telephone in the vehicle.
Check that the
headphones are facing the
front of the vehicle.
I lost the remote and/or
the headphones.See your dealer for
assistance.
The DVD is playing, but
there is no picture or
sound.Check that the DVD player
is in DVD mode.
The audio/video skips
or jumps.The DVD or CD could be
dirty, scratched, or
damaged.
What is the best way to
clean the video screen?Wipe the video screen with
a damp, soft cloth.
The audio from the radio
for the Radio with
Six-Disc CD and XMŸ
has taken over the audio
from the DVD or CD
when using the wired
headphones.The RSE is working
correctly.
Use the wireless
headphones or have the
front seat passengers
listen to another audio
source.
3-93
Page 238 of 478

To load a CD, perform the following steps:
1. Press the LOAD button. Available positions will
blink amber.
2. Select a position by pressing the desired numbered
button with the amber blinking light. If a button is
not pressed within ®ve seconds, the changer will go
to the lowest available position.
3. Load the CD when the loading slot indicators turn
amber. An internal door will open allowing a single
CD to be inserted into the changer. After
approximately 10 seconds the changer will be ready
to play.
To load two or more CDs, perform the
following steps:
1. Press and hold the LOAD button. The ®rst CD will
be loaded into the lowest numbered empty position.
2. Load a single CD when the loading slot indicators
turn amber. After about 10 seconds the changer will
cycle to the next available position.
3. Repeat Step 2 until all CDs are loaded into all of
the desired positions. If you do not wish to load all
of the positions, you can cancel the load all
function by pressing a button with a green ¯ashing
indicator light or wait 20 seconds for the changer
to time out.
To eject a single CD, perform the following
steps:
1. Press the eject button (upward pointing arrow). The
buttons with loaded CDs will blink amber.
2. Press one of the amber blinking buttons to select
the location of the CD you want to eject. The
changer will move to that location and eject the CD.
If you do not remove the CD from the player
within 10 seconds, it will be reloaded. If the eject
button is pressed and a numbered location button is
not pressed within ®ve seconds, the current or
last played CD will be ejected.
To eject all CDs, press and hold the eject button.
There are two ways to play a CD. Perform
one of the following:
·
With the radio on, press the desired numbered
button with a green indicator light on the CD
changer.
·Press the TAPE CD button on the radio. The CD
changer will go to its last played position.
3-96
Page 257 of 478

Steering in Emergencies
There are times when steering can be more effective
than braking. For example, you come over a hill and ®nd
a truck stopped in your lane, or a car suddenly pulls
out from nowhere, or a child darts out from between
parked cars and stops right in front of you. You
can avoid these problems by braking Ð if you can stop
in time. But sometimes you can not; there is not
room. That is the time for evasive action Ð steering
around the problem.
Your vehicle can perform very well in emergencies like
these. First apply your brakes.
See
Braking on page 4-6. It is better to remove as much
speed as you can from a possible collision. Then
steer around the problem, to the left or right depending
on the space available.An emergency like this requires close attention and a
quick decision. If you are holding the steering wheel at
the recommended 9 and 3 o'clock positions, you
can turn it a full 180 degrees very quickly without
removing either hand. But you have to act fast, steer
quickly, and just as quickly straighten the wheel
once you have avoided the object.
The fact that such emergency situations are always
possible is a good reason to practice defensive driving
at all times and wear safety belts properly.
4-13
Page 263 of 478

Environmental Concerns
Off-road driving can provide wholesome and satisfying
recreation. However, it also raises environmental
concerns. We recognize these concerns and urge every
off-roader to follow these basic rules for protecting
the environment:
·Always use established trails, roads and areas that
have been specially set aside for public off-road
recreational driving; obey all posted regulations.
·Avoid any driving practice that could damage
the environment Ð shrubs, ¯owers, trees,
grasses Ð or disturb wildlife (this includes
wheel-spinning, breaking down trees or
unnecessary driving through streams or over
soft ground).
·Always carry a litter bag Ð make sure all refuse is
removed from any campsite before leaving.
·Take extreme care with open ®res
(where permitted), camp stoves and lanterns.
·Never park your vehicle over dry grass or other
combustible materials that could catch ®re from
the heat of the vehicle's exhaust system.
Traveling to Remote Areas
It makes sense to plan your trip, especially when going
to a remote area. Know the terrain and plan your
route. You are much less likely to get bad surprises.
Get accurate maps of trails and terrain. Try to learn of
any blocked or closed roads.
It is also a good idea to travel with at least one other
vehicle. If something happens to one of them, the other
can help quickly.
4-19
Page 274 of 478

Driving in Water
Heavy rain can mean ¯ash ¯ooding, and ¯ood waters
demand extreme caution.
Find out how deep the water is before you drive through
it. If it is deep enough to cover your wheel hubs,
axles or exhaust pipe, do not try it Ð you probably will
not get through. Also, water that deep can damage
your axle and other vehicle parts.
If the water is not too deep, drive slowly through it. At
faster speeds, water splashes on your ignition
system and your vehicle can stall. Stalling can also
occur if you get your tailpipe under water. And, as long
as your tailpipe is under water, you will never be
able to start your engine. When you go through water,
remember that when your brakes get wet, it may
take you longer to stop.
{CAUTION:
Driving through rushing water can be
dangerous. Deep water can sweep your vehicle
downstream and you and your passengers
could drown. If it is only shallow water, it can
CAUTION: (Continued)
CAUTION: (Continued)
still wash away the ground from under your
tires, and you could lose traction and roll
the vehicle over. Do not drive through
rushing water.
See
Driving in Rain and on Wet Roads on page 4-32for
more information on driving through water.
After Off-Road Driving
Remove any brush or debris that has collected on the
underbody, chassis or under the hood. These
accumulations can be a ®re hazard.
After operation in mud or sand, have the brake linings
cleaned and checked. These substances can cause
glazing and uneven braking. Check the body structure,
steering, suspension, wheels, tires and exhaust
system for damage. Also, check the fuel lines and
cooling system for any leakage.
Your vehicle will require more frequent service due to
off-road use. Refer to the Maintenance Schedule
for additional information.
4-30
Page 317 of 478

CAUTION: (Continued)
Keep sparks, ¯ames and smoking materials
away from fuel. Do not leave the fuel pump
unattended when refueling your vehicle Ð this
is against the law in some places. Keep
children away from the fuel pump; never let
children pump fuel.
The fuel cap is located behind a hinged door on the
driver's side of the vehicle.
To remove the fuel cap,
turn it slowly to the left
(counterclockwise). It will
require more effort to turn
the fuel cap on the last turn
as you loosen it.
While refueling, hang
the fuel cap by the tether
using the hook located
on the inside of the
®ller door.
{CAUTION:
If a ®re starts while you are refueling, do not
remove the nozzle. Shut off the ¯ow of fuel by
shutting off the pump or by notifying the
station attendant. Leave the area immediately.
Be careful not to spill fuel. Don't top off or over®ll your
tank and wait a few seconds after you've ®nished
pumping before you remove the nozzle. Clean any spilled
fuel from painted surfaces as soon as possible. See
Cleaning the Outside of Your Vehicle on page 5-105.
When you put the fuel cap back on, turn it to the right
(clockwise) until you hear a clicking sound. It will require
more effort to turn the fuel cap on the last turn as you
tighten it. Make sure you fully install the cap. The
diagnostic system can determine if the fuel cap has
been left off or improperly installed. this would allow fuel
to evaporate into the atmosphere. See
Malfunction
Indicator Lamp on page 3-44.
Notice:If you need a new fuel cap, be sure to get
the right type. Your dealer can get one for you. If you
get the wrong type, it may not ®t properly. This may
cause your malfunction indicator lamp to light and
may damage your fuel tank and emissions system.
See
Malfunction Indicator Lamp on page 3-44.
5-7
Page 322 of 478

Checking Engine Oil
It is a good idea to check your engine oil every time you
get fuel. In order to get an accurate reading, the oil
must be warm and the vehicle must be on level ground.
The engine oil dipstick handle is a yellow loop. See
Engine Compartment Overview on page 5-10for
the location of the engine oil dipstick.
Turn off the engine and give the oil several minutes to
drain back into the oil pan. If you don't, the oil
dipstick might not show the actual level.
Pull out the dipstick and clean it with a paper towel or
cloth, then push it back in all the way. Remove it again,
keeping the tip down, and check the level.
When to Add Engine Oil
If the oil is at or below the cross-hatched area at the tip
of the dipstick, then you will need to add at least one
quart of oil. But you must use the right kind. This section
explains what kind of oil to use. For engine oil
crankcase capacity, see
Capacities and Speci®cations
on page 5-120.
Notice:Do not add too much oil. If your engine has
so much oil that the oil level gets above the
cross-hatched area that shows the proper operating
range, your engine could be damaged.
See
Engine Compartment
Overview on page 5-10for
the location of the
engine oil ®ll cap.
Be sure to add enough oil to put the level somewhere in
the proper operating range. Push the dipstick all the
way back in when you are through.
5-12