2004 BMW 645CI COUPE Page 48
[x] Cancel search: Page 48Page 104 of 216

Things to remember when driving
102
Things to remember when driving
Break-in procedures
To ensure that your vehicle continues to
provide optimized economy of operation
throughout an extended service life, we
request that you devote careful attention to
the following section.
Engine and differential
Up to 1,200 miles/2,000 km:
You should attempt to vary both vehicle
and engine speeds. Until the break-in
period has been completed, you should
also refrain from exceeding an engine
speed of 4500 rpm or a driving speed of
100 mph/160 km/h.
Always obey all official speed limits.
Avoid full-throttle operation and use of the
transmission's kickdown mode during
these initial miles.
Once you have driven 1,200 miles/
2,000 km, the engine and vehicle speeds
can be gradually increased.
SMG Sequential manual
transmission
Do not use the acceleration assistant dur-
ing the break-in period, refer to page 60.
Tires
Due to technical factors associated with
their manufacture, tires do not achieve their
full traction potential until after an initial
break-in period. Therefore, drive reservedly
during the first 200 miles/300 km.
Brake system
Brakes require an initial break-in period of
approx. 300 miles/500 km to achieve opti-
mized contact and wear patterns between
brake pads and rotors.
Clutch
The function of the clutch is only at its opti-
mized level after a distance driven of
approx. 300 miles/500 km. During this
break-in period, engage the clutch gently.
After component replacement
You should also comply with these break-in
procedures should the components men-
tioned above need to be replaced at a later
point.
General driving notes
Hot exhaust system
Extreme temperatures occur at the
catalytic converter on this and every
catalyst-equipped vehicle. Do not remove
the heat shields installed adjacent to vari-
ous sections of the exhaust system, and
never apply undercoating to them. When
driving, standing at idle and while parking,
take care to avoid possible contact
between the hot exhaust system and any
highly flammable materials such as hay,
leaves, grass, etc. Such contact could lead
to a fire, and with it the risk of serious prop-
erty damage as well as personal injury.<
Parking vehicle
Condensation forms in the air conditioner
system during operation, and then exits
under the vehicle. Traces of condensed
water under the vehicle are thus normal.
Before driving into a car wash
Fold in the exterior mirrors manually, as
otherwise they could be damaged due to
the width of the vehicle.
Hydroplaning
When driving on wet or slushy roads,
reduce road speed. If you do not, a
wedge of water can form between tires and
Page 105 of 216
Driving tips
103Reference
At a glance
Controls
Communications
Navigation
Entertainment
Mobility
road surface. This phenomenon is referred
to as hydroplaning, and is characterized
by a partial or complete loss of contact
between the tires and the road surface, ulti-
mately undermining your ability to steer
and brake the vehicle.<
The risk of hydroplaning increases as the
tread depth of the tires decreases, also
refer to Tire tread on page 167.
Driving through water
Do not drive through water on the
road if it is deeper than 1 ft/30 cm,
and then only at walking speed at the most.
Otherwise, the vehicle's engine, the electri-
cal systems and the transmission may be
damaged.<
Braking safely
Your BMW is equipped with ABS as stan-
dard. The best way to achieve optimized
braking response from the ABS is to apply
maximum pressure to the brake pedal in
situations where this is required: panic
stops. Since the vehicle maintains steering
responsiveness, you can nevertheless
avoid possible obstacles with a minimum
of steering effort.
Pulsation at the brake pedal combines with
sounds from the hydraulic circuits to indi-
cate to the driver that ABS is in its active
mode.
Do not drive with your foot resting on
the brake pedal. Even light but con-
sistent pedal pressure can lead to high
temperatures, brake wear and possibly
even brake failure.<
Driving in wet conditions
While driving in wet conditions and in
heavy rain, it is a good idea to apply light
pressure to the brake pedal every few
miles. Monitor traffic conditions to ensure
that this maneuver does not endanger
other road users. The heat generated in this
process helps dry the pads and rotors to
ensure that full braking efficiency will then
be available when you need it.
Hills
To prevent overheating and thus
reduced efficiency of the brake sys-
tem, downshift to a gear in which only min-
imal brake applications are needed when
descending long or steep downhill
stretches. Even light but consistent pedal
pressure can lead to high temperatures,
brake wear and possibly even brake fail-
ure.<
You can further enhance the engine's brak-
ing effect by selecting a lower gear in the
automatic transmission's manual mode,
downshifting as far as first gear on
extremely steep stretches, refer to
page 59. This strategy helps you avoid
placing excessive loads on the brake sys-
tem.
Never drive with the clutch pressed
or allow the vehicle to coast with the
transmission in Neutral – or with the engine
switched off – there is no engine braking
when the transmission is in Neutral, and no
power assist for brakes and steering when
the engine is not running.
Never allow floor mats, carpets or any other
objects to protrude into the area around the
accelerator and brake pedals and obstruct
their movement.<
Corrosion on brake rotors
When the vehicle is driven only occasion-
ally, during extended periods when the
vehicle is not used at all, and in operating
conditions where brake applications are
less frequent, there is an increased ten-
dency for corrosion to form on rotors, while
contaminants accumulate on the brake
pads. This occurs because the minimum
pressure which must be exerted by the
pads during brake applications to clean the
rotors is not reached.
Should corrosion form on the brake rotors,
the brakes will tend to respond with a pul-
sating effect that even extended applica-
tion will fail to cure.
Page 107 of 216
Driving tips
105Reference
At a glance
Controls
Communications
Navigation
Entertainment
Mobility
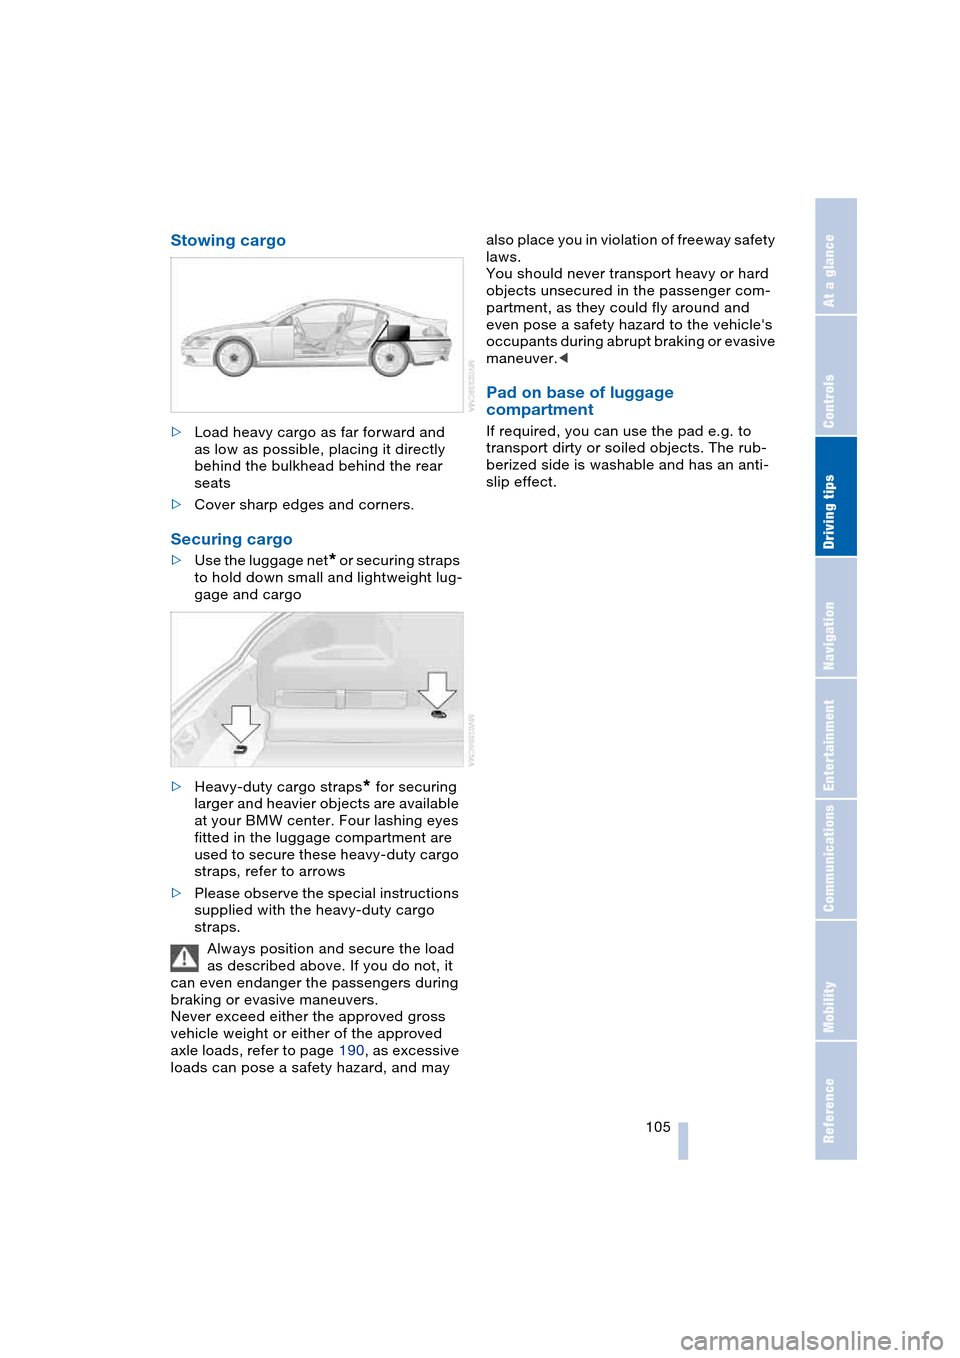
Stowing cargo
>Load heavy cargo as far forward and
as low as possible, placing it directly
behind the bulkhead behind the rear
seats
>Cover sharp edges and corners.
Securing cargo
>Use the luggage net* or securing straps
to hold down small and lightweight lug-
gage and cargo
>Heavy-duty cargo straps
* for securing
larger and heavier objects are available
at your BMW center. Four lashing eyes
fitted in the luggage compartment are
used to secure these heavy-duty cargo
straps, refer to arrows
>Please observe the special instructions
supplied with the heavy-duty cargo
straps.
Always position and secure the load
as described above. If you do not, it
can even endanger the passengers during
braking or evasive maneuvers.
Never exceed either the approved gross
vehicle weight or either of the approved
axle loads, refer to page 190, as excessive
loads can pose a safety hazard, and may also place you in violation of freeway safety
laws.
You should never transport heavy or hard
objects unsecured in the passenger com-
partment, as they could fly around and
even pose a safety hazard to the vehicle's
occupants during abrupt braking or evasive
maneuver.<
Pad on base of luggage
compartment
If required, you can use the pad e.g. to
transport dirty or soiled objects. The rub-
berized side is washable and has an anti-
slip effect.
Page 110 of 216
Starting navigation system
108
Starting navigation system
Your navigation system can use satellites
to ascertain the precise position of your
vehicle and guide you reliably to any desti-
nation you enter.
Navigation DVD
Special navigation DVDs are required;
these are available from your BMW center.
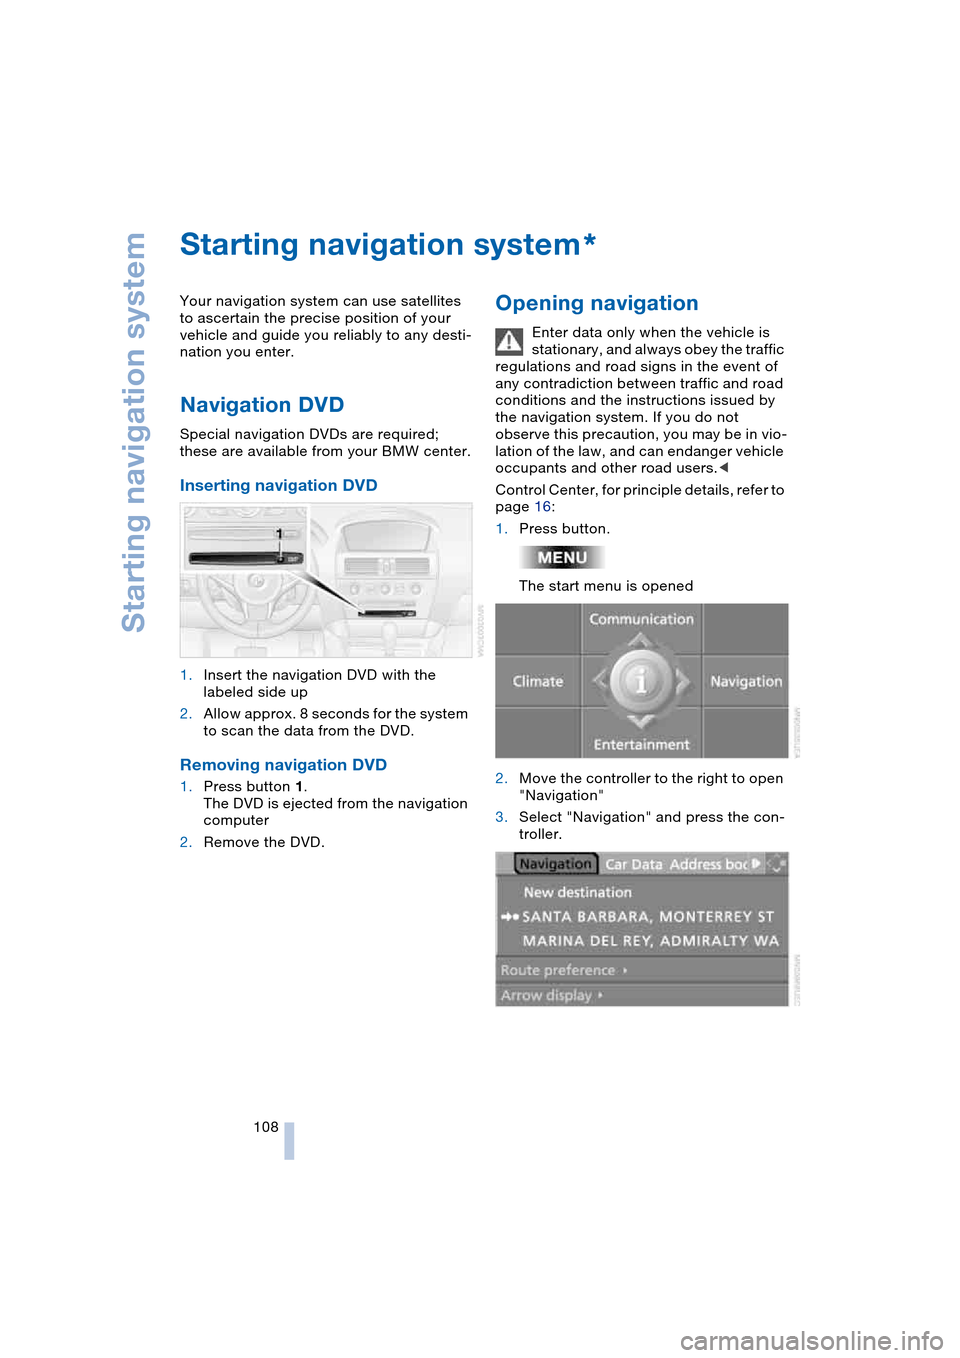
Inserting navigation DVD
1.Insert the navigation DVD with the
labeled side up
2.Allow approx. 8 seconds for the system
to scan the data from the DVD.
Removing navigation DVD
1.Press button 1.
The DVD is ejected from the navigation
computer
2.Remove the DVD.
Opening navigation
Enter data only when the vehicle is
stationary, and always obey the traffic
regulations and road signs in the event of
any contradiction between traffic and road
conditions and the instructions issued by
the navigation system. If you do not
observe this precaution, you may be in vio-
lation of the law, and can endanger vehicle
occupants and other road users.<
Control Center, for principle details, refer to
page 16:
1.Press button.
The start menu is opened
2.Move the controller to the right to open
"Navigation"
3.Select "Navigation" and press the con-
troller.
*
Page 111 of 216
Navigation
Driving tips
109Reference
At a glance
Controls
Communications
Entertainment
Mobility
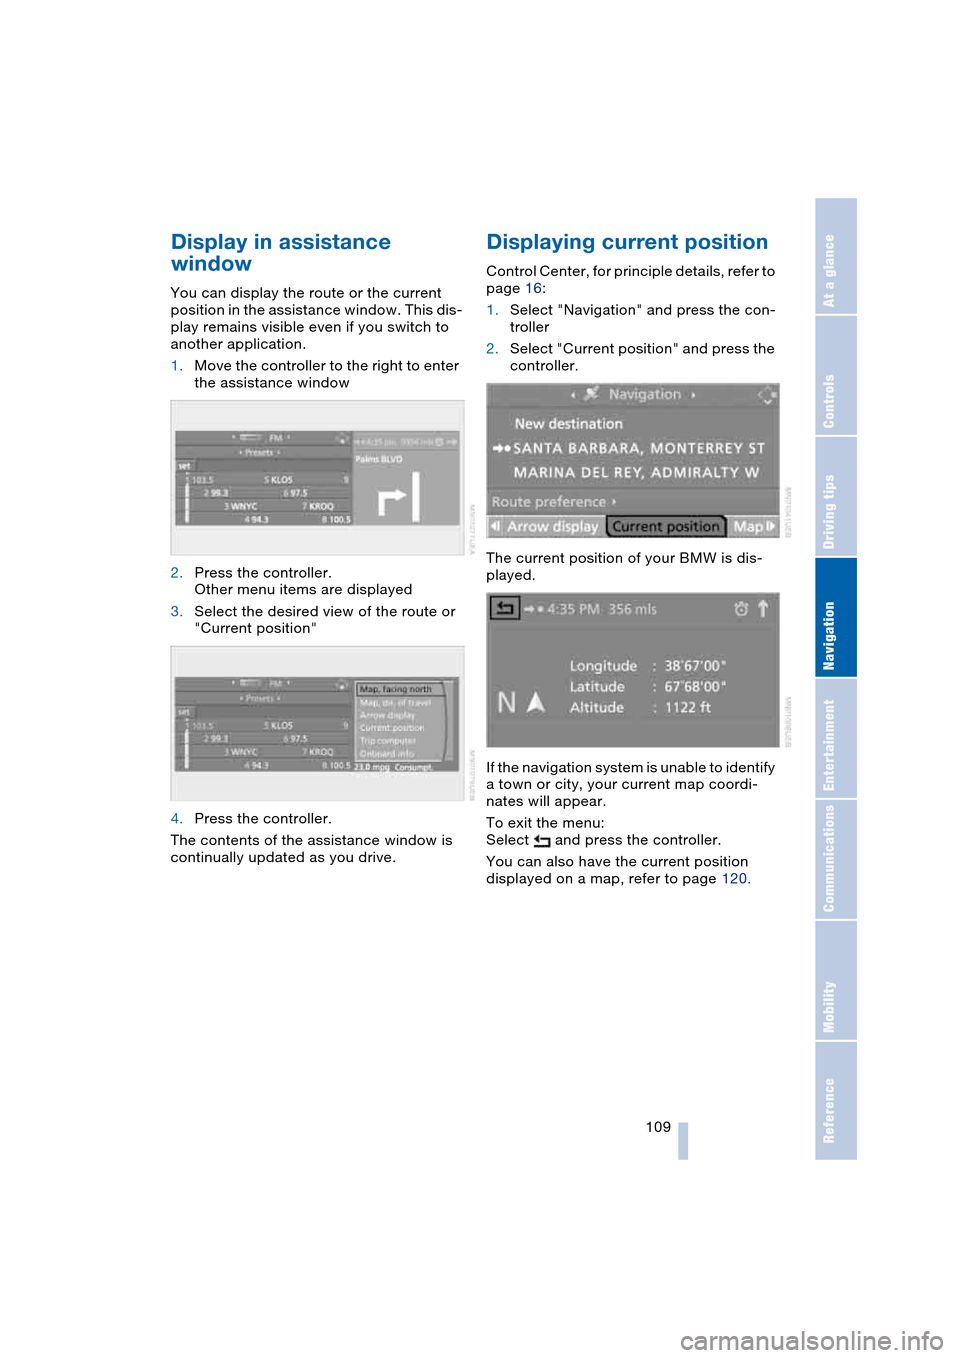
Display in assistance
window
You can display the route or the current
position in the assistance window. This dis-
play remains visible even if you switch to
another application.
1.Move the controller to the right to enter
the assistance window
2.Press the controller.
Other menu items are displayed
3.Select the desired view of the route or
"Current position"
4.Press the controller.
The contents of the assistance window is
continually updated as you drive.
Displaying current position
Control Center, for principle details, refer to
page 16:
1.Select "Navigation" and press the con-
troller
2.Select "Current position" and press the
controller.
The current position of your BMW is dis-
played.
If the navigation system is unable to identify
a town or city, your current map coordi-
nates will appear.
To exit the menu:
Select and press the controller.
You can also have the current position
displayed on a map, refer to page 120.
Page 112 of 216

Destination entry
110
Destination entry
In entering your destination you can select
from among the following options:
>Entering a destination manually, see
below
>Selecting destination using information,
refer to page 113
>Selecting from among recent destina-
tions, refer to Destination list, page 113
>Selecting destination from address
book, refer to page 114.
After selecting your destination you can
proceed to start the destination guidance,
refer to page 118.
Entering a destination
manually
The system supports the wordmatch prin-
ciple to make it easier for you to enter the
names of streets or towns/cities. This
enables input of different spellings and
supplements your input automatically so
that stored names can be applied as desti-
nations as quickly as possible.
Control Center, for principle details, refer to
page 16:
1.Select "Navigation" and press the con-
troller
2.Select "New destination" and press the
controller
3.Select "Enter address" and press the
controller.The system also supports you with the fol-
lowing features:
>If you do not enter a street, the system
will guide you to the downtown area of
a town or city
>You can skip the entry of country and
locality if the current entries are being
retained for your new destination
>The commands of the voice command
system for destination entry differ from
those of the individual menu items on
the Control Display. You can have the
system list the possible voice com-
mands, refer to page 21.
Selecting country of destination
1.Select "State / Province" or the dis-
played country and press the controller.
A list of available countries appears on
the display
2.Select the country of destination and
press the controller.
In order to be able to start the destination
guidance, at least the city of destination or
its zip code must be entered.
Page 114 of 216
Destination entry
112 The destination is saved in the destination
list, refer to page 113.
Selecting destination using
map
If you only know the location of the town/
city or street, the system offers you a map.
You can use the cursor to limit the destina-
tion in the map and then apply it into the
destination guidance.
Control Center, for principle details, refer to
page 16:
1.Select "Navigation" and press the con-
troller
2.Select "New destination" and press the
controller
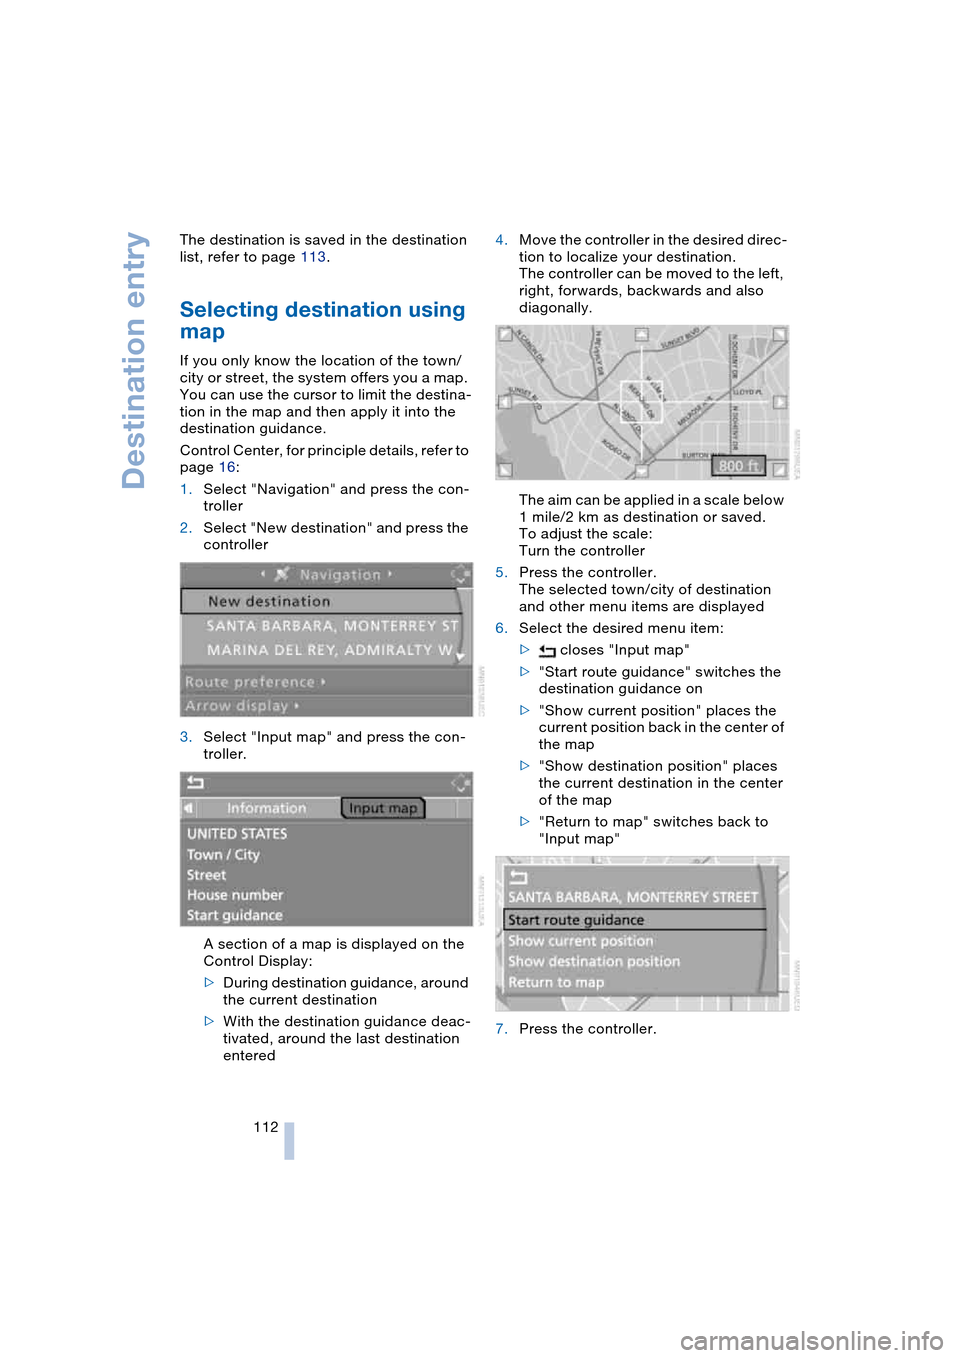
3.Select "Input map" and press the con-
troller.
A section of a map is displayed on the
Control Display:
>During destination guidance, around
the current destination
>With the destination guidance deac-
tivated, around the last destination
entered4.Move the controller in the desired direc-
tion to localize your destination.
The controller can be moved to the left,
right, forwards, backwards and also
diagonally.
The aim can be applied in a scale below
1 mile/2 km as destination or saved.
To adjust the scale:
Turn the controller
5.Press the controller.
The selected town/city of destination
and other menu items are displayed
6.Select the desired menu item:
> closes "Input map"
>"Start route guidance" switches the
destination guidance on
>"Show current position" places the
current position back in the center of
the map
>"Show destination position" places
the current destination in the center
of the map
>"Return to map" switches back to
"Input map"
7.Press the controller.
Page 115 of 216
Navigation
Driving tips
113Reference
At a glance
Controls
Communications
Entertainment
Mobility
Selecting destination using
information
You can obtain a display of selected desti-
nations for towns/cities and apply them
into the destination guidance, e. g. hotels,
sights or hospitals.
Control Center, for principle details, refer to
page 16:
1.Select "Navigation" and press the con-
troller
2.Select "New destination" and press the
controller
3.Select "Information" and press the con-
troller
4.Select the destination town/city or
country:
>"On destination"
>"On location"
>"On a new destination"
The display for entering a town/city
appears on the Control Display.
Select the desired town/city and
press the controller
5.Press the controller
6.Select the desired type of destination,
such as "Hotels and restaurants"7.Press the controller.
A list with a maximum of ten destina-
tions, sorted by distance, is displayed
on the Control Display
8.Select a destination and press the con-
troller
9.Select a menu item:
>To apply the address in the destina-
tion list and start the destination
guidance:
Select "Select as destination" and
press the controller
>To set up a telephone connection:
Select "Call" and press the control-
ler.
To exit the menu:
Select and press the controller.
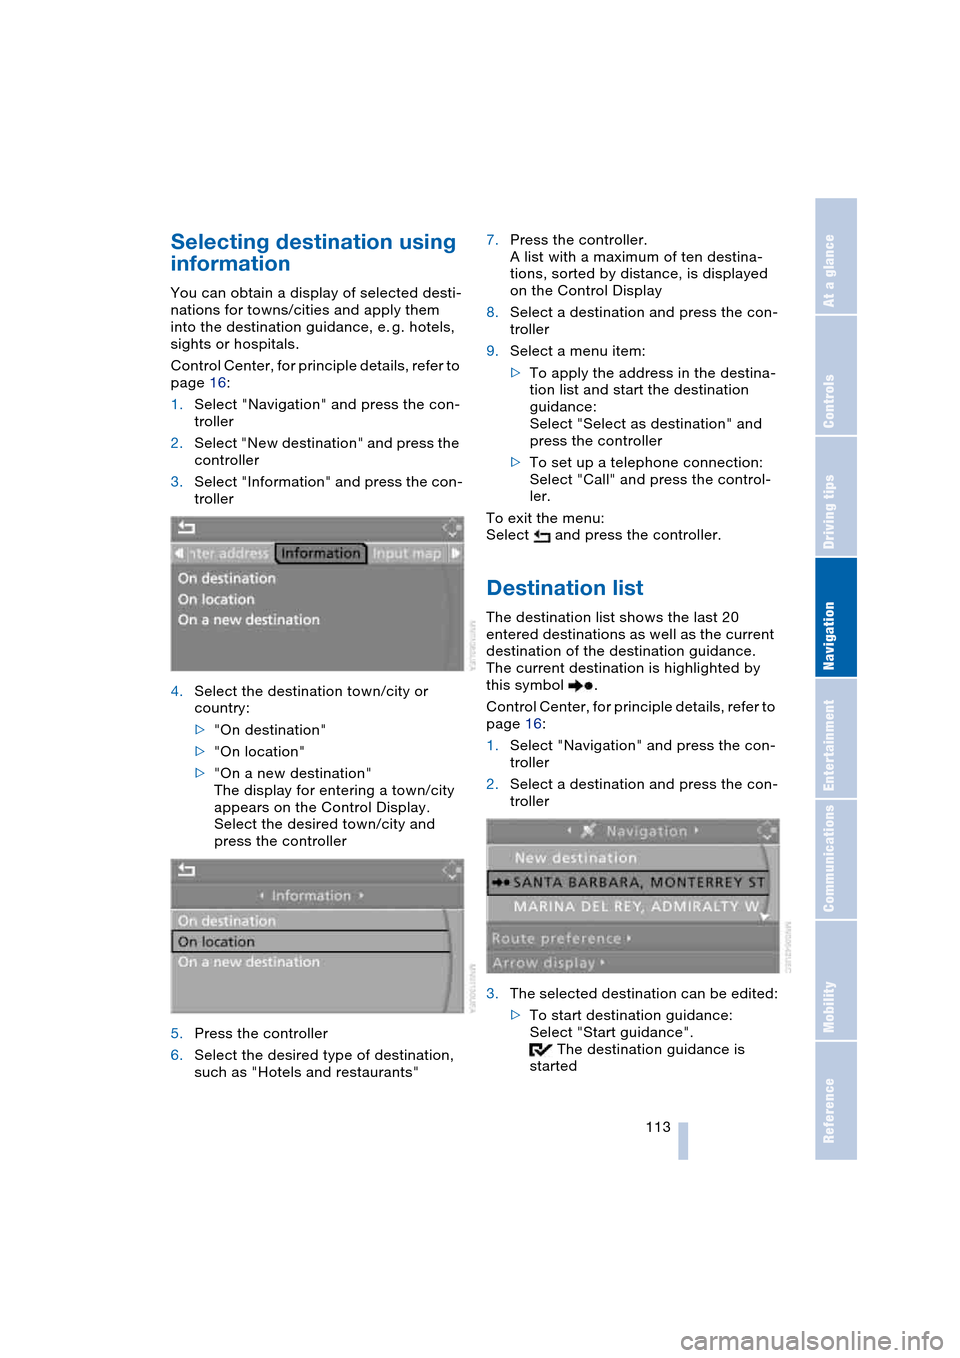
Destination list
The destination list shows the last 20
entered destinations as well as the current
destination of the destination guidance.
The current destination is highlighted by
this symbol .
Control Center, for principle details, refer to
page 16:
1.Select "Navigation" and press the con-
troller
2.Select a destination and press the con-
troller
3.The selected destination can be edited:
>To start destination guidance:
Select "Start guidance".
The destination guidance is
started