2004 BMW 645CI COUPE navigation
[x] Cancel search: navigationPage 167 of 216

Mobility
165Reference
At a glance
Controls
Driving tips
Communications
Navigation
Entertainment
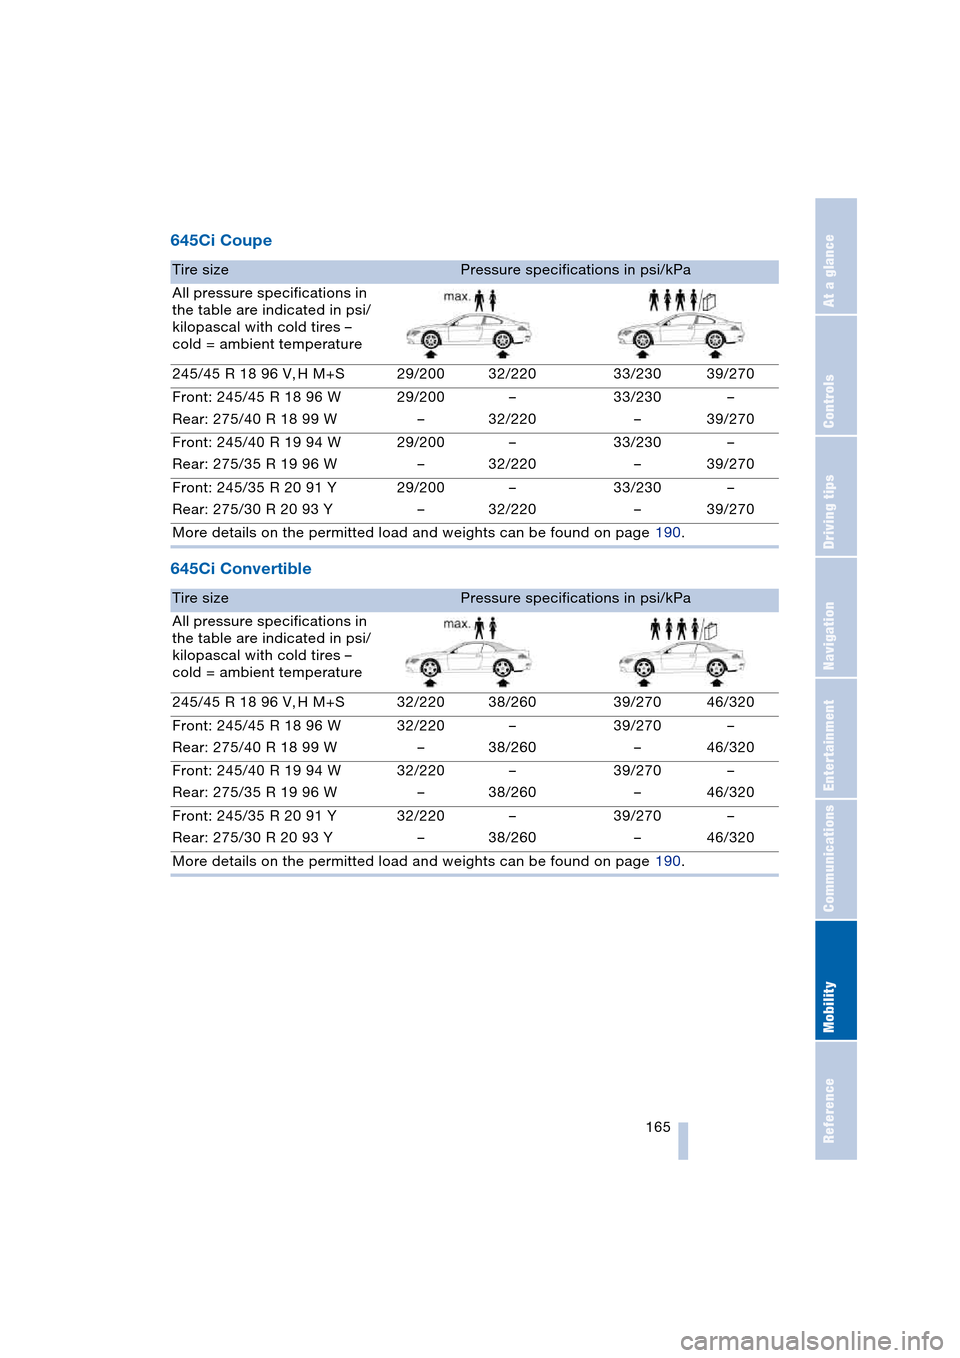
645Ci Coupe
645Ci Convertible
Tire sizePressure specifications in psi/kPa
All pressure specifications in
the table are indicated in psi/
kilopascal with cold tires –
cold = ambient temperature
245/45 R 18 96 V, H M+S 29/200 32/220 33/230 39/270
Front: 245/45 R 18 96 W
Rear: 275/40 R 18 99 W29/200
––
32/22033/230
––
39/270
Front: 245/40 R 19 94 W
Rear: 275/35 R 19 96 W29/200
––
32/22033/230
––
39/270
Front: 245/35 R 20 91 Y
Rear: 275/30 R 20 93 Y29/200
––
32/22033/230
––
39/270
More details on the permitted load and weights can be found on page 190.
Tire sizePressure specifications in psi/kPa
All pressure specifications in
the table are indicated in psi/
kilopascal with cold tires –
cold = ambient temperature
245/45 R 18 96 V, H M+S 32/220 38/260 39/270 46/320
Front: 245/45 R 18 96 W
Rear: 275/40 R 18 99 W32/220
––
38/26039/270
––
46/320
Front: 245/40 R 19 94 W
Rear: 275/35 R 19 96 W32/220
––
38/26039/270
––
46/320
Front: 245/35 R 20 91 Y
Rear: 275/30 R 20 93 Y32/220
––
38/26039/270
––
46/320
More details on the permitted load and weights can be found on page 190.
Page 169 of 216

Mobility
167Reference
At a glance
Controls
Driving tips
Communications
Navigation
Entertainment
Temperature
The temperature grades are A, the highest,
B, and C, representing the tire's resistance
to the generation of heat and its ability to
dissipate heat when tested under con-
trolled conditions on a specified indoor lab-
oratory test wheel.
Sustained high temperature can cause the
material of the tire to degenerate and
reduce tire life, and excessive temperature
can lead to sudden tire failure. The grade C
corresponds to a level of performance
which all passenger car tires must meet
under the Federal Motor Vehicle Safety
Standard No. 109. Grades B and A repre-
sent higher levels of performance on the
laboratory test wheel than the minimum
required by law.
The temperature grade for this tire is
established for a tire that is properly
inflated and not overloaded. Excessive
speed, underinflation, or excessive load-
ing, either separately or in combination,
can cause heat buildup and possible tire
failure.<
RSC – run-flat tires
You will recognize run-flat tires by a circular
symbol containing the letters RSC on the
side of the tire, refer to page 168.
M+S
Winter and all-season tires.
These have better winter properties than
summer tires.
Tire condition
Before driving off, inspect your tires for
tread wear, signs of damage and foreign
objects lodged in the tread, and check the
tread depth.
Minimum tread depth
The tread depth should not drop below
0.12 in/3 mm, although, for example, Euro-
pean legislation only specifies a minimum
tread depth of 0.063 in/1.6 mm. At tread
depths below 0.12 in/3 mm there is an increased risk of high-speed hydroplaning,
even when only small amounts of water are
present on the road surface.
As winter tires display a noticeable loss in
their ability to cope with cold-weather driv-
ing conditions once the tread wears to
below 0.157 in/4 mm, to ensure continued
safety you should always have such tires
replaced.
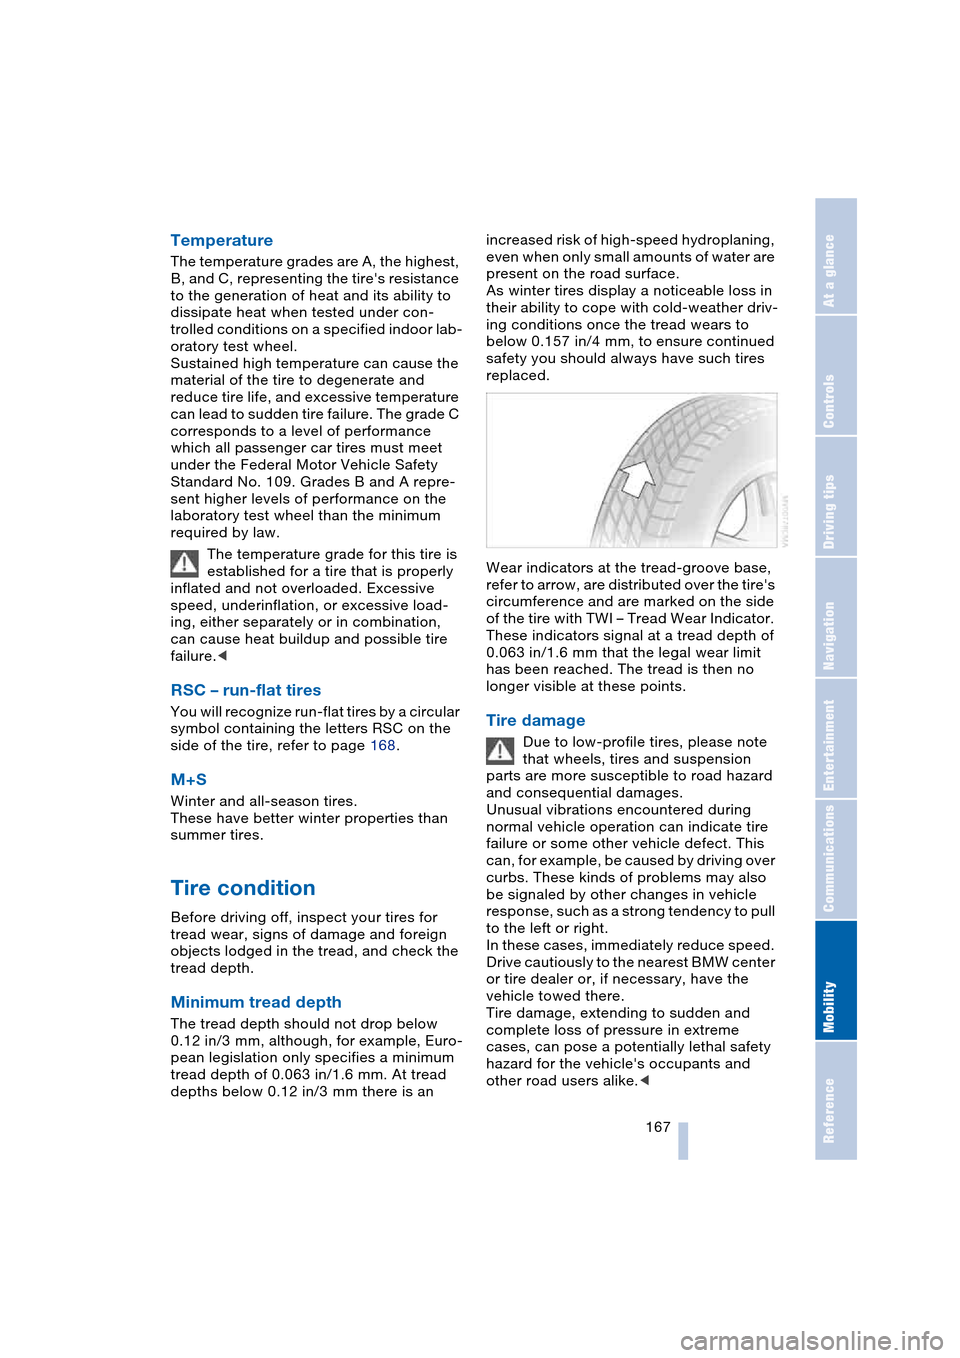
Wear indicators at the tread-groove base,
refer to arrow, are distributed over the tire's
circumference and are marked on the side
of the tire with TWI – Tread Wear Indicator.
These indicators signal at a tread depth of
0.063 in/1.6 mm that the legal wear limit
has been reached. The tread is then no
longer visible at these points.
Tire damage
Due to low-profile tires, please note
that wheels, tires and suspension
parts are more susceptible to road hazard
and consequential damages.
Unusual vibrations encountered during
normal vehicle operation can indicate tire
failure or some other vehicle defect. This
can, for example, be caused by driving over
curbs. These kinds of problems may also
be signaled by other changes in vehicle
response, such as a strong tendency to pull
to the left or right.
In these cases, immediately reduce speed.
Drive cautiously to the nearest BMW center
or tire dealer or, if necessary, have the
vehicle towed there.
Tire damage, extending to sudden and
complete loss of pressure in extreme
cases, can pose a potentially lethal safety
hazard for the vehicle's occupants and
other road users alike.<
Page 171 of 216

Mobility
169Reference
At a glance
Controls
Driving tips
Communications
Navigation
Entertainment
Recommended tire sizes and makes
BMW tests certain tire brands for each tire
size, classifies them as road-safe and
approves them. You can find out about
these at specialized dealers or at your
BMW center. Observe any country-specific
regulations, e.g. on making a correspond-
ing entry in the vehicle documents.
The factory-mounted tires have been spe-
cially selected to provide optimized perfor-
mance when installed on your vehicle; if
properly cared for, they will provide a com-
bination of safety and excellent ride com-
fort.
Run-flat tires
In the event of replacement, use run-flat
tires, refer to page 168, as there is no spare
wheel available for flats.
For safety reasons, BMW recom-
mends that you do not have damaged
run-flat tires repaired; they should be
replaced.<
Special characteristics of winter
tires
BMW recommends winter tires for use in
cold winter driving conditions. Although all-
season M+S tires provide better winter
traction than summer tires, they generally
fail to provide the same levels of cold-
weather performance as winter tires.
Run-flat tires
If you switch from summer to winter tires,
or vice versa, use run-flat tires, refer to
page 168, as in the event of a flat tire there
is no spare tire available. Your BMW center
will be glad to advise you.
Observing speed ratings
Never exceed the maximum speed for
which the winter tires are rated.
Unprofessional attempts by laymen to ser-
vice tires can lead to damage and acci-
dents. Have this work performed by skilled
professionals only. The technicians at your
BMW center will be glad to assist you with the required professional knowledge and
specialized equipment.<
Storage
Always store wheels and tires in a cool, dry
place with as little exposure to light as pos-
sible. Always protect tires against all con-
tact with oil, grease and fuels. Do not
exceed the maximum tire inflation pressure
indicated on the side wall of the tire.
Snow chains*
BMW only tests certain snow chains, clas-
sifies them as road-safe and approves
them. Consult your BMW center for more
information. BMW recommends using
these approved, narrow-link snow chains.
These snow chains are approved exclu-
sively for use in pairs on the rear wheels
with the tire size 245/45 R 18.
Observe the manufacturer's instructions
when mounting snow chains.
Do not exceed a vehicle speed of 30 mph/
50 km/h with the chains mounted.
Do not initialize the Runflat Indicator
after mounting snow chains.
When you are driving with snow chains, it
can be beneficial to switch off DSC briefly,
refer to page 77.<
Page 173 of 216

Mobility
171Reference
At a glance
Controls
Driving tips
Communications
Navigation
Entertainment
Engine compartment
1Filler neck for engine oil, refer to
Topping up engine oil
2Brake fluid reservoir, located beneath
the microfilter cover, refer to page 173
3Dipstick for engine oil, refer to
Checking oil level
4Starting-aid terminal, refer to page 184
5Washer fluid reservoir of the headlamp
and windshield cleaning systems, refer
to page 62
6Expansion tank for coolant, refer to
page 172
Engine oil
Checking oil level
1.Park the vehicle on a level surface with
the engine at operating temperature
2.After approx. 5 minutes, pull the
dipstick 3 out and wipe it off with a
clean lint-free cloth, paper towel, or
similar material3.Carefully push the dipstick all the way
into the guide tube and pull it out again
4.The oil should extend to between the
two marks on the dipstick.
The engine oil consumption is dependent
on driving style and driving conditions.
The oil quantity between the centers of the
two marks on the dipstick, refer to arrows,
is approx. 1.6 US quarts/1.5 liters. Do not
fill beyond the upper mark on the dipstick.
Excess oil can damage the engine.
Page 175 of 216

Mobility
173Reference
At a glance
Controls
Driving tips
Communications
Navigation
Entertainment
3.The coolant level is correct when the
measuring range of the fill level indica-
tor is at the level of the upper edge of
the filler neck, also refer to the drawing
next to the filler neck
4.If the coolant is low, slowly add coolant
up to the specified level – do not overfill
5.Turn the cap until you hear a click
6.Have the reason for the coolant loss
eliminated as soon as possible.
Brake system
Malfunction
Brake fluid
The warning lamp lights up in red
in spite of the handbrake being
released; a message appears on
the Control Display.
Stop the vehicle immediately.
The brake fluid in the reservoir has fallen to
below the minimum level. At the same time,
a significantly longer brake pedal path is
noticeable. Have the system checked
immediately by a BMW center.
Warning lamp for Canadian models.
When you continue driving, an
increased brake pedal path can be
necessary, and significantly longer braking
distances might be required. Please adapt
your driving style accordingly.<
Brake pads
The warning lamp lights up in red
in spite of the handbrake being
released; a message appears on
the Control Display. The brake pads have
reached their minimum pad thickness.
Have the brake pads replaced as soon as
possible.
Warning lamp for Canadian models.For your own safety: use only brake
pads that BMW has approved for your
particular vehicle model. As BMW cannot
assess the suitability of other brake pads
for use on your vehicle, BMW is unable to
assume continued responsibility for the
vehicle's operating safety if non-approved
pads are installed.<
Page 177 of 216

Mobility
175Reference
At a glance
Controls
Driving tips
Communications
Navigation
Entertainment
Care
Important information on care and main-
tenance of your BMW is contained in the
Caring for your vehicle brochure.
Page 179 of 216

Mobility
177Reference
At a glance
Controls
Driving tips
Communications
Navigation
Entertainment
When the fuel filler cap is not properly
tightened, the OBD system can
detect the vapor leak and the indicator
lamp will light up. If the filler cap is subse-
quently tightened, the indicator lamp
should go out within a few days.<
Page 181 of 216

Mobility
179Reference
At a glance
Controls
Driving tips
Communications
Navigation
Entertainment
High beams, parking lamps
The illustration shows the front left side of
the engine compartment.
High beams
Bulb 55 watts, H 7
1.Remove the cover cap 1 by pressing
the tab and removing the cover cap
upward
2.Press the bulb holder from above to
release it
3.Remove the bulb holder
4.Remove and replace the bulb.
Parking lamps
Bulb 10 watts
Bulb holder and reflector are one unit
and are replaced together.<
1.Turn the bulb holder 2 to the right and
remove
2.Press the detent on the plug connector,
pull off the bulb holder and replace.
Front turn signal, sidemarker
Your BMW is equipped with two turn signal
lamps per side in the front. Turn signal
lamp 1 can be replaced via the engine
compartment, and turn signal lamp 2 via
the wheel well.
Turn signal lamp 1
Bulb 21 watts, WY 21 SV
The illustration shows the front right side of
the engine compartment.
1.The lever shown:
>Right turn signal: press downwards
>Left turn signal: press upwards
2.Remove the bulb holder towards the
rear
3.Remove and replace the bulb.
Turn signal lamp 2
Bulb 21 watts, WY 21 SV
The bulb of the turn signal lamp 2 can be
replaced via a cover at the front of the
wheel well.
The illustration shows the left side of the
vehicle.
1.Turn the steering all the way to lock to
obtain access to the cover, refer to
illustration
2.Remove the cover by unscrewing the
two bolts with an open-end wrench
from the onboard tool kit
3.Location of the bulb holder of turn sig-
nal lamp 2, refer to arrow