2004 BMW 645CI COUPE&CONVERTIBLE mirror
[x] Cancel search: mirrorPage 12 of 216
Cockpit
10
Cockpit
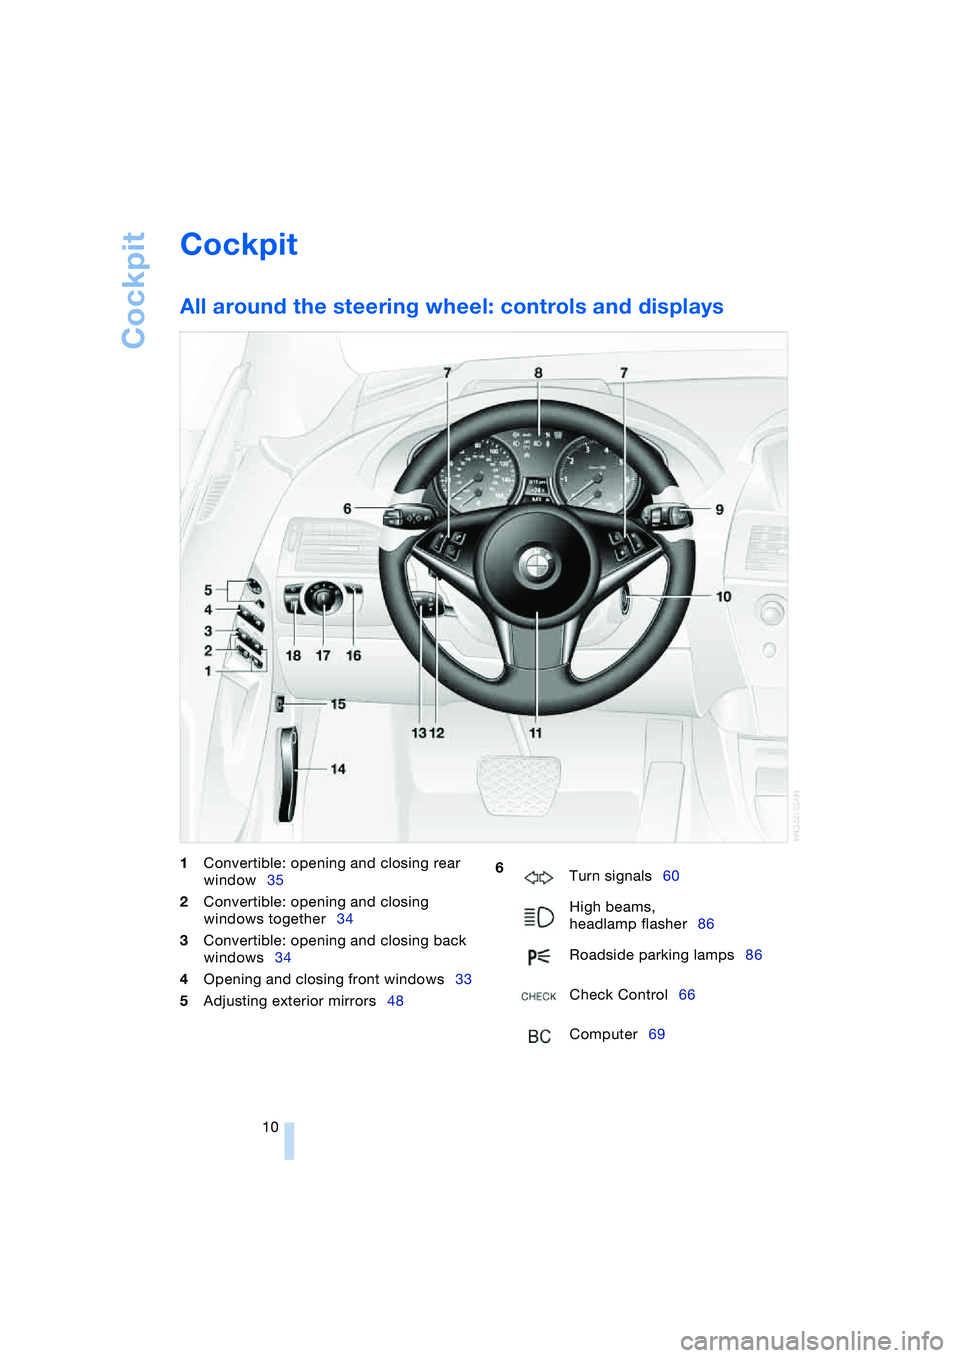
All around the steering wheel: controls and displays
1Convertible: opening and closing rear
window35
2Convertible: opening and closing
windows together34
3Convertible: opening and closing back
windows34
4Opening and closing front windows33
5Adjusting exterior mirrors48 6
Turn signals60
High beams,
headlamp flasher86
Roadside parking lamps86
Check Control66
Computer69
Page 22 of 216
Voice command system
20
Voice command system
The concept
The voice command system allows you to
control operation of various vehicle sys-
tems without ever removing your hands
from the steering wheel.
Individual menu items on the Control Dis-
play can be spoken as commands. Opera-
tion via the controller is not required.
The voice command system transforms
your oral commands into control signals for
the selected systems and provides support
in the form of instructions or questions.
The voice command system includes a
special microphone.
The microphone is located:
>On the Coupe near the interior rearview
mirror, refer to page 14
>On the Convertible near the interior
rearview mirror, refer to page 14, or on
the steering column.
Precondition
The set language of the Control Center and
of the voice command system should
match so that the commands to be spoken
can be identified more easily. Setting the
language of the Control Center, refer to
page 73.
Symbols used
Voice commands
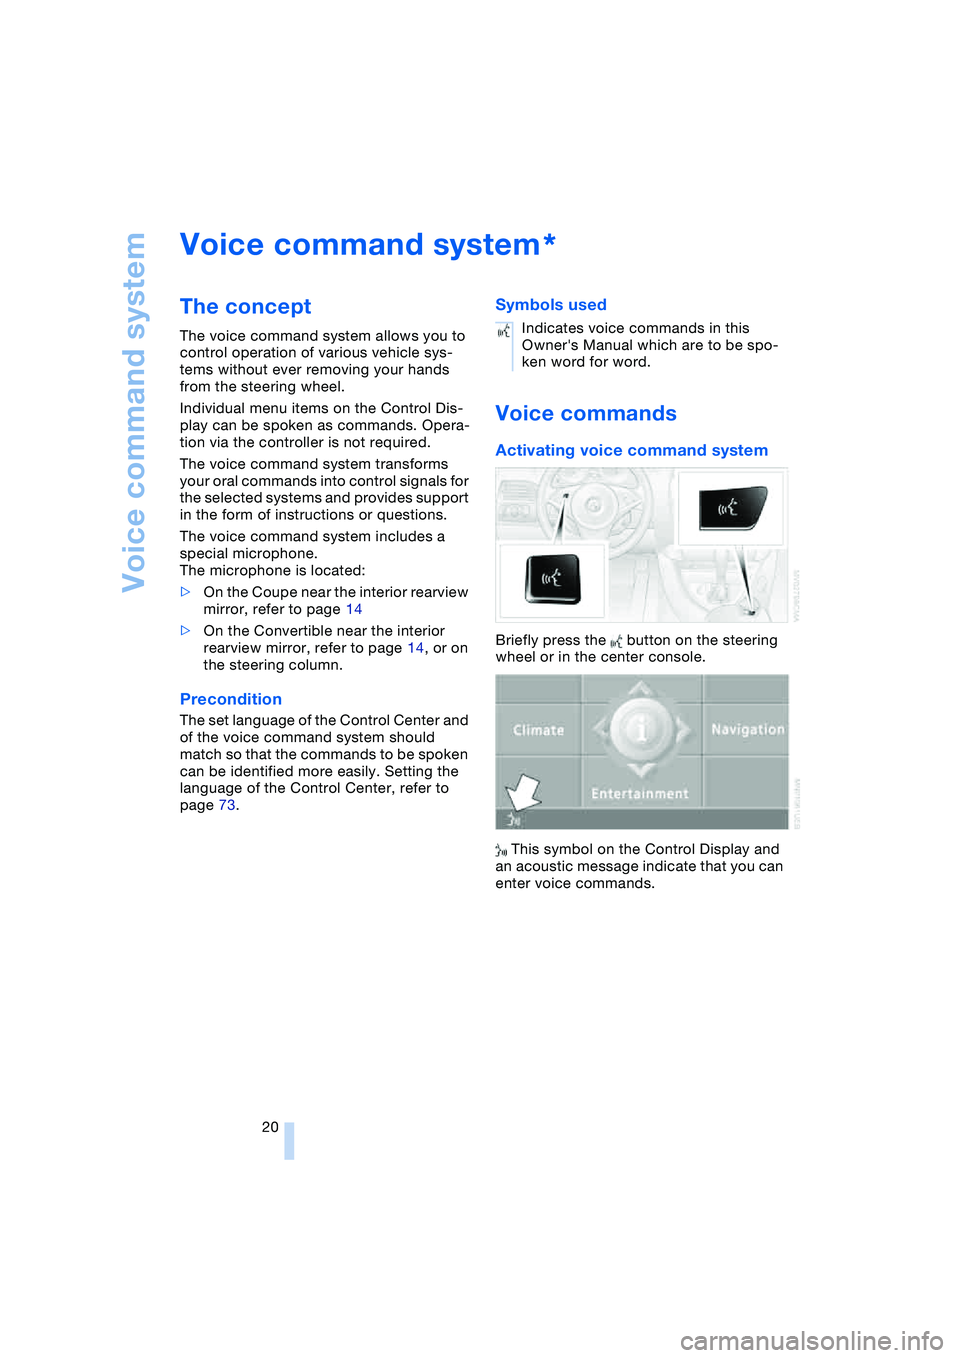
Activating voice command system
Briefly press the button on the steering
wheel or in the center console.
This symbol on the Control Display and
an acoustic message indicate that you can
enter voice commands.
*
Indicates voice commands in this
Owner's Manual which are to be spo-
ken word for word.
Page 35 of 216
Controls
33Reference
At a glance
Driving tips
Communications
Navigation
Entertainment
Mobility
Indicator lamp displays
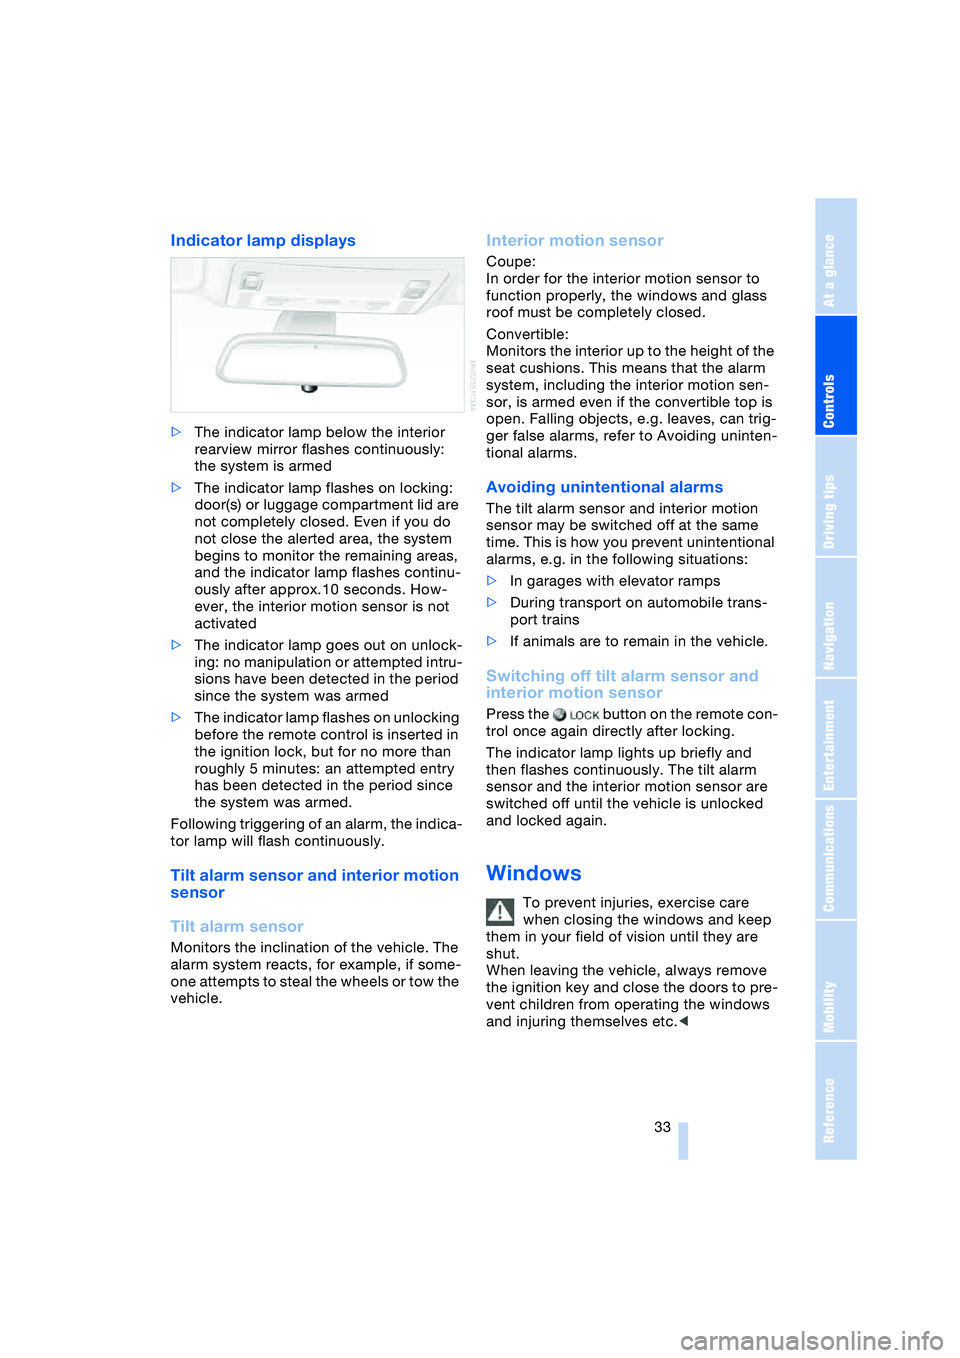
>The indicator lamp below the interior
rearview mirror flashes continuously:
the system is armed
>The indicator lamp flashes on locking:
door(s) or luggage compartment lid are
not completely closed. Even if you do
not close the alerted area, the system
begins to monitor the remaining areas,
and the indicator lamp flashes continu-
ously after approx.10 seconds. How-
ever, the interior motion sensor is not
activated
>The indicator lamp goes out on unlock-
ing: no manipulation or attempted intru-
sions have been detected in the period
since the system was armed
>The indicator lamp flashes on unlocking
before the remote control is inserted in
the ignition lock, but for no more than
roughly 5 minutes: an attempted entry
has been detected in the period since
the system was armed.
Following triggering of an alarm, the indica-
tor lamp will flash continuously.
Tilt alarm sensor and interior motion
sensor
Tilt alarm sensor
Monitors the inclination of the vehicle. The
alarm system reacts, for example, if some-
one attempts to steal the wheels or tow the
vehicle.
Interior motion sensor
Coupe:
In order for the interior motion sensor to
function properly, the windows and glass
roof must be completely closed.
Convertible:
Monitors the interior up to the height of the
seat cushions. This means that the alarm
system, including the interior motion sen-
sor, is armed even if the convertible top is
open. Falling objects, e.g. leaves, can trig-
ger false alarms, refer to Avoiding uninten-
tional alarms.
Avoiding unintentional alarms
The tilt alarm sensor and interior motion
sensor may be switched off at the same
time. This is how you prevent unintentional
alarms, e.g. in the following situations:
>In garages with elevator ramps
>During transport on automobile trans-
port trains
>If animals are to remain in the vehicle.
Switching off tilt alarm sensor and
interior motion sensor
Press the button on the remote con-
trol once again directly after locking.
The indicator lamp lights up briefly and
then flashes continuously. The tilt alarm
sensor and the interior motion sensor are
switched off until the vehicle is unlocked
and locked again.
Windows
To prevent injuries, exercise care
when closing the windows and keep
them in your field of vision until they are
shut.
When leaving the vehicle, always remove
the ignition key and close the doors to pre-
vent children from operating the windows
and injuring themselves etc.<
Page 46 of 216
Adjustments
44
Seat, mirror and steering
wheel memory
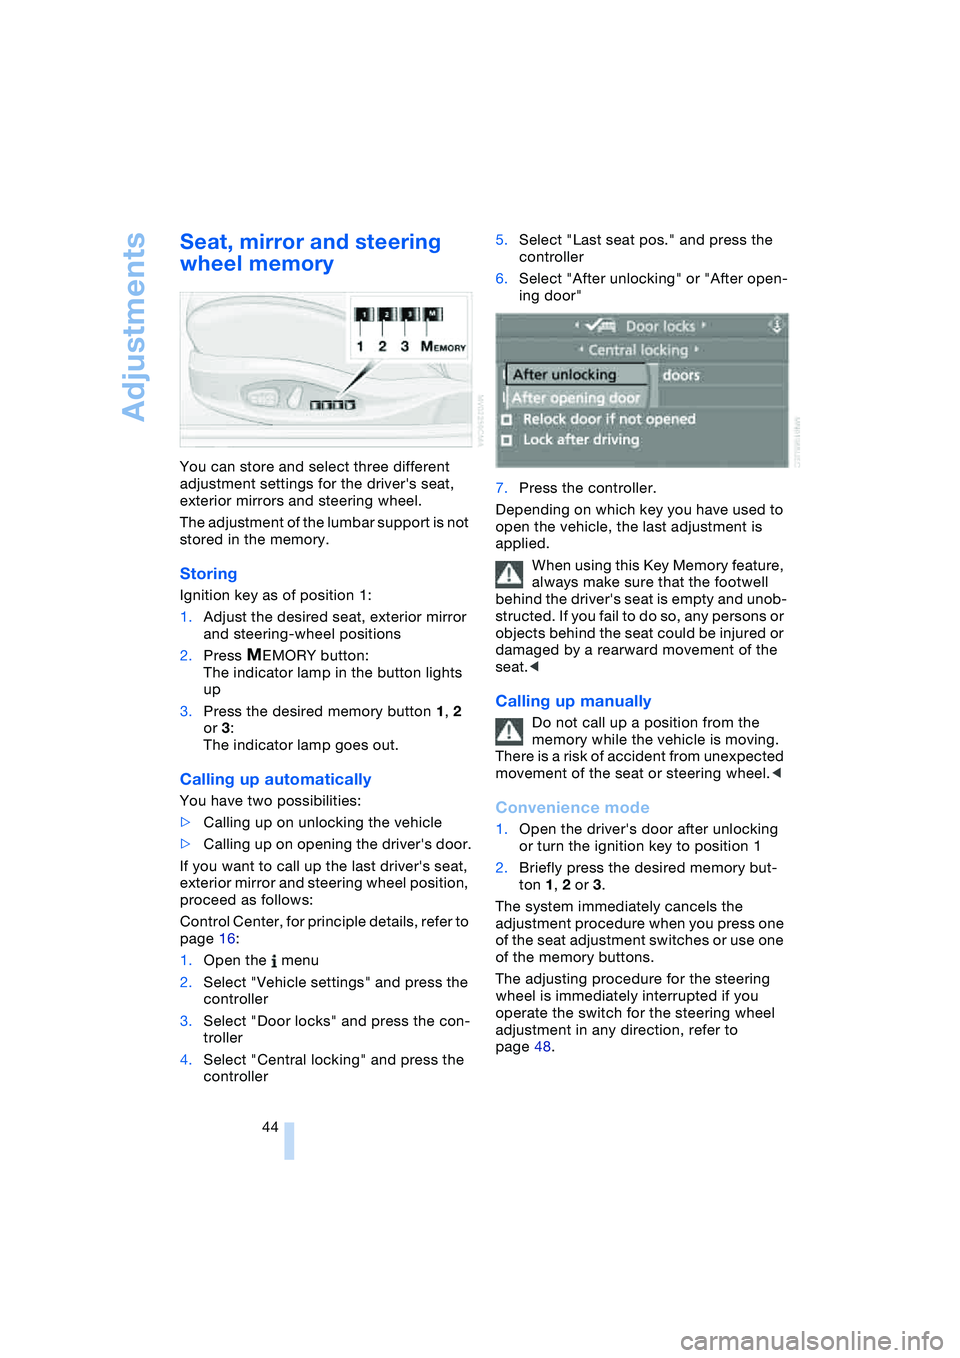
You can store and select three different
adjustment settings for the driver's seat,
exterior mirrors and steering wheel.
The adjustment of the lumbar support is not
stored in the memory.
Storing
Ignition key as of position 1:
1.Adjust the desired seat, exterior mirror
and steering-wheel positions
2.Press
MEMORY button:
The indicator lamp in the button lights
up
3.Press the desired memory button 1, 2
or 3:
The indicator lamp goes out.
Calling up automatically
You have two possibilities:
>Calling up on unlocking the vehicle
>Calling up on opening the driver's door.
If you want to call up the last driver's seat,
exterior mirror and steering wheel position,
proceed as follows:
Control Center, for principle details, refer to
page 16:
1.Open the menu
2.Select "Vehicle settings" and press the
controller
3.Select "Door locks" and press the con-
troller
4.Select "Central locking" and press the
controller5.Select "Last seat pos." and press the
controller
6.Select "After unlocking" or "After open-
ing door"
7.Press the controller.
Depending on which key you have used to
open the vehicle, the last adjustment is
applied.
When using this Key Memory feature,
always make sure that the footwell
behind the driver's seat is empty and unob-
structed. If you fail to do so, any persons or
objects behind the seat could be injured or
damaged by a rearward movement of the
seat.<
Calling up manually
Do not call up a position from the
memory while the vehicle is moving.
There is a risk of accident from unexpected
movement of the seat or steering wheel.<
Convenience mode
1.Open the driver's door after unlocking
or turn the ignition key to position 1
2.Briefly press the desired memory but-
ton 1, 2 or 3.
The system immediately cancels the
adjustment procedure when you press one
of the seat adjustment switches or use one
of the memory buttons.
The adjusting procedure for the steering
wheel is immediately interrupted if you
operate the switch for the steering wheel
adjustment in any direction, refer to
page 48.
Page 47 of 216
Controls
45Reference
At a glance
Driving tips
Communications
Navigation
Entertainment
Mobility
Safety feature
1.Close the driver's door and turn the
ignition key to position 0 or 2
2.Press the desired memory button 1, 2
or 3 and maintain pressure until the
adjustment process has been com-
pleted.
If you press the
MEMORY button acciden-
tally:
Press the button again; the indicator lamp
goes out.
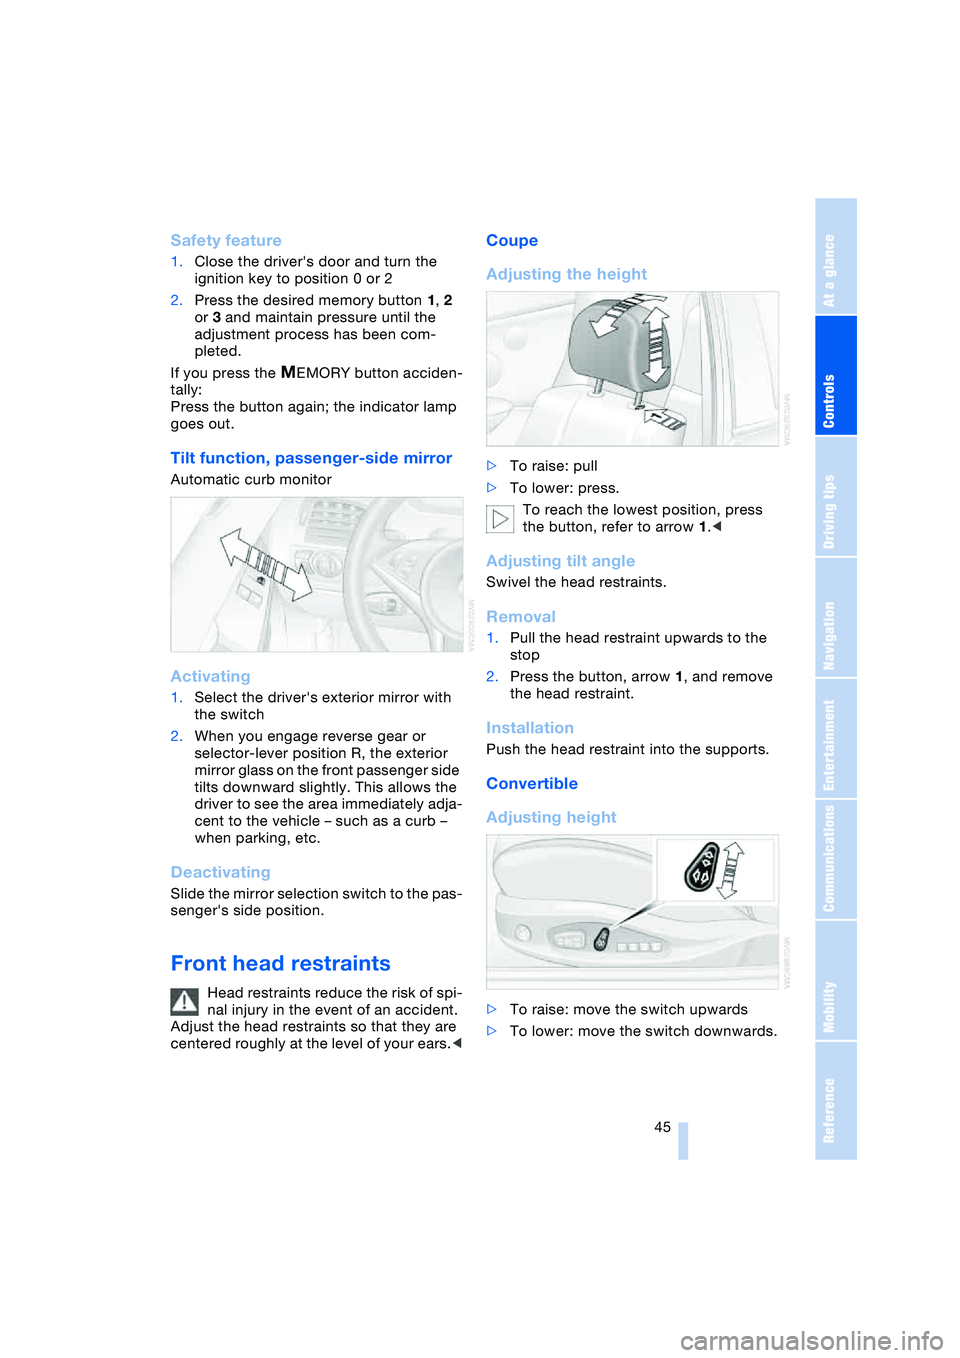
Tilt function, passenger-side mirror
Automatic curb monitor
Activating
1.Select the driver's exterior mirror with
the switch
2.When you engage reverse gear or
selector-lever position R, the exterior
mirror glass on the front passenger side
tilts downward slightly. This allows the
driver to see the area immediately adja-
cent to the vehicle – such as a curb –
when parking, etc.
Deactivating
Slide the mirror selection switch to the pas-
senger's side position.
Front head restraints
Head restraints reduce the risk of spi-
nal injury in the event of an accident.
Adjust the head restraints so that they are
centered roughly at the level of your ears.<
Coupe
Adjusting the height
>To raise: pull
>To lower: press.
To reach the lowest position, press
the button, refer to arrow 1.<
Adjusting tilt angle
Swivel the head restraints.
Removal
1.Pull the head restraint upwards to the
stop
2.Press the button, arrow 1, and remove
the head restraint.
Installation
Push the head restraint into the supports.
Convertible
Adjusting height
>To raise: move the switch upwards
>To lower: move the switch downwards.
Page 50 of 216
Adjustments
48
Mirrors
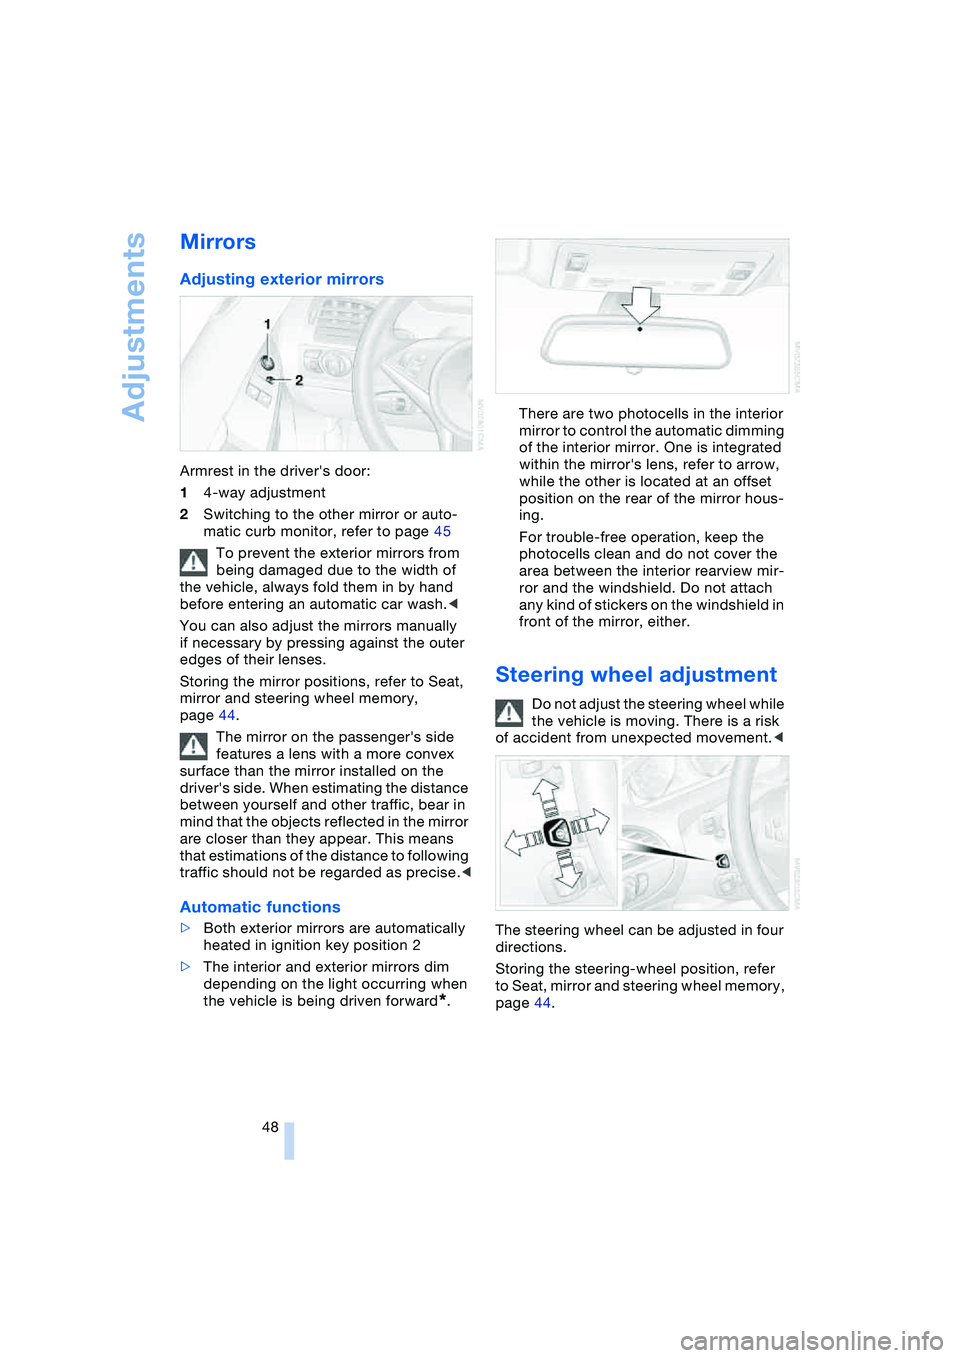
Adjusting exterior mirrors
Armrest in the driver's door:
14-way adjustment
2Switching to the other mirror or auto-
matic curb monitor, refer to page 45
To prevent the exterior mirrors from
being damaged due to the width of
the vehicle, always fold them in by hand
before entering an automatic car wash.<
You can also adjust the mirrors manually
if necessary by pressing against the outer
edges of their lenses.
Storing the mirror positions, refer to Seat,
mirror and steering wheel memory,
page 44.
The mirror on the passenger's side
features a lens with a more convex
surface than the mirror installed on the
driver's side. When estimating the distance
between yourself and other traffic, bear in
mind that the objects reflected in the mirror
are closer than they appear. This means
that estimations of the distance to following
traffic should not be regarded as precise.<
Automatic functions
>Both exterior mirrors are automatically
heated in ignition key position 2
>The interior and exterior mirrors dim
depending on the light occurring when
the vehicle is being driven forward
*.There are two photocells in the interior
mirror to control the automatic dimming
of the interior mirror. One is integrated
within the mirror's lens, refer to arrow,
while the other is located at an offset
position on the rear of the mirror hous-
ing.
For trouble-free operation, keep the
photocells clean and do not cover the
area between the interior rearview mir-
ror and the windshield. Do not attach
any kind of stickers on the windshield in
front of the mirror, either.
Steering wheel adjustment
Do not adjust the steering wheel while
the vehicle is moving. There is a risk
of accident from unexpected movement.<
The steering wheel can be adjusted in four
directions.
Storing the steering-wheel position, refer
to Seat, mirror and steering wheel memory,
page 44.
Page 51 of 216
Controls
49Reference
At a glance
Driving tips
Communications
Navigation
Entertainment
Mobility
Automatic steering wheel
adjustment
In conjunction with seat, mirror and steer-
ing wheel memory.
The steering wheel automatically moves as
high up and far forward as possible to ease
driver entry and exit before then returning
to the standard position or stored memory
setting.
This automatic feature is governed by the
driver's door and the ignition lock.
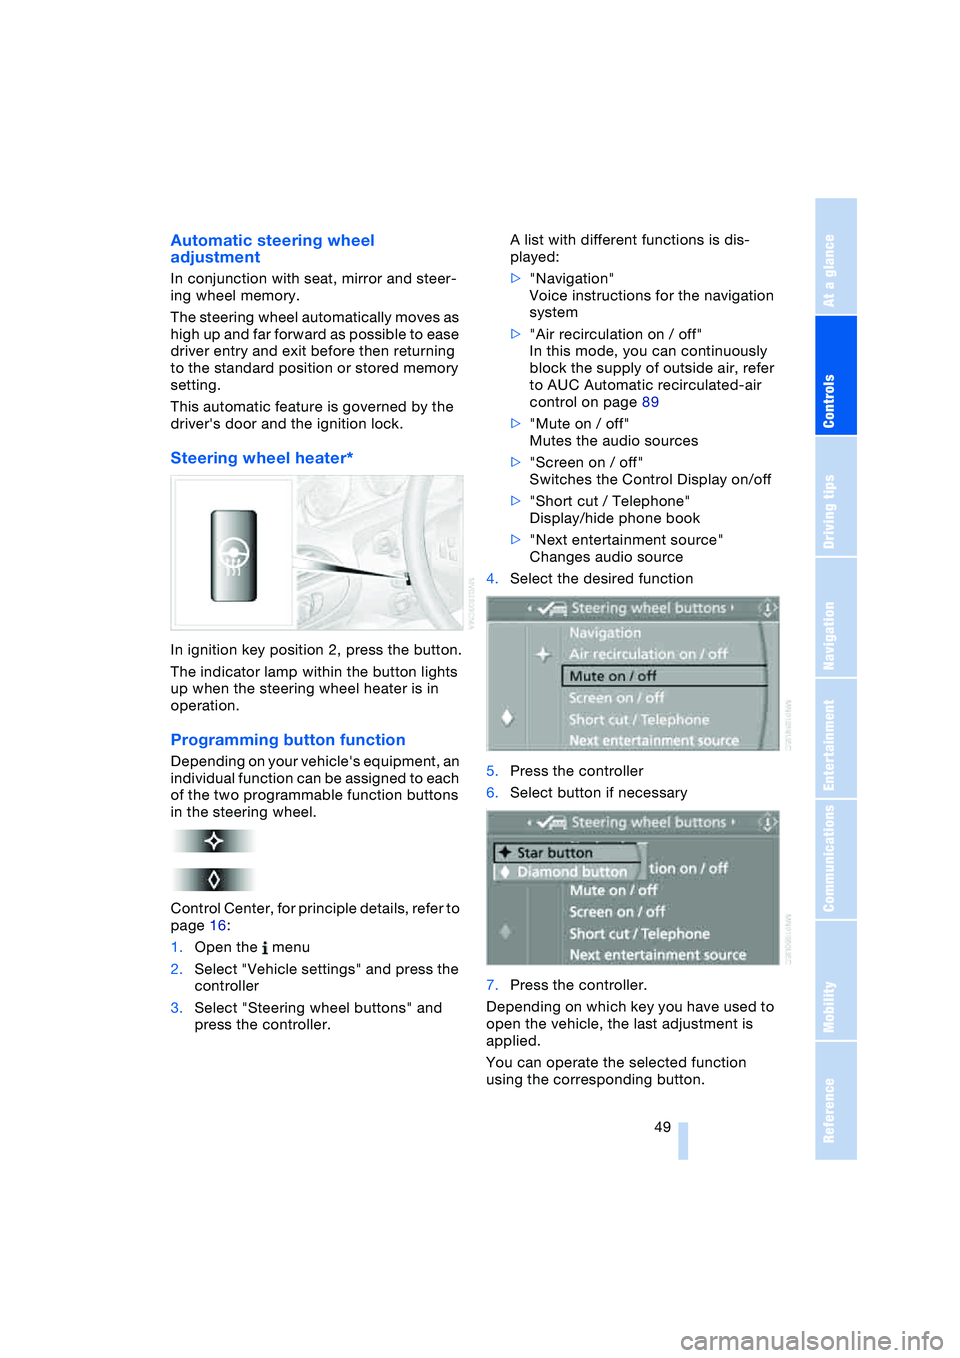
Steering wheel heater*
In ignition key position 2, press the button.
The indicator lamp within the button lights
up when the steering wheel heater is in
operation.
Programming button function
Depending on your vehicle's equipment, an
individual function can be assigned to each
of the two programmable function buttons
in the steering wheel.
Control Center, for principle details, refer to
page 16:
1.Open the menu
2.Select "Vehicle settings" and press the
controller
3.Select "Steering wheel buttons" and
press the controller.A list with different functions is dis-
played:
>"Navigation"
Voice instructions for the navigation
system
>"Air recirculation on / off"
In this mode, you can continuously
block the supply of outside air, refer
to AUC Automatic recirculated-air
control on page 89
>"Mute on / off"
Mutes the audio sources
>"Screen on / off"
Switches the Control Display on/off
>"Short cut / Telephone"
Display/hide phone book
>"Next entertainment source"
Changes audio source
4.Select the desired function
5.Press the controller
6.Select button if necessary
.
7.Press the controller.
Depending on which key you have used to
open the vehicle, the last adjustment is
applied.
You can operate the selected function
using the corresponding button.
Page 63 of 216
Controls
61Reference
At a glance
Driving tips
Communications
Navigation
Entertainment
Mobility
Triple turn signal activation is acti-
vated.
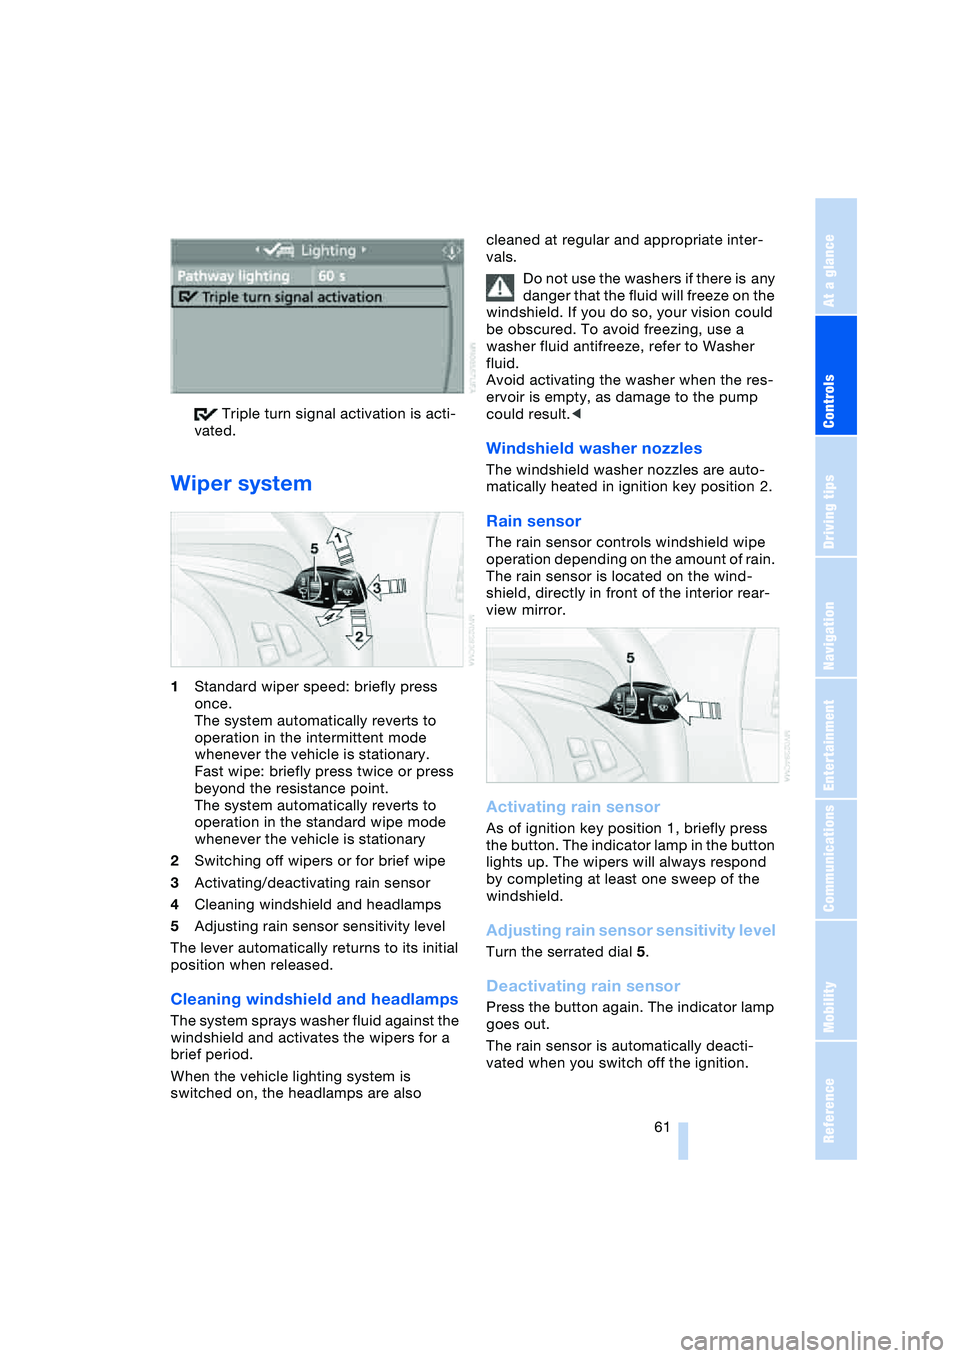
Wiper system
1Standard wiper speed: briefly press
once.
The system automatically reverts to
operation in the intermittent mode
whenever the vehicle is stationary.
Fast wipe: briefly press twice or press
beyond the resistance point.
The system automatically reverts to
operation in the standard wipe mode
whenever the vehicle is stationary
2Switching off wipers or for brief wipe
3Activating/deactivating rain sensor
4Cleaning windshield and headlamps
5Adjusting rain sensor sensitivity level
The lever automatically returns to its initial
position when released.
Cleaning windshield and headlamps
The system sprays washer fluid against the
windshield and activates the wipers for a
brief period.
When the vehicle lighting system is
switched on, the headlamps are also cleaned at regular and appropriate inter-
vals.
Do not use the washers if there is any
danger that the fluid will freeze on the
windshield. If you do so, your vision could
be obscured. To avoid freezing, use a
washer fluid antifreeze, refer to Washer
fluid.
Avoid activating the washer when the res-
ervoir is empty, as damage to the pump
could result.<
Windshield washer nozzles
The windshield washer nozzles are auto-
matically heated in ignition key position 2.
Rain sensor
The rain sensor controls windshield wipe
operation depending on the amount of rain.
The rain sensor is located on the wind-
shield, directly in front of the interior rear-
view mirror.
Activating rain sensor
As of ignition key position 1, briefly press
the button. The indicator lamp in the button
lights up. The wipers will always respond
by completing at least one sweep of the
windshield.
Adjusting rain sensor sensitivity level
Turn the serrated dial 5.
Deactivating rain sensor
Press the button again. The indicator lamp
goes out.
The rain sensor is automatically deacti-
vated when you switch off the ignition.