2004 BMW 645CI COUPE&CONVERTIBLE turn signal
[x] Cancel search: turn signalPage 12 of 216
Cockpit
10
Cockpit
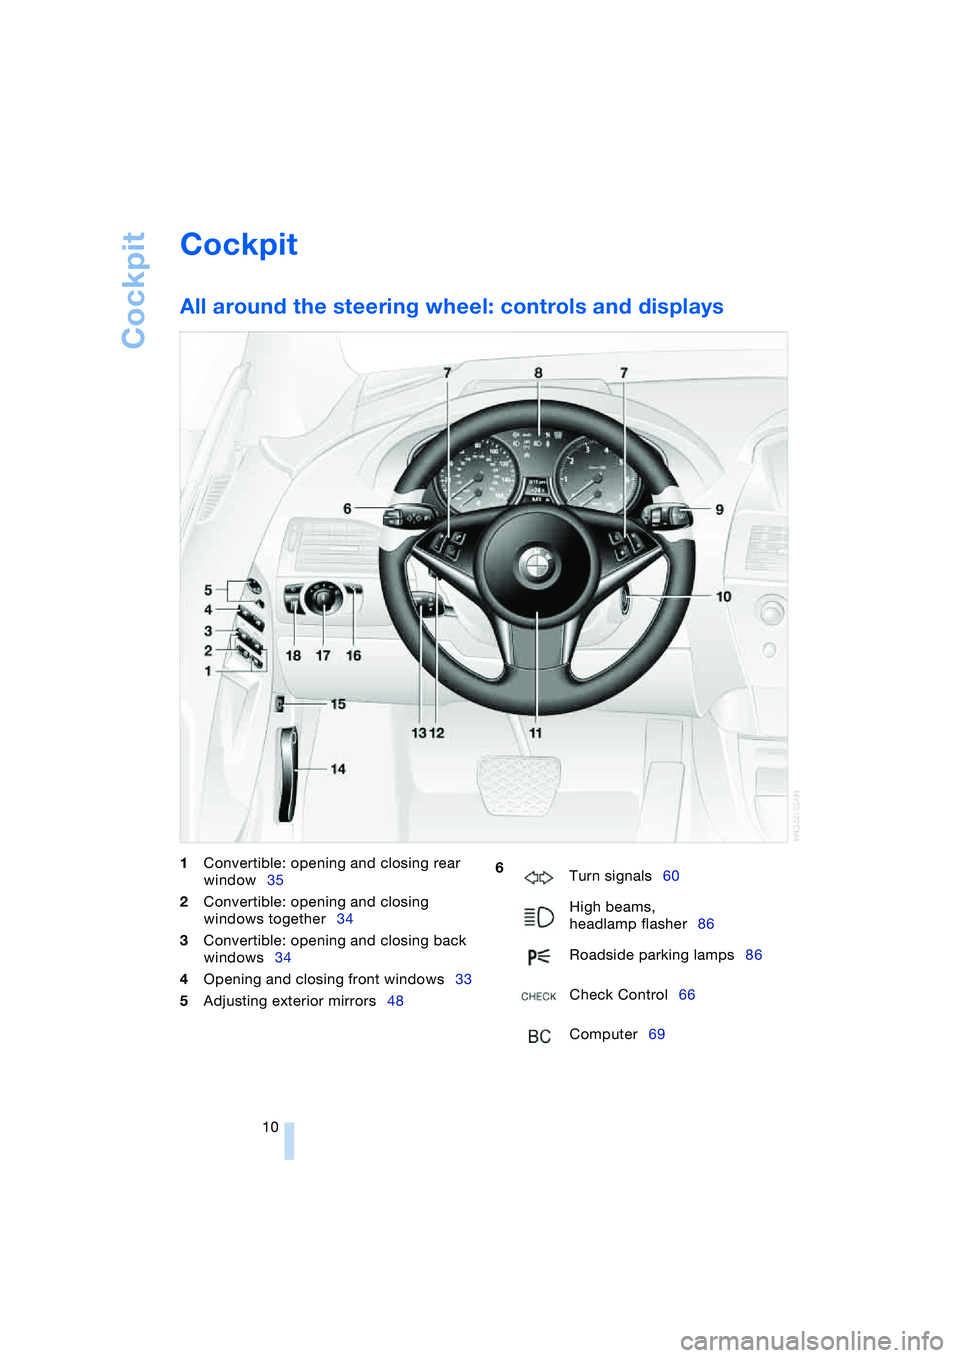
All around the steering wheel: controls and displays
1Convertible: opening and closing rear
window35
2Convertible: opening and closing
windows together34
3Convertible: opening and closing back
windows34
4Opening and closing front windows33
5Adjusting exterior mirrors48 6
Turn signals60
High beams,
headlamp flasher86
Roadside parking lamps86
Check Control66
Computer69
Page 14 of 216
Cockpit
12
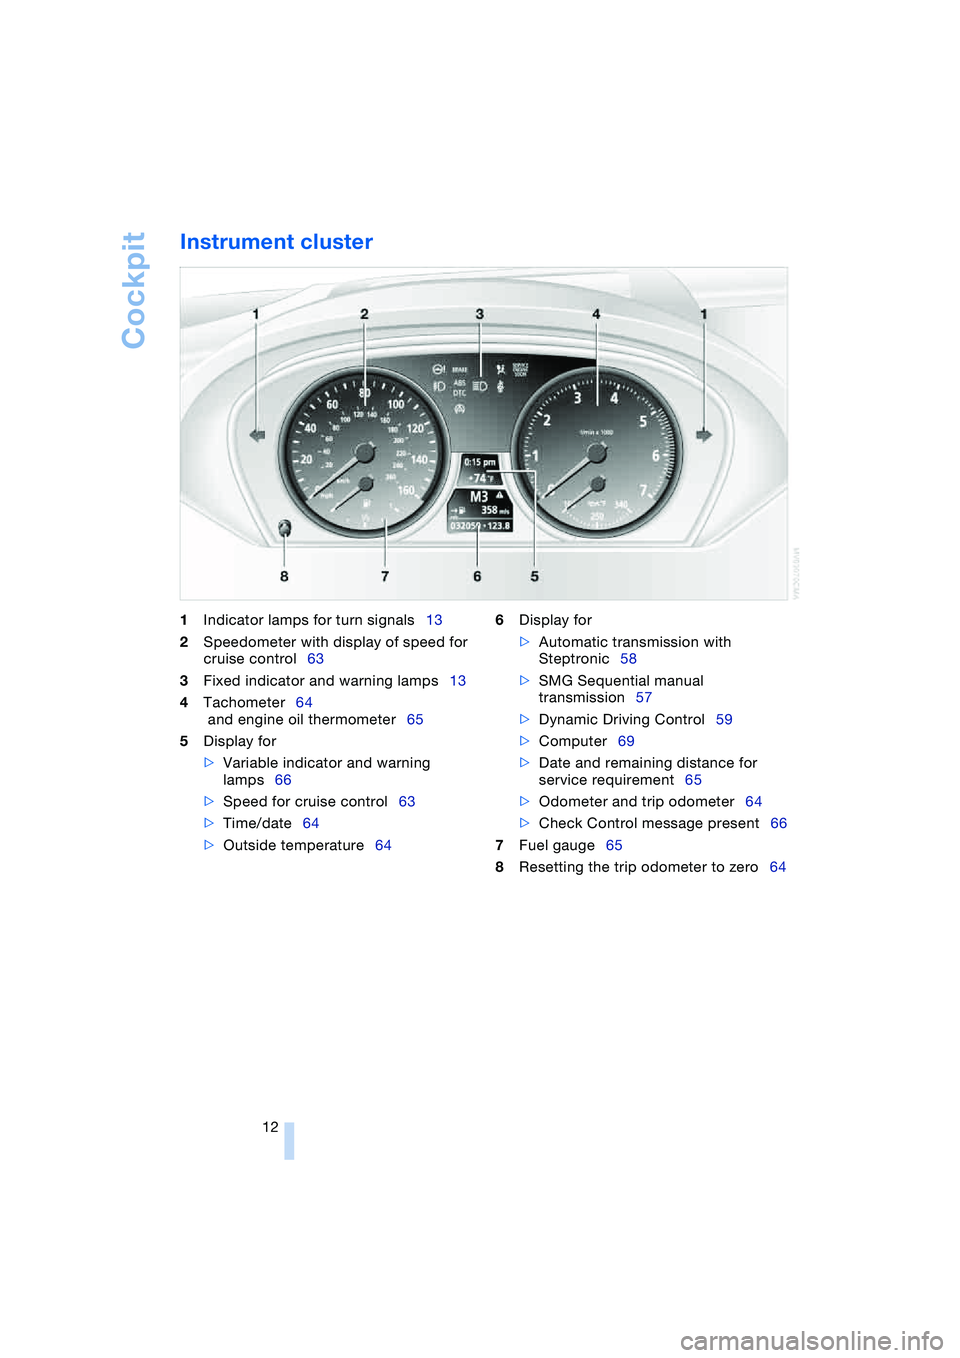
Instrument cluster
1Indicator lamps for turn signals13
2Speedometer with display of speed for
cruise control63
3Fixed indicator and warning lamps13
4Tachometer64
and engine oil thermometer65
5Display for
>Variable indicator and warning
lamps66
>Speed for cruise control63
>Time/date64
>Outside temperature646Display for
>Automatic transmission with
Steptronic58
>SMG Sequential manual
transmission57
>Dynamic Driving Control59
>Computer69
>Date and remaining distance for
service requirement65
>Odometer and trip odometer64
>Check Control message present66
7Fuel gauge65
8Resetting the trip odometer to zero64
Page 15 of 216
At a glance
13Reference
Controls
Driving tips
Communications
Navigation
Entertainment
Mobility
Indicator and warning
lamps
Technology that monitors itself
The indicator and warning lamps identified
by the
+ symbol are subjected to an oper-
ation check each time you switch on the
ignition or start the engine. They each light
up once for different periods of time.
When a malfunction occurs in a monitored
system, the corresponding lamp will either
fail to go out when the engine is started, or
it will come on again during normal driving,
usually accompanied by a Check Control
message. You will find more details on the
specified pages.
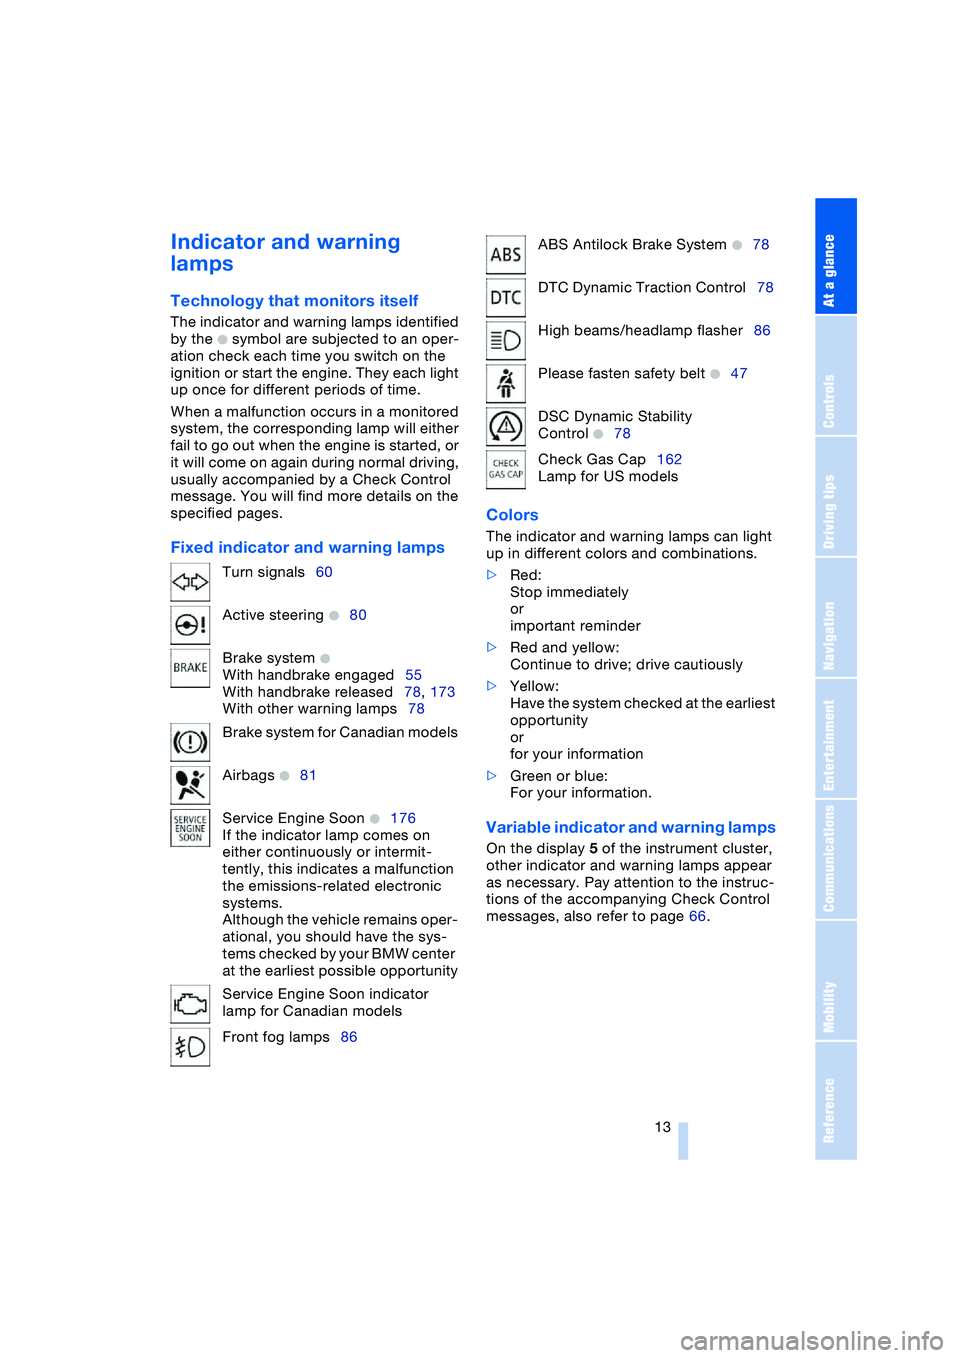
Fixed indicator and warning lampsColors The indicator and warning lamps can light
up in different colors and combinations.
>Red:
Stop immediately
or
important reminder
>Red and yellow:
Continue to drive; drive cautiously
>Yellow:
Have the system checked at the earliest
opportunity
or
for your information
>Green or blue:
For your information.
Variable indicator and warning lamps
On the display 5 of the instrument cluster,
other indicator and warning lamps appear
as necessary. Pay attention to the instruc-
tions of the accompanying Check Control
messages, also refer to page 66. Turn signals60
Active steering
+80
Brake system
+
With handbrake engaged55
With handbrake released78, 173
With other warning lamps78
Brake system for Canadian models
Airbags
+81
Service Engine Soon
+176
If the indicator lamp comes on
either continuously or intermit-
tently, this indicates a malfunction
the emissions-related electronic
systems.
Although the vehicle remains oper-
ational, you should have the sys-
tems checked by your BMW center
at the earliest possible opportunity
Service Engine Soon indicator
lamp for Canadian models
Front fog lamps86
ABS Antilock Brake System +78
DTC Dynamic Traction Control78
High beams/headlamp flasher86
Please fasten safety belt
+47
DSC Dynamic Stability
Control
+78
Check Gas Cap162
Lamp for US models
Page 34 of 216
Opening and closing
32 If special circumstances should make it
absolutely necessary to operate the vehicle
with the lid open:
1.Coupe: close both windows as well as
the glass roof
Convertible: with closed top, close all
windows
2.Adjust the automatic climate control to
supply a high air volume, refer to
page 89.
Luggage compartment
There are four lashing eyes on the inner
corners of the luggage compartment for
securing luggage nets or securing straps to
fix luggage in position.
Also refer to Cargo loading, page 104.
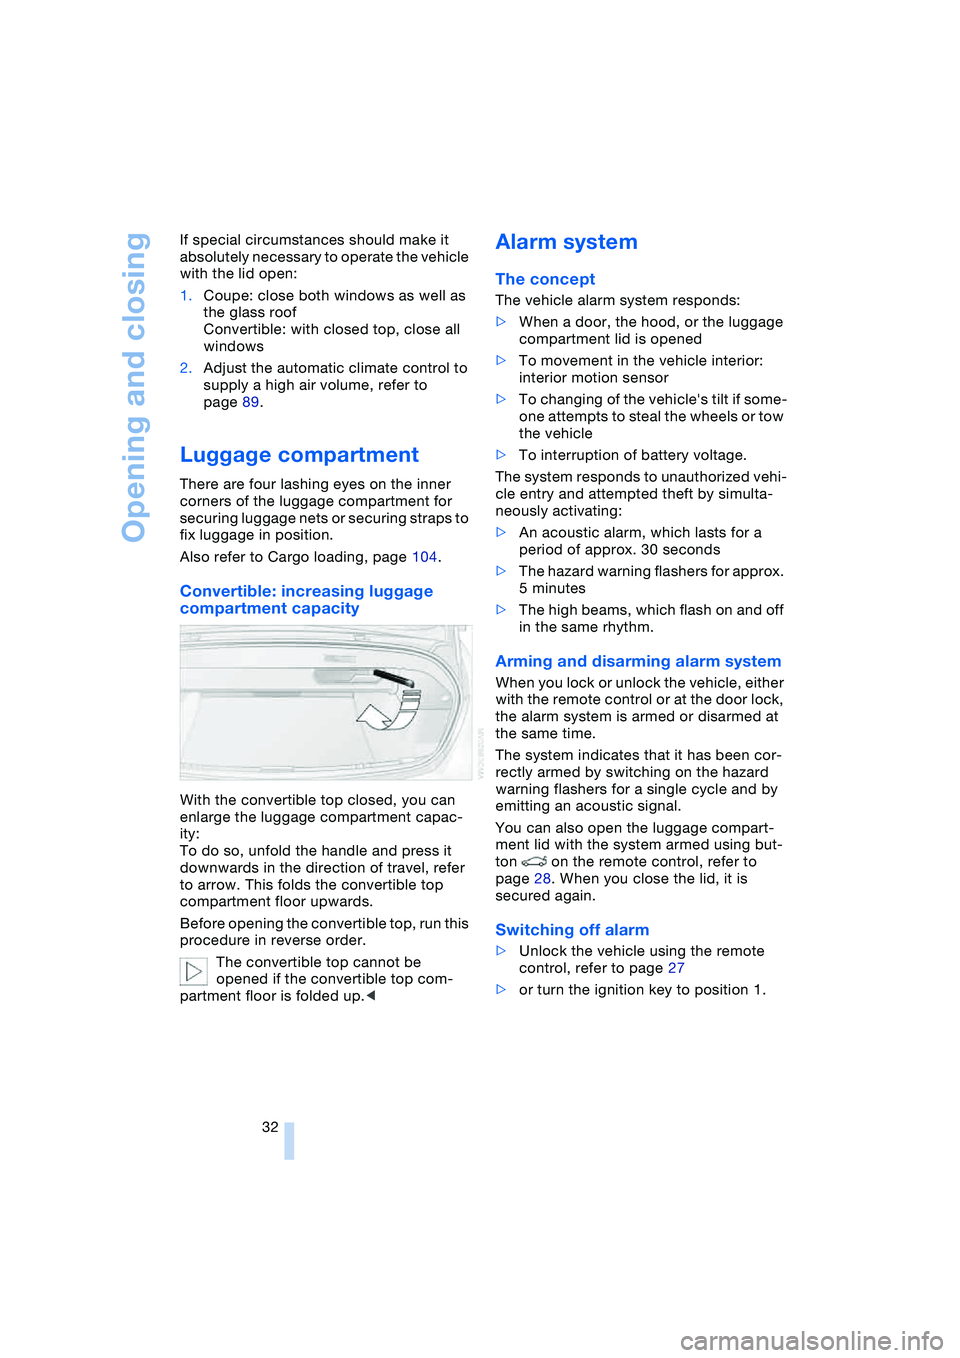
Convertible: increasing luggage
compartment capacity
With the convertible top closed, you can
enlarge the luggage compartment capac-
ity:
To do so, unfold the handle and press it
downwards in the direction of travel, refer
to arrow. This folds the convertible top
compartment floor upwards.
Before opening the convertible top, run this
procedure in reverse order.
The convertible top cannot be
opened if the convertible top com-
partment floor is folded up.<
Alarm system
The concept
The vehicle alarm system responds:
>When a door, the hood, or the luggage
compartment lid is opened
>To movement in the vehicle interior:
interior motion sensor
>To changing of the vehicle's tilt if some-
one attempts to steal the wheels or tow
the vehicle
>To interruption of battery voltage.
The system responds to unauthorized vehi-
cle entry and attempted theft by simulta-
neously activating:
>An acoustic alarm, which lasts for a
period of approx. 30 seconds
>The hazard warning flashers for approx.
5 minutes
>The high beams, which flash on and off
in the same rhythm.
Arming and disarming alarm system
When you lock or unlock the vehicle, either
with the remote control or at the door lock,
the alarm system is armed or disarmed at
the same time.
The system indicates that it has been cor-
rectly armed by switching on the hazard
warning flashers for a single cycle and by
emitting an acoustic signal.
You can also open the luggage compart-
ment lid with the system armed using but-
ton on the remote control, refer to
page 28. When you close the lid, it is
secured again.
Switching off alarm
>Unlock the vehicle using the remote
control, refer to page 27
>or turn the ignition key to position 1.
Page 57 of 216
Controls
55Reference
At a glance
Driving tips
Communications
Navigation
Entertainment
Mobility
SMG Sequential manual
transmission and automatic
transmission
Your BMW is equipped with the conve-
nience starting feature. Here, it is sufficient
to turn the ignition key only briefly to posi-
tion 3 'Start engine' and to let go of it right
away. The system responds by automati-
cally engaging the starter for a certain
period and allowing it to run until the engine
starts, after which it then disengages auto-
matically.
SMG Sequential manual
transmission
1.Press the brake pedal
2.Engage selector-lever position N
3.Start the engine.
If the engine does not start, engage
the last gear selected again, refer to
instrument cluster display, and then
engage selector-lever position N.<
Automatic transmission with
Steptronic
1.Press the brake pedal
2.Engage selector-lever position P or N
3.Start the engine.
Switching off engine
Do not remove the ignition key while
the vehicle is rolling, as otherwise the
steering wheel lock would engage while
steering.
When leaving the vehicle, remove the igni-
tion key and lock the steering.
When parking on a downhill incline, apply
the handbrake, as otherwise the vehicle
could roll away.<
Manual transmission
1.Turn the ignition key to position 1 or 0
2.Engage first or reverse gear.
SMG Sequential manual
transmission
1.Engage a drive position
2.Turn the ignition key to position 1 or 0.
A signal sounds if the idle position N is
engaged on stopping the engine.
Automatic transmission with
Steptronic
1.Engage selector-lever position P
2.Turn the ignition key to position 1 or 0.
Handbrake
The handbrake is primarily intended to pre-
vent the vehicle from rolling while parked;
it brakes the rear wheels.
Indicator lamp
The indicator lamp lights up, and an
acoustic signal also sounds when
starting off. The handbrake is
engaged.
Indicator lamp for Canadian mod-
els.
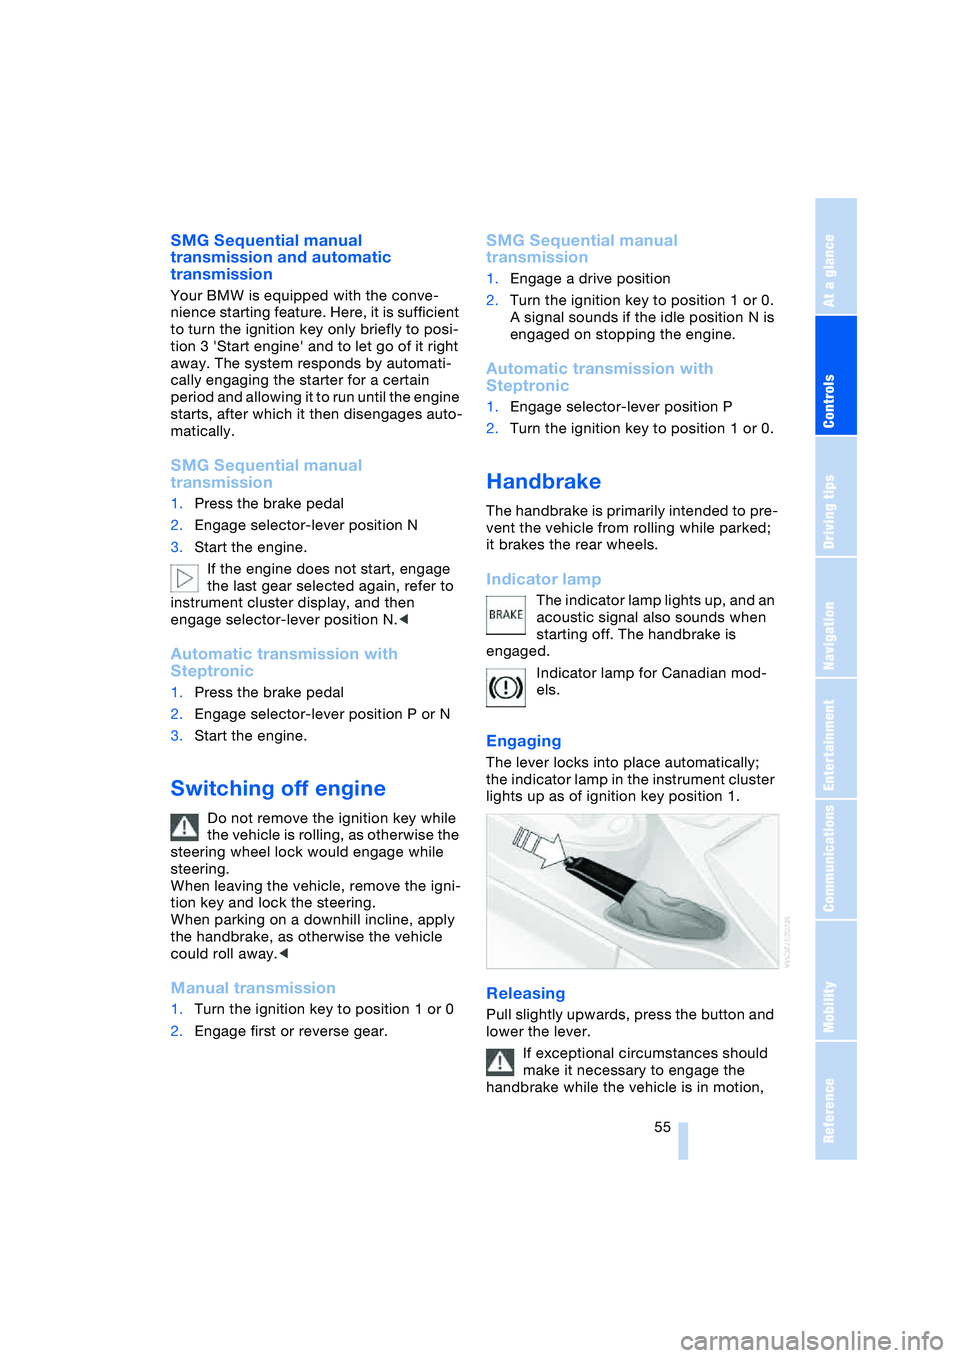
Engaging
The lever locks into place automatically;
the indicator lamp in the instrument cluster
lights up as of ignition key position 1.
Releasing
Pull slightly upwards, press the button and
lower the lever.
If exceptional circumstances should
make it necessary to engage the
handbrake while the vehicle is in motion,
Page 62 of 216
Driving
60
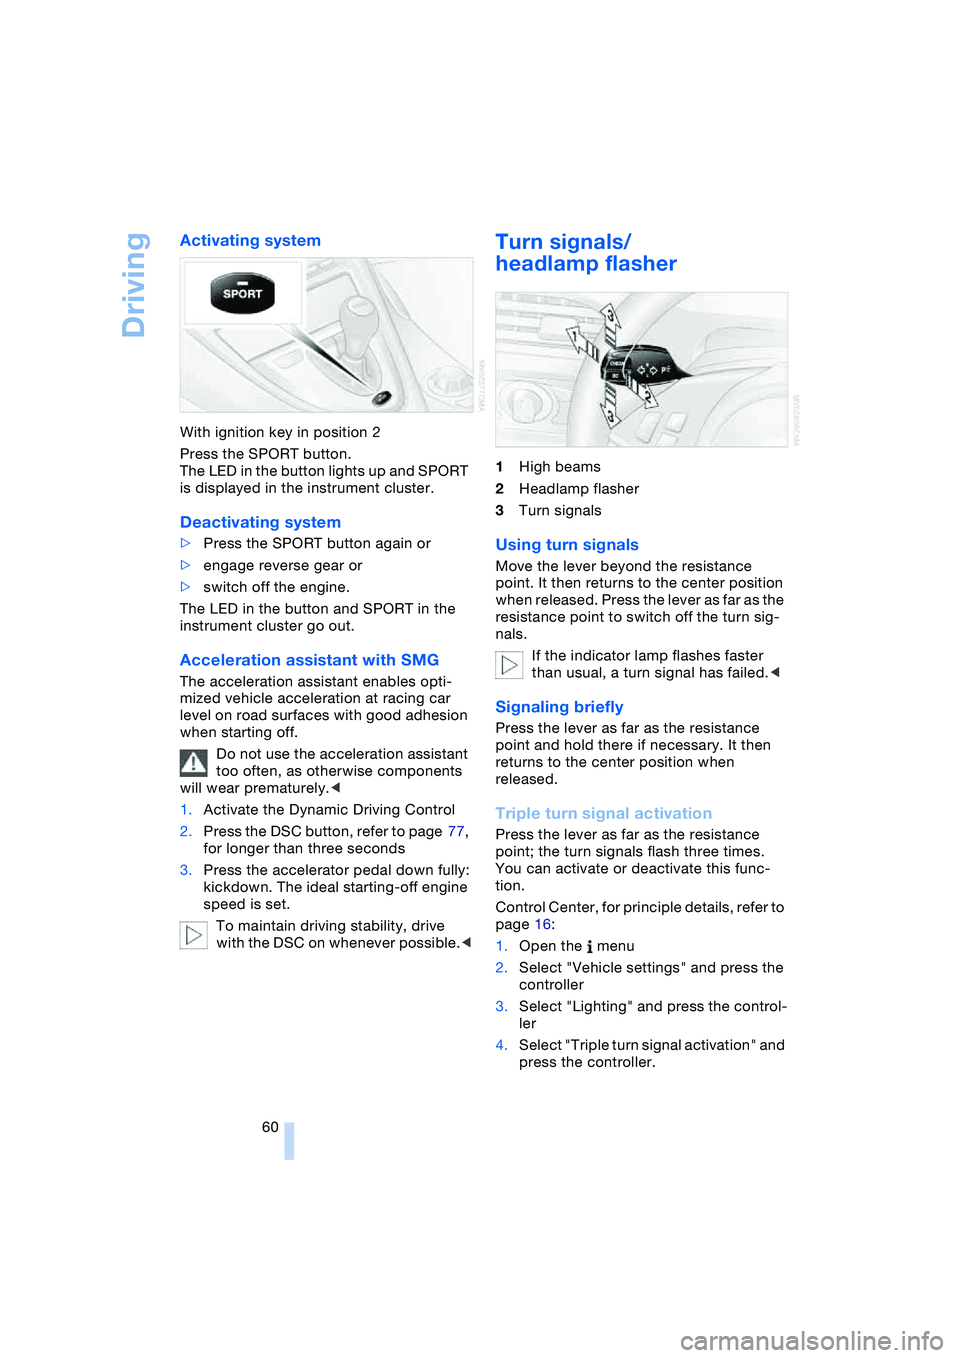
Activating system
With ignition key in position 2
Press the SPORT button.
The LED in the button lights up and SPORT
is displayed in the instrument cluster.
Deactivating system
>Press the SPORT button again or
>engage reverse gear or
>switch off the engine.
The LED in the button and SPORT in the
instrument cluster go out.
Acceleration assistant with SMG
The acceleration assistant enables opti-
mized vehicle acceleration at racing car
level on road surfaces with good adhesion
when starting off.
Do not use the acceleration assistant
too often, as otherwise components
will wear prematurely.<
1.Activate the Dynamic Driving Control
2.Press the DSC button, refer to page 77,
for longer than three seconds
3.Press the accelerator pedal down fully:
kickdown. The ideal starting-off engine
speed is set.
To maintain driving stability, drive
with the DSC on whenever possible.<
Turn signals/
headlamp flasher
1High beams
2Headlamp flasher
3Turn signals
Using turn signals
Move the lever beyond the resistance
point. It then returns to the center position
when released. Press the lever as far as the
resistance point to switch off the turn sig-
nals.
If the indicator lamp flashes faster
than usual, a turn signal has failed.<
Signaling briefly
Press the lever as far as the resistance
point and hold there if necessary. It then
returns to the center position when
released.
Triple turn signal activation
Press the lever as far as the resistance
point; the turn signals flash three times.
You can activate or deactivate this func-
tion.
Control Center, for principle details, refer to
page 16:
1.Open the menu
2.Select "Vehicle settings" and press the
controller
3.Select "Lighting" and press the control-
ler
4.Select "Triple turn signal activation" and
press the controller.
Page 63 of 216
Controls
61Reference
At a glance
Driving tips
Communications
Navigation
Entertainment
Mobility
Triple turn signal activation is acti-
vated.
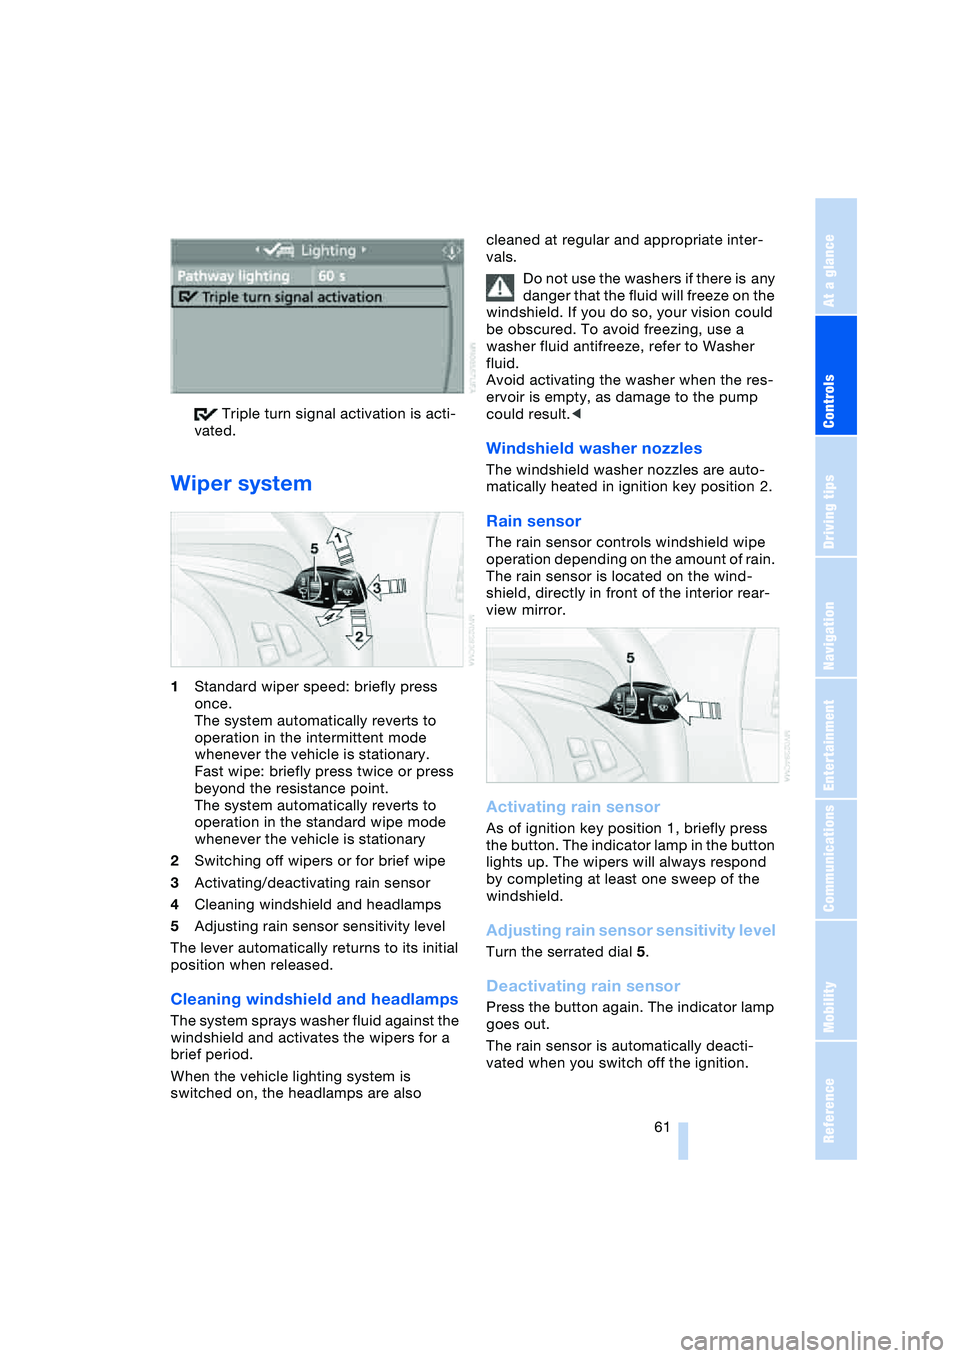
Wiper system
1Standard wiper speed: briefly press
once.
The system automatically reverts to
operation in the intermittent mode
whenever the vehicle is stationary.
Fast wipe: briefly press twice or press
beyond the resistance point.
The system automatically reverts to
operation in the standard wipe mode
whenever the vehicle is stationary
2Switching off wipers or for brief wipe
3Activating/deactivating rain sensor
4Cleaning windshield and headlamps
5Adjusting rain sensor sensitivity level
The lever automatically returns to its initial
position when released.
Cleaning windshield and headlamps
The system sprays washer fluid against the
windshield and activates the wipers for a
brief period.
When the vehicle lighting system is
switched on, the headlamps are also cleaned at regular and appropriate inter-
vals.
Do not use the washers if there is any
danger that the fluid will freeze on the
windshield. If you do so, your vision could
be obscured. To avoid freezing, use a
washer fluid antifreeze, refer to Washer
fluid.
Avoid activating the washer when the res-
ervoir is empty, as damage to the pump
could result.<
Windshield washer nozzles
The windshield washer nozzles are auto-
matically heated in ignition key position 2.
Rain sensor
The rain sensor controls windshield wipe
operation depending on the amount of rain.
The rain sensor is located on the wind-
shield, directly in front of the interior rear-
view mirror.
Activating rain sensor
As of ignition key position 1, briefly press
the button. The indicator lamp in the button
lights up. The wipers will always respond
by completing at least one sweep of the
windshield.
Adjusting rain sensor sensitivity level
Turn the serrated dial 5.
Deactivating rain sensor
Press the button again. The indicator lamp
goes out.
The rain sensor is automatically deacti-
vated when you switch off the ignition.
Page 66 of 216
Everything under control
64
Everything under control
Odometer, outside
temperature display, clock
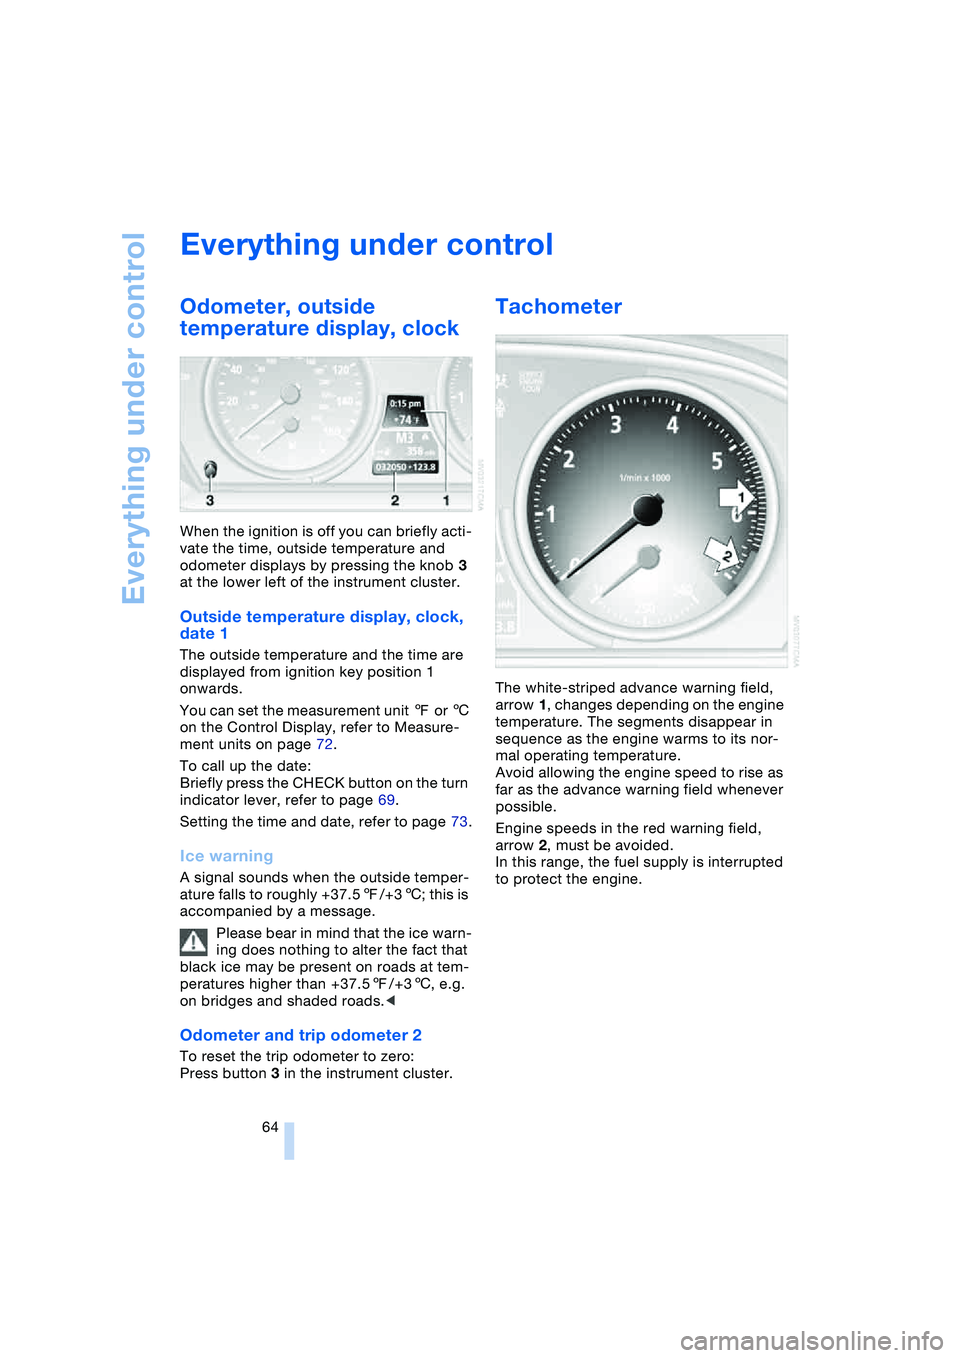
When the ignition is off you can briefly acti-
vate the time, outside temperature and
odometer displays by pressing the knob 3
at the lower left of the instrument cluster.
Outside temperature display, clock,
date 1
The outside temperature and the time are
displayed from ignition key position 1
onwards.
You can set the measurement unit 7 or 6
on the Control Display, refer to Measure-
ment units on page 72.
To call up the date:
Briefly press the CHECK button on the turn
indicator lever, refer to page 69.
Setting the time and date, refer to page 73.
Ice warning
A signal sounds when the outside temper-
ature falls to roughly +37.57/+36; this is
accompanied by a message.
Please bear in mind that the ice warn-
ing does nothing to alter the fact that
black ice may be present on roads at tem-
peratures higher than +37.57/+36, e.g.
on bridges and shaded roads.<
Odometer and trip odometer 2
To reset the trip odometer to zero:
Press button 3 in the instrument cluster.
Tachometer
The white-striped advance warning field,
arrow 1, changes depending on the engine
temperature. The segments disappear in
sequence as the engine warms to its nor-
mal operating temperature.
Avoid allowing the engine speed to rise as
far as the advance warning field whenever
possible.
Engine speeds in the red warning field,
arrow 2, must be avoided.
In this range, the fuel supply is interrupted
to protect the engine.