2004 BMW 645CI COUPE&CONVERTIBLE key battery
[x] Cancel search: key batteryPage 28 of 216
Opening and closing
26
Opening and closing
The key set
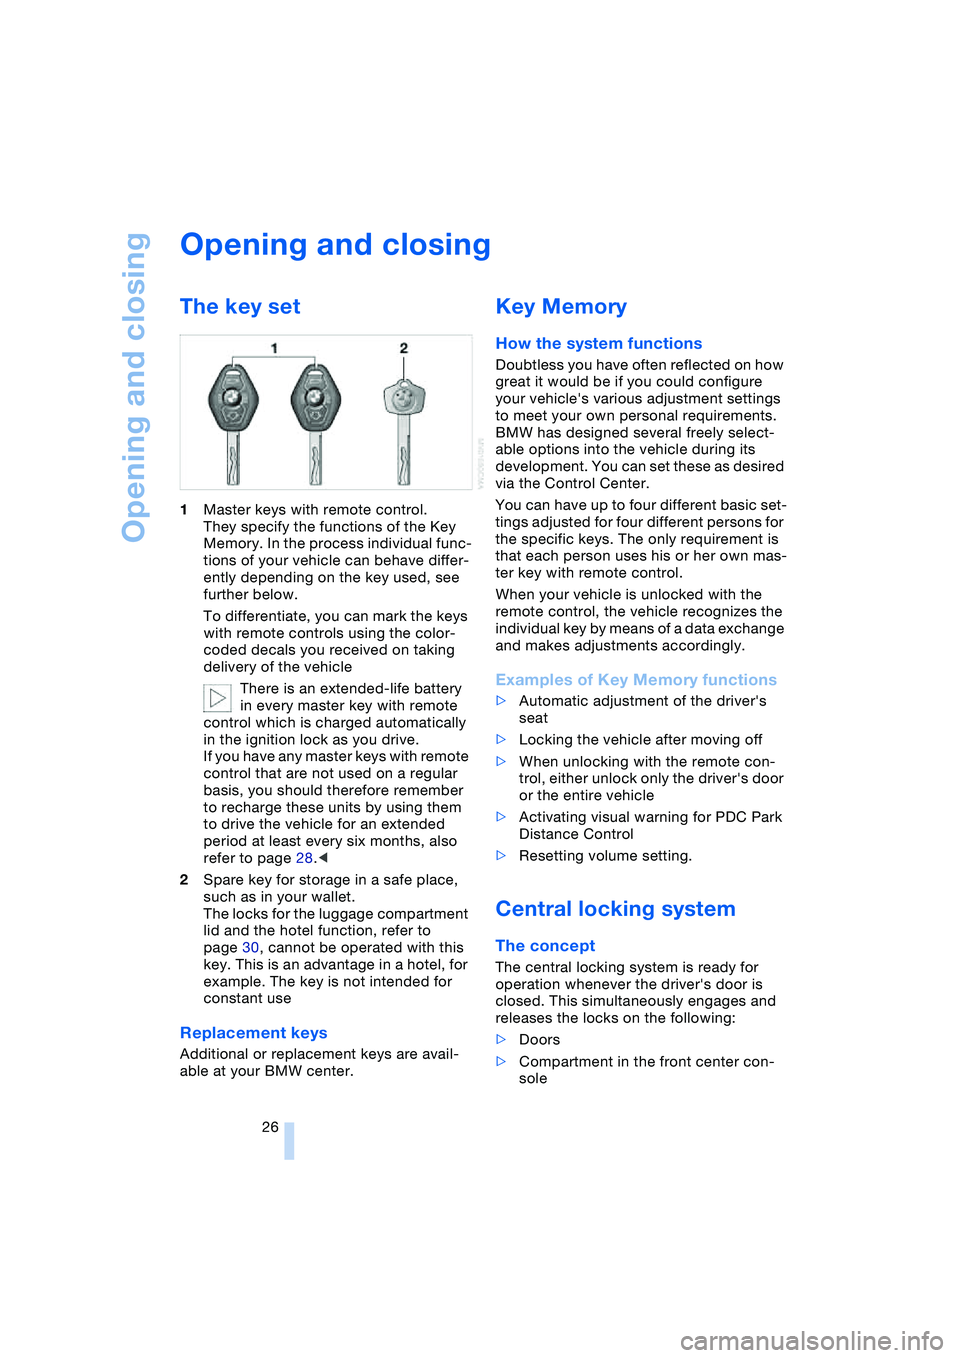
1Master keys with remote control.
They specify the functions of the Key
Memory. In the process individual func-
tions of your vehicle can behave differ-
ently depending on the key used, see
further below.
To differentiate, you can mark the keys
with remote controls using the color-
coded decals you received on taking
delivery of the vehicle
There is an extended-life battery
in every master key with remote
control which is charged automatically
in the ignition lock as you drive.
If you have any master keys with remote
control that are not used on a regular
basis, you should therefore remember
to recharge these units by using them
to drive the vehicle for an extended
period at least every six months, also
refer to page 28.<
2Spare key for storage in a safe place,
such as in your wallet.
The locks for the luggage compartment
lid and the hotel function, refer to
page 30, cannot be operated with this
key. This is an advantage in a hotel, for
example. The key is not intended for
constant use
Replacement keys
Additional or replacement keys are avail-
able at your BMW center.
Key Memory
How the system functions
Doubtless you have often reflected on how
great it would be if you could configure
your vehicle's various adjustment settings
to meet your own personal requirements.
BMW has designed several freely select-
able options into the vehicle during its
development. You can set these as desired
via the Control Center.
You can have up to four different basic set-
tings adjusted for four different persons for
the specific keys. The only requirement is
that each person uses his or her own mas-
ter key with remote control.
When your vehicle is unlocked with the
remote control, the vehicle recognizes the
individual key by means of a data exchange
and makes adjustments accordingly.
Examples of Key Memory functions
>Automatic adjustment of the driver's
seat
>Locking the vehicle after moving off
>When unlocking with the remote con-
trol, either unlock only the driver's door
or the entire vehicle
>Activating visual warning for PDC Park
Distance Control
>Resetting volume setting.
Central locking system
The concept
The central locking system is ready for
operation whenever the driver's door is
closed. This simultaneously engages and
releases the locks on the following:
>Doors
>Compartment in the front center con-
sole
Page 30 of 216
Opening and closing
28
Locking and securing
Press the button.
Switching on interior lamps
Press the button if the vehicle is
locked.
You can also use this function to locate
your vehicle in parking garages etc.
Panic mode*
By pressing and holding the button for
more than approx. two seconds, you can
trigger the alarm system in response to any
impending danger.
To switch off the alarm: press any of the
buttons.
Opening luggage compartment lid
Press the button:
The luggage compartment lid opens,
regardless of whether it was previously
locked or unlocked.
A previously locked luggage com-
partment lid is also locked after clos-
ing.
Coupe: the luggage compartment lid
swings to the rear and upwards when
opened. Make sure there is sufficient free
space.<
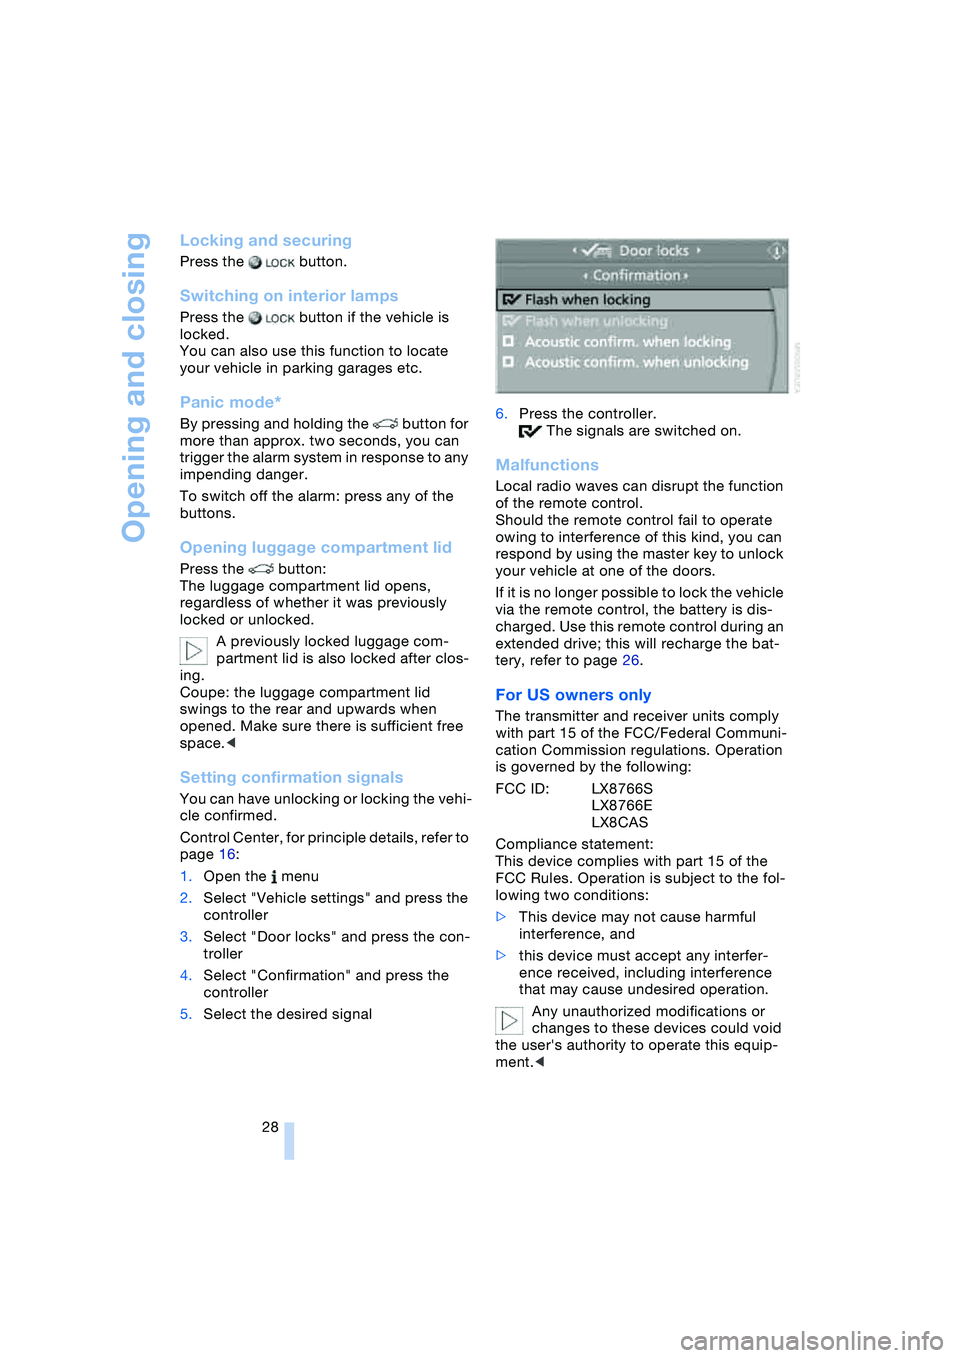
Setting confirmation signals
You can have unlocking or locking the vehi-
cle confirmed.
Control Center, for principle details, refer to
page 16:
1.Open the menu
2.Select "Vehicle settings" and press the
controller
3.Select "Door locks" and press the con-
troller
4.Select "Confirmation" and press the
controller
5.Select the desired signal6.Press the controller.
The signals are switched on.
Malfunctions
Local radio waves can disrupt the function
of the remote control.
Should the remote control fail to operate
owing to interference of this kind, you can
respond by using the master key to unlock
your vehicle at one of the doors.
If it is no longer possible to lock the vehicle
via the remote control, the battery is dis-
charged. Use this remote control during an
extended drive; this will recharge the bat-
tery, refer to page 26.
For US owners only
The transmitter and receiver units comply
with part 15 of the FCC/Federal Communi-
cation Commission regulations. Operation
is governed by the following:
FCC ID: LX8766S
LX8766E
LX8CAS
Compliance statement:
This device complies with part 15 of the
FCC Rules. Operation is subject to the fol-
lowing two conditions:
>This device may not cause harmful
interference, and
>this device must accept any interfer-
ence received, including interference
that may cause undesired operation.
Any unauthorized modifications or
changes to these devices could void
the user's authority to operate this equip-
ment.<
Page 34 of 216
Opening and closing
32 If special circumstances should make it
absolutely necessary to operate the vehicle
with the lid open:
1.Coupe: close both windows as well as
the glass roof
Convertible: with closed top, close all
windows
2.Adjust the automatic climate control to
supply a high air volume, refer to
page 89.
Luggage compartment
There are four lashing eyes on the inner
corners of the luggage compartment for
securing luggage nets or securing straps to
fix luggage in position.
Also refer to Cargo loading, page 104.
Convertible: increasing luggage
compartment capacity
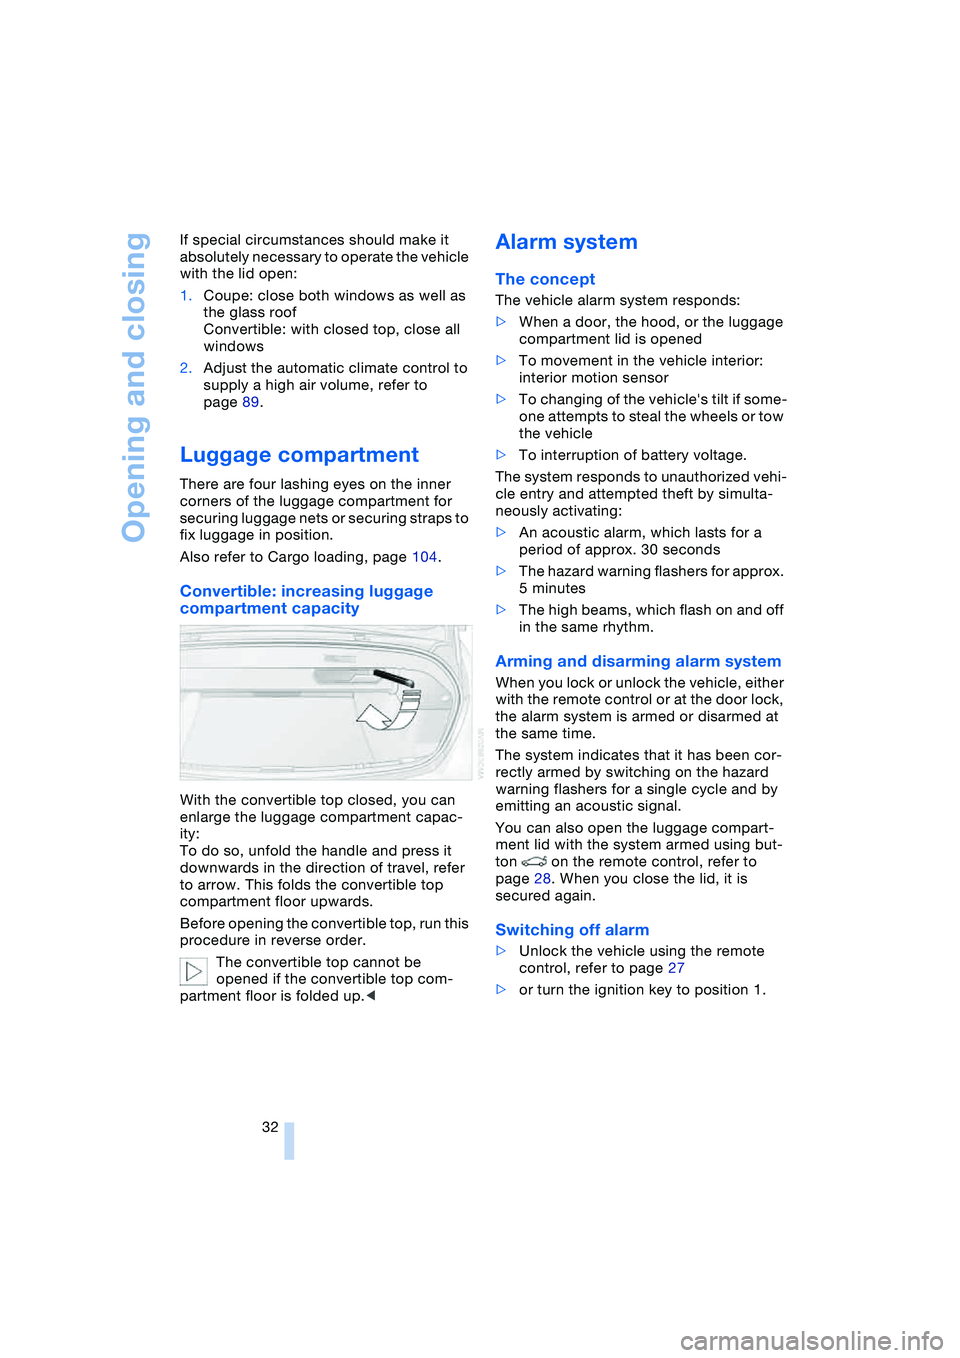
With the convertible top closed, you can
enlarge the luggage compartment capac-
ity:
To do so, unfold the handle and press it
downwards in the direction of travel, refer
to arrow. This folds the convertible top
compartment floor upwards.
Before opening the convertible top, run this
procedure in reverse order.
The convertible top cannot be
opened if the convertible top com-
partment floor is folded up.<
Alarm system
The concept
The vehicle alarm system responds:
>When a door, the hood, or the luggage
compartment lid is opened
>To movement in the vehicle interior:
interior motion sensor
>To changing of the vehicle's tilt if some-
one attempts to steal the wheels or tow
the vehicle
>To interruption of battery voltage.
The system responds to unauthorized vehi-
cle entry and attempted theft by simulta-
neously activating:
>An acoustic alarm, which lasts for a
period of approx. 30 seconds
>The hazard warning flashers for approx.
5 minutes
>The high beams, which flash on and off
in the same rhythm.
Arming and disarming alarm system
When you lock or unlock the vehicle, either
with the remote control or at the door lock,
the alarm system is armed or disarmed at
the same time.
The system indicates that it has been cor-
rectly armed by switching on the hazard
warning flashers for a single cycle and by
emitting an acoustic signal.
You can also open the luggage compart-
ment lid with the system armed using but-
ton on the remote control, refer to
page 28. When you close the lid, it is
secured again.
Switching off alarm
>Unlock the vehicle using the remote
control, refer to page 27
>or turn the ignition key to position 1.
Page 38 of 216
Opening and closing
36
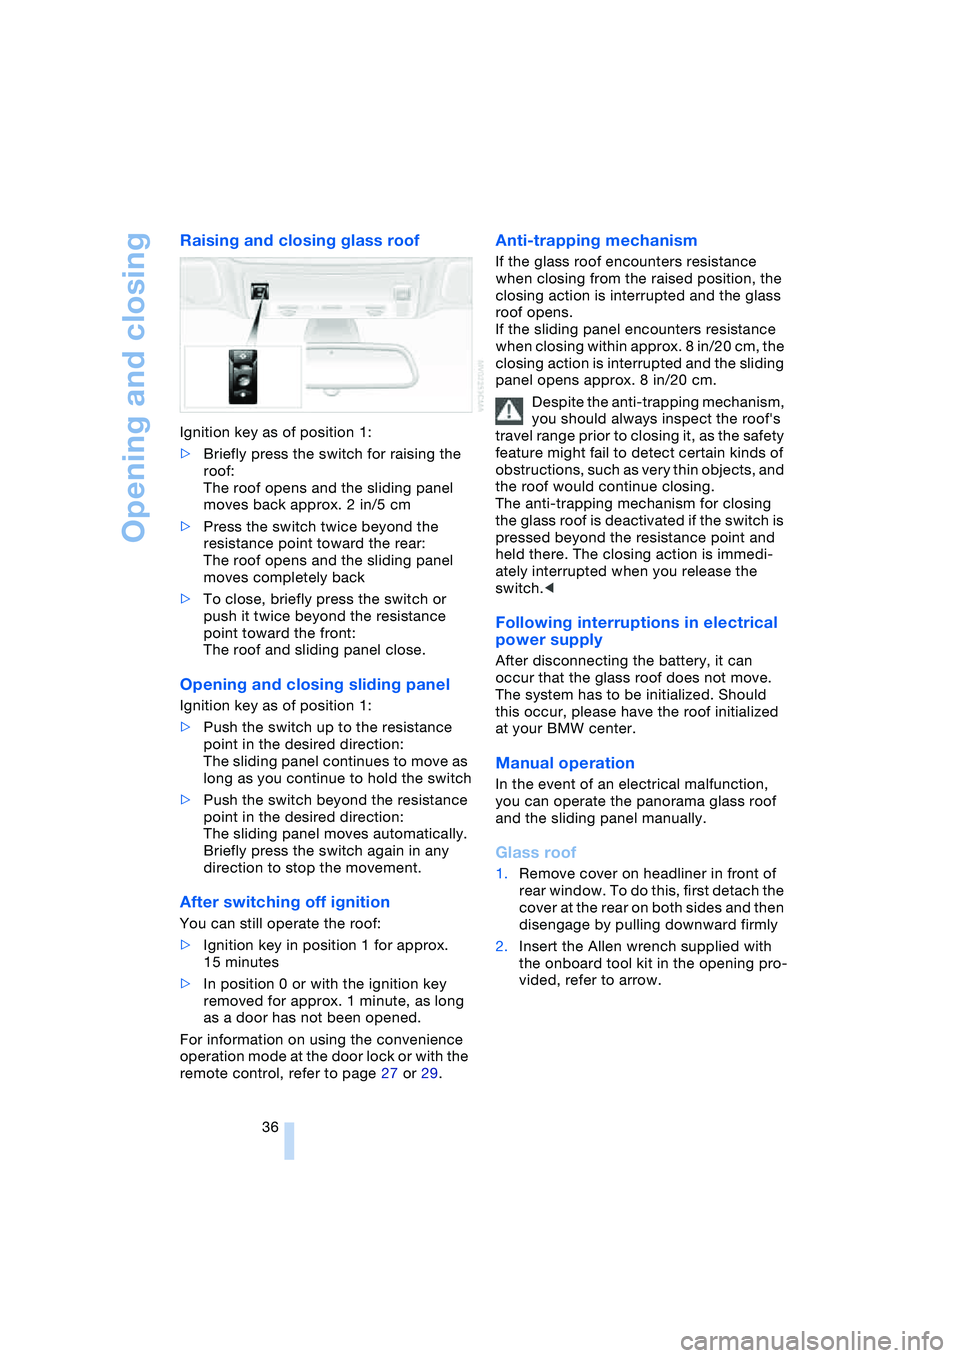
Raising and closing glass roof
Ignition key as of position 1:
>Briefly press the switch for raising the
roof:
The roof opens and the sliding panel
moves back approx. 2 in/5 cm
>Press the switch twice beyond the
resistance point toward the rear:
The roof opens and the sliding panel
moves completely back
>To close, briefly press the switch or
push it twice beyond the resistance
point toward the front:
The roof and sliding panel close.
Opening and closing sliding panel
Ignition key as of position 1:
>Push the switch up to the resistance
point in the desired direction:
The sliding panel continues to move as
long as you continue to hold the switch
>Push the switch beyond the resistance
point in the desired direction:
The sliding panel moves automatically.
Briefly press the switch again in any
direction to stop the movement.
After switching off ignition
You can still operate the roof:
>Ignition key in position 1 for approx.
15 minutes
>In position 0 or with the ignition key
removed for approx. 1 minute, as long
as a door has not been opened.
For information on using the convenience
operation mode at the door lock or with the
remote control, refer to page 27 or 29.
Anti-trapping mechanism
If the glass roof encounters resistance
when closing from the raised position, the
closing action is interrupted and the glass
roof opens.
If the sliding panel encounters resistance
when closing within approx. 8 in/20 cm, the
closing action is interrupted and the sliding
panel opens approx. 8 in/20 cm.
Despite the anti-trapping mechanism,
you should always inspect the roof's
travel range prior to closing it, as the safety
feature might fail to detect certain kinds of
obstructions, such as very thin objects, and
the roof would continue closing.
The anti-trapping mechanism for closing
the glass roof is deactivated if the switch is
pressed beyond the resistance point and
held there. The closing action is immedi-
ately interrupted when you release the
switch.<
Following interruptions in electrical
power supply
After disconnecting the battery, it can
occur that the glass roof does not move.
The system has to be initialized. Should
this occur, please have the roof initialized
at your BMW center.
Manual operation
In the event of an electrical malfunction,
you can operate the panorama glass roof
and the sliding panel manually.
Glass roof
1.Remove cover on headliner in front of
rear window. To do this, first detach the
cover at the rear on both sides and then
disengage by pulling downward firmly
2.Insert the Allen wrench supplied with
the onboard tool kit in the opening pro-
vided, refer to arrow.
Page 40 of 216
Opening and closing
38 Partial vacuums that occur at higher
speeds in the passenger compart-
ment can make the convertible top flap.
Use the ventilation controls to increase the
air supply so that no partial vacuum occurs
in the vehicle.<
To close the electrically activated side
windows while the vehicle is being
driven, always close the rear windows or
all four windows simultaneously first, as
otherwise the windows cannot close tightly
at higher speeds.<
Prior to opening and closing
>Read carefully and comply with the
safety precautions that appear above
>Ensure that the convertible top com-
partment floor in the luggage compart-
ment is folded down, refer to page 32,
as otherwise the convertible top cannot
be opened
>Ensure that the luggage compartment
lid is closed.
Opening and closing
As of ignition key position 1, with the vehi-
cle stationary:
So as not to place an excessive load
on the battery, only operate the con-
vertible top with the engine running, if pos-
sible.
Before closing the convertible top, remove
foreign bodies from the windshield frame,
as these might inhibit closing of the con-
vertible top.<
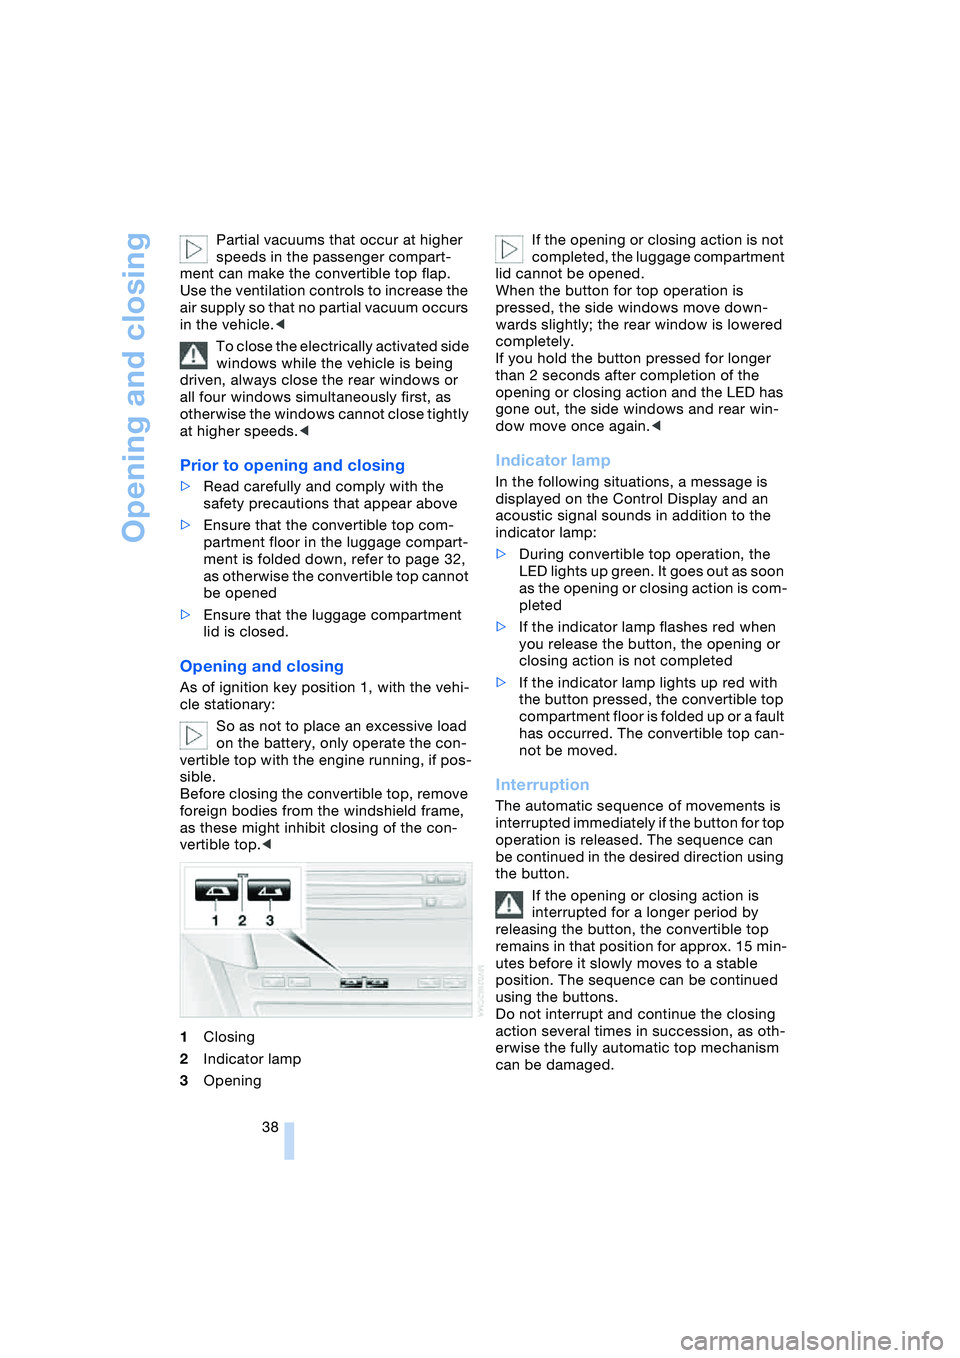
1Closing
2Indicator lamp
3OpeningIf the opening or closing action is not
completed, the luggage compartment
lid cannot be opened.
When the button for top operation is
pressed, the side windows move down-
wards slightly; the rear window is lowered
completely.
If you hold the button pressed for longer
than 2 seconds after completion of the
opening or closing action and the LED has
gone out, the side windows and rear win-
dow move once again.<
Indicator lamp
In the following situations, a message is
displayed on the Control Display and an
acoustic signal sounds in addition to the
indicator lamp:
>During convertible top operation, the
LED lights up green. It goes out as soon
as the opening or closing action is com-
pleted
>If the indicator lamp flashes red when
you release the button, the opening or
closing action is not completed
>If the indicator lamp lights up red with
the button pressed, the convertible top
compartment floor is folded up or a fault
has occurred. The convertible top can-
not be moved.
Interruption
The automatic sequence of movements is
interrupted immediately if the button for top
operation is released. The sequence can
be continued in the desired direction using
the button.
If the opening or closing action is
interrupted for a longer period by
releasing the button, the convertible top
remains in that position for approx. 15 min-
utes before it slowly moves to a stable
position. The sequence can be continued
using the buttons.
Do not interrupt and continue the closing
action several times in succession, as oth-
erwise the fully automatic top mechanism
can be damaged.
Page 94 of 216
A congenial climate
92 climate control is optimized for driving with
the convertible top open. In addition, the air
supply is increased as the speed increases.
If the convertible program has been
selected, it is automatically active every
time the top is opened.
The effect of the convertible program
can be greatly enhanced if the wind
deflector is fitted.<
Ventilation
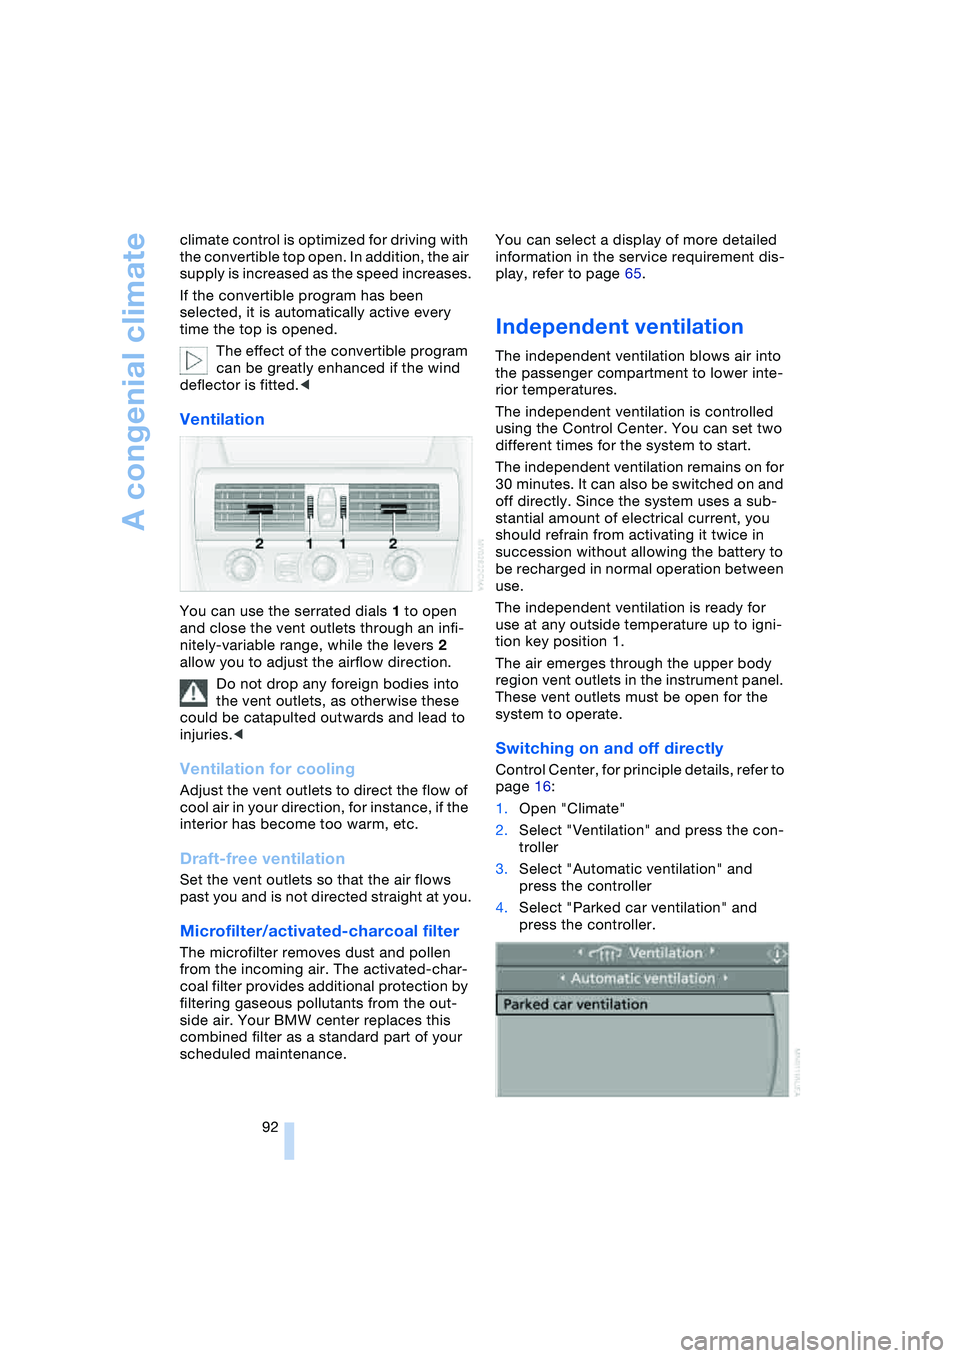
You can use the serrated dials 1 to open
and close the vent outlets through an infi-
nitely-variable range, while the levers 2
allow you to adjust the airflow direction.
Do not drop any foreign bodies into
the vent outlets, as otherwise these
could be catapulted outwards and lead to
injuries.<
Ventilation for cooling
Adjust the vent outlets to direct the flow of
cool air in your direction, for instance, if the
interior has become too warm, etc.
Draft-free ventilation
Set the vent outlets so that the air flows
past you and is not directed straight at you.
Microfilter/activated-charcoal filter
The microfilter removes dust and pollen
from the incoming air. The activated-char-
coal filter provides additional protection by
filtering gaseous pollutants from the out-
side air. Your BMW center replaces this
combined filter as a standard part of your
scheduled maintenance.You can select a display of more detailed
information in the service requirement dis-
play, refer to page 65.
Independent ventilation
The independent ventilation blows air into
the passenger compartment to lower inte-
rior temperatures.
The independent ventilation is controlled
using the Control Center. You can set two
different times for the system to start.
The independent ventilation remains on for
30 minutes. It can also be switched on and
off directly. Since the system uses a sub-
stantial amount of electrical current, you
should refrain from activating it twice in
succession without allowing the battery to
be recharged in normal operation between
use.
The independent ventilation is ready for
use at any outside temperature up to igni-
tion key position 1.
The air emerges through the upper body
region vent outlets in the instrument panel.
These vent outlets must be open for the
system to operate.
Switching on and off directly
Control Center, for principle details, refer to
page 16:
1.Open "Climate"
2.Select "Ventilation" and press the con-
troller
3.Select "Automatic ventilation" and
press the controller
4.Select "Parked car ventilation" and
press the controller.
Page 147 of 216
145
Entertainment
Reference
At a glance
Controls
Driving tips Communications
Navigation
Mobility
Batteries
Never attempt to dismantle your
BMW portable phone or its battery.
Use only approved battery types – the
wrong battery can destroy your portable
phone.
To avoid possible short circuits, after
removing a battery you should never allow
it to come into contact with metallic sur-
faces of any kind.<
Disposing of used batteries
Return used batteries to a recycling
collection point or to your BMW cen-
ter.<
Care instructions
You can find what you need to know about
caring for your portable phone in the Caring
for your vehicle brochure and in the sepa-
rate portable phone Owner's Manual.
Operating options
You can operate the BMW portable phone*
with:
>The steering wheel, refer to page 11
>The Control Center, refer to page 146
>Voice control, refer to page 151.
Telephoning with car phone:
BMW Assist calls
You can use the car phone via the hands-
free system for BMW Assist calls.
When the status information "Car Phone" is
displayed in "Communication", only BMW
Assist calls are possible.
Activating the
BMW portable phone*
Requirements for portable phones with
SIM card:
>Enter a Personal Identification Number,
PIN, if necessary
>Remove all keypad locks, refer to sepa-
rate Owner's Manual.
Before starting off, place the BMW portable
phone in the cradle. If a connection to
BMW Assist has been established, you
cannot use the BMW portable phone until
this connection has been terminated.
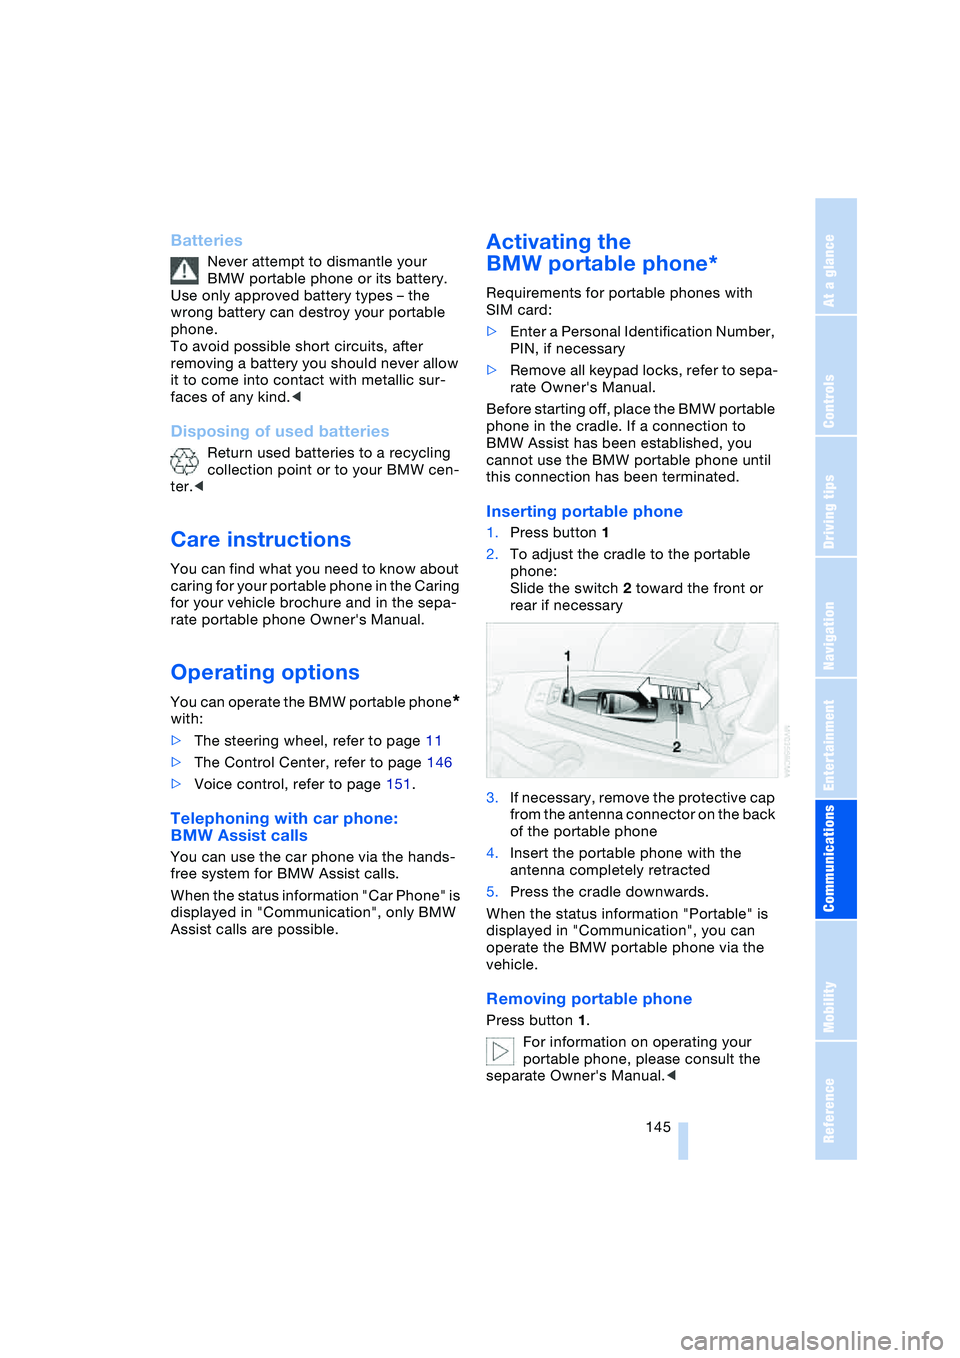
Inserting portable phone
1.Press button 1
2.To adjust the cradle to the portable
phone:
Slide the switch 2 toward the front or
rear if necessary
3.If necessary, remove the protective cap
from the antenna connector on the back
of the portable phone
4.Insert the portable phone with the
antenna completely retracted
5.Press the cradle downwards.
When the status information "Portable" is
displayed in "Communication", you can
operate the BMW portable phone via the
vehicle.
Removing portable phone
Press button 1.
For information on operating your
portable phone, please consult the
separate Owner's Manual.<
Page 201 of 216
Reference 199
At a glance
Controls
Driving tips
Communications
Navigation
Entertainment
Mobility
C
California laws
– Event Data
Recorders 176
– Proposition 65
Warning 176
"Call" 148
Call
– accepting 147
– display accepted 149
– ending 148
– in absence 149
– starting 147
Calling
– from phone book 148
– from the Top 8 list 149
– redialing 149
– refer to telephone
Owner's Manual 96
"Call sender" 151
Can holder, refer to
Cup holders 97
Capacities 193
Car battery, refer to
Battery 181
Car care, refer to the Caring
for your vehicle brochure
Car-care products, refer to
the Caring for your
vehicle brochure
"Car data" 69
Care 175
Cargo, securing 105
Caring for artificial leather,
refer to the Caring for
your vehicle brochure
Caring for leather, refer to
the Caring for your
vehicle brochure
Caring for light-alloy
wheels, refer to the
Caring for your vehicle
brochure'
Caring for plastic, refer to
the Caring for your
vehicle brochure
Caring for the carpet, refer
to the Caring for your
vehicle brochureCaring for the vehicle finish,
refer to the Caring for
your vehicle brochure'
Car jacking points 181
Car keys, refer to
Key set 26
Car phone 145
– location, refer to
Center armrest 96
– refer to
Portable phone 144
– refer to separate
Owner's Manual
Car radio, refer to
Radio 130
Car wash 102
– also refer to the Caring for
your vehicle brochure
Catalytic converter, refer to
Exhaust system 102
"Categories" 135
CBC Cornering Brake
Control 76
CBS Condition Based
Service 174
"CD" 127, 137
CD changer 137
– adjusting the tone 127
– controls 126
– fast forward/reverse 140
– installation location 140
– playing a track 139
– random play
sequence 140
– repeating a track 139
– selecting a CD 137
– selecting a track 138
– switching on/off 126
– volume 127
CD player 137
– adjusting the tone 127
– controls 126
– fast forward/reverse 140
– playing a track 139
– random play
sequence 140
– repeating a track 139
– selecting a track 138
– switching on/off 126
– volume 127Center armrest
– adjusting the height 96
– front 96
Center console 14
"Central locking" 27
Central locking system 26
– from inside vehicle 29
Changes, technical, refer to
For your own safety 6
Changing a wheel 181
Changing the language on
Control Display 73
Changing the
measurement units on the
Control Display 72
Changing wheels 181
CHECK button 68
Check Control 66
"Check Control
messages" 68
Check Gas Cap 162
Checking the air pressure,
refer to Tire inflation
pressure 164
Child's seats, refer to
Child-restraint
systems 52
Child-restraint system 51
Chrome parts, care, refer
to the Caring for your
vehicle brochure
Cigarette lighter 97
Cleaning, refer to the
Caring for your vehicle
brochure
Cleaning windshield, refer
to Wiper system 61
"Climate" 90
"Climate control" 91
Clock 64
– 12/24 hour mode 73
– setting time and date 73
Closing
– from inside 29
– from outside 27
Clothes hooks, Coupe 96
Cockpit 10
Cold start, refer to
Starting the engine 54
"Communication" 146