Page 89 of 220

Controls
87Reference
At a glance
Driving tips
Communications
Navigation
Entertainment
Mobility
Lamps
Parking lamps/low beams
Parking lamps
With the switch in this position, the
front, rear and side vehicle lighting
is switched on. You can use the side
marker lamps for parking. For lighting on
one side for parking as an additional fea-
ture, refer to page 88.
Low beams
When you switch off the ignition
with the headlamps on, the head-
lamps go out, and only the parking
lamps remain on.
Pathway lighting
After parking the vehicle and switching off
the headlamps, operating the headlamp
flasher activates the low beams. You can
set the duration using the Control Center or
deactivate the function.
Control Center, for principle details, refer to
page 16:
1.Open the menu
2.Select "Vehicle settings" and press the
controller
3.Select "Lighting" and press the control-
ler 4.Select "Pathway lighting" and press the
controller
5.Turn the controller to select the corre-
sponding duration
6.Press the controller to apply the setting.
Lights on warning
If you turn the ignition key to position 0, an
acoustic signal sounds when you open the
driver's door for a few seconds to remind
you that the light has not yet been switched
off. At the same time a message appears
on the Control Display.
Daytime driving lamps*
If desired, the light switch can remain in the
low beam position:
When you switch off the ignition, the exte-
rior lighting goes out.
Always observe all applicable laws govern-
ing the use of daytime driving lamps.
You can switch on the parking lamps when
needed using the standard procedure
described under Parking lamps.
Automatic headlamp control*
When you set the switch to this
position, the system activates and
switches on and off the low beams
in response to changes in ambient light
conditions, for instance, in a tunnel, at
dawn and dusk, and in rain and snow. The
LED next to the symbol is illuminated when
the low beams are on.
Page 90 of 220

Lamps
88 Following automatic activation, the
vehicle's external lighting remains on
when you switch on the fog lamps.<
The automatic headlamp control can-
not serve as a substitute for your per-
sonal judgment in determining when the
lamps should be switched on in response
to ambient lighting conditions. For exam-
ple, the system cannot detect fog. To avoid
safety risks, you should always switch on
the lamps manually under these condi-
tions.<
Adaptive Head Light*
The concept
Adaptive Head Light is a variable headlamp
control system that enables dynamic illumi-
nation of the road surface. Depending on
the steering angle and other assumptions,
the light from the headlamp follows the
course of the road.
Activating Adaptive Head Light
In ignition key position 2, turn the
light switch to the position 'Auto-
matic headlamp control', refer to
page 87.
When reversing, the Adaptive Head
Light is inactive; when the vehicle is
stationary, it is only active in one direc-
tion.<
In case of malfunction
The LED above the symbol for automatic
headlamp control flashes. Please have the
system inspected at your BMW center.
Instrument lighting
Turn the serrated dial to adjust the illumina-
tion intensity.
High beams/standing lamps
1High beams: blue indicator lamp
2Headlamp flasher: blue indicator lamp
3Standing lamps
Standing lamps, left or right*
You also enjoy the option of lighting up just
one side of your vehicle when parking.
When using this function, comply with
national regulations:
With the ignition switched off, press the
lever in the desired direction 3, past the
resistance point.
Page 91 of 220

Controls
89Reference
At a glance
Driving tips
Communications
Navigation
Entertainment
Mobility
Fog lamps
Always observe all applicable laws govern-
ing the use of fog lamps.
To disconnect, briefly press the button
again.
The parking lamps or low beams
must be switched on for the fog
lamps to operate. The green indica-
tor lamp in the instrument cluster lights up
whenever the fog lamps are on.
The fog lamps are switched off whenever
the high beams are switched on.
If the automatic headlamp control is
activated, the low beams will come on
automatically when you switch on the fog
lamps.<
Interior lamps
The interior lamps operate automatically.
Switching the interior lamps on
and off manually
Briefly press button 1.
If you want the interior lamps to remain off
continuously, maintain pressure on the but-
ton for approx. 3 seconds. To revert to normal operation, press the
button briefly.
Control of the footwell lamps, door entry
lighting and courtesy lamps
* is also auto-
matic.
Reading lamps
Reading lamps are provided in the front
and rear adjacent to the interior lamps. You
can switch them on and off using the
buttons 2 located next to the lamps.
To avoid discharging the battery, all of
the vehicle's interior lamps are auto-
matically switched off approx. 15 minutes
after the ignition is switched off.<
Light-emitting diodes LEDs
Light-emitting diodes installed behind
translucent lenses serve as the light source
for many of the controls and displays in
your vehicle.These light-emitting diodes,
which operate using a concept similar to
that applied in conventional lasers, are offi-
cially designated as Class 1 light-emitting
diodes.
Do not remove the covers, and never
stare into the unfiltered light several
hours, as irritation of the retina could
result.<
Page 92 of 220
A congenial climate
90
A congenial climate
1Airflow directed toward the windshield
and side windows
2Air to the upper body.
The serrated dials allow you to open
and close the air supply vent outlets
through an infinitely-variable range. The
levers change the direction of the air
flow. You can find more information on
adjusting for draft-free ventilation on
page 94
3Air to footwell
4Temperature, left side of passenger
compartment
5Maximum cooling 6Defrosting windows and removing con-
densation
7Air volume
8Switching off automatic climate control
9Switching cooling function on and off
manually
10Temperature, right side of passenger
compartment
11Residual heat mode
12Automatic air distribution and volume
13Outside air/AUC Automatic recircu-
lated-air control/Recirculated air
14Indicator lamp for independent
ventilation
Page 93 of 220

Controls
91Reference
At a glance
Driving tips
Communications
Navigation
Entertainment
Mobility
>Activation time set:
The indicator lamp lights up
>Independent ventilation switched
on:
The indicator lamp flashes
15Rear window defroster
16Air grill for interior temperature sensor,
please keep clear and unobstructed
All other setting options for the automatic
climate control can be found in the "Cli-
mate" menu and in the menu on the Con-
trol Display, as of page 92.
The current setting for air distribution is dis-
played on the Control Display.
A congenial climate
To use the automatic function, press the
AUTO button. Select an interior tempera-
ture you find pleasant.
The following section contains more
detailed information on the available set-
ting options.
The cooling function is only possible with
the engine running.
Automatic air distribution and supply
The AUTO program adjusts the
air distribution to the wind-
shield and side windows,
towards the upper body and footwell as
well as the air volume, while also using your
preselected temperature setting as the
basis for adjusting the interior climate to
adapt to external influences: summer, win-
ter.
The cooling function comes on automati-
cally when you select the AUTO program.
At the same time, a condensation sensor
controls the program in such a way that
window condensation is prevented as far
as possible.
Adjusting temperature
You can turn to select the
desired temperatures for the
driver and passenger sides.
The figures on the display pro-
vide a general indication of inte-rior temperature. A pleasant adjustment is
727/226. When you start the vehicle, the
system ensures that the selected tempera-
ture is achieved as quickly as possible. It
then maintains this temperature, regard-
less of the season.
Defrosting windows and removing
condensation
This program quickly removes
ice and condensation from the
windshield and front side win-
dows.
Adjusting the air volume manually
You can adjust the air volume
by turning. You can reactivate
the automatic mode for the air
volume with the AUTO button.
Switching cooling function on and off
manually
The cooling function cools and
dehumidifies the incoming air
before also reheating it as
required, according to the temperature set-
ting. Depending on the weather, the wind-
shield may fog over briefly when the engine
is started.
The cooling function comes on automati-
cally when you select the AUTO program.
Maximum cooling
This program quickly provides
maximum cooling.
The system switches to the
recirculated-air mode and the
air flows at maximum air volume only from
the vent outlets for the upper body area.
For this reason you should ensure that
these vent outlets are open before select-
ing this program.
Outside air/AUC Automatic
recirculated-air control/
Recirculated air
You can respond to unpleasant
odors or pollutants in the imme-
diate environment by tempo-
Page 94 of 220

A congenial climate
92 rarily suspending the supply of outside air.
The system then recirculates the air cur-
rently within the vehicle. AUC executes this
function automatically.
Press the button repeatedly to run through
the following control sequence:
>Indicator lamps off: outside air flows in
>Right indicator lamp on, AUC mode: the
system detects pollutants in the outside
air and responds by blocking the supply
of outside air when required. The sys-
tem then recirculates the air currently
within the vehicle.
Depending upon air quality require-
ments, in the automatic mode the sys-
tem alternates between its outside-air
and recirculated-air modes
>Left indicator lamp on, recirculated-air
mode: the supply of outside air is per-
manently blocked. The system then
recirculates the air currently within the
vehicle.
If condensation starts to form on the
inside window surfaces during opera-
tion in the recirculated-air mode, you
should switch it off while also increasing
the air volume as required.
The recirculated-air mode should not be
used over a sustained longer period of
time, as the air quality inside the vehicle
deteriorates continuously.<
Residual heat mode
The system uses the warmth
stored in the engine to heat the
interior when the ignition is off,
for instance, while the vehicle is
stopped at a school to pick up a
child.
You can adjust the automatic climate con-
trol settings in ignition key position 1.
Provided that the engine has warmed
to its normal operating temperature
and the battery is charged, you can use this
function for up to 15 minutes after switch-
ing off the ignition. The LED within the but-
ton lights up to confirm compliance with
these conditions.<
Switching automatic climate control
off
The air volume, the heater and
the cooling function are all
switched off. You can restart
the automatic climate control
by pressing any of its buttons
except the REST button.
Settings using the Control Center
You can make the settings for each specific
key.
Control Center, for principle details, refer to
page 16:
1.Turn the ignition key to position 2
2.Open the start menu by pressing the
button
3.Move the controller to the left to open
"Climate".
You can set the following:
>Air distribution, separate settings for
driver and front passenger
>Addition of cooler air for the upper body
area.
Automatic air distribution
1.Select "Vent settings" and press the
controller
2.Select "AUTO" and press the controller.
Page 95 of 220

Controls
93Reference
At a glance
Driving tips
Communications
Navigation
Entertainment
Mobility
is displayed with automatic air dis-
tribution.
The program handles adjustment of the air
distribution, separately for the driver and
passenger side.
To switch on the automatic air distribution
for the front passenger:
Move the controller to the right.
Manual air distribution
You can combine your air distribution your-
self and also set the air temperature for the
upper body area individually.
1.Select "Vent settings" and press the
controller
2.Select "AUTO" and press the controller.
is displayed with manual air distribu-
tion
3.Select the desired field by moving the
controller and turn the controller to
adjust the air distribution.
1Airflow directed toward the windshield
and side windows, driver's side only
2Air to the upper body. You can also indi-
vidually adjust the air temperature of
the vent outlets for the upper body area
3Air to footwell To select the passenger area:
Move the controller to the right.
Adjusting temperature for the upper
body
4Setting the addition of cool air from the
air vent outlets for the upper body area
Setting the intensity of the AUTO
program
To meet your individual needs, you can
weaken or strengthen the intensity of the
automatic climate control.
1.Turn the ignition key to position 1
Control Center, for principle details, refer to
page 16:
2.Open the menu
3.Select "Vehicle settings" and press the
controller
4.Select "Climate control" and press the
controller
5."Automatic programs"
6.Select the desired intensity and press
the controller.
Page 96 of 220

A congenial climate
94
Front ventilation
You can adjust the vent outlets for the
upper body to suit your personal require-
ments.
You can use the serrated dials 1 to open
and close the vent outlets through an infi-
nitely-variable range, while the levers 2
allow you to adjust the airflow direction.
Ventilation for cooling
Adjust the vent outlets to direct the flow of
cool air in your direction, for instance, if the
interior has become too warm, etc.
Draft-free ventilation
Set the vent outlets so that the air flows
past you and is not directed straight at you.
You can also individually adjust the air tem-
perature of the vent outlets for the upper
body area using the Control Center.
Rear ventilation
The serrated dial 1 allows you to open and
close the vents through an infinitely-vari-
able range.
Serrated dial 2:
Turn towards blue: colder.
Turn towards red: warmer. You can adjust the airflow direction using
the levers 3.
Independent ventilation*
The independent ventilation blows air into
the passenger compartment to lower inte-
rior temperatures.
System operation is controlled using the
Control Center. You can set two different
times for the system to start.
The system remains on for 30 minutes. It
can also be switched on and off directly.
Since the system uses a substantial
amount of electrical current, you should
refrain from activating it twice in succes-
sion without allowing the battery to be
recharged in normal operation between
use.
The independent ventilation system is
available for preprogrammed operation at
outside temperatures above approx. 597/
156 and for direct activation at any tem-
perature, but is not operational when the
vehicle is underway.
The air enters the passenger compartment
through the vent outlets in the instrument
cluster, which can be adjusted for both
direction and airflow. These vent outlets
must be open for the system to operate.
Switching on and off directly
1.Turn the ignition key to position 1
Control Center, for principle details, refer to
page 16:
2.Open "Climate"
3.Select "Independent ventilation" and
press the controller
4.Select "Automatic venting" and press
the controller
 1
1 2
2 3
3 4
4 5
5 6
6 7
7 8
8 9
9 10
10 11
11 12
12 13
13 14
14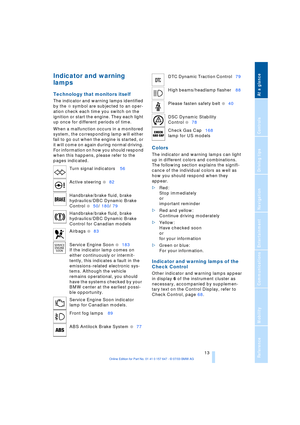 15
15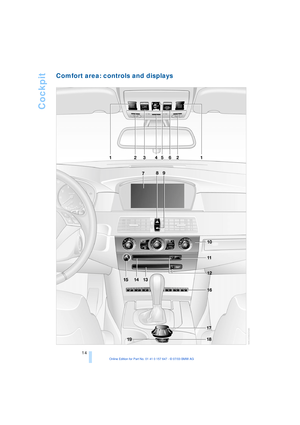 16
16 17
17 18
18 19
19 20
20 21
21 22
22 23
23 24
24 25
25 26
26 27
27 28
28 29
29 30
30 31
31 32
32 33
33 34
34 35
35 36
36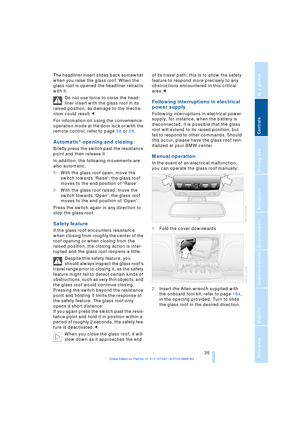 37
37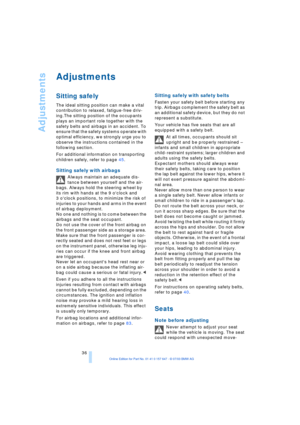 38
38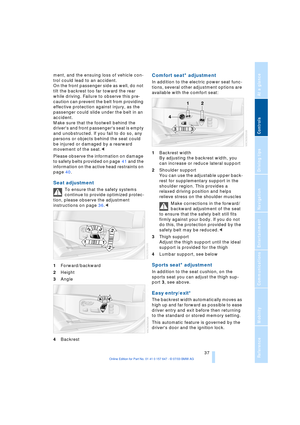 39
39 40
40 41
41 42
42 43
43 44
44 45
45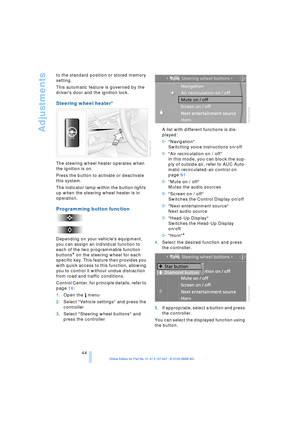 46
46 47
47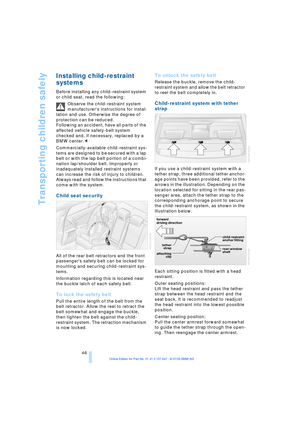 48
48 49
49 50
50 51
51 52
52 53
53 54
54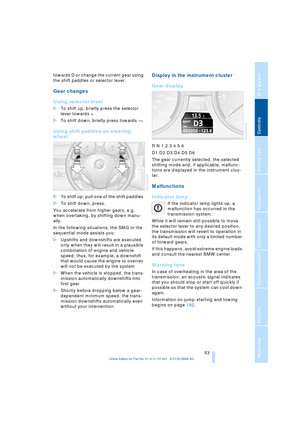 55
55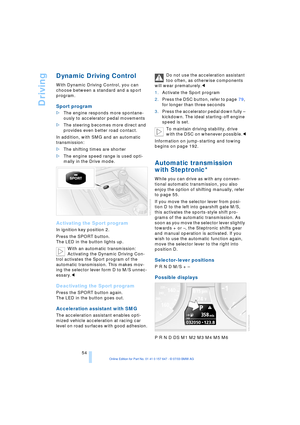 56
56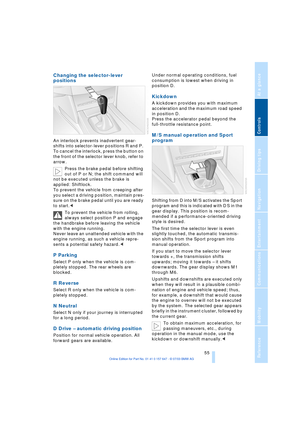 57
57 58
58 59
59 60
60 61
61 62
62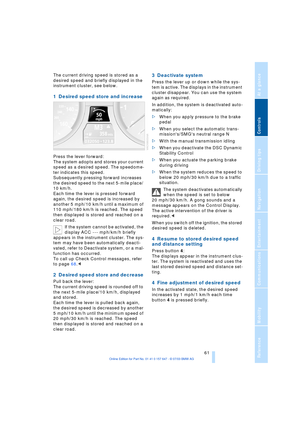 63
63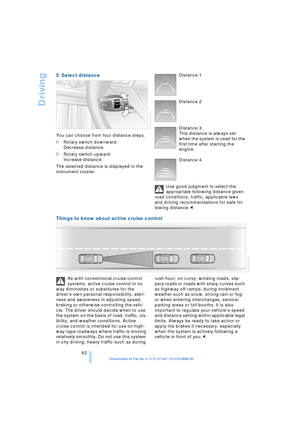 64
64 65
65 66
66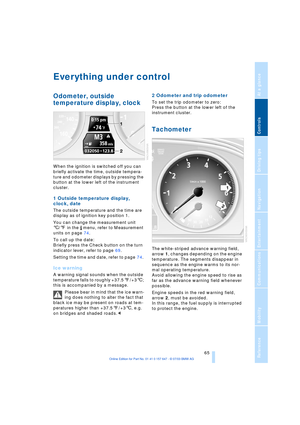 67
67 68
68 69
69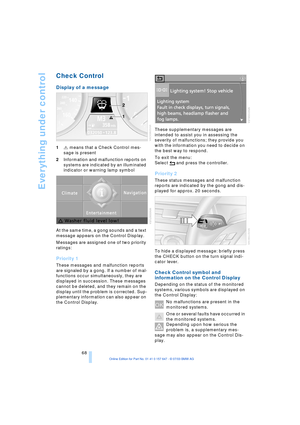 70
70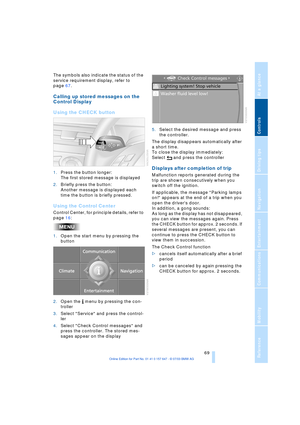 71
71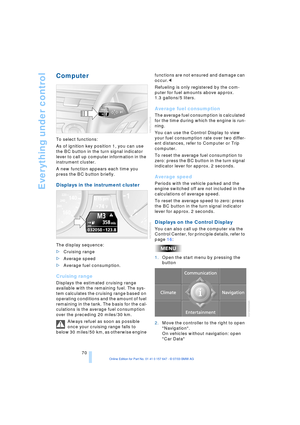 72
72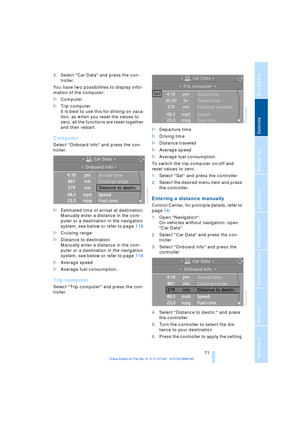 73
73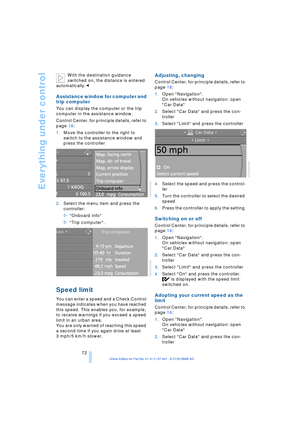 74
74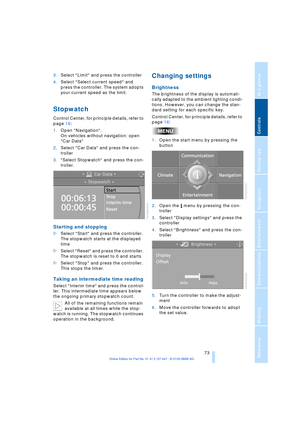 75
75 76
76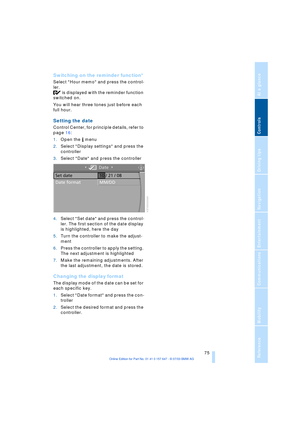 77
77 78
78 79
79 80
80 81
81 82
82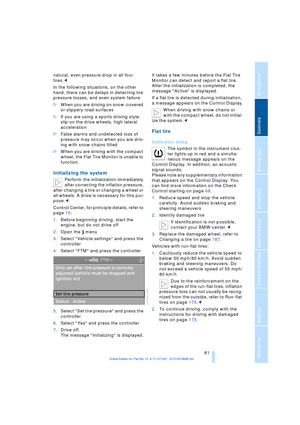 83
83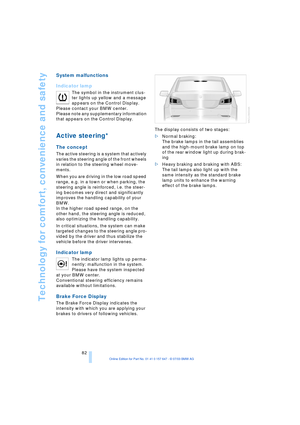 84
84 85
85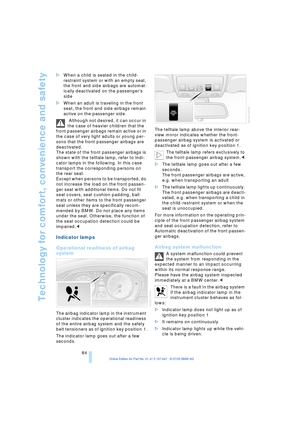 86
86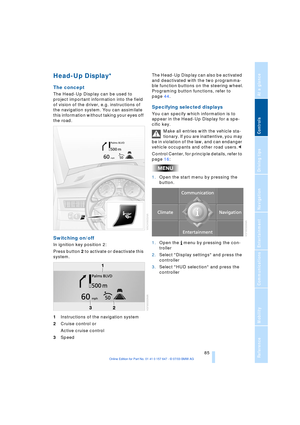 87
87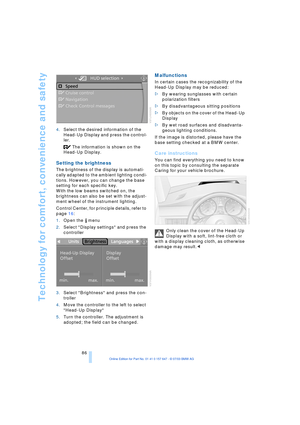 88
88 89
89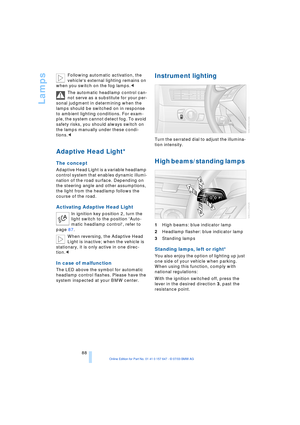 90
90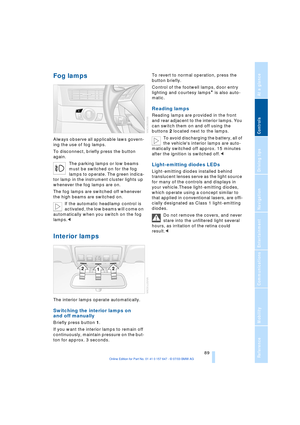 91
91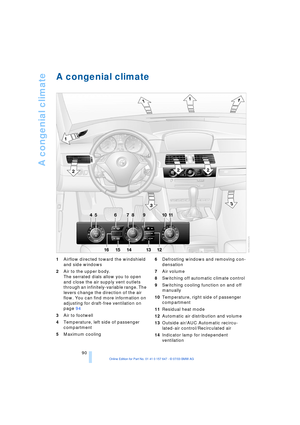 92
92 93
93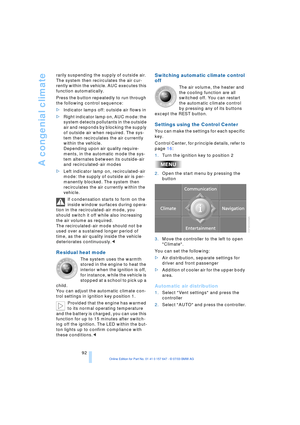 94
94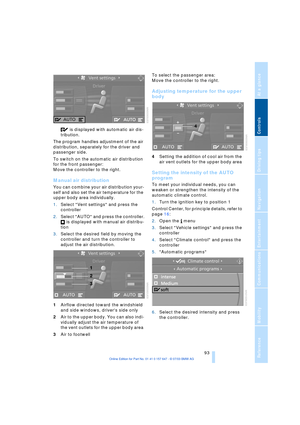 95
95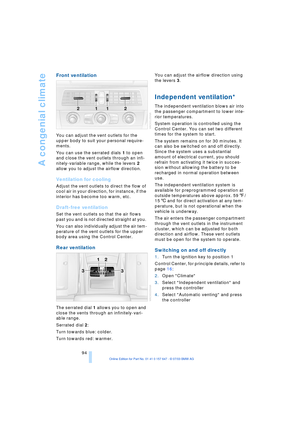 96
96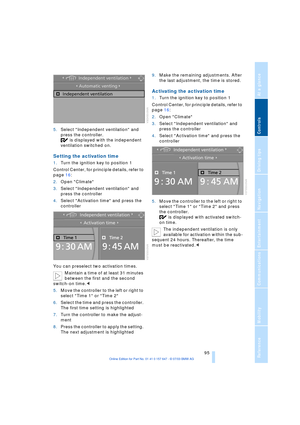 97
97 98
98 99
99 100
100 101
101 102
102 103
103 104
104 105
105 106
106 107
107 108
108 109
109 110
110 111
111 112
112 113
113 114
114 115
115 116
116 117
117 118
118 119
119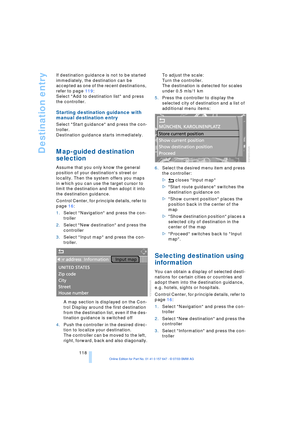 120
120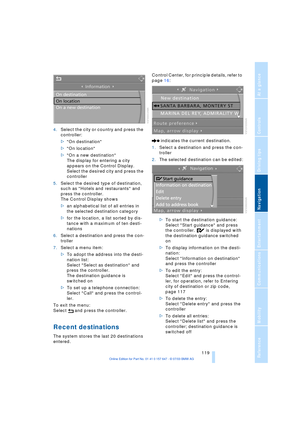 121
121 122
122 123
123 124
124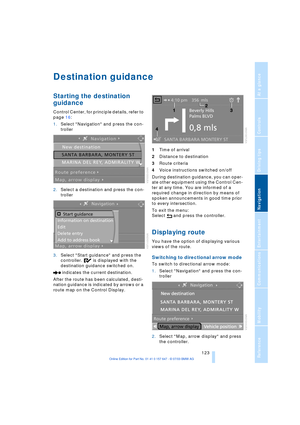 125
125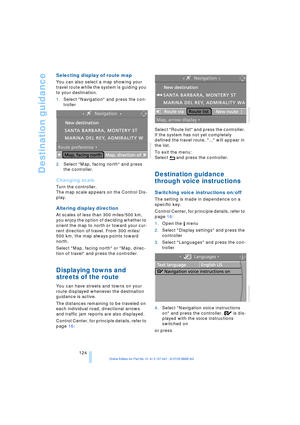 126
126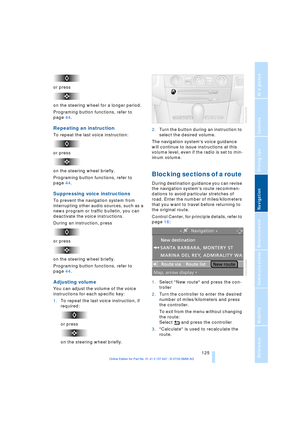 127
127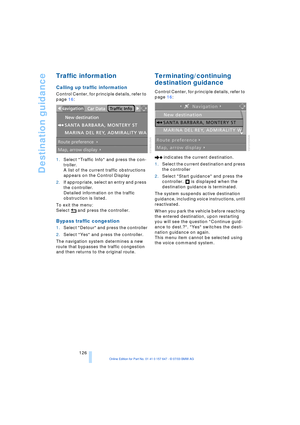 128
128 129
129 130
130 131
131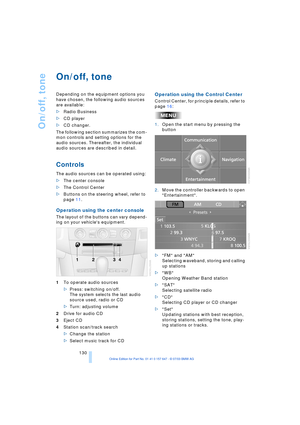 132
132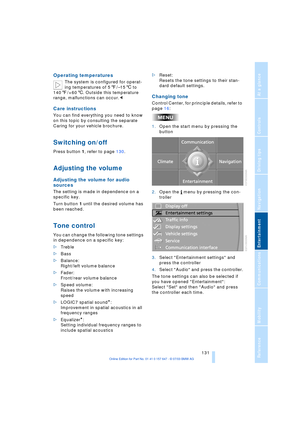 133
133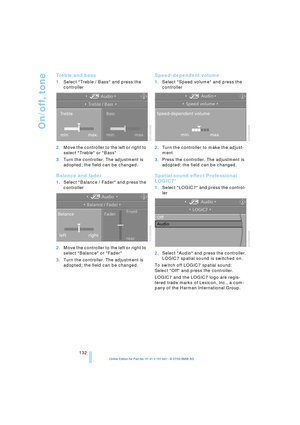 134
134 135
135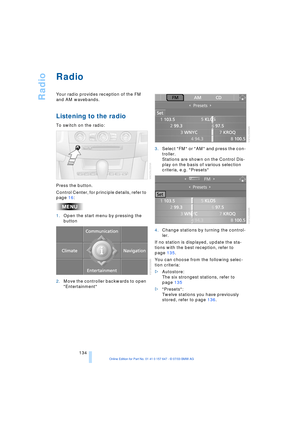 136
136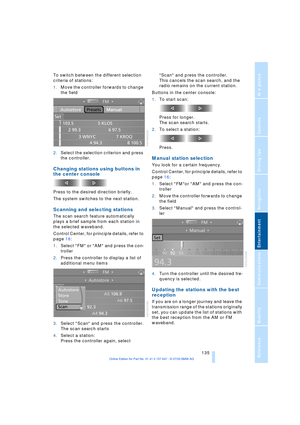 137
137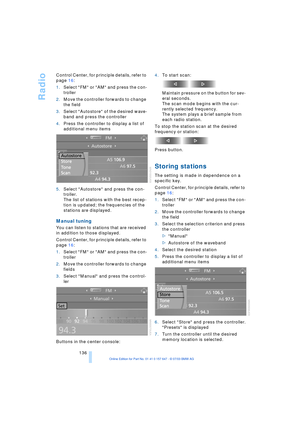 138
138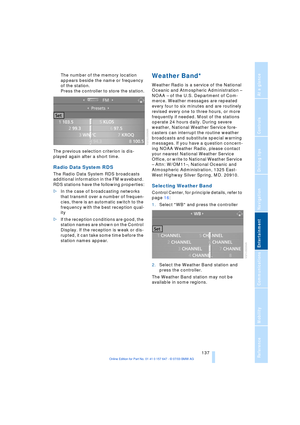 139
139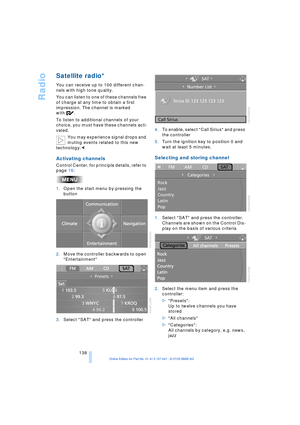 140
140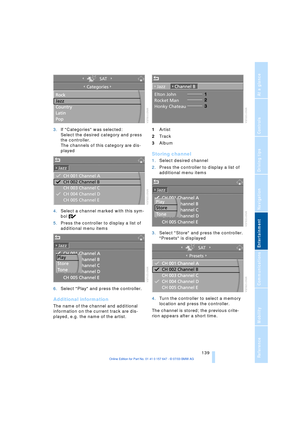 141
141 142
142 143
143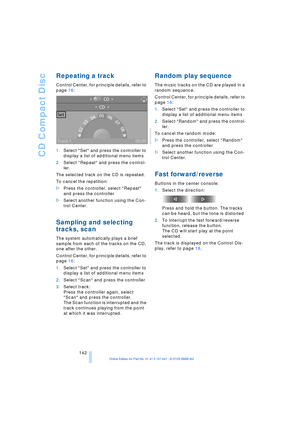 144
144 145
145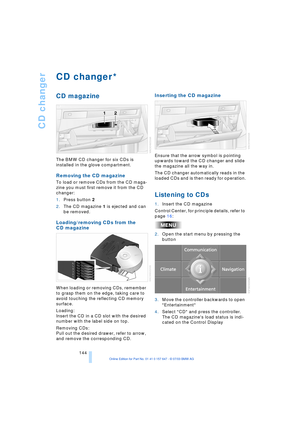 146
146 147
147 148
148 149
149 150
150 151
151 152
152 153
153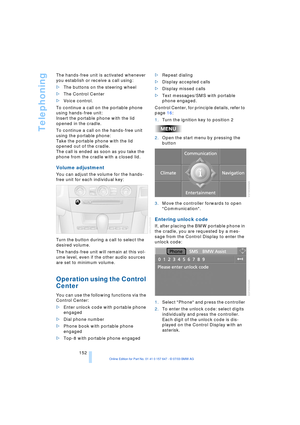 154
154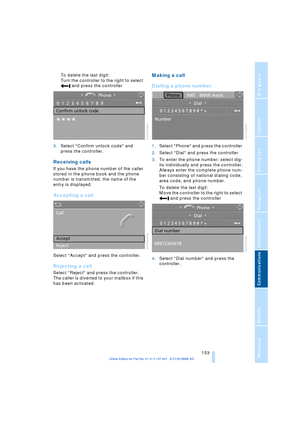 155
155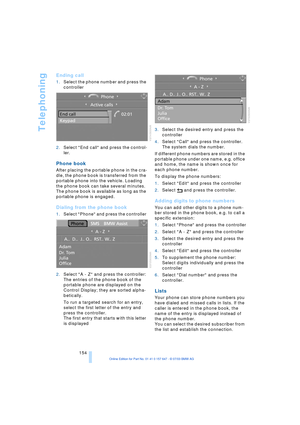 156
156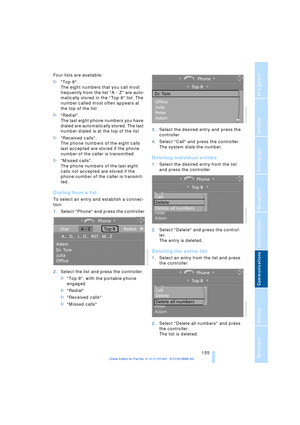 157
157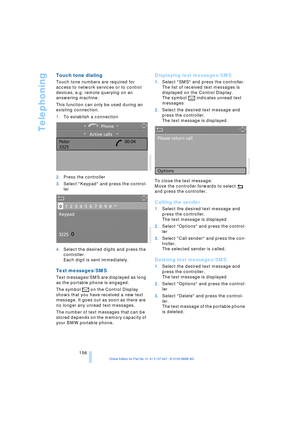 158
158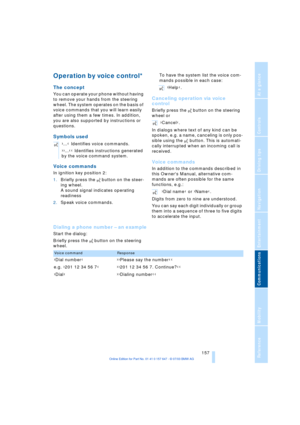 159
159 160
160 161
161 162
162 163
163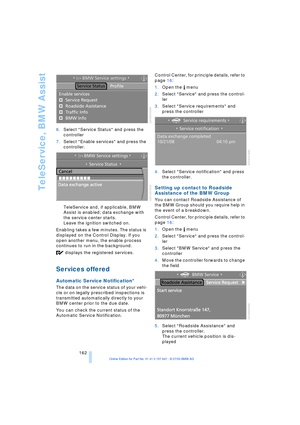 164
164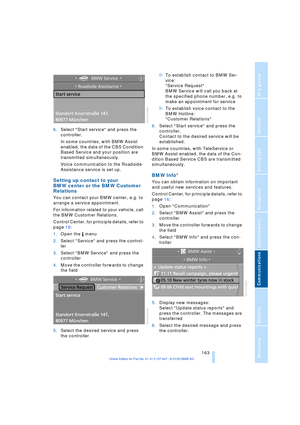 165
165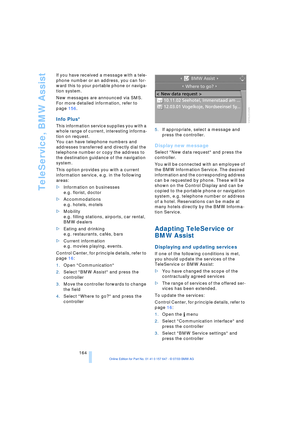 166
166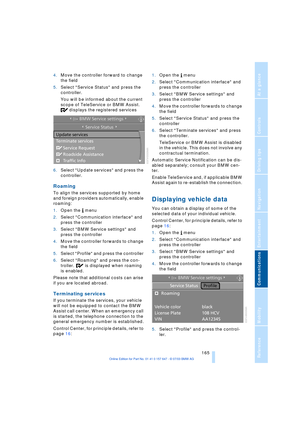 167
167 168
168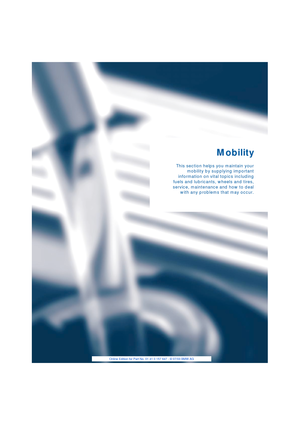 169
169 170
170 171
171 172
172 173
173 174
174 175
175 176
176 177
177 178
178 179
179 180
180 181
181 182
182 183
183 184
184 185
185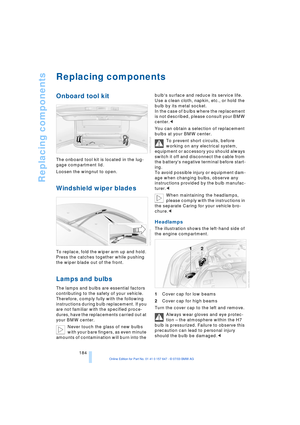 186
186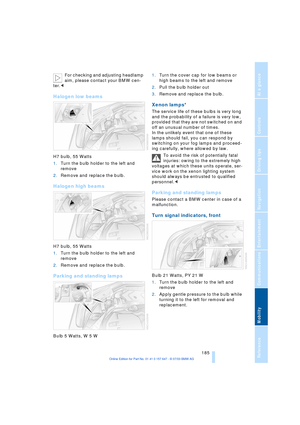 187
187 188
188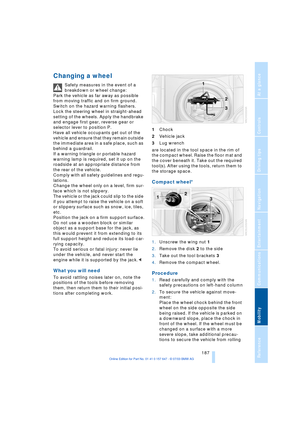 189
189 190
190 191
191 192
192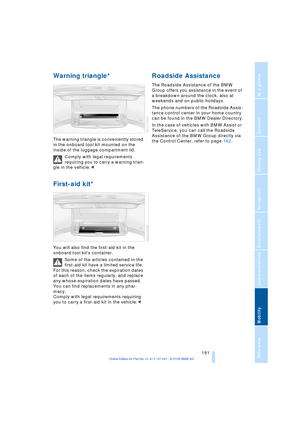 193
193 194
194 195
195 196
196 197
197 198
198 199
199 200
200 201
201 202
202 203
203 204
204 205
205 206
206 207
207 208
208 209
209 210
210 211
211 212
212 213
213 214
214 215
215 216
216 217
217 218
218 219
219