Page 370 of 578
4 - 63
ENG
ENGINE REMOVAL
ENGINE REMOVAL
Extent of removal:
1
Engine removal
Extent of removal Order Part name Q’ty Remarks
ENGINE REMOVAL
Preparation for removal Hold the machine by placing the
suitable stand under the frame.
Seat, fuel tank and side covers Refer to “SEAT, FUEL TANK AND SIDE
COVERS” section.
Carburetor Refer to “CARBURETOR” section.
Muffler Refer to “MUFFLER” section.
Clutch cable Disconnect at engine side.
Spark plug cap
Disconnect the CDI magneto
lead.
Disconnect the neutral switch
lead.
Starter motor Refer to “ELECTRIC STARTING SYS-
TEM” section in the CHAPTER 6.
Drain the engine oil. Refer to “ENGINE OIL REPLACEMENT”
section in the CHAPTER 3.
Page 378 of 578
4 - 67
ENGCRANKCASE, CRANKSHAFT AND BALANCER
CRANKCASE, CRANKSHAFT AND BALANCER
Extent of removal:1 Crankcase separation2 Balancer removal
3 Crankshaft removal
Extent of removal Order Part name Q’ty Remarks
CRANKCASE, CRANKSHAFT
AND BALANCER REMOVAL
Preparation for removal Engine Refer to “ENGINE REMOVAL” section.
Piston Refer to “CYLINDER AND PISTON” sec-
tion.
Primary drive gear Refer to “CLUTCH AND PRIMARY
DRIVEN GEAR” section.
Kick axle assembly
Refer to “KICK AXLE AND SHIFT
SHAFT” section.
Segment
Rotor and stator Refer to “CDI MAGNETO AND
STARTER CLUTCH” section.
Page 380 of 578
4 - 68
ENGCRANKCASE, CRANKSHAFT AND BALANCER
Extent of removal Order Part name Q’ty Remarks
1 Intake timing chain guide 1
2 Timing chain 1
3 Bolt [45 mm (1.8 in)] 7
4 Bolt [55 mm (2.2 in)] 1
5 Bolt [30 mm (1.2 in)] 2
6 Lead guide 1
7 Clutch cable holder 1
8 Right crankcase 1
Use special tool.
Refer to “REMOVAL POINTS”.
9 Left crankcase 1
10 Balancer 1
11 Crankshaft 1 Use special tool.
Refer to “REMOVAL POINTS”.
12 Bearing 3 Refer to “REMOVAL POINTS”.
3
21
Page 382 of 578
4 - 69
ENGCRANKCASE, CRANKSHAFT AND BALANCER
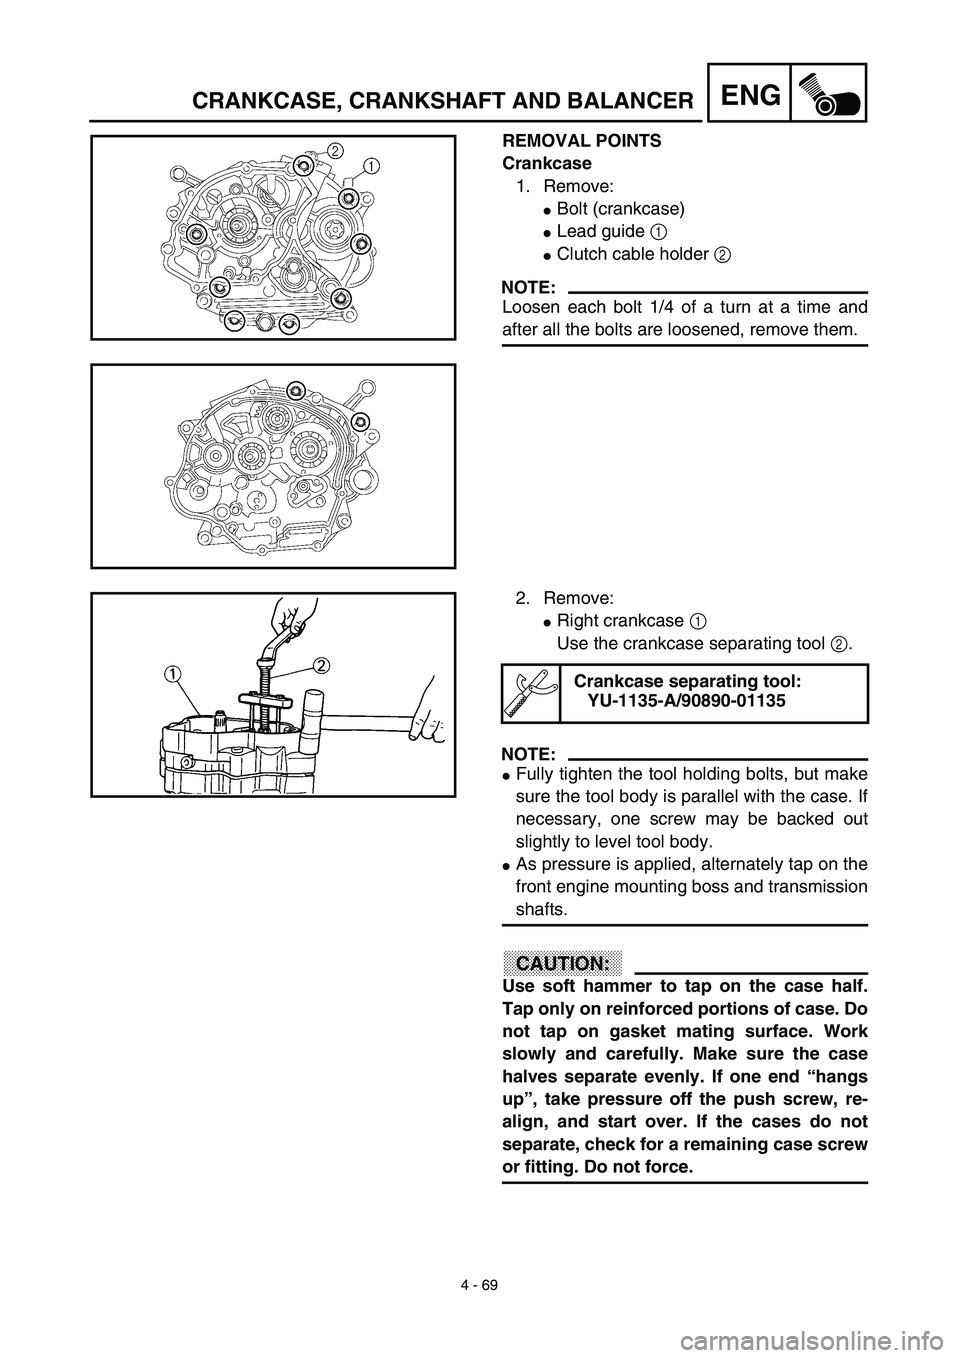
REMOVAL POINTS
Crankcase
1. Remove:
�Bolt (crankcase)
�Lead guide 1
�Clutch cable holder 2
NOTE:
Loosen each bolt 1/4 of a turn at a time and
after all the bolts are loosened, remove them.
2. Remove:
�Right crankcase 1
Use the crankcase separating tool 2.
NOTE:
�Fully tighten the tool holding bolts, but make
sure the tool body is parallel with the case. If
necessary, one screw may be backed out
slightly to level tool body.
�As pressure is applied, alternately tap on the
front engine mounting boss and transmission
shafts.
CAUTION:
Use soft hammer to tap on the case half.
Tap only on reinforced portions of case. Do
not tap on gasket mating surface. Work
slowly and carefully. Make sure the case
halves separate evenly. If one end “hangs
up”, take pressure off the push screw, re-
align, and start over. If the cases do not
separate, check for a remaining case screw
or fitting. Do not force.
Crankcase separating tool:
YU-1135-A/90890-01135
Page 392 of 578
4 - 74
ENGCRANKCASE, CRANKSHAFT AND BALANCER
3. Tighten:
�Lead guide 1
�Clutch cable holder 2
�Bolt (crankcase) [45 mm (1.8 in)] 3
�Bolt (crankcase) [55 mm (2.2 in)] 4
�Bolt (crankcase) [30 mm (1.2 in)] 5
NOTE:
�Apply Quick gasket® (YAMAHA Bond
No.1215) on end of the crankcase bolts [45
mm (1.8 in)] 3, as shown.
�Tighten the crankcase bolts in stage, using a
crisscross pattern.
Quick gasket®:
ACC-QUICK-GS-KT
YAMAHA Bond No.1215:
90890-85505
T R..10 Nm (1.0 m · kg, 7.2 ft · lb)
T R..10 Nm (1.0 m · kg, 7.2 ft · lb)
T R..10 Nm (1.0 m · kg, 7.2 ft · lb)
4. Check:
�Crankshaft and transmission operation
Unsmooth operation → Repair.
5. Install:
�Timing chain 1
�Intake timing chain guide 2
�Bolt (intake timing chain guide)
T R..10 Nm (1.0 m · kg, 7.2 ft · lb)LT
Page 486 of 578
5 - 41
CHASHANDLEBAR
EC5B0000
HANDLEBAR
TT-R125E
Extent of removal:1 Handlebar removal
Extent of removal Order Part name Q’ty Remarks
Preparation for removalHANDLEBAR REMOVAL
Number plate
1 Clutch cable 1
2 Clutch lever 1
3 Engine stop switch 1
4 Front brake cable 1
5 Start switch 1
6 Front brake lever 1
7 Grip cap (lower) 1
8 Grip cap (upper) 1
9 Throttle cable 1
10 Throttle grip assembly 1
11 Collar 1
12 Handlebar grip (left) 1 Refer to “REMOVAL POINTS”.
13 Main switch 1
14 Handlebar holder 2
15 Handlebar 1
1
Page 488 of 578
5 - 42
CHASHANDLEBAR
TT-R125LWE
Extent of removal:1 Handlebar removal
Extent of removal Order Part name Q’ty Remarks
Preparation for removalHANDLEBAR REMOVAL
Number plate
1 Clutch cable 1
2 Clutch lever 1
3 Engine stop switch 1
4 Brake master cylinder 1 Refer to “REMOVAL POINTS”.
5 Start switch 1
6 Grip cap (lower) 1
7 Grip cap (upper) 1
8 Throttle cable 1
9 Throttle grip assembly 1
10 Handlebar grip (left) 1 Refer to “REMOVAL POINTS”.
11 Main switch 1
12 Upper handlebar holder 2
13 Handlebar 1
1
Page 498 of 578

5 - 47
CHAS
6. Install:
TT-R125E
�Start switch 1
�Bolts (start switch) 2
�Front brake cable 3
�Clamp
NOTE:
Apply the lithium soap base grease on the
front brake cable end.
TT-R125LWE
�Start switch 1
�Brake master cylinder 2
�Brake master cylinder bracket 3
�Bolt (brake master cylinder bracket) 4
NOTE:
�Install the bracket so that the arrow mark a
face upward.
�First tighten the bolts on the upper side of the
brake master cylinder bracket, and then
tighten the bolts on the lower side.
7. Install:
�Engine stop switch 1
�Clutch lever holder 2
�Screws (clutch lever holder) 3
NOTE:
�The engine stop switch and clutch lever
holder should be installed according to the
dimensions shown.
�Pass the engine stop switch lead in the mid-
dle of the clutch lever holder.
8. Install:
�Clutch cable 1
�Clamp
NOTE:
Apply the lithium soap base grease on the
clutch cable end.
9. Adjust:
�Brake lever free play
Refer to “FRONT BRAKE ADJUST-
MENT” section in the CHAPTER 3.
�Clutch lever free play
Refer to “CLUTCH ADJUSTMENT”
section in the CHAPTER 3.
3
1
2
LS
T R..4 Nm (0.4 m · kg, 2.9 ft · lb)
U P3 2
4 4
a1
T R..9 Nm (0.9 m · kg, 6.5 ft · lb)
12 3
3T R..4 Nm (0.4 m · kg, 2.9 ft · lb)
HANDLEBAR


