Page 57 of 104

6-12
PERIODIC MAINTENANCE AND MINOR REPAIR
6 5. Place the spark plug cover in the
original position as shown, and
then install the cowling.
1
1. Spark plug cover
2. Start the engine, warm it up for
two minutes, and then turn it off.
3. Wait two minutes until the oil set-
tles, and then check the oil level
through the check window locat-
ed at the bottom-left side of the
crankcase.
NOTE:
The engine oil should be between the
minimum and maximum level marks.
1
32
1. Engine oil level check window
2. Maximum level mark
3. Minimum level mark
EAU04621
Engine oil and oil filter
cartridge
Engine oil and oil filter cartridge
The engine oil level should be
checked before each ride. In addition,
the oil must be changed and the oil
filter cartridge replaced at the inter-
vals specified in the periodic mainte-
nance and lubrication chart.
To check the engine oil level
1. Place the scooter on the center-
stand.
ECA00081
cC
The engine must be cold before
proceeding with the oil level
check, otherwise the check will
result in a false reading.
NOTE:
Make sure that the scooter is posi-
tioned straight up when checking the
oil level. A slight tilt to the side can
result in a false reading.
5GJ-28199-E2 9/9/02 9:15 AM Page 55
Page 58 of 104

6-13
PERIODIC MAINTENANCE AND MINOR REPAIR
64. If the engine oil is below the min-
imum level mark, add sufficient
oil of the recommended type to
raise it to the correct level.
2
1
3
1. Maximum level mark
2. Minimum level mark
3. Engine oil drain bolt
4. Remove the oil filter cartridge
with an oil filter wrench.
NOTE:
An oil filter wrench is available at a
Yamaha dealer.
5. Apply a thin coat of engine oil to
the O-ring of the new oil filter
cartridge.
NOTE:
Make sure that the O-ring is properly
seated.
2
1
1. Oil filter wrench
2. Oil filter cartridge
To change the engine oil (with or
without oil filter cartridge replace-
ment)
1. Start the engine, warm it up for
several minutes, and then turn it
off.
2. Place an oil pan under the
engine to collect the used oil.
3. Remove the engine oil filler cap
and drain bolt to drain the oil
from the crankcase.
NOTE:
Skip steps 4–6 if the oil filter cartridge
is not being replaced.
1
1. Engine oil filler cap
5GJ-28199-E2 9/9/02 9:15 AM Page 56
Page 59 of 104

6-14
PERIODIC MAINTENANCE AND MINOR REPAIR
6 6. Install the new oil filter cartridge,
and then tighten it to the speci-
fied torque with a torque wrench.
7. Install the engine oil drain bolt,
and then tighten it to the speci-
fied torque.
1
1. Torque wrench
ECA00133
cC
8
8
In order to prevent clutch slip-
page (since the engine oil also
lubricates the clutch), do not
mix any chemical additives.
Do not use oils with a diesel
specification of “CD” or oils of
a higher quality than specified.
In addition, do not use oils
labeled “ENERGY CONSERV-
ING
II” or higher.
8 8
Make sure that no foreign
material enters the crankcase.
9. Start the engine, and then let it
idle for several minutes while
checking it for oil leakage. If oil is
leaking, immediately turn the
engine off and check for the
cause.
10.Turn the engine off, and then
check the oil level and correct it if
necessary. 8. Add the specified amount of the
recommended engine oil, and
then install and tighten the oil
filler cap.
Tightening torque:
Oil filter cartridge:
17 Nm (1.7 m·kgf)
Tightening torque:
Engine oil drain bolt:
43 Nm (4.3 m·kgf)
Recommended engine oil:
SAE 10W-30 or SAE 10W-40
(API SE, SF, SG or higher)
Oil quantity:
Without oil filter cartridge
replacement:
2.8 L
With oil filter cartridge
replacement:
2.9 L
Total amount (dry engine):
3.6 L
5GJ-28199-E2 9/9/02 9:15 AM Page 57
Page 60 of 104

6-15
PERIODIC MAINTENANCE AND MINOR REPAIR
6To reset the oil change indicator
light
1. Turn the key to “ON”.
2. Hold the reset button pushed for
two to five seconds.
3. Release the reset button, and
the oil change indicator light will
go off.
1
1. Reset button “Oil Change”
EAU04253
Chain drive oilChain drive oil
The chain drive oil should be
changed as follows at the intervals
specified in the periodic maintenance
and lubrication chart.
1. Remove panel F. (See page 6-8
for panel removal and installation
procedures.)
2. Place an oil pan under the chain
drive case to collect the used oil.
3. Remove the oil filler cap and
drain bolt to drain the oil from the
chain drive case.
1
2
1. Chain drive oil filler cap
2. Chain drive oil drain bolt
NOTE:
If the engine oil is changed before the
oil change indicator light comes on
(i.e. before the periodic oil change
interval has been reached), the indi-
cator light must be reset after the oil
change for the next periodic oil
change to be indicated at the correct
time. To reset the oil change indicator
light before the periodic oil change
interval has been reached, follow the
above procedure, but note that the
indicator light will come on for
1.4 seconds after releasing the reset
button, otherwise repeat the proce-
dure.
5GJ-28199-E2 9/9/02 9:15 AM Page 58
Page 61 of 104
6-16
PERIODIC MAINTENANCE AND MINOR REPAIR
6 4. Install the chain drive oil drain
bolt, and then tighten it to the
specified torque.
5. Add the specified amount of the
recommended oil.
6. Wipe the dipstick clean, insert it
into the oil filler hole (without
screwing it in), and then remove
it to check the oil level.
ECA00078
cC
Make sure that no foreign material
enters the chain drive case.
NOTE:
The engine oil should be between the
minimum and maximum level marks.
7. If the engine oil is below the min-
imum level mark, add sufficient
oil of the recommended type to
raise it to the correct level.
8. Insert the dipstick into the oil filler
hole, and then tighten the oil filler
cap.
1
2
1. Maximum level mark
2. Minimum level mark
Tightening torque:
Chain drive oil drain bolt:
20 Nm (2.0 m·kgf)
Recommended chain drive oil:
See page 8-1.
Oil quantity:
0.7 L
5GJ-28199-E2 9/9/02 9:15 AM Page 59
Page 62 of 104
6-17
PERIODIC MAINTENANCE AND MINOR REPAIR
6
EAU04964
Coolant
To check the coolant level
1. Place the scooter on a level sur-
face and hold it in an upright
position.
NOTE:
8The coolant level must be
checked on a cold engine since
the level varies with engine tem-
perature.
8Make sure that the scooter is
positioned straight up when
checking the coolant level. A
slight tilt to the side can result in
a false reading.
3. Check the coolant level in the
coolant reservoir.
NOTE:
The coolant should be between the
minimum and maximum level marks.
12
1. Maximum level mark
2. Minimum level mark
2. Remove the coolant reservoir
cover by removing the screw.
12
1. Coolant reservoir cover
2. Screw
5GJ-28199-E2 9/9/02 9:15 AM Page 60
Page 63 of 104

6-18
PERIODIC MAINTENANCE AND MINOR REPAIR
6 4. If the coolant is at or below the
minimum level mark, open the
reservoir cap, add coolant to the
maximum level mark, and then
close the reservoir cap.
1
1. Coolant reservoir cap
EW000067
w
Never attempt to remove the radia-
tor cap when the engine is hot.
5. Install the coolant reservoir cover
by installing the screw.
NOTE:
The radiator fan is automatically
switched on or off according to the
coolant temperature in the radiator. If
the engine overheats, see page 6-38
for further instructions.
EC000080
cC
8
8
If coolant is not available, use
distilled water or soft tap water
instead. Do not use hard water
or salt water since it is harmful
to the engine.
8 8
If water has been used instead
of coolant, replace it with
coolant as soon as possible,
otherwise the engine may not
be sufficiently cooled and the
cooling system will not be pro-
tected against frost and corro-
sion.
8 8
If water has been added to the
coolant, have a Yamaha dealer
check the antifreeze content of
the coolant as soon as possi-
ble, otherwise the effective-
ness of the coolant will be
reduced.
Coolant reservoir capacity
(up to the maximum level mark):
0.35 L
5GJ-28199-E2 9/9/02 9:15 AM Page 61
Page 64 of 104
6-19
PERIODIC MAINTENANCE AND MINOR REPAIR
6
EAU03877
Cleaning the air filter
element
Air filter element, cleaning
The air filter element should be
cleaned at the intervals specified in
the periodic maintenance and lubrica-
tion chart. Clean the air filter element
more frequently if you are riding in
unusually wet or dusty areas.
1. Remove cowling A. (See page
6-8 for cowling removal and
installation procedures.)3. Remove the air filter case cover
by removing the screws, and
then pull the air filter element
out.
1
22
1. Air filter case cover
2. Screw (×4)
2. Remove the windshield by
removing the screws.
11
1. Screw (×5)
5GJ-28199-E2 9/9/02 9:15 AM Page 62
 1
1 2
2 3
3 4
4 5
5 6
6 7
7 8
8 9
9 10
10 11
11 12
12 13
13 14
14 15
15 16
16 17
17 18
18 19
19 20
20 21
21 22
22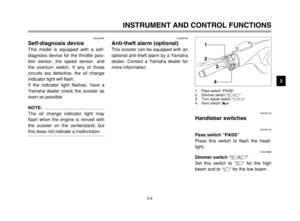 23
23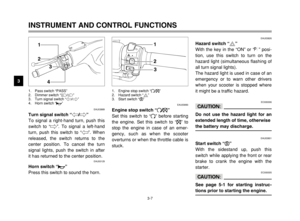 24
24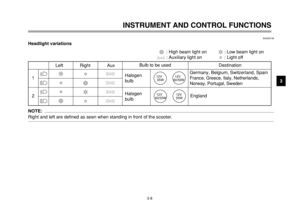 25
25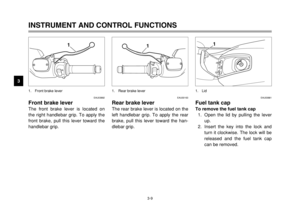 26
26 27
27 28
28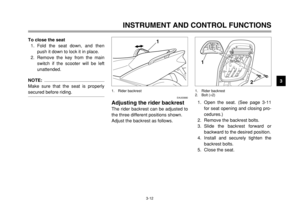 29
29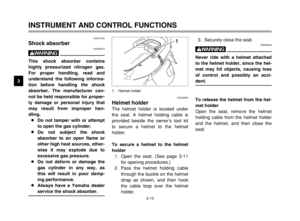 30
30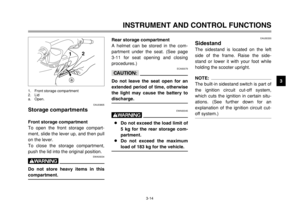 31
31 32
32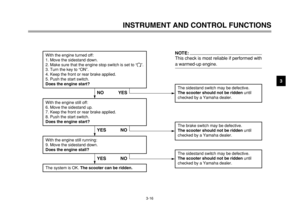 33
33 34
34 35
35 36
36 37
37 38
38 39
39 40
40 41
41 42
42 43
43 44
44 45
45 46
46 47
47 48
48 49
49 50
50 51
51 52
52 53
53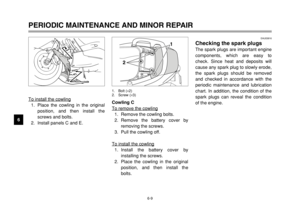 54
54 55
55 56
56 57
57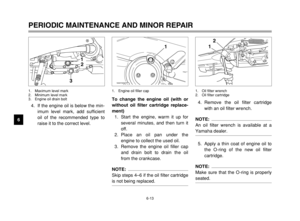 58
58 59
59 60
60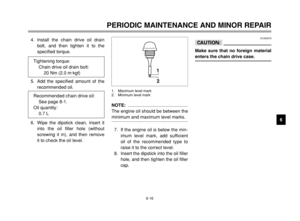 61
61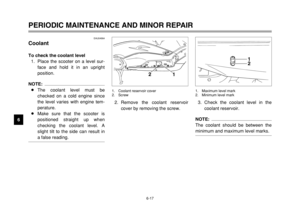 62
62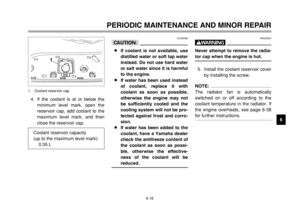 63
63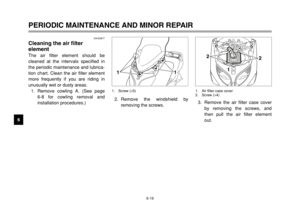 64
64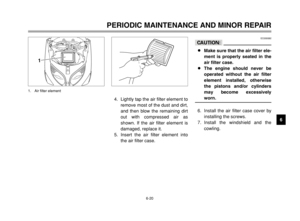 65
65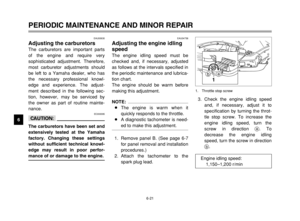 66
66 67
67 68
68 69
69 70
70 71
71 72
72 73
73 74
74 75
75 76
76 77
77 78
78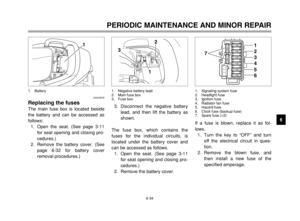 79
79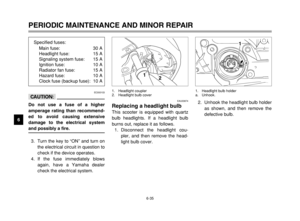 80
80 81
81 82
82 83
83 84
84 85
85 86
86 87
87 88
88 89
89 90
90 91
91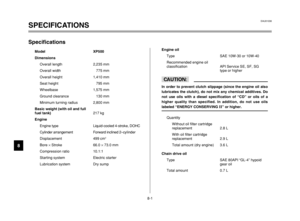 92
92 93
93 94
94 95
95 96
96 97
97 98
98 99
99 100
100 101
101 102
102 103
103

