2003 VOLVO XC90 parking brake
[x] Cancel search: parking brakePage 6 of 242

2003 VOLVO XC90
1. Headlights/Parking lights 31
2. Instrument lighting 31
3. Panel vents 47
4. Text window 28
5. Temperature gauge 24
6. Odometer/Trip odometer/Cruise control indicator 24, 37
7. Speedometer iv
8. Turn signal indicator lights 24
9. Tachometer 24
10. Ambient temperature gauge, clock, gear indicator 24
11. Fuel gauge 24
12. Indicator and warning symbols 25
13. Panel vents 47
14. Glove compartment 65
15. Hazard warning flashers 35
16. Audio system 159
17. Switches in the center console 29
18. Climate system controls 48
19. Windshield wiper/washer lever 34
20. Audio control buttons in steering wheel 161
21. Instrument panel 24
22. Horn iv
23. Cruise control buttons in steering wheel 37
24. Turn signals, High/low beams 33
25. Front fog lights, Rear fog light 31
26. Parking brake pedal 38
27. Parking brake release handle 38
28. Button for unlocking fuel filler door 31
29. Reading lights 61
30. Courtesy light 61
31. Moonroof control (option) 43
32. Seat belt reminder 27
33. Rearview mirror 42
34. Central locking button 77
35. Lockout switch for rear seat power windows 41
36. Power window controls 40
37. Sideview mirror controls 42
Contents
file:///K|/ownersdocs/2003/2003_XC90/03xc90_00.htm (6 of 7)12/30/2006 \
4:18:48 PM
Page 35 of 242

2003 VOLVO XC90
2 0 0 3
VOLVO XC90
Safety
pg. 23 Instruments and controls
Instrument panel24
Indicator and warning symbols25
Switches in center console29
Steering wheel adjustment30
Lighting panel31
Manually unlocking the fuel filler door32
Turn signals33
Hazard warning flashers, rear window/sideview mirror defroster, heated f\
ront seats35
Trip computer (option)36
Cruise control37
Parking brake, Opening/closing the hood38
Opening the tailgate, Auxiliary 12-volt sockets39
Electrically operated windows40
Rearview mirror/power folding sideview mirrors42
Electrically operated moonroof (option)43
pg. 24 Instruments and controls
file:///K|/ownersdocs/2003/2003_XC90/03xc90_02a.htm (1 of 16)12/30/200\
6 4:18:52 PM
Page 37 of 242

2003 VOLVO XC90
automatically prevent excessively high engines speeds. This will be noti\
ceable as a pronounced
unevenness in engine speed.
10. Gear and driving mode indicator
The currently selected driving mode is displayed here. If you use the op\
tional Geartronic function on the
automatic transmission, the currently selected gear will be displayed.
11. Ambient temperature gauge
This display indicates the air temperature outside your vehicle. A "snow\
flake" symbol in the text
window is displayed when the temperature is in the range of 23 -36° F\
(-5 -+2° C). Please note that this
symbol does not indicate a fault with your vehicle. At low speeds or whe\
n the vehicle is not moving, the
temperature readings may be slightly higher than the actual ambient temp\
erature.
12. Clock/set button
Turn the button to set the clock.
13. Fuel gauge
The fuel tank holds approximately 19 US gals (72 liters). When a warni\
ng light in the gauge comes on,
there are approximately 1.8 US gal. (8 liters) of fuel remaining in th\
e tank.
14. Indicator and warning symbols
pg. 25 Instruments and controls
Indicator and warning symbols
The indicator and warning symbols light up when you turn the ignition ke\
y to the driving position
(position II) before starting. This shows that the symbols are functio\
ning. When the engine starts, all
symbols go out. If the engine is not started within 5 seconds, all symbo\
ls except CHECK ENGINE and
go out. The symbol for the parking brake goes out when the parking brak\
e is released.
Warning symbol
in center of instrument panel
This symbol shines as a red or yellow light depending on the severity of\
the fault that has been detected.
Red symbol -Stop the vehicle as soon as possible in a suitable location and read th\
e message shown in
the text window.
Yellow symbol -Follow the instructions shown in the text window.
file:///K|/ownersdocs/2003/2003_XC90/03xc90_02a.htm (3 of 16)12/30/200\
6 4:18:52 PM
Page 40 of 242

2003 VOLVO XC90
Fault in the DSTC system
If the yellow indicator light remains on, there is a fault in the system\
. The text ANTI-SKID SERVICE
REQUIRED will be displayed.
l Stop the vehicle in a safe place and switch off the engine. Restart the \
engine.
l If the indicator light goes off, no further action is necessary.
If the indicator light remains on, drive to an authorized Volvo retailer\
to have the system inspected.
pg. 27 Instruments and controls
Indicator and warning symbols (contd)
Supplemental Restraint system (SRS)
If the light comes on (or stays on after the vehicle has started), the\
SRS diagnostic system has detected a
fault. Drive to an authorized Volvo retailer for an inspection of the sy\
stem. See the SRS section for more
information.
Generator warning light
If the light comes on while the engine is running, have the charging sys\
tem checked.
Seat belt reminder This symbol lights up to indicate that the driver has not fastened his/\
her seat
belt.
PARKING BRAKE
This light will be on when the parking brake is applied. The parking bra\
ke lever is situated between the
front seats.
Canadian models are equipped with this symbol.
Rear fog light
This light indicates that the fog light is on.
Turn signal indicator - trailer (certain models)
If you are towing a trailer, this light will flash simultaneously with t\
he turn signals on the trailer. If the
light does not flash when signaling, neither the trailer's turn signals \
nor the vehicle's turn signals are
file:///K|/ownersdocs/2003/2003_XC90/03xc90_02a.htm (6 of 16)12/30/200\
6 4:18:52 PM
Page 55 of 242

2003 VOLVO XC90
placed in (N)eutral, if the vehicle's speed drops to under 70% of the \
currently set speed or if the wheels
start to spin.
Temporarily disengaging cruise control
l Press 0 to temporarily disengage cruise control. Press "resume" to return to the previously set
speed.
l Press the brake pedal. Press "resume" to return to the previously set speed.
WARNING!
The Cruise control should not be used in heavy traffic or when driving o\
n wet or slippery roads, or
when driving on unpaved or uneven road surfaces. Cruise control may not \
maintain set speed on steep
downgrades.
pg. 38 Instruments and controls
Parking brake, Opening/closing the hood
Parking brake
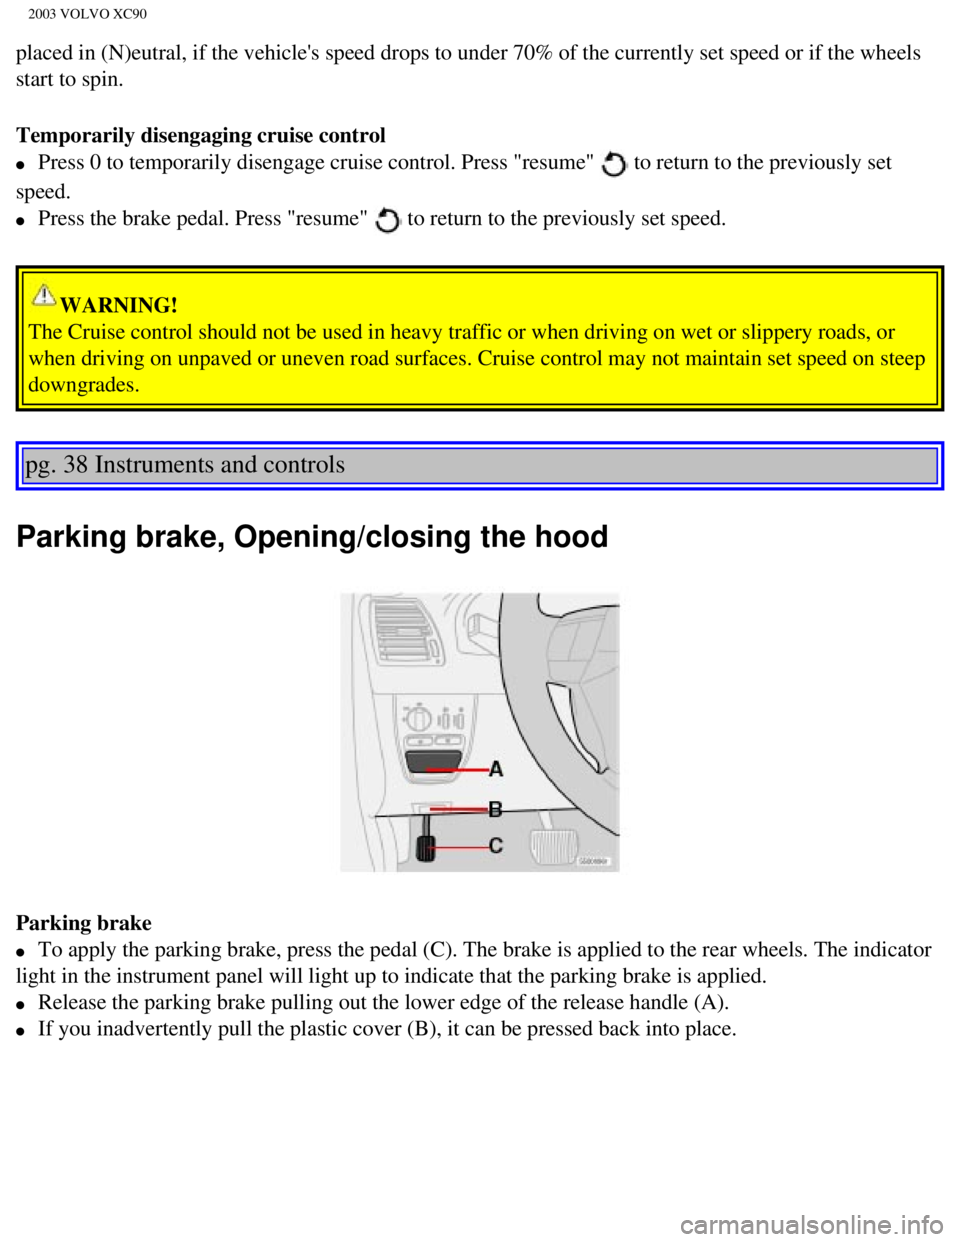
l To apply the parking brake, press the pedal (C). The brake is applied \
to the rear wheels. The indicator
light in the instrument panel will light up to indicate that the parking\
brake is applied.
l Release the parking brake pulling out the lower edge of the release hand\
le (A).
l If you inadvertently pull the plastic cover (B), it can be pressed bac\
k into place.
file:///K|/ownersdocs/2003/2003_XC90/03xc90_02b.htm (5 of 14)12/30/200\
6 4:18:53 PM
Page 56 of 242

2003 VOLVO XC90
WARNING!
Always use the parking brake when parking. On hills, also turn the front\
wheels toward the curb.The
indicator light in the instrument panel will light up even if the parkin\
g brake is applied only slightly.
Be sure to press down on the pedal sufficiently.
Opening the hood
Opening/closing the hood
1. Pull the lever (1) located under the left side of the dashboard to \
release the hood lock.
2. Lift the hood slightly.
3. Press up the release control (2) located under the front edge of th\
e hood and lift.
To close the hood, place your hand on it and press down until the hood l\
ocks in the closed position.
WARNING!
l Do not grasp the ribs in the grille when closing the hood. If your finge\
rs protrude through the
grille, they could be injured on components in the engine compartment as\
the grille closes. We
recommend pressing down on the hood to close it.
l Check that the hood locks properly when closed!
pg. 39 Instruments and controls
Opening the tailgate, Auxiliary 12-volt sockets
file:///K|/ownersdocs/2003/2003_XC90/03xc90_02b.htm (6 of 14)12/30/200\
6 4:18:53 PM
Page 104 of 242

2003 VOLVO XC90
2 0 0 3
VOLVO XC90
Starting and driving
pg. 83 Starting and driving
Refueling84
Starting the vehicle87
General information89
Automatic transmission with Geartronic91
All Wheel Drive94
Brake system95
Dynamic Stability Traction Control (DSTC)97
Rear Parking Assistance99
Towing 100
Jump starting 102
Towing a trailer 103
Detachable trailer hitch - installing/
removing 105
Load carriers 106
Cold weather precautions 107
Before a long distance trip108
file:///K|/ownersdocs/2003/2003_XC90/03xc90_06a.htm (1 of 15)12/30/200\
6 4:18:58 PM
Page 108 of 242

2003 VOLVO XC90
CAUTION
- Do not refuel with the engine running *. Turn the ignition off or to p\
osition I. If the ignition is on,
an incorrect reading could occur in the fuel gauge
- After refueling, close the fuel filler cap by turning it clockwise unt\
il it clicks into place*.
- Allow for fuel expansion by not overfilling the tank. Overfilling coul\
d also cause damage to the
emission control systems.
- Avoid spilling gasoline during refueling. In addition to causing damag\
e to the environment,
gasolines containing alcohol can cause damage to painted surfaces, which\
may not be covered under
the New Vehicle Limited Warranty.
- Do not use gasolines containing methanol (methyl alcohol, wood alcoho\
l). This practice can result
in vehicle performance deterioration and can damage critical parts in th\
e fuel system. Such damage
may not be covered under the New Vehicle Limited Warranty.
* If the fuel filler cap is not closed tightly or if the engine is runni\
ng when the vehicle is refueled, the
Check Engine Light (malfunction indicator lamp) may indicate a fault. \
However, your vehicle's
performance will not be affected. Use only Volvo original or approved fu\
el filler caps.
pg. 87 Starting and driving
Starting the engine
1. Fasten the seat belt.
WARNING!
Before starting, check that the seat, steering wheel and mirrors are adj\
usted properly. Make sure the
brake pedal can be depressed completely. Adjust the seat if necessary. S\
ee
pages 54, 56.
2. Apply the parking brake if not already set. The gear selector is lock\
ed in the (P)ark position
(Shiftlock).
Manual transmission: the clutch must be fully depressed.
3. Without touching the accelerator pedal, turn the ignition key* to the\
starting position. Allow the
starter to operate for up to 10 seconds. Release the key as soon as the \
engine starts. If the engine fails to
start, repeat this step.
NOTE:
- On certain models, when the vehicle is started, idle speed may be noti\
ceably higher than normal for a
short period, depending on the temperature of the engine.
This has been done to help bring components in the emission control syst\
em to their normal operating
temperature as quickly as possible, which enables them to function norma\
lly.
file:///K|/ownersdocs/2003/2003_XC90/03xc90_06a.htm (5 of 15)12/30/200\
6 4:18:58 PM