2003 VOLVO XC90 parking brake
[x] Cancel search: parking brakePage 109 of 242

2003 VOLVO XC90
- For cold starts at altitudes above 6000 ft (1800 meters), depress th\
e accelerator pedal halfway and turn
the key to the starting position. Release the pedal slowly when the engi\
ne starts.
4. To release the gear selector from the (P)ark position, the engine must be running (or the ignition key
must be in position II) and the brake pedal must be depressed.
5. Select the desired gear. The gear engages after a very slight delay w\
hich is especially noticeable when
selecting R.
NOTE: Your vehicle is equipped with a Keylock system. When the engine is switc\
hed off, the gear
selector must be in the (P)ark position before the key can be removed \
from the ignition switch.
When starting in cold weather, the transmission may shift up at slightly\
higher engine speeds than
normal until the automatic transmission fluid reaches normal operating t\
emperature.
Do not race a cold engine immediately after starting. Oil flow may not r\
each some lubrication points fast
enough to prevent engine damage.
* If two of the keys to your vehicle are close together, e.g., on the sa\
me key ring, when you try to start
the vehicle, this could cause interference in the immobilizer system and\
result in the vehicle not starting.
If this should occur, remove one of the keys from the key ring before tr\
ying to start the vehicle again. CAUTION
Automatic transmission
The engine should be idling when you move the gear selector. Never accel\
erate until after you feel
the transmission engage! Accelerating immediately after selecting a gear\
will cause harsh engagement
and premature transmission wear.
Selecting P or N when idling at a standstill for prolonged periods of time will help pre\
vent
overheating of the automatic transmission fluid.
WARNING!
Always place the gear selector in Park and apply the parking brake befor\
e leaving the vehicle. Never
leave the vehicle unattended with the engine running.
Always open garage doors fully before starting the engine inside a garag\
e to ensure adequate
ventilation. The exhaust gases contain carbon monoxide, which is invisib\
le and odorless but very
poisonous.
file:///K|/ownersdocs/2003/2003_XC90/03xc90_06a.htm (6 of 15)12/30/200\
6 4:18:58 PM
Page 114 of 242

2003 VOLVO XC90
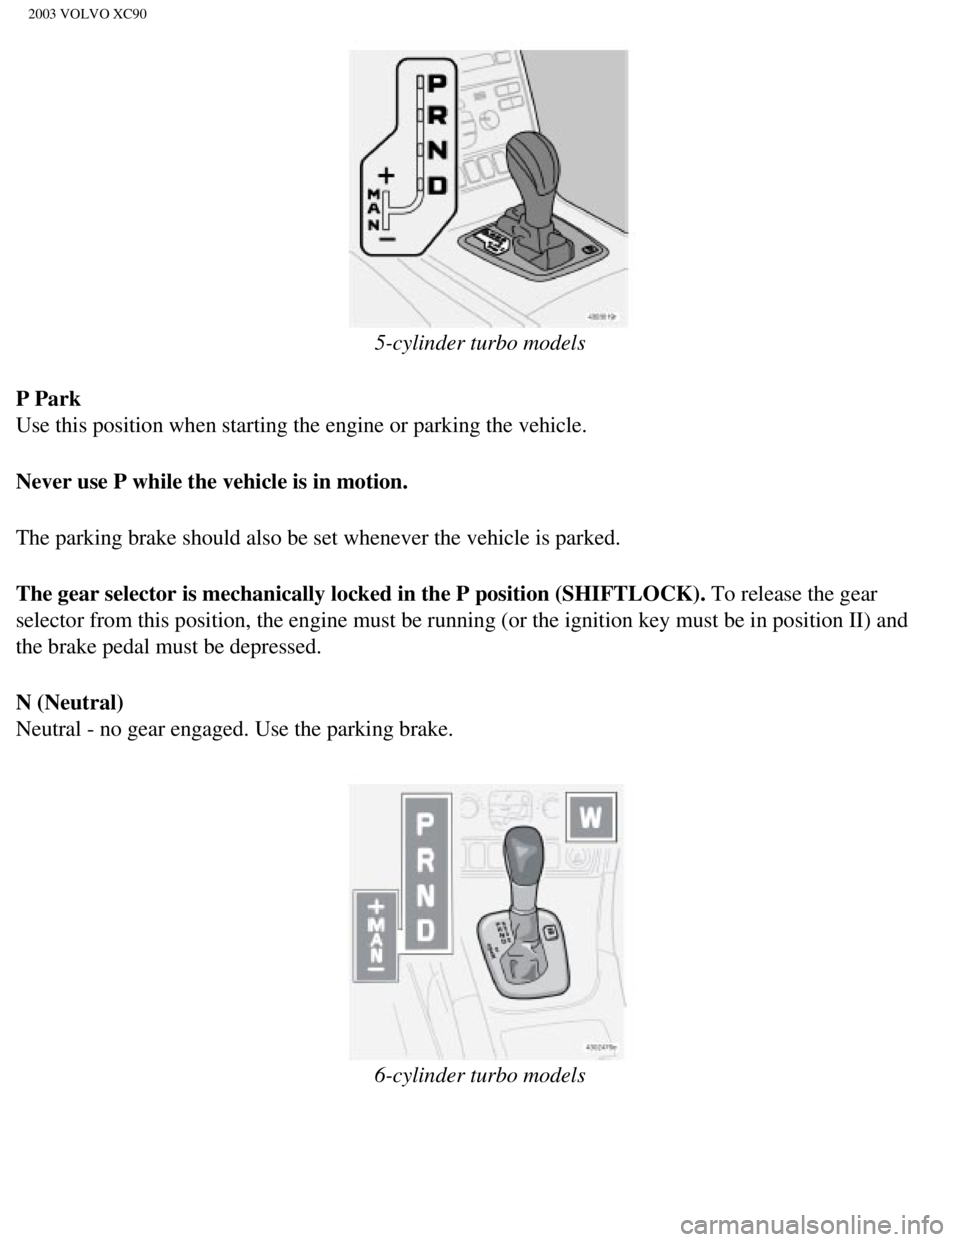
5-cylinder turbo models
P Park
Use this position when starting the engine or parking the vehicle.
Never use P while the vehicle is in motion.
The parking brake should also be set whenever the vehicle is parked.
The gear selector is mechanically locked in the P position (SHIFTLOCK)\
. To release the gear
selector from this position, the engine must be running (or the ignitio\
n key must be in position II) and
the brake pedal must be depressed.
N (Neutral)
Neutral - no gear engaged. Use the parking brake.
6-cylinder turbo models
file:///K|/ownersdocs/2003/2003_XC90/03xc90_06a.htm (11 of 15)12/30/20\
06 4:18:58 PM
Page 123 of 242

2003 VOLVO XC90
All DSTC functions are (re)activated each time the engine is started.
The Stability Control indicator light
The Stability Control indicator light will come on for approximately 2 s\
econds when the ignition is
switched on as the system performs a self-diagnostic test.
The Stability Control indicator light will flash when:
l Traction Control is actively functioning to help avoid drive-wheel spin.\
l Spin Control is actively functioning to help avoid loss of traction duri\
ng acceleration.
l Active Yaw Control is actively functioning to help avoid skids or latera\
l slides.
l Roll Stability Control is actively functioning to help avoid a roll-over\
situation.
The warning symbol in the instrument panel
A steady yellow glow indicates:
l That the system has been automatically disengaged due to a fault. "ANTI \
SKID SERVICE
REQUIRED" be displayed in the text window. An authorized Volvo retailer \
should check the system.
l In the event of high brake temperature, "TRACTION CONTROL TEMPORARILY OF\
F" will be
displayed in the text window. The system will automatically switch on ag\
ain when the brakes have
cooled.
Emergency Brake Assistance (EBA)
The EBA function is an integrated part of the DSTC system. EBA is design\
ed to provide full brake
effect immediately in the event of sudden, hard braking. The system is a\
ctivated by the speed with which
you depress the brake pedal.
NOTE:
l When the EBA system is activated, the brake pedal will go down and press\
ure in the brake system
immediately increases to the maximum level. Maintain full pressure on th\
e brake pedal in order to utilize
the system completely. EBA is automatically deactivated when the brake p\
edal is released.
l When the vehicle has been parked for some time, the brake pedal may sink\
more than usual when the
engine is started. This is normal and the pedal will return to its usual\
position when it is released.
pg. 99 Starting and driving
Rear Parking Assistance
file:///K|/ownersdocs/2003/2003_XC90/03xc90_06b.htm (5 of 17)12/30/200\
6 4:18:59 PM
Page 130 of 242

2003 VOLVO XC90
WARNING!
Bumper-attached trailer hitches must not be used on Volvos, nor should s\
afety chains be attached to
the bumper.
Trailer hitches attaching to the vehicle rear axle must not be used.
Never connect a trailer's hydraulic brake system directly to the vehicle\
brake system, nor a trailer's
lighting system directly to the vehicle lighting system. Consult your ne\
arest authorized Volvo retailer
for correct installation.
When towing a trailer, the trailer's safety wire must be correctly faste\
ned to the hole or hook provided
in the trailer hitch on the vehicle. The safety wire should never be fas\
tened to or wound around the
drawbar ball.
pg. 104 Starting and driving
Towing a trailer (contd)
NOTE!
- When parking the vehicle with a trailer on a hill, apply the parking b\
rake before putting the gear
selector in (P)ark. When starting on a hill, put the gear selector in \
(D)rive before releasing the parking
brake.
- If you use the manual (Geartronic) shift positions while towing a tr\
ailer, make sure the gear you select
does not put too much strain on the engine (using too high a gear).
- The drawbar assembly/trailer hitch may be rated for trailers heavier t\
han the vehicle is designed to tow.
Please adhere to Volvo's recommended trailer weights.
Leveling
If your vehicle is equipped with automatic levelling, the rear suspensio\
n always retains the correct ride
height regardless of the load. When the vehicle is stationary, the rear \
suspension lowers, which is
normal.
pg. 105 Starting and driving
Detachable trailer hitch - installing/removing
file:///K|/ownersdocs/2003/2003_XC90/03xc90_06b.htm (12 of 17)12/30/20\
06 4:18:59 PM
Page 150 of 242

2003 VOLVO XC90
Changing a wheel
There are two attachment points for the jack on each side of the vehicle\
. These attachment points are
under the center of each door.The jack is located in the storage compart\
ment under the cargo area floor
(to the right in five-seat models and in the center in seven-seat model\
s), and the crank is stored in the
tool bag.
WARNING!
- There is an attachment point on each side of the vehicle located under\
the pillars between the front
and rear doors. This point is used during the production process only, a\
nd is NOT intended for
attaching the jack.
-The undersides of accessory running boards are not intended for attachi\
ng the jack.
To change a wheel:
1. Park the vehicle on a firm, level, nonslippery surface.
2. Engage the parking brake and put the gear selector in the Park positi\
on.
3. Loosen the wheel bolts by exerting downward pressure on the lug wrenc\
h.
4. Remove the wheel cap (where applicable) using the lug wrench in the\
tool kit.
5. With the wheels still on the ground, use the lug wrench to loosen the\
wheel bolts 1/2 - 1 turn. Turn the
bolts counterclockwise to loosen the bolts.
file:///K|/ownersdocs/2003/2003_XC90/03xc90_08.htm (10 of 12)12/30/200\
6 4:19:01 PM
Page 152 of 242

2003 VOLVO XC90
l Lift the wheel and place it on the hub.
l Install the wheel bolts and tighten handtight. Using the lug wrench, tig\
hten crosswise until all bolts
are snug.
l Lower the vehicle to the ground and alternately tighten the bolts crossw\
ise to 102 ft. lbs. (140 Nm).
l Install the wheel cap (where applicable).
WARNING!
- The jack must correctly engage the bar in the jack attachment. The veh\
icle's weight must not rest on
the jack attachment. See illustration "Attaching the jack" above. Be sure the jack is on a firm, level,
non-slippery surface.
- Never allow any part of your body to be extended under a vehicle suppo\
rted by a jack.
- Use the jack intended for the vehicle when replacing a wheel. For any \
other job, use stands to
support the side of the vehicle being worked on.
- Apply the parking brake and put the gear selector in the (P)ark position (or reverse on manual
transmissions).
- Block the wheels standing on the ground, use rigid wooden blocks or la\
rge stones. The jack should
be kept well-greased.
pg. 122 Wheels and tires
This page intentionally left blank
Contents | Top of Page
file:///K|/ownersdocs/2003/2003_XC90/03xc90_08.htm (12 of 12)12/30/200\
6 4:19:01 PM
Page 172 of 242

2003 VOLVO XC90
locking system's remote control to reactivate such features as the power\
windows, moonroof, courtesy
lighting, etc.
WARNING!
PROPOSITION 65 WARNING!
Battery posts, terminals, and related accessories contain lead and lead \
compounds, chemicals known
to the state of California to cause cancer and reproductive harm. Wash h\
ands after handling.
pg. 137 Maintenance
Bulbs
The following bulbs are used in the vehicle:
1. Low beam/high beam - 55W H7
2. Bi-Xenon headlight (option) - 35W D2R
3. Backup light - 21 W BA15
4. Brake light - 21W BA15
5. Turn signals, rear - PY21W(amber bulb)
6. Turn signals, front - H21W
7. Door step courtesy light/cargo area lighting - W5W
8. Vanity mirror - 1,2W
9. License plate lighting/parking light in headlight/side marker light, \
rear W5W
Side turn signal - W5W (amber bulb)
10. Fog lights, front - 55W H1
11. Fog light, rear - 21W BA5
file:///K|/ownersdocs/2003/2003_XC90/03xc90_09b.htm (5 of 23)12/30/200\
6 4:19:04 PM
Page 198 of 242

2003 VOLVO XC90
Cold start capacity
(CCA) 520 A
600 A
Reserve capacity (RC) 90
min 115 min
If you must replace your battery, be sure to replace it with a battery o\
f the same cold start capacity and
reserve capacity as the original (See the decal on the battery). Generator max. current 140 A*160 A
Starter motor, power 1.4 kW 1.7 kW
Spark plugs P/N272313-8 or equivalent
Gap 0.028-0.032 in.0.7-0.8
mm
Tightening torque 22 ft. lbs. (30 Nm)
Firing order 1-2-4-5-3 1-5-3-6-2-4
* Models equipped with the optional rear A/C unit have 160 A generators.\
pg. 156 Specifications
Bulbs
Bulbs OutputSocket
Low beam 55 W H7
High beam 55 W H7
Bi-Xenon headlights
(option) 35 W
D2R
Fog lights, front 55 W H 1
Parking lights, front 5W5 W2.1x9.5d
Turn signals, front 21 W PY (amber)
Turn signals, rear 21 W PY (amber)
Parking lights, rear 5 W BA15
Brake light 21 W BA15
Back up lights 21 W BA15
Fog light, left rear 5 W BA15
License plate lighting 5 W W 2.1x9.5 d
file:///K|/ownersdocs/2003/2003_XC90/03xc90_10.htm (8 of 10)12/30/2006\
4:19:05 PM