2003 VOLVO XC90 start stop button
[x] Cancel search: start stop buttonPage 37 of 242

2003 VOLVO XC90
automatically prevent excessively high engines speeds. This will be noti\
ceable as a pronounced
unevenness in engine speed.
10. Gear and driving mode indicator
The currently selected driving mode is displayed here. If you use the op\
tional Geartronic function on the
automatic transmission, the currently selected gear will be displayed.
11. Ambient temperature gauge
This display indicates the air temperature outside your vehicle. A "snow\
flake" symbol in the text
window is displayed when the temperature is in the range of 23 -36° F\
(-5 -+2° C). Please note that this
symbol does not indicate a fault with your vehicle. At low speeds or whe\
n the vehicle is not moving, the
temperature readings may be slightly higher than the actual ambient temp\
erature.
12. Clock/set button
Turn the button to set the clock.
13. Fuel gauge
The fuel tank holds approximately 19 US gals (72 liters). When a warni\
ng light in the gauge comes on,
there are approximately 1.8 US gal. (8 liters) of fuel remaining in th\
e tank.
14. Indicator and warning symbols
pg. 25 Instruments and controls
Indicator and warning symbols
The indicator and warning symbols light up when you turn the ignition ke\
y to the driving position
(position II) before starting. This shows that the symbols are functio\
ning. When the engine starts, all
symbols go out. If the engine is not started within 5 seconds, all symbo\
ls except CHECK ENGINE and
go out. The symbol for the parking brake goes out when the parking brak\
e is released.
Warning symbol
in center of instrument panel
This symbol shines as a red or yellow light depending on the severity of\
the fault that has been detected.
Red symbol -Stop the vehicle as soon as possible in a suitable location and read th\
e message shown in
the text window.
Yellow symbol -Follow the instructions shown in the text window.
file:///K|/ownersdocs/2003/2003_XC90/03xc90_02a.htm (3 of 16)12/30/200\
6 4:18:52 PM
Page 42 of 242

2003 VOLVO XC90
When a warning light in the instrument panel comes on, a message is also\
displayed in the text window.
After you have read the message, you can erase it by pressing button A (\
see illustration).
NOTE: Certain messages cannot be erased until the condition has been correcte\
d.
If a warning message is displayed when e.g. you are using the trip compu\
ter, this message must be
erased before you can access the function of your choice. Press button A\
to erase the warning message.
You can scroll through the stored messages by pressing button A (see il\
lustration). The text window can
be cleared (the message will be returned to memory) by pressing button\
A again. Message Meaning:
STOP SAFELY: Stop and switch off the engine - to help prevent serious risk of
damage.
STOP ENGINE: Stop and switch off the engine - to help prevent serious risk of
damage.
SERVICE URGENT: Take your vehicle to an authorized Volvo retailer for inspection as
soon as possible.
SEE MANUAL: Refer to your owner's manual. For additional information, please
contact your Volvo retailer.
SERVICE REQUIRED: Take your vehicle to an authorized Volvo retailer for inspection at
your convenience (but preferably before the next scheduled
maintenance).
FIX NEXT SERVICE: Have the system affected inspected at the next scheduled
maintenance.
TIME FOR REGULAR
SERVICE This light will come on at 7,500 mile (12,000 km) intervals, after
750 hours of driving or after 12 months, whichever occurs first, to
remind the driver that the maintenance interval has been exceeded.
The light will stay on for 2 minutes after start until reset by the
servicing retailer.
pg. 29 Instruments and controls
Switches in center console
file:///K|/ownersdocs/2003/2003_XC90/03xc90_02a.htm (8 of 16)12/30/200\
6 4:18:52 PM
Page 121 of 242

2003 VOLVO XC90
If the BRAKE and ABS warning lights come on at the same time, this could\
indicate a fault in the brake
system.
l Stop the vehicle in a suitable place and switch off the engine.
l Restart the engine.
l If both warning lights go off, no further action is required.
l If both lights are still on after the engine has been restarted, switch \
off the engine again and check the
brake fluid level (see
page 128 for the location of the brake fluid reservoir).
l If the brake fluid level is above the MIN mark, drive carefully to an au\
thorized Volvo retailer and
have the brake system inspected.
WARNING!
If the fluid level is below the MIN mark in the reservoir or if a "Brake\
failure - Service urgent"
message is displayed in the text window: DO NOT DRIVE. Have the vehicle \
towed to a Volvo
retailer and have the brake system inspected.
pg. 97 Starting and driving
Dynamic Stability Traction Control (DSTC)
The DSTC system on the Volvo XC90 consists of a number of functions:
1. Traction control (TC)
This function is designed to help reduce wheel spin by transferring powe\
r from a drive wheel that begins
to lose traction to the wheel on the opposite side of the vehicle (on t\
he same axle). TC monitors and
compares the rotational speed of the drive wheels. If one of the drive w\
heels shows a tendency to spin,
the difference in speed is immediately detected. This triggers the Anti-\
lock Brake System, which brakes
the spinning wheel until the difference in rotational speed is corrected\
.
TC is most active at low speeds, and a pulsating sound will be audible w\
hen the system is regulating
wheel spin. This is quite normal.
This is one of the DSTC system's permanent functions and is not affected\
when the DSTC button on the
center control panel is pressed.
2. Spin control (SC)
The spin control function is designed to help prevent the drive wheels f\
rom spinning while the vehicle is
accelerating. This is done by temporarily reducing engine torque to the \
drive wheels, which helps
file:///K|/ownersdocs/2003/2003_XC90/03xc90_06b.htm (3 of 17)12/30/200\
6 4:18:59 PM
Page 211 of 242

2003 VOLVO XC90
audible station and then stop.
3. Press one of the buttons again to start a new search.
Manually search for a known frequency
1. Press and hold the
or button (or the corresponding buttons on the steering wheel
keypad). MAN will be shown in the display. The radio will slowly scroll\
in the desired direction and
then increase speed after a few seconds.
2. Release the button when the desired frequency is displayed.
3. If you need to adjust the frequency, press briefly on
or .
4. The manual search function is available for five seconds after you la\
st pressed the button.
pg. 169 Audio
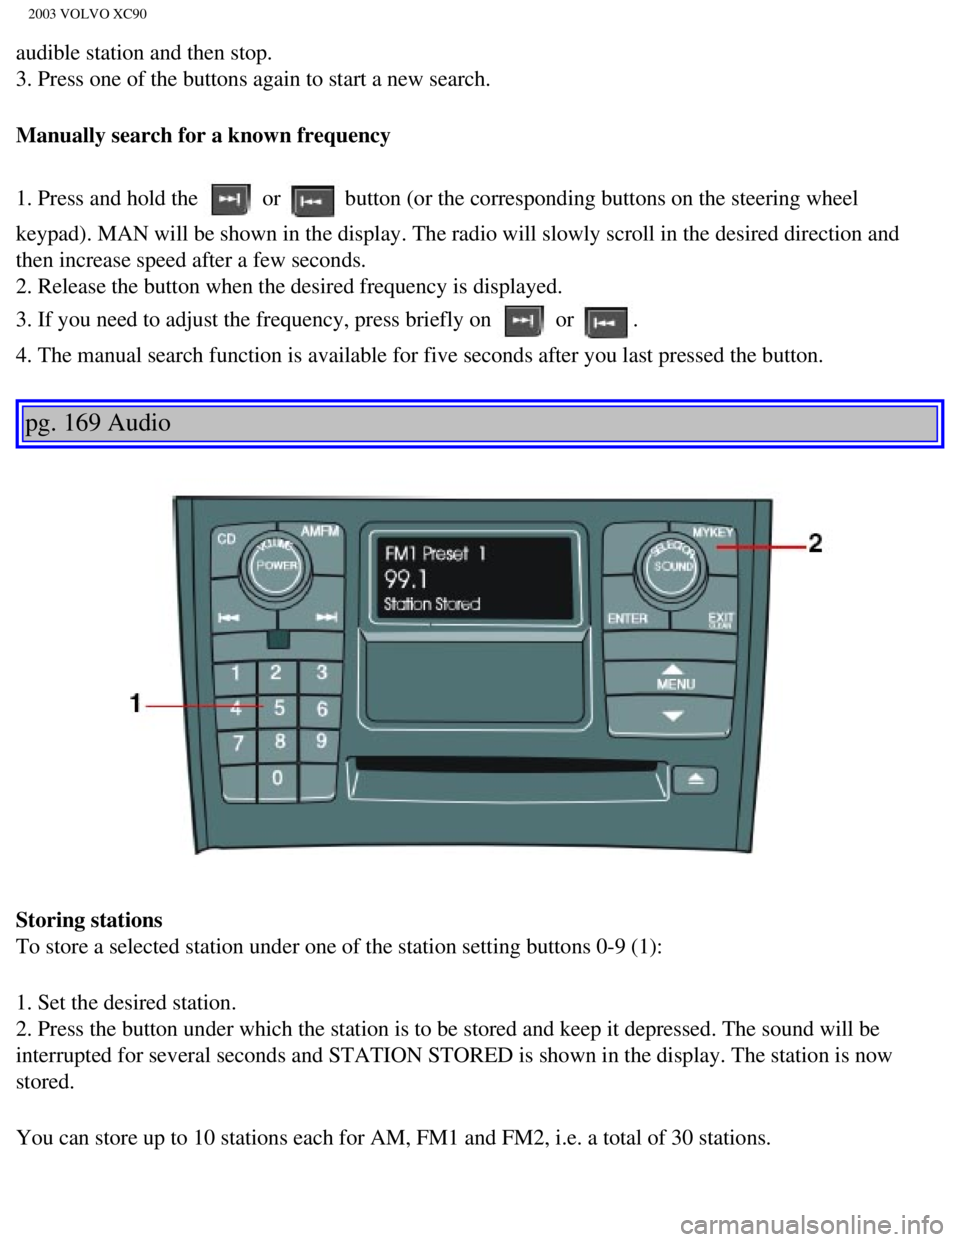
Storing stations
To store a selected station under one of the station setting buttons 0-9\
(1):
1. Set the desired station.
2. Press the button under which the station is to be stored and keep it \
depressed. The sound will be
interrupted for several seconds and STATION STORED is shown in the displ\
ay. The station is now
stored.
You can store up to 10 stations each for AM, FM1 and FM2, i.e. a total o\
f 30 stations.
file:///K|/ownersdocs/2003/2003_XC90/03xc90_11a.htm (11 of 17)12/30/20\
06 4:19:06 PM
Page 213 of 242

2003 VOLVO XC90
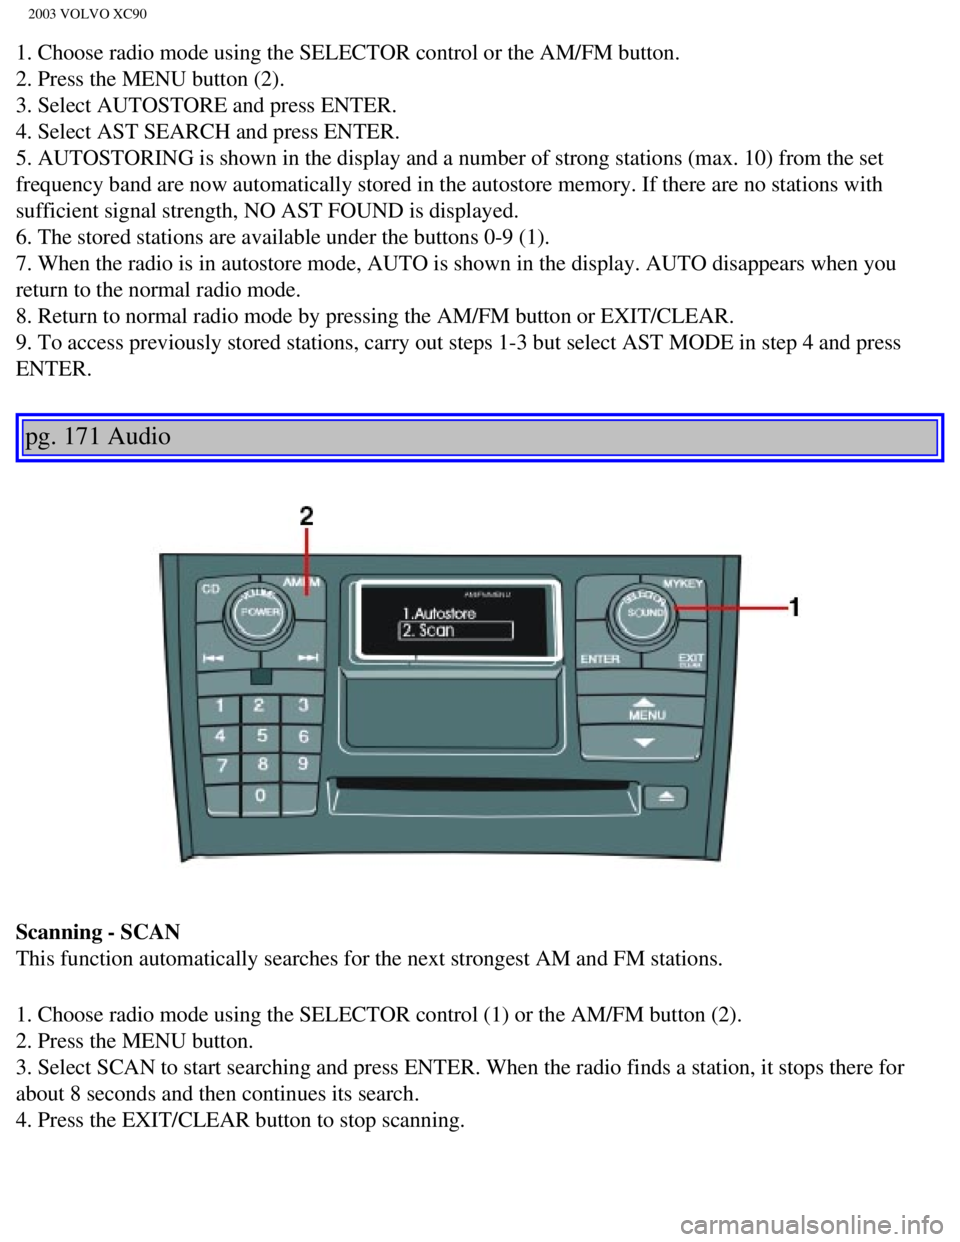
1. Choose radio mode using the SELECTOR control or the AM/FM button.
2. Press the MENU button (2).
3. Select AUTOSTORE and press ENTER.
4. Select AST SEARCH and press ENTER.
5. AUTOSTORING is shown in the display and a number of strong stations (\
max. 10) from the set
frequency band are now automatically stored in the autostore memory. If \
there are no stations with
sufficient signal strength, NO AST FOUND is displayed.
6. The stored stations are available under the buttons 0-9 (1).
7. When the radio is in autostore mode, AUTO is shown in the display. AU\
TO disappears when you
return to the normal radio mode.
8. Return to normal radio mode by pressing the AM/FM button or EXIT/CLEA\
R.
9. To access previously stored stations, carry out steps 1-3 but select \
AST MODE in step 4 and press
ENTER.
pg. 171 Audio
Scanning - SCAN
This function automatically searches for the next strongest AM and FM st\
ations.
1. Choose radio mode using the SELECTOR control (1) or the AM/FM butto\
n (2).
2. Press the MENU button.
3. Select SCAN to start searching and press ENTER. When the radio finds \
a station, it stops there for
about 8 seconds and then continues its search.
4. Press the EXIT/CLEAR button to stop scanning.
file:///K|/ownersdocs/2003/2003_XC90/03xc90_11a.htm (13 of 17)12/30/20\
06 4:19:06 PM
Page 220 of 242

2003 VOLVO XC90
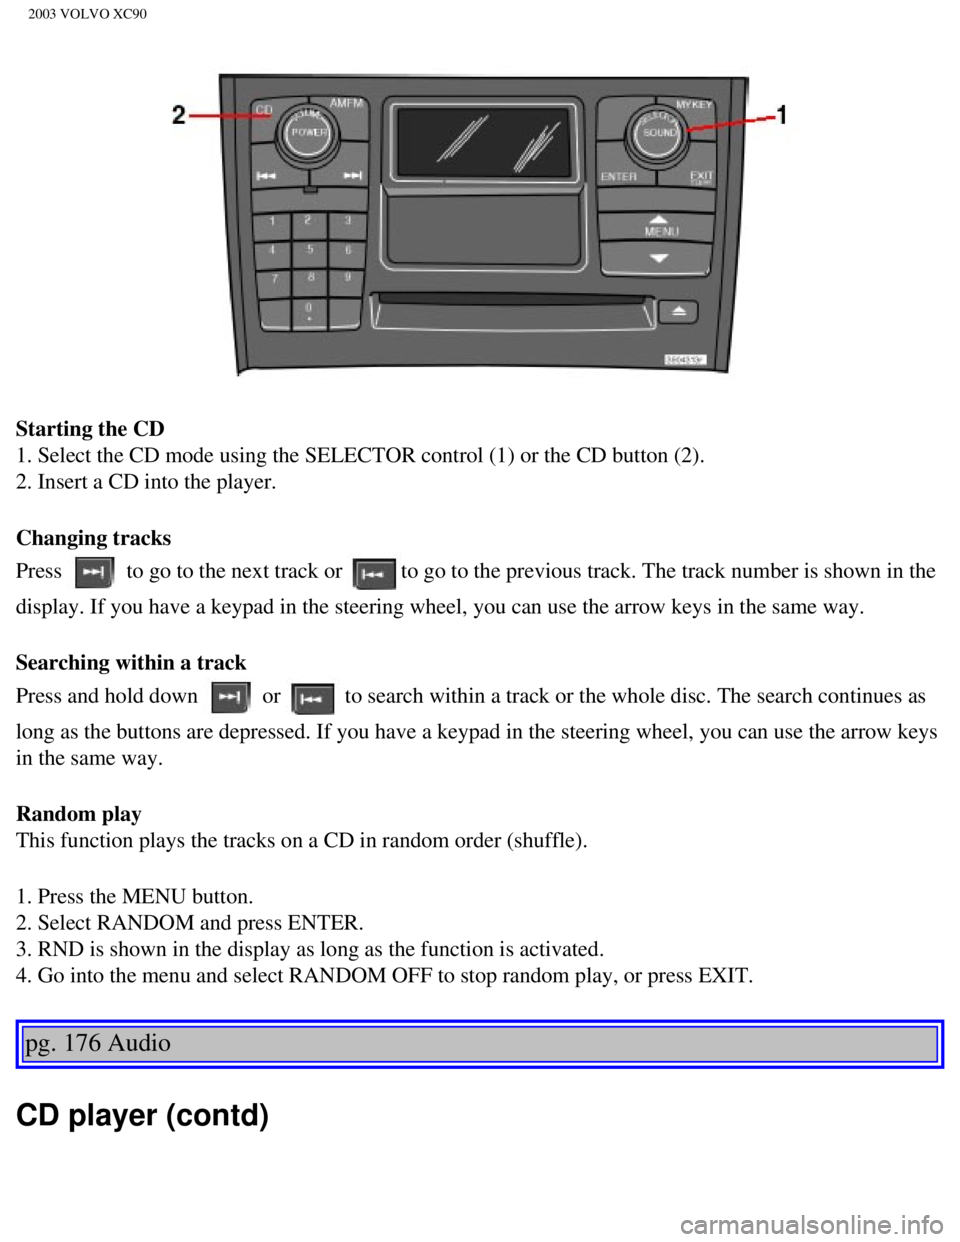
Starting the CD
1. Select the CD mode using the SELECTOR control (1) or the CD button \
(2).
2. Insert a CD into the player.
Changing tracks
Press
to go to the next track or to go to the previous track. The track number is shown in the
display. If you have a keypad in the steering wheel, you can use the arr\
ow keys in the same way.
Searching within a track
Press and hold down
or to search within a track or the whole disc. The search continues as
long as the buttons are depressed. If you have a keypad in the steering \
wheel, you can use the arrow keys
in the same way.
Random play
This function plays the tracks on a CD in random order (shuffle).
1. Press the MENU button.
2. Select RANDOM and press ENTER.
3. RND is shown in the display as long as the function is activated.
4. Go into the menu and select RANDOM OFF to stop random play, or press \
EXIT.
pg. 176 Audio
CD player (contd)
file:///K|/ownersdocs/2003/2003_XC90/03xc90_11b.htm (3 of 11)12/30/200\
6 4:19:07 PM