Page 115 of 257

2003 VOLVO XC70
Exterior courtesy lights
Home Safe System
When you leave your car at night, you can make use of the courtesy light\
ing function:
l Remove the key from the ignition switch.
l Pull the direction indicator lever towards the steering wheel (as when \
activating the high beams).
l Exit the car and lock the doors.
The headlights, parking lights, license plate lights and the lights in t\
he sideview mirrors will now come
on and remain on for 30, 60 or 90 seconds (the time interval is at your\
discretion and can be changed by
an authorized Volvo retailer).
Approach lighting
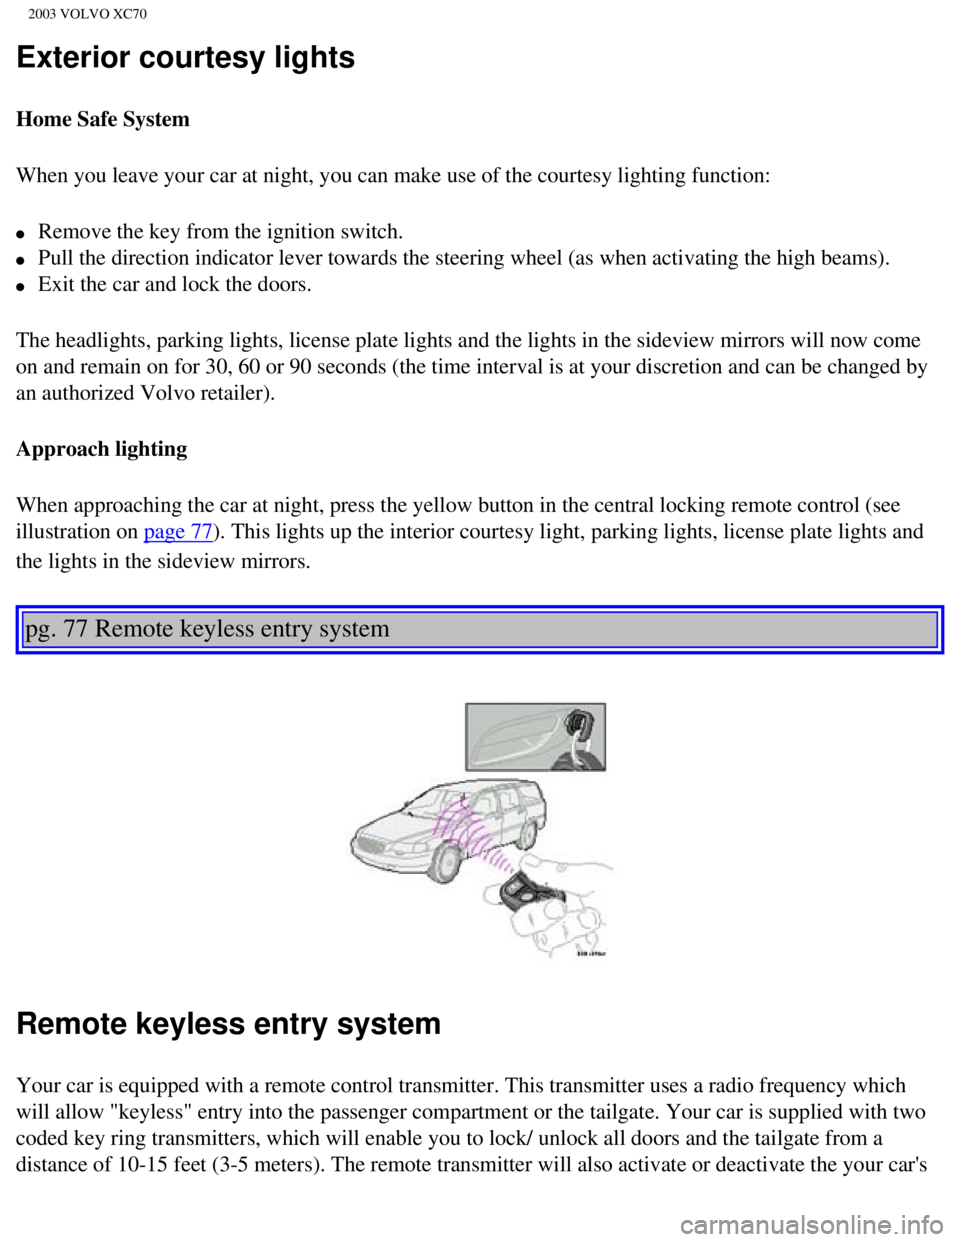
When approaching the car at night, press the yellow button in the centra\
l locking remote control (see
illustration on
page 77). This lights up the interior courtesy light, parking lights, license \
plate lights and
the lights in the sideview mirrors.
pg. 77 Remote keyless entry system
Remote keyless entry system
Your car is equipped with a remote control transmitter. This transmitter\
uses a radio frequency which
will allow "keyless" entry into the passenger compartment or the tailgat\
e. Your car is supplied with two
coded key ring transmitters, which will enable you to lock/ unlock all d\
oors and the tailgate from a
distance of 10-15 feet (3-5 meters). The remote transmitter will also \
activate or deactivate the your car's
file:///K|/ownersdocs/2003/2003_XC70/03xc70_05.htm (3 of 11)12/30/2006\
4:17:58 PM
Page 120 of 257

2003 VOLVO XC70
Disarming the alarm
Press the UNLOCK button on the remote control or unlock the doors with t\
he key.
Turning off (stopping) the alarm
If the alarm is sounding, it can be stopped by pressing the UNLOCK butto\
n on the remote control or by
unlocking the driver's door with the key.
Visual alarm signal
The visual alarm signal is given by flashing all turn signals and turnin\
g on the interior lighting for
approximately 5 minutes.
Audible alarm signal
An audible alarm signal is given by a battery powered siren. One alarm c\
ycle lasts for 25 seconds.
"Panic" button
In an emergency situation, this feature can be used to attract attention\
. Activate the "panic" function by
pressing the red button on the remote control (see illustration on
page 77) for at least 3 seconds or by
pressing this button twice within 3 seconds. The turn signals will flash\
, the interior lights will go on and
the car's horn will sound.
The function can be turned off by pressing any of the buttons on the rem\
ote control or will stop
automatically after 25 seconds. When a button is pressed, there is a 5 s\
econd delay before the
panic alarm is deactivated.
NOTE: This function will NOT unlock the car.
pg. 81 Alarm
file:///K|/ownersdocs/2003/2003_XC70/03xc70_05.htm (8 of 11)12/30/2006\
4:17:58 PM
Page 154 of 257

2003 VOLVO XC70
pg. 105 Long distance trips
Before a long distance trip
It is always worthwhile to have your car checked at a Volvo retailer bef\
ore driving long distances. Your
retailer will also be able to supply you with bulbs, fuses, spark plugs \
and wiper blades for your use in the
event that problems occur.
As a minimum, the following items should be checked before any long trip\
:
l Check that engine runs smoothly and that fuel consumption is normal.
l Check for fuel, oil, and fluid leakage.
l Check condition of accessory drive belts.
l Check transmission oil level*.
l Check state of the battery's charge.
l Examine tires carefully (the spare tire as well), and replace those th\
at are worn. Check tire pressures.
l The brakes, front wheel alignment, and steering gear should be checked b\
y your Volvo retailer only.
l Check all lights, including high beams.
l Reflective warning triangles are legal requirement in some countries.
l Have a word with your Volvo retailer if you intend to drive in countries\
where it may be difficult to
obtain the correct fuel.
l Consider your destination. If you will be driving through an area where \
snow or ice are likely to
occur, consider snow tires.
* To prevent injury from contact with hot surfaces, do not inspect your \
car's transmission fluid yourself.
Have your car's transmission fluid level inspected by a qualified Volvo \
service technician.
pg. 106 Three-way catalytic converters
file:///K|/ownersdocs/2003/2003_XC70/03xc70_06b.htm (9 of 10)12/30/200\
6 4:18:00 PM
Page 170 of 257
2003 VOLVO XC70
Location Amperage
1 Low beam headlights 15A
2 High beam headlights 20A
3 Power driver's seat 30A
4 Power passenger's seat 30A
5 -
6 -
7 Heated seat - front left (option) 15A
8 Heated seat - front right (option) 15A
9 ABS/STC/DSTC 5A
10 -
11 -
12 Headlight wipers (certain models) 15A
13 Electric socket 12 V 15A
14 Power passenger's seat 5A
15 Audio system, VNS 5A
16 Audio system 20A
17 Audio amplifier 30A
18 Front fog lights 15A
19 VNS display 10A
20 -
21 Automatic transmission, shiftlock, extended D2 feed 10A
22 Direction indicators 20A
23 Headlight switch module, climate control system, onboard diagnostic c\
onnector, steering
wheel lever modules 5A
file:///K|/ownersdocs/2003/2003_XC70/03xc70_08a.htm (5 of 21)12/30/200\
6 4:18:03 PM
Page 171 of 257

2003 VOLVO XC70
24 Relay for extended D1 feed: climate control system, power driver's se\
at, driver's info 10A
25 Ignition switch, relay starter motor, SRS, engine control module 10A
26 Climate control system blower 30A
27 -
28 Electronic module - courtesy lighting 10A
29 -
30 Left front/rear parking lights 7.5A
31 Right front/rear parking lights, license plate lights 7.5A
32 Central electrical module, vanity mirror lighting, power steering, gl\
ove compartment
light, interior courtesy lighting 10A
33 Fuel pump 15A
34 Power sun roof 15A
35 Central locking system, power windows - left door mirror 25A
36 Central locking system, power windows - right door mirror 25A
37 Rear power windows, power child safety 30A
38 Alarm siren 5A
* Please be aware that if this fuse is not intact, or if it is removed, \
the alarm will sound.
pg. 119 Fuses in the cargo area
Fuses in the cargo area
The fuses in the cargo area are located on the trim on the left-hand sid\
e. When replacing a blown fuse,
be sure to replace it with a new one of the same color and amperage (wr\
itten on the fuse).
file:///K|/ownersdocs/2003/2003_XC70/03xc70_08a.htm (6 of 21)12/30/200\
6 4:18:03 PM
Page 172 of 257
2003 VOLVO XC70
Ordinary fuses
Location Amperage
1 Rear electrical module, cargo area lighting 10A
2 Rear fog light 10A
3 Brake lights 15A
4 Backup lights 10A
5 Rear window defroster, relay 15I -
accessories 5A
6 Unlocking tailgate 10A
7 Auxiliary 12 volt socket in cargo area
(option) 15A
8 Central locking rear doors/fuel filler door 20A
9 Trailer (30 feed) 15A
10 CD changer, VNS 10A
11 Accessory control module (AEM) 15A
12 Tailgate wiper 15A
13 Loudspeaker (subwoofer) cargo area -
option 15A
14 Brake lights 7.5A
15 Trailer (15I feed) 20A
16 -
17 All Wheel Drive control module 7.5A
18 -
pg. 120 Replacing bulbs
file:///K|/ownersdocs/2003/2003_XC70/03xc70_08a.htm (7 of 21)12/30/200\
6 4:18:03 PM
Page 173 of 257
2003 VOLVO XC70
Replacing high/low beam headlight bulbs
The headlight bulbs must be replaced from the engine compartment.
CAUTION:
l Do not touch the glass on halogen bulbs with your fingers. Grease, oil o\
r any other impurities can be
carbonized onto the bulb and cause damage to the reflector.
l Be sure to use bulbs of the correct type and voltage.
Removing a defective bulb
To remove a defective low beam bulb:
l Switch off all lights and turn the ignition switch to position 0.
l Open the hood.
l Remove the plastic cover over the bulb (1) by turning it counterclockw\
ise.
file:///K|/ownersdocs/2003/2003_XC70/03xc70_08a.htm (8 of 21)12/30/200\
6 4:18:03 PM
Page 174 of 257

2003 VOLVO XC70
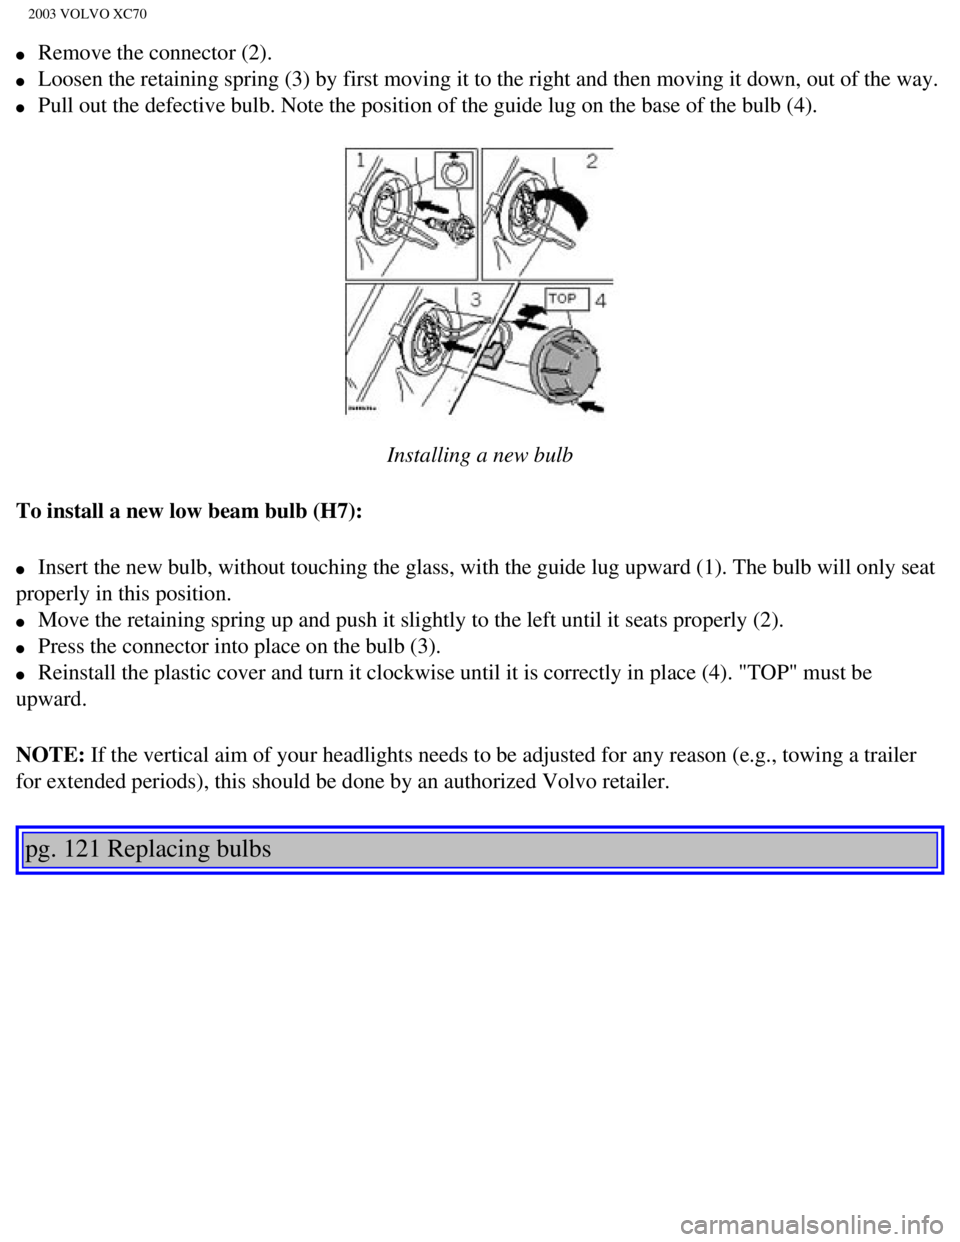
l Remove the connector (2).
l Loosen the retaining spring (3) by first moving it to the right and th\
en moving it down, out of the way.
l Pull out the defective bulb. Note the position of the guide lug on the b\
ase of the bulb (4).
Installing a new bulb
To install a new low beam bulb (H7):
l Insert the new bulb, without touching the glass, with the guide lug upwa\
rd (1). The bulb will only seat
properly in this position.
l Move the retaining spring up and push it slightly to the left until it s\
eats properly (2).
l Press the connector into place on the bulb (3).
l Reinstall the plastic cover and turn it clockwise until it is correctly \
in place (4). "TOP" must be
upward.
NOTE: If the vertical aim of your headlights needs to be adjusted for any reas\
on (e.g., towing a trailer
for extended periods), this should be done by an authorized Volvo retai\
ler.
pg. 121 Replacing bulbs
file:///K|/ownersdocs/2003/2003_XC70/03xc70_08a.htm (9 of 21)12/30/200\
6 4:18:03 PM