Page 17 of 345
’03 TUNDRA_U (L/O 0307)
8
2003 TUNDRA from Jul. ’03 Prod. (OM 34430U)
Driver’s seat belt reminder light∗
1
Low engine oil pressure warning light∗1
Low fuel level warning light∗1
Brake system warning light∗1
Discharge warning light∗1
Malfunction indicator lamp∗1
Anti −lock brake system warning light∗
1
SRS warning light∗1
or
Automatic transmission fluid temperature
warning light∗1
Unengaged “Park” warning light∗1
Low windshield washer fluid level warning
light∗1
Headlight high beam indicator light
Overdrive −off indicator light
Turn signal indicator lights
Open door warning light∗
1
Passenger airbag off indicator light
Front passenger ’s seat belt reminder light∗1
Indicator symbols on the instrument panel
Page 101 of 345

’03 TUNDRA_U (L/O 0307)
92
2003 TUNDRA from Jul. ’03 Prod. (OM 34430U)
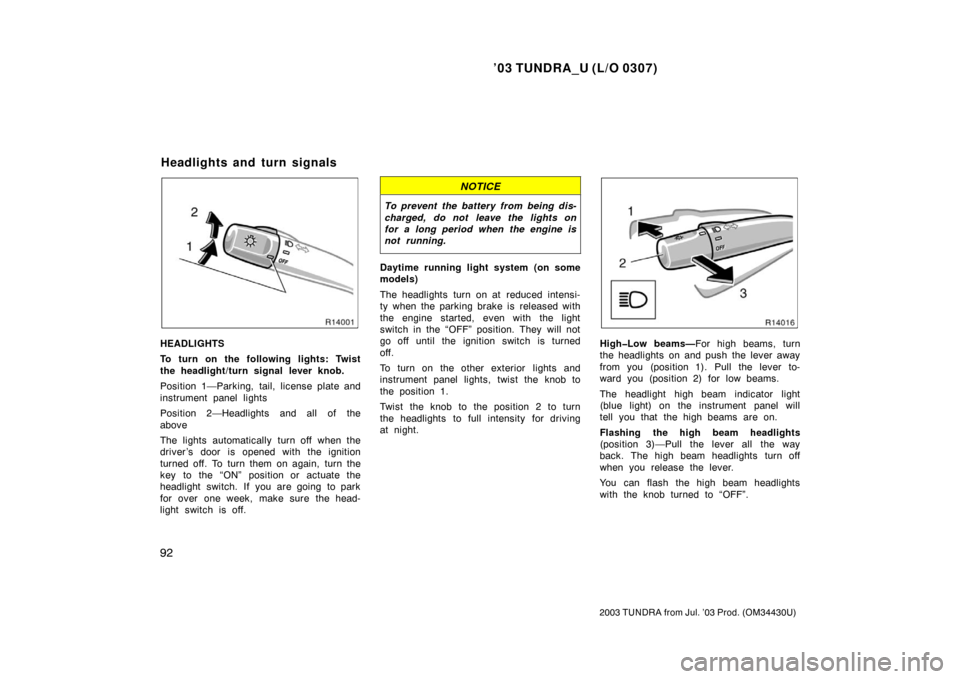
HEADLIGHTS
To turn on the following lights: Twist
the headlight/turn signal lever knob.
Position 1—Parking, tail, license plate and
instrument panel lights
Position 2—Headlights and all of the
above
The lights automatically turn off when the
driver ’s door is opened with the ignition
turned off. To turn them on again, turn the
key to the “ON” position or actuate the
headlight switch. If you are going to park
for over one week, make sure the head-
light switch is off.
NOTICE
To prevent the battery from being dis-
charged, do not leave the lights on
for a long period when the engine is
not running.
Daytime running light system (on some
models)
The headlights turn on at reduced intensi-
ty when the parking brake is released with
the engine started, even with the light
switch in the “OFF” position. They will not
go off until the ignition switch is turned
off.
To turn on the other exterior lights and
instrument panel lights, twist the knob to
the position 1.
Twist the knob to the position 2 to turn
the headlights to full intensity for driving
at night.
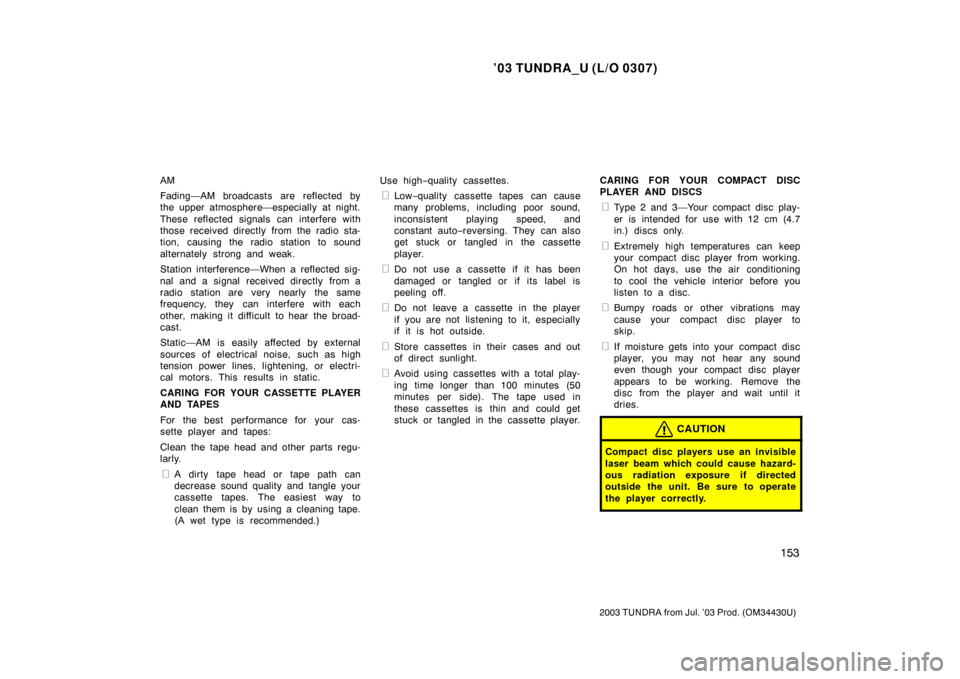
High�Low beams—For high beams, turn
the headlights on and push the lever away
from you (position 1). Pull the lever to-
ward you (position 2) for low beams.
The headlight high beam indicator light
(blue light) on the instrument panel will
tell you that the high beams are on.
Flashing the high beam headlights
(position 3)—Pull the lever all the way
back. The high beam headlights turn off
when you release the lever.
You can flash the high beam headlights
with the knob turned to “OFF”.
Headlights and turn signals
Page 162 of 345

’03 TUNDRA_U (L/O 0307)
153
2003 TUNDRA from Jul. ’03 Prod. (OM 34430U)
AM
Fading—AM broadcasts are reflected by
the upper atmosphere—especially at night.
These reflected signals can interfere with
those received directly from the radio sta-
tion, causing the radio station to sound
alternately strong and weak.
Station interference—When a reflected sig-
nal and a signal received directly from a
radio station are very nearly the same
frequency, they can interfere with each
other, making it difficult to hear the broad-
cast.
Static—AM is easily affected by external
sources of electrical noise, such as high
tension power lines, lightening, or electri-
cal motors. This results in static.
CARING FOR YOUR CASSETTE PLAYER
AND TAPES
For the best performance for your cas-
sette player and tapes:
Clean the tape head and other parts regu-
larly.
�A dirty tape head or tape path can
decrease sound quality and tangle your
cassette tapes. The easiest way to
clean them is by using a cleaning tape.
(A wet type is recommended.) Use high
−quality cassettes.
�Low −quality cassette tapes can cause
many problems, including poor sound,
inconsistent playing speed, and
constant auto− reversing. They can also
get stuck or tangled in the cassette
player.
�Do not use a cassette if it has been
damaged or tangled or if its label is
peeling off.
�Do not leave a cassette in the player
if you are not listening to it, especially
if it is hot outside.
�Store cassettes in their cases and out
of direct sunlight.
�Avoid using cassettes with a total play-
ing time longer than 100 minutes (50
minutes per side). The tape used in
these cassettes is thin and could get
stuck or tangled in the cassette player. CARING FOR YOUR COMPACT DISC
PLAYER AND DISCS
�Type 2 and 3—Your compact disc play-
er is intended for use with 12 cm (4.7
in.) discs only.
�Extremely high temperatures can keep
your compact disc player from working.
On hot days, use the air conditioning
to cool the vehicle interior before you
listen to a disc.
�Bumpy roads or other vibrations may
cause your compact disc player to
skip.
�If moisture gets into your compact disc
player, you may not hear any sound
even though your compact disc player
appears to be working. Remove the
disc from the player and wait until it
dries.
CAUTION
Compact disc players use an invisible
laser beam which could cause hazard-
ous radiation exposure if directed
outside the unit. Be sure to operate
the player correctly.
Page 326 of 345

’03 TUNDRA_U (L/O 0307)
317
2003 TUNDRA from Jul. ’03 Prod. (OM 34430U)
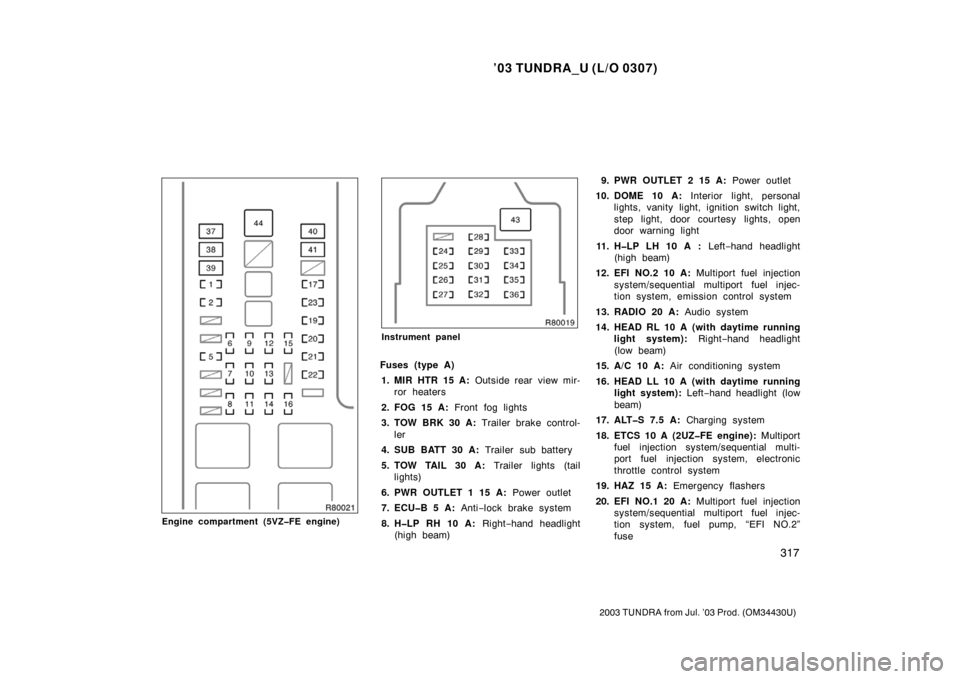
Engine compartment (5VZ�FE engine)
Instrument panel
Fuses (type A)
1. MIR HTR 15 A: Outside rear view mir-
ror heaters
2. FOG 15 A: Front fog lights
3. TOW BRK 30 A: Trailer brake control-
ler
4. SUB BATT 30 A: Trailer sub battery
5. TOW TAIL 30 A: Trailer lights (tail
lights)
6. PWR OUTLET 1 15 A: Power outlet
7. ECU�B 5 A: Anti−lock brake system
8. H�LP RH 10 A: Right−hand headlight
(high beam) 9. PWR OUTLET 2 15 A:
Power outlet
10. DOME 10 A: Interior light, personal
lights, vanity light, ignition switch light,
step light, door courtesy lights, open
door warning light
11. H�LP LH 10 A : Left−hand headlight
(high beam)
12. EFI NO.2 10 A: Multiport fuel injection
system/s equential multiport fuel injec-
tion system, emission control system
13. RADIO 20 A: Audio system
14. HEAD RL 10 A (with daytime running light system): Right−hand headlight
(low beam)
15. A/C 10 A: Air conditioning system
16. HEAD LL 10 A (with daytime running light system): Left−hand headlight (low
beam)
17. ALT�S 7.5 A: Charging system
18. ETCS 10 A (2UZ�FE engine): Multiport
fuel injection system/sequential multi-
port fuel injection system, electronic
throttle control system
19. HAZ 15 A: Emergency flashers
20. EFI NO.1 20 A: Multiport fuel injection
system/s equential multiport fuel injec-
tion system, fuel pump, “EFI NO.2”
fuse