Page 25 of 98

18You can delete the list of previous destina-
tions
while you stop your car, if you no longer
need them.
1UE026
Push the “MENU” switch to display the
Menu screen and touch the
“Marked
points”
switch. Touch the
“Del.prev.dest.” switch.
When you touch the switch on each pre-
vious destination or
“Delete all”
switch, a message appears to confirm
your request. If you are sure, touch the
“Yes” switch. If not, touch the “No”
switch. By touching the
“Emergency” switch
on the Destination screen, the display
changes to a screen to select dealers,
hospitals or police stations. During driv-
ing, only nearby police stations, hospi-
tals or dealers are shown. The current
position is shown with an address, the
latitude and the longitude at the top of the
screen.
1UE027
When you touch your desired emergency
category, the selected emergency category
list is displayed.
1UE028
The distance from your current position up to
the destination is displayed on the right of the
name.
You can see the names of the emergency
destinations in alphabetical order by touch-
ing the
“Name Sort” switch on the
screen.
Touch the
of your desired item. The
screen changes and displays the map
location of the selected destination and
the route preference. (See
“(a) Entering
Destination” on page 22.)
Touch the
“Info.” switch on the screen to
display the selected emergency destination
name, address and telephone number.
Destination input by
E
MERGENCY
Page 26 of 98
19
INFORMATION
The navigation system does not guide
in areas where route guidance is un-
available. (See page 52.)
Touch the “Intersection” switch on
the Destination screen.
1UE029
Input the name of the two intersecting
streets which are located near the des-
tination to be set.
When you touch the
“List” switch or the
number of sites becomes 4 or less, the list of
matching street names appears.
1UE030
Touch the of your desired item. Af-
ter inputting the two intersecting streets,
the screen changes and displays the map
location of the selected destination and
the route preference. (See “(a) Entering
Destination” on page 22.)
Destination input by
I
NTERSECTION
Page 27 of 98
20
EMV3111U
If the same two streets cross at more than
one intersection, the screen changes and
displays the menu to select the city name
where the streets intersect. Select the city
and the map location of the selected destina-
tion and the route preference. (See “(a) En-
tering Destination” on page 22.)To input a freeway entrance or exit, touch
the
“FWY Ent./Exit” switch on the
Destination screen.
1UE030�1
Be sure to use the complete name of the
freeway, including the hyphen, when enter-
ing the destination. Freeways and inter-
states use an “I” (I −405). US highways use
the state designation before the number
(CA−118).
As the number of matching freeways de-
creases, you can touch the
“List” switch to
display the list. When the number of sites be-
comes 4 or less, the list screen appears au-
tomatically.
1UE031
Select the desired freeway by touching
the
.
1UE032
You can then select either a freeway “En-
trance”
or “Exit”.
Destination input by
F
REEWAY ENTRANCE or EXIT
Page 28 of 98
21
1UE033
Touch the of the desired entrance
or exit name. The screen changes and
displays the map location of the selected
destination and the route preference.
(See “(a) Entering Destination” on page
22.) There are 2 ways to list the freeway en-
trance or exit.
Dist. sort: Touch this switch to list the en-
trances or exits in order of distance from your
current location.1UE034
Name sort: Touch this switch to list the en-
trances or exits in alphabetical order. Touch
the
“Previous starting point”
switch on the Destination screen.
The screen changes and displays the
map location of the previous starting
point and the route preference. (See “En-
tering Destination” on page 22.)
If you have not used the navigation yet, the
“Previous starting point” switch is
dimmed.
Destination input by
P
REVIOUS STARTING POINT
Page 29 of 98

22Touch
the
“Map” switch on the Destina-
tion screen.
1UE035
The screen changes and displays the
map location that is previously displayed
just before the operation and the route
preference. (See “( a) Entering Destina-
tion” on page 22.)
(a) Entering destination
After you input the destination, the
screen changes and displays the map
location of the selected destination and
the route preference.
1UE036
You can move and set the cursor at a de-
sired point. (For the method of how to move
the cursor, see page 3.)
When you touch the
“Enter” switch, the
system starts searching for a route to your
destination using the conditions entered.
Route preference
Touch the
“Change” switch to change the
conditions which are to determine the route
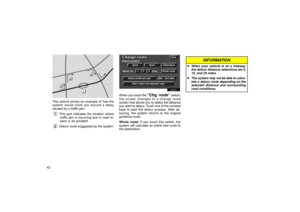
to your destination. You are given a number of choices on the
conditions which the system uses to deter-
mine the route to your destination.
1UE037
Touch the “Detour” switch of “Free-
way” to search for a route other than free-
ways as much as possible. (In some cases,
the route cannot avoid running on a free-
way.)
Touch the
“Detour” switch of “Toll
road” to search for a route other than toll
roads as much as possible.
Touch the
“Detour” switch of “Ferry” to
search for a route without using a ferry as
much as possible.
Destination input by MAP
Setting and deleting
d
estination
Page 30 of 98

23
Touch the
“Detour” switch of “Re-
stricted road” to search for a route other
than restricted road.
Touching the
“Allow” switch on each item
allows to use it.
The switches you select are highlighted in
green. After choosing conditions, touch the
“OK” switch.
1UE038
The system starts searching for a route to
your destination.
1UE039
If you want to see the other routes and make
a comparison, touch the
“3 routes”
switch. Three types of the routes are dis-
played on the screen. Quick:
A route on which you can reach the
destination in the shortest time
This route is shown as an orange line.
Short: A route on which you can reach the
destination in the shortest distance
This route is shown as a purple line.
Alternative: Other route
This route is shown as a green line.
Touch the switch to select the route.
If you want to add a destination, see the fol-
lowing “(b) Adding destination”.
After selecting one, you can start the route
guidance by touching the
“Start” switch or
starting to move your vehicle.
If you want to change the search condition,
touch the
“Edit. route” switch. The
screen changes and displays the Edit route.
(For details, see page 30.)
When you keep touching the
“Start”
switch until you hear a beep, Demo mode will
start.
Page 31 of 98
241. Push the
“MENU” switch to display
the Menu screen.
1UE040
2. Touch the “Edit route” switch.
1UE041
3. Touch the “Add” switch of Destina-
tion. 4. Input an additional destination in the
same way as the destination input.
(See page 22.)
1UE042
5. The Add destination screen appears.Touch the “Add” switch that you
want to add a destination. 1. Push the
“MENU” switch to display
the Menu screen and touch the “Edit
route” switch.
1UE041
2. Touch the “Reorder” switch of Des-
tination.
(b) Adding destinations(c) Reordering destinations
Page 32 of 98
25
1UE043
3. Select the destinations in the order ofarrival by touching the
switch.
After you finished selecting the destinations,
touch the
“OK” switch. The previous
screen returns.
1UE041
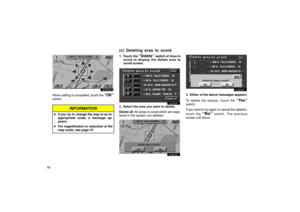
1. Touch the “Delete” switch of Des-
tination.
1UE044
2. Touch the switch of destination
where you want to delete. Touch the
“Delete all” switch if you want to de-
lete all destinations.
3. The message appears to confirm your request to delete. To delete the
point(s), touch the
“Yes” switch.
If you touch the
“Yes” switch, the data can-
not be recovered.
If you touch the
“No” switch. The previous
screen will return.
(d) Deleting destination


Touch the “Intersection” switch on
the Destination screen.
1UE029
Input the name")

 Entering Destination�")

