Page 21 of 98
14When
you touch the
of your desired
item, the screen changes and displays
the map location of the selected destina-
tion and the route preference. (See “(a)
Entering Destination” on page 22.)
1UE023
Touch the “Info.” switch on the screen to
display the selected destination name, ad-
dress and telephone number.
INFORMATION
The desired point of interest can be dis-
played on the Map screen. (For details,
see page 43.)
POI (Points of Interest) icons
AUTOMOBILE CLUB
AUTO SERVICE & MAINTE-
NANCE
GAS STATION
LEXUS DEALERSHIPS
(all search areas)
PARKING GARAGE/HOUSE
PARKING LOT
TOYOTA DEALERSHIPS
(all search areas)
AT M
BANK
CITY HALL
CIVIC/COMMUNITY CENTER
CONVENTION/EXHIBITION
CENTER
COURT HOUSE
HIGHER EDUCATION
Page 25 of 98

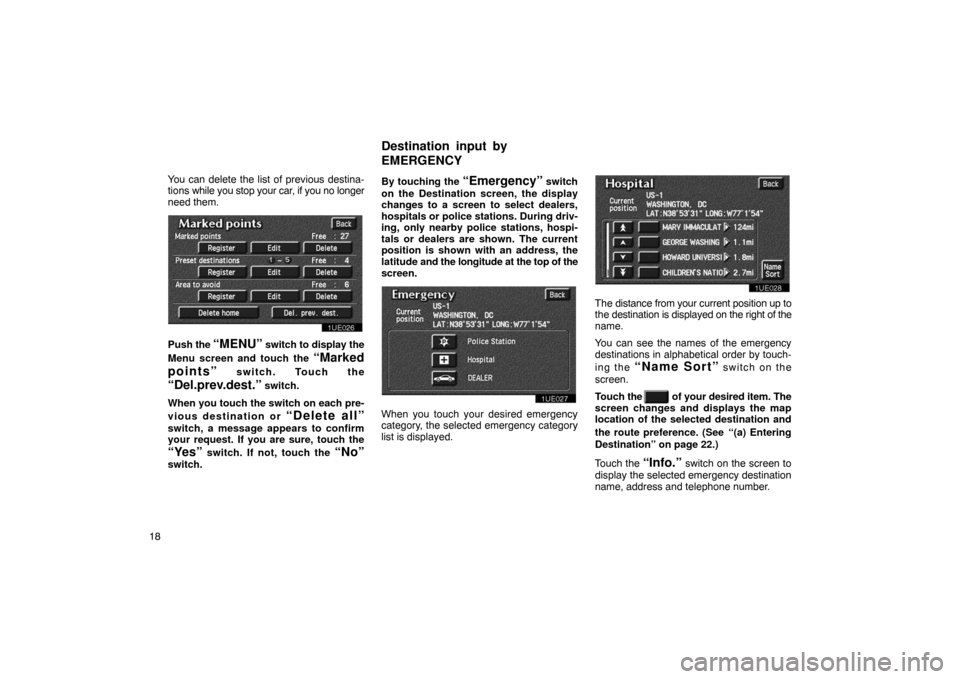
18You can delete the list of previous destina-
tions
while you stop your car, if you no longer
need them.
1UE026
Push the “MENU” switch to display the
Menu screen and touch the
“Marked
points”
switch. Touch the
“Del.prev.dest.” switch.
When you touch the switch on each pre-
vious destination or
“Delete all”
switch, a message appears to confirm
your request. If you are sure, touch the
“Yes” switch. If not, touch the “No”
switch. By touching the
“Emergency” switch
on the Destination screen, the display
changes to a screen to select dealers,
hospitals or police stations. During driv-
ing, only nearby police stations, hospi-
tals or dealers are shown. The current
position is shown with an address, the
latitude and the longitude at the top of the
screen.
1UE027
When you touch your desired emergency
category, the selected emergency category
list is displayed.
1UE028
The distance from your current position up to
the destination is displayed on the right of the
name.
You can see the names of the emergency
destinations in alphabetical order by touch-
ing the
“Name Sort” switch on the
screen.
Touch the
of your desired item. The
screen changes and displays the map
location of the selected destination and
the route preference. (See
“(a) Entering
Destination” on page 22.)
Touch the
“Info.” switch on the screen to
display the selected emergency destination
name, address and telephone number.
Destination input by
E
MERGENCY
Page 47 of 98
40If you have already registered the preset
destination,
you can overwrite on the present
registered destination.
1UE067
4. Input the preset destination in the
same way as the destination input.
(See page 22.)
Editing preset destinations
1. Push the “MENU” switch to display
the Menu screen and touch the
“Marked points” switch.
1UE065
2. Touch the “Edit” switch of Preset
destinations
1~5.
1UE068
3. Select the preset destination that you want to edit and touch the
switch.
1UE069
You can change the name, location and
phone number of the preset destination.
Touch the
“Change” switch.
Page 74 of 98
67
When you finish registration of the
marked point, the Register marked point
screen appears.
2SE004U
3. Touch your desired icon. You can turn
the pages by touching the “Page 1”or “Page 2” switch. Touching the“With sound” switch, you can se-
lect your desired sound. (For details,
see page 68.)
INFORMATION
Up to 100 marked points can be regis-
tered.
Once a marked point is registered, you
can edit the icon, name or telephone
number.
1. Push the
“MENU” switch to display
the Menu screen and touch the
“Marked points” switch.
1UE063
2. Touch the “Edit” switch of Marked
points.
2UE003
The screen lists the marked points.
Sort by Icon: Touch this switch to list the
marked points in order of the category of
icon.
Sort by Date: Touch this switch to list the
marked points in order of the registered date.
Sort by Name: Touch this switch to list the
marked points in alphabetical order.
Touch
of the desired marked point to
display the Edit marked point screen.
(b) Editing marked points
Page 76 of 98
69
�
CHANGING THE “NAME”
2UE006
Touch alphabet or numeral keys directly
to input the name.
After you finish your entry, touch the
“OK”
switch.
The previous screen will be displayed. If you
touch the
“Off” switch of show name, the
name of this marked point is not shown on
the map. �
CHANGING THE “PHONE NUMBER”
2UE007
Touch numeral keys directly.
After you finish your entry, touch the
“OK”
switch.
The previous screen will be displayed. �
CHANGING THE “LOCATION”
2UE008
Touch the arrows to scroll to your desired
point on the Map screen.
Touch the
“OK” switch when the cursor
moves to your desired point.
The previous screen will return.
After you finish any editing, touch the
“Back” switch on the first screen of Edit
marked points.
Page 97 of 98
90�
Editing the location
3UE019T
Touch the arrows to scroll to your desired
point on the Map screen.
Touch the
“OK” switch when the cursor
moves to your desired point.
The previous screen will be displayed. �
Editing the phone number
3UE020
Touch numeral keys directly.
After you finish your entry, touch the
“OK”
switch.
The previous screen will be displayed.
After you finish any editing, touch the
“Back” switch.
3UE017T
1. Touch the “Set dealer” switch and
touch the “Delete dealer” switch.
(c) Deleting dealer