Page 5 of 98
v
Overview of Touch Screen and Switches
Switch operation
This system operates mainly by the
switches on the screen. To protect the
screen, lightly touch switches on the
screen with your finger. When you touch
a switch on the screen or on the bezel, a
beep sounds.
INFORMATION
� If the system does not respond to a
touch of a switch, move your finger
away from the screen and then touch
it again.
� You cannot operate dimmed
switches.
� Wipe off fingerprints on the surface
of the display using a glass cleaning
cloth.
� The displayed image may become
darker and moving images may be
slightly distorted when the display is
cold.
Page 9 of 98

2The navigation system operates by
switches on
the screen and the switches
located on the front face around the
screen. When you touch or push a switch,
a beep sounds. When using the switches
on the touch screen, please use only light
pressure with your finger to protect the
screen from damage. Do not use objects
other than your finger to touch the
screen.
1UE001
To type in an address etc., directly touch al-
phabet keys on the screen. If you touch a
wrong letter, delete it using the
switch.
Touching the
switch erases one letter. Touching
the
“List” switch will change the
screen to a display of the database items that
match the name or address that you have
entered on the screen. The number of
matching items is shown to the right side of
the screen. If the matching item is more than
9,999, the system displays
“����” on the
screen.
To input numerals, touch the
“0–9” switch
and the display will change the screen to
number input display.
1UE002
Touching the “A–Z” switch changes the
screen back to the previous name input dis-
play.
1UE003
When a list is displayed, you can scroll or
page through the list by using the appropri-
ate switch.
To shift to the next or previous
page.
To scroll up or down one item at a
time.
This expresses a displayed screen
position.
Inputting letters and number
Page 30 of 98

23
Touch the
“Detour” switch of “Re-
stricted road” to search for a route other
than restricted road.
Touching the
“Allow” switch on each item
allows to use it.
The switches you select are highlighted in
green. After choosing conditions, touch the
“OK” switch.
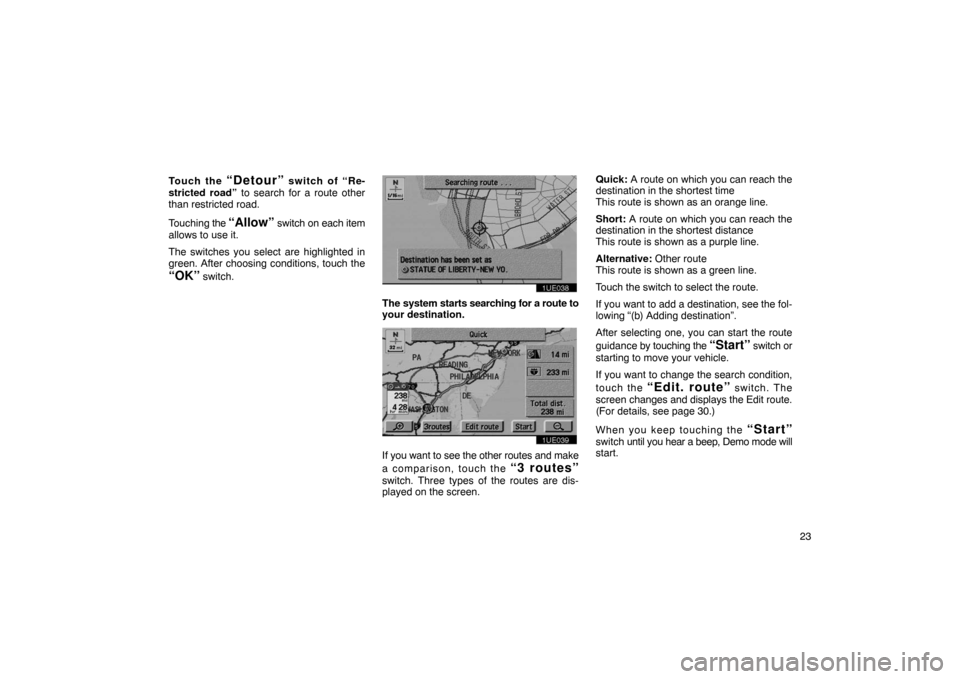
1UE038
The system starts searching for a route to
your destination.
1UE039
If you want to see the other routes and make
a comparison, touch the
“3 routes”
switch. Three types of the routes are dis-
played on the screen. Quick:
A route on which you can reach the
destination in the shortest time
This route is shown as an orange line.
Short: A route on which you can reach the
destination in the shortest distance
This route is shown as a purple line.
Alternative: Other route
This route is shown as a green line.
Touch the switch to select the route.
If you want to add a destination, see the fol-
lowing “(b) Adding destination”.
After selecting one, you can start the route
guidance by touching the
“Start” switch or
starting to move your vehicle.
If you want to change the search condition,
touch the
“Edit. route” switch. The
screen changes and displays the Edit route.
(For details, see page 30.)
When you keep touching the
“Start”
switch until you hear a beep, Demo mode will
start.
Page 87 of 98

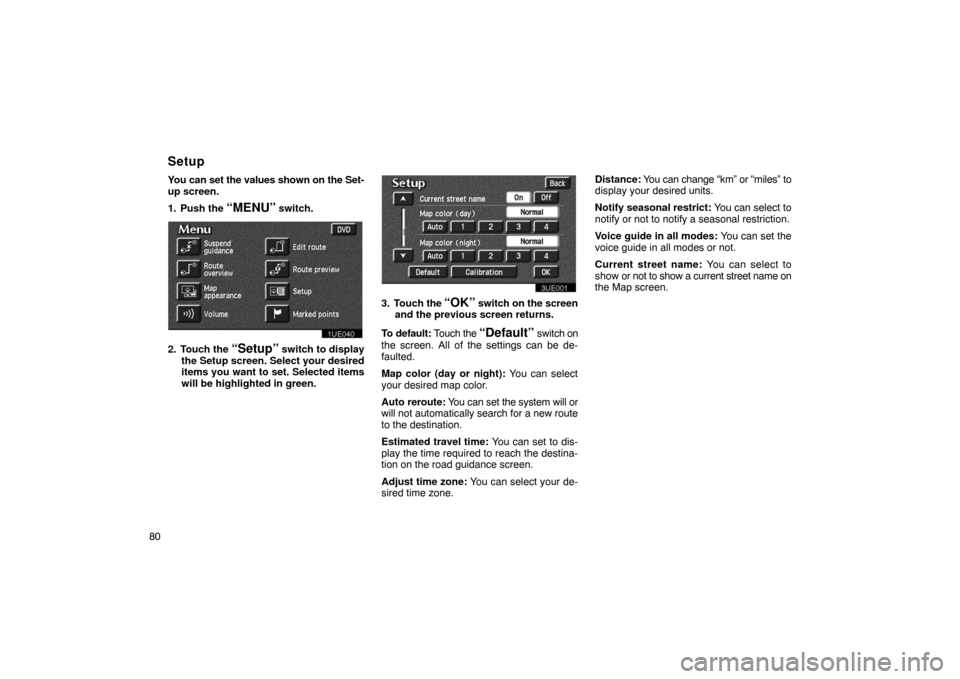
80You can set the values shown on the Set-
up screen.
1. Push the
“MENU” switch.
1UE040
2. Touch the “Setup” switch to display
the Setup screen. Select your desired
items you want to set. Selected items
will be highlighted in green.
3UE001
3. Touch the “OK” switch on the screen
and the previous screen returns.
To default: Touch the
“Default” switch on
the screen. All of the settings can be de-
faulted.
Map color (day or night): You can select
your desired map color.
Auto reroute: You can set the system will or
will not automatically search for a new route
to the destination.
Estimated travel time: You can set to dis-
play the time required to reach the destina-
tion on the road guidance screen.
Adjust time zone: You can select your de-
sired time zone. Distance:
You can change “km” or “miles” to
display your desired units.
Notify seasonal restrict: You can select to
notify or not to notify a seasonal restriction.
Voice guide in all modes: You can set the
voice guide in all modes or not.
Current street name: You can select to
show or not to show a current street name on
the Map screen.
Setup
Page 91 of 98
843. Touch the
“Adjust” switch, the Ad-
just time zone screen appears on the
display.
3UE006a
4. Select your desired time zone. Se- lected switch is highlighted in green.
Touch the
“On” switch and then touch
or switch to set the daylight saving time.
5. Touch the
“OK” switch on the screen
and the Setup screen returns. 1. Push the
“MENU” switch.
1UE040
2. Touch the “Setup” switch.
3UE007
3. Touch “km” or “miles” to select
your desired units.
4. Touch the
“OK” switch. 1. Push the
“MENU” switch.
1UE040
2. Touch the “Setup” switch.
3UE008
Distance indicationNotifying seasonal restriction