Page 87 of 119

Corolla_MATRIX_Navi_U (L/O 0208)
792003 MY COROLLA MATRIX (OM12774U)
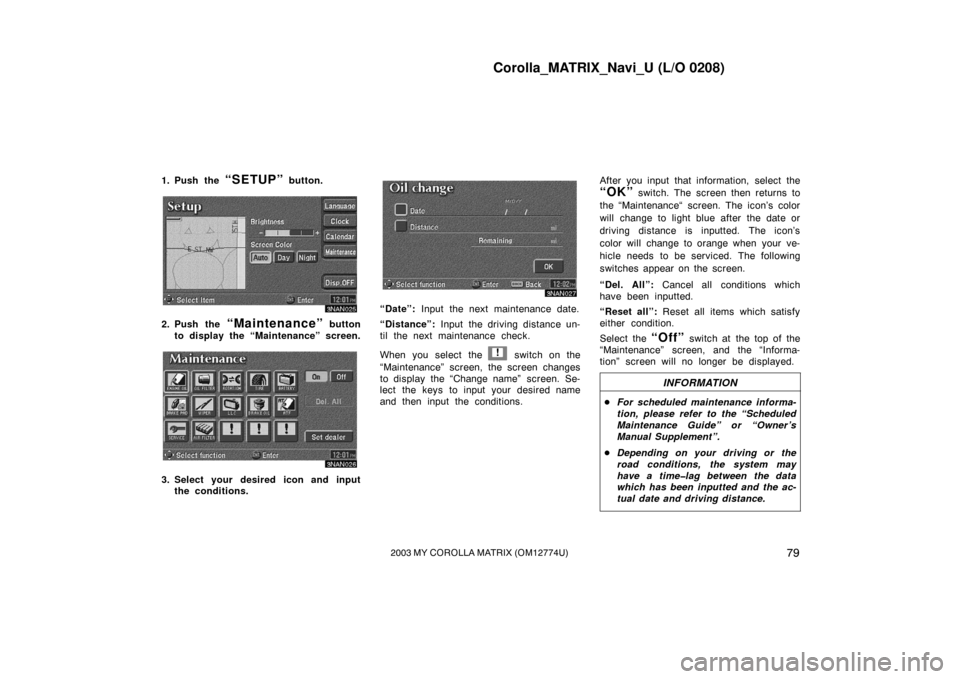
1. Push the “SETUP” button.
3NAN025
2. Push the “Maintenance” button
to display the “Maintenance” screen.
3NAN026
3. Select your desired icon and input the conditions.
3NAN027
“Date”: Input the next maintenance date.
“Distance”: Input the driving distance un-
til the next maintenance check.
When you select the
! switch on the
“Maintenance” screen, the screen changes
to display the “Change name” screen. Se-
lect the keys to input your desired name
and then input the conditions. After you input that information, select the
“OK” switch. The screen then returns to
the “Maintenance“ screen. The icon’s color
will change to light blue after the date or
driving distance is inputted. The icon’s
color will change to orange when your ve-
hicle needs to be serviced. The following
switches appear on the screen.
“Del. All”: Cancel all conditions which
have been inputted.
“Reset all”: Reset all items which satisfy
either condition.
Select the
“Off” switch at the top of the
“Maintenance” screen, and the “Informa-
tion” screen will no longer be displayed.
INFORMATION
� For scheduled maintenance informa-
tion, please refer to the “Scheduled
Maintenance Guide” or “Owner’s
Manual Supplement”.
� Depending on your driving or the
road conditions, the system may
have a time�lag between the data
which has been inputted and the ac-
tual date and driving distance.
Page 92 of 119
Corolla_MATRIX_Navi_U (L/O 0208)
842003 MY COROLLA MATRIX (OM12774U)
3NAN040
Push the “SETUP” button. Push the
“Calendar” button to display the
“Calendar” screen.
3NAN041
Today’s date is highlighted. If today’s date
is not displayed on the screen, select
“Today” switch to display a calendar of
this month.
3NAN042
1. Select the day you want to input a memo.
3NAN074
2. Select the “Memo” switch to dis-
play the “Change name” screen.
(a) Inputting a memo
Page 98 of 119

Corolla_MATRIX_Navi_U (L/O 0208)
902003 MY COROLLA MATRIX (OM12774U)
The clock in this system can be cor-
rected manually or by using signals
from the GPS. Daylight Saving Time
setting or your desired time setting is
available.1. Push the
“SETUP” button.
4NAN003
2. Push the “Clock” button.
�Clock setting
4NAN008
Select your desired switch you want to
set.
“12Hr/24Hr”: You can select standard 12
hour AM/PM time,
“12Hr”, or 24 hour
military time,
“24Hr”.
“Auto GPS Update”: If you select the
“ON” switch, the time is automatically
adjusted by the GPS clock. If you select
the
“OFF” switch, you can adjust the
clock manually. (For the method of how to
adjust the clock, see manual clock adjust-
ment.)
“Daylight Savings”: Daylight savings time
can be set or canceled.
“Time Zone”: You can select the time
zone. Selected switch is highlighted in
green.
�Manual clock adjustment
4NAN008
Push the “Adjust” button and select
hour or minute. The highlighted num-
bers may then be adjusted by moving
the select and scroll lever up or down.
Push the
“Adjust” button once again,
and return to clock setting mode.
If you push the
“Adjust” button, “Auto
GPS Update” will turn to
“OFF” auto-
matically.
After making any changes on the “Ad-
just Clock” screen, push the
“OK”
button so that the previous screen will
be displayed. You can also display the
previous screen by pushing the
“Back” button.
Clock adjustment
Page 117 of 119

Corolla_MATRIX_Navi_U (L/O 0208)
1092003 MY COROLLA MATRIX (OM12774U)
AM
Fading—AM broadcasts are reflected by
the upper atmosphere—especially at
night. These reflected signals can inter-
fere with those received directly from the
radio station, causing the radio station to
sound alternately strong and weak.
Station interference—When a reflected
signal and a signal received directly from
a radio station are very nearly the same
frequency, they can interfere with each
other, making it difficult to hear the
broadcast.
Static—AM is easily affected by external
sources of electrical noise, such as high
tension power lines, lightening, or electri-
cal motors. This results in static. CARING FOR YOUR COMPACT DISC
PLAYER AND DISCS
�Your compact disc player is intended
for use with 12 cm (4.7 in.) discs only.
�Extremely high temperatures can keep
your compact disc player from work-
ing. On hot days, use the air condi-
tioning to cool the vehicle interior be-
fore you listen to a disc.
�Bumpy roads or other vibrations may
make your compact disc player skip.
�If moisture gets into your compact
disc player, you may not hear any
sound even though your compact disc
player appears to be working. Remove
the disc from the player and wait until
it dries.
CAUTION
Compact disc player
s use an invis-
ible laser beam which could cause
hazardous radiatio n exposure if di-
rected outside the unit. Be sure to
operate the player correctly.
�Use only compact discs marked as
shown above. The following products
may not be playable on your compact
disc player.
Copy −protected CD
CD− R (CD −Recordable)
CD− RW (CD −Re− writable)
CD− ROM
Page 118 of 119
Corolla_MATRIX_Navi_U (L/O 0208)
11 02003 MY COROLLA MATRIX (OM12774U)
Special shaped discs
Low quality discs
Labeled discs
NOTICE
To prevent damage to the player or
changer, do not use special shaped,
low quality or labeled discs such as
those shown in the illustrations.
CorrectWrong
�Handle compact discs carefully, espe-
cially when you are inserting them.
Hold them on the edge and do not
bend them. Avoid getting fingerprints
on them, particularly on the shiny
side.
�Dirt, scrapes, warping, pin holes, or
other disc damage could cause the
player to skip or to repeat a section
of a track. (To see a pin hole, hold
the disc up to the light.)
�Remove discs from the compact disc
player when you are not listening to
them. Store them in their plastic cases
away from moisture, heat, and direct
sunlight.