Page 85 of 2234
010B5±11
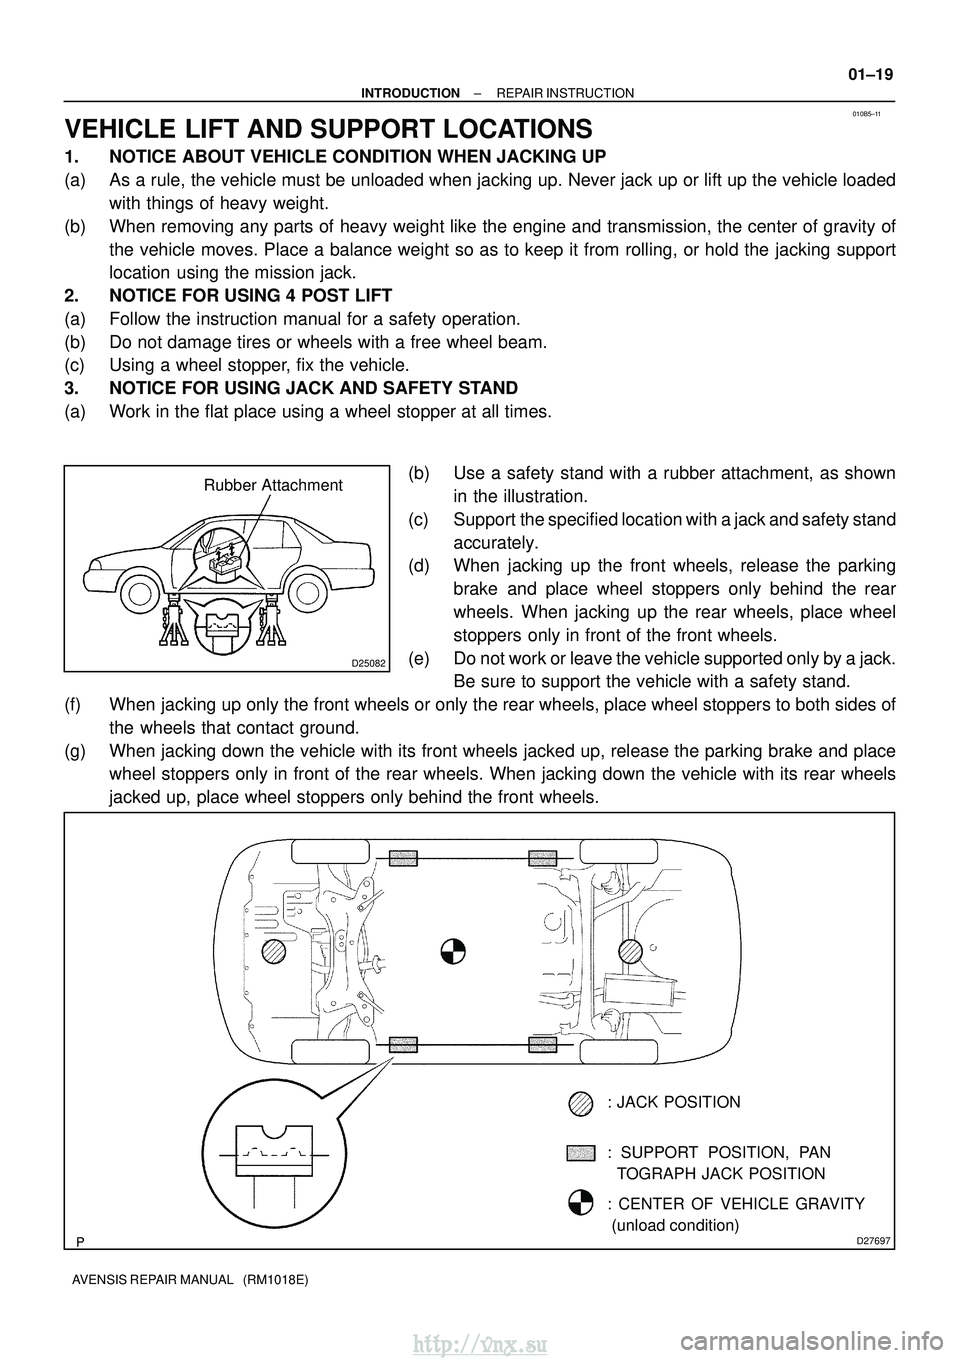
D25082
Rubber Attachment
D27697
: SUPPORT POSITION, PAN
TOGRAPH JACK POSITION
: CENTER OF VEHICLE GRAVITY
(unload condition)
: JACK POSITION
±
INTRODUCTION REPAIR INSTRUCTION
01±19
AVENSIS REPAIR MANUAL (RM1018E)
VEHICLE LIFT AND SUPPORT LOCATIONS
1. NOTICE ABOUT VEHICLE CONDITION WHEN JACKING UP
(a) As a rule, the vehicle must be unloaded when jacking up. Never jack up o\
r lift up the vehicle loaded
with things of heavy weight.
(b) When removing any parts of heavy weight like the engine and transmission, the center of gravity of the vehicle moves. Place a balance weight so as to keep it from rolling,\
or hold the jacking support
location using the mission jack.
2. NOTICE FOR USING 4 POST LIFT
(a) Follow the instruction manual for a safety operation.
(b) Do not damage tires or wheels with a free wheel beam.
(c) Using a wheel stopper, fix the vehicle.
3. NOTICE FOR USING JACK AND SAFETY STAND
(a) Work in the flat place using a wheel stopper at all times.
(b) Use a safety stand with a rubber attachment, as shownin the illustration.
(c) Support the specified location with a jack and safety stand accurately.
(d) When jacking up the front wheels, release the parking
brake and place wheel stoppers only behind the rear
wheels. When jacking up the rear wheels, place wheel
stoppers only in front of the front wheels.
(e) Do not work or leave the vehicle supported only by a jack. Be sure to support the vehicle with a safety stand.
(f) When jacking up only the front wheels or only the rear wheels, place wheel stoppers to both sides of the wheels that contact ground.
(g) When jacking down the vehicle with its front wheels jacked up, release t\
he parking brake and place wheel stoppers only in front of the rear wheels. When jacking down the v\
ehicle with its rear wheels
jacked up, place wheel stoppers only behind the front wheels.
http://vnx.su
Page 86 of 2234
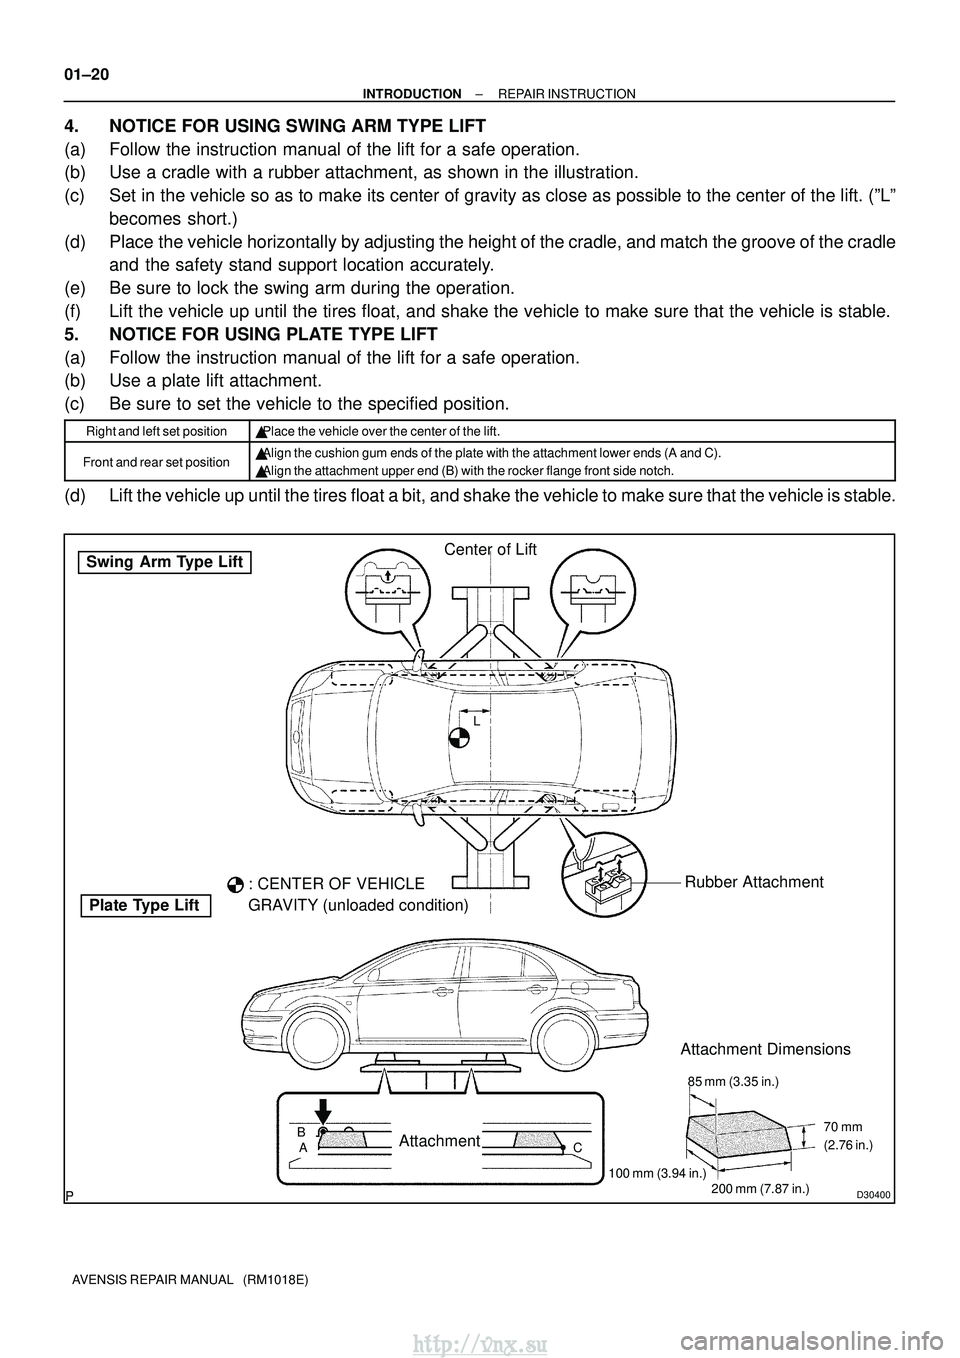
D30400
Swing Arm Type Lift
Plate Type LiftCenter of Lift
: CENTER OF VEHICLE
GRAVITY (unloaded condition) Rubber Attachment
AttachmentBAL
Attachment Dimensions
85 mm (3.35 in.)
200 mm (7.87 in.)
100 mm (3.94 in.) 70 mm
(2.76 in.)
C
01±20
±
INTRODUCTION REPAIR INSTRUCTION
AVENSIS REPAIR MANUAL (RM1018E)
4. NOTICE FOR USING SWING ARM TYPE LIFT
(a) Follow the instruction manual of the lift for a safe operation.
(b) Use a cradle with a rubber attachment, as shown in the illustration.
(c) Set in the vehicle so as to make its center of gravity as close as possible\
to the center of the lift. (ºLº becomes short.)
(d) Place the vehicle horizontally by adjusting the height of the cradle, and match th\
e groove of the cradle and the safety stand support location accurately.
(e) Be sure to lock the swing arm during the operation.
(f) Lift the vehicle up until the tires float, and shake the vehicle to make\
sure that the vehicle is stable.
5. NOTICE FOR USING PLATE TYPE LIFT
(a) Follow the instruction manual of the lift for a safe operation.
(b) Use a plate lift attachment.
(c) Be sure to set the vehicle to the specified position.
Right and left set position� Place the vehicle over the center of the lift.
Front and rear set position�Align the cushion gum ends of the plate with the attachment lower ends (\
A and C).
� Align the attachment upper end (B) with the rocker flange front side n\
otch.
(d) Lift the vehicle up until the tires float a bit, and shake the vehicle t\
o make sure that the vehicle is stable.
http://vnx.su
Page 1048 of 2234
2801F±02
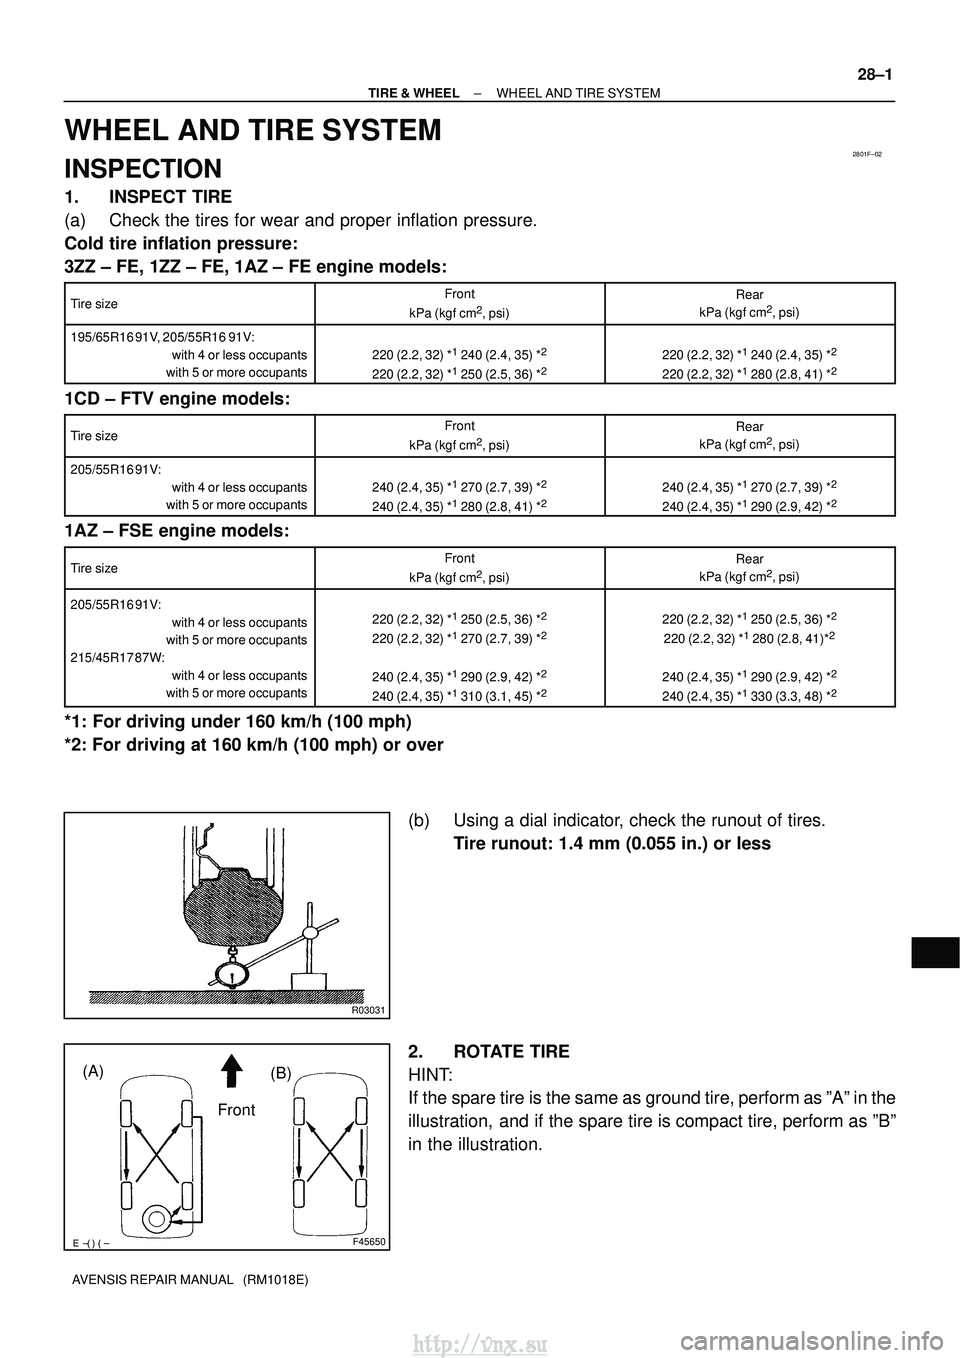
R03031
������F45650
Front
(A)
(B)
±
TIRE & WHEEL WHEEL AND TIRE SYSTEM
28±1
AVENSIS REPAIR MANUAL (RM1018E)
WHEEL AND TIRE SYSTEM
INSPECTION
1. INSPECT TIRE
(a) Check the tires for wear and proper inflation pressure.
Cold tire inflation pressure:
3ZZ ± FE, 1ZZ ± FE, 1AZ ± FE engine models:
Tire sizeFront
kPa (kgf� cm2, psi)
Rear
kPa (kgf �cm2, psi)
195/65R16 91V, 205/55R16 91V:
with 4 or less occupants
with 5 or more occupants
220 (2.2, 32) *1 240 (2.4, 35) *2
220 (2.2, 32) *1 250 (2.5, 36) *2220 (2.2, 32) *1 240 (2.4, 35) *2
220 (2.2, 32) *1 280 (2.8, 41) *2
1CD ± FTV engine models:
Tire sizeFront
kPa (kgf� cm2, psi)
Rear
kPa (kgf �cm2, psi)
205/55R16 91V:
with 4 or less occupants
with 5 or more occupants
240 (2.4, 35) *1 270 (2.7, 39) *2
240 (2.4, 35) *1 280 (2.8, 41) *2240 (2.4, 35) *1 270 (2.7, 39) *2
240 (2.4, 35) *1 290 (2.9, 42) *2
1AZ ± FSE engine models:
Tire sizeFront
kPa (kgf� cm2, psi)
Rear
kPa (kgf �cm2, psi)
205/55R16 91V:
with 4 or less occupants
with 5 or more occupants
215/45R17 87W: with 4 or less occupants
with 5 or more occupants220 (2.2, 32) *1 250 (2.5, 36) *2
220 (2.2, 32) *1 270 (2.7, 39) *2
240 (2.4, 35) *1 290 (2.9, 42) *2
240 (2.4, 35) *1 310 (3.1, 45) *2
220 (2.2, 32) *1 250 (2.5, 36) *2
220 (2.2, 32) *1 280 (2.8, 41)*2
240 (2.4, 35) *1 290 (2.9, 42) *2
240 (2.4, 35) *1 330 (3.3, 48) *2
*1: For driving under 160 km/h (100 mph)
*2: For driving at 160 km/h (100 mph) or over
(b) Using a dial indicator, check the runout of tires.Tire runout: 1.4 mm (0.055 in.) or less
2. ROTATE TIRE
HINT:
If the spare tire is the same as ground tire, perform as ºAº in the
illustration, and if the spare tire is compact tire, perform as ºBº
in the illustration.
http://vnx.su
Page 1233 of 2234
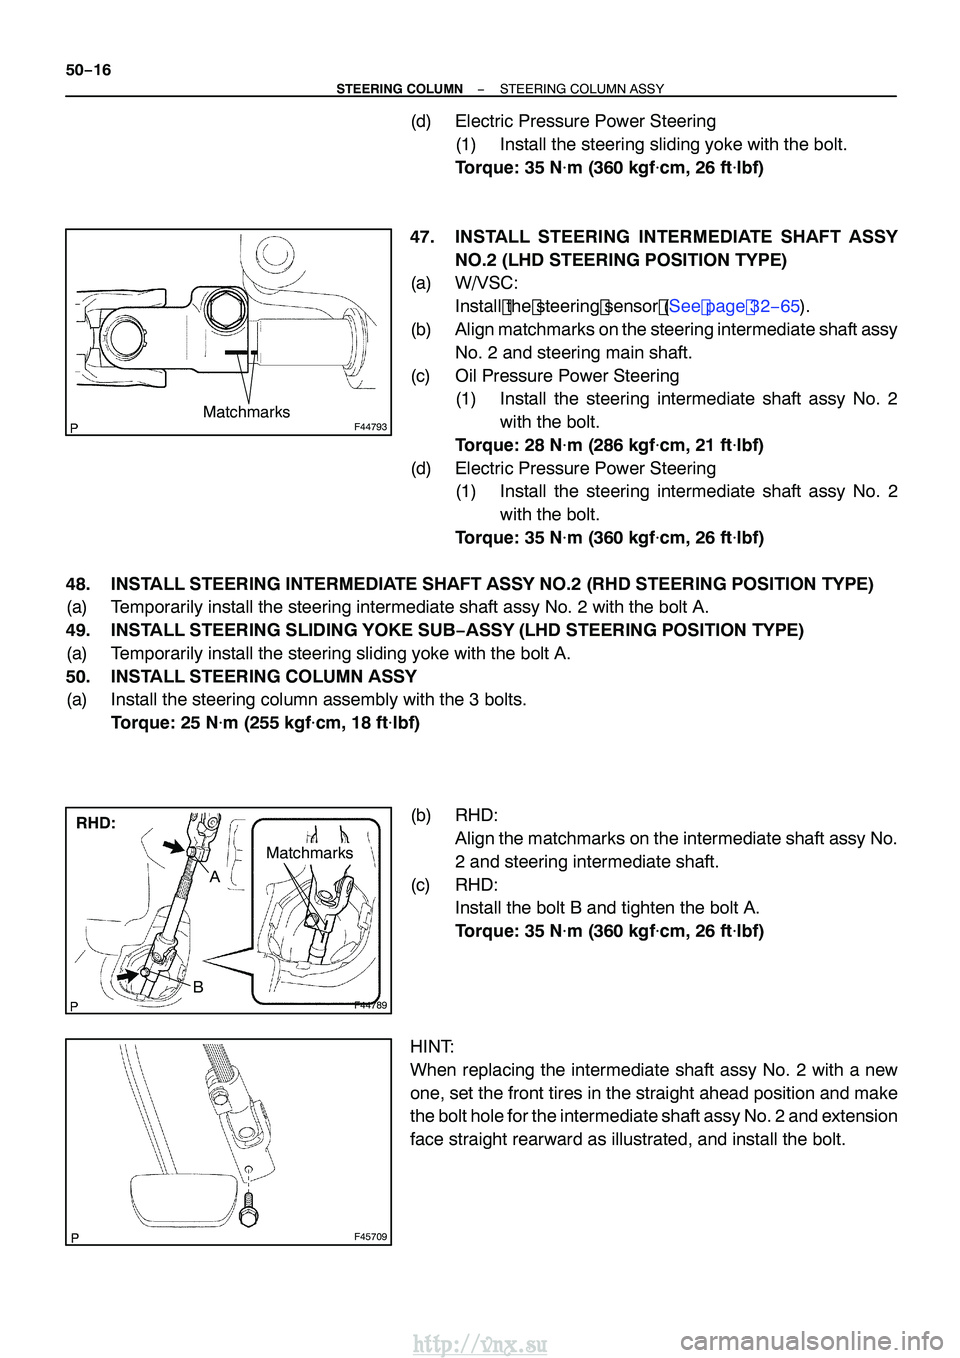
F44793Matchmarks
F44789
RHD:
Matchmarks
A
B
F45709
50−16
−
STEERING COLUMN STEERING COLUMN ASSY
(d) Electric Pressure Power Steering
(1) Install the steering sliding yoke with the bolt.
Torque: 35 N �m (360 kgf�cm, 26 ft �lbf)
47. INSTALL STEERING INTERMEDIATE SHAFT ASSY NO.2 (LHD STEERING POSITION TYPE)
(a) W/VSC:
Install the steering sensor (See page 32− 65).
(b) Align matchmarks on the steering intermediate shaft assy
No. 2 and steering main shaft.
(c) Oil Pressure Power Steering (1) Install the steering intermediate shaft assy No. 2
with the bolt.
Torque: 28 N �m (286 kgf�cm, 21 ft �lbf)
(d) Electric Pressure Power Steering (1) Install the steering intermediate shaft assy No. 2
with the bolt.
Torque: 35 N �m (360 kgf�cm, 26 ft �lbf)
48. INSTALL STEERING INTERMEDIATE SHAFT ASSY NO.2 (RHD STEERING POSITION TYPE)
(a) Temporarily install the steering intermediate shaft assy No. 2 with the bolt A.
49. INSTALL STEERING SLIDING YOKE SUB −ASSY (LHD STEERING POSITION TYPE)
(a) Temporarily install the steering sliding yoke with the bolt A.
50. INSTALL STEERING COLUMN ASSY
(a) Install the steering column assembly with the 3 bolts.
Torque: 25 N �m (255 kgf�cm, 18 ft �lbf)
(b) RHD: Align the matchmarks on the intermediate shaft assy No.
2 and steering intermediate shaft.
(c) RHD: Install the bolt B and tighten the bolt A.
Torque: 35 N �m (360 kgf�cm, 26 ft �lbf)
HINT:
When replacing the intermediate shaft assy No. 2 with a new
one, set the front tires in the straight ahead position and make
the bolt hole for the intermediate shaft assy No. 2 and extension
face straight rearward as illustrated, and install the bolt.
http://vnx.su
Page 1234 of 2234
F44790
LHD:
Matchmarks
BA
C82037
F45269
−
STEERING COLUMN STEERING COLUMN ASSY
50−17
(d) LHD:
Align matchmarks on the sliding yoke and steering inter-
mediate shaft.
(e) LHD:
Install the bolt B and tighten the bolt A.
Torque: 35 N �m (360 kgf�cm, 26 ft �lbf)
HINT:
When replacing the sliding yoke with a new one, set the front
tires in the straight ahead position and make the bolt hole for the
yoke and extension face straight rearward as illustrated, and
install the bolt.
(f) RHD, M/T: Install the protector with the bolt.
Torque: 25 N �m (255 kgf�cm, 18 ft �lbf)
51. INSTALL FLOOR SHIFT PARKING LOCK CABLE ASSY (A/T TRANSAXLE)(See page 40 −74)
http://vnx.su
Page 1238 of 2234
5000D±14
50±2
±
STEERING COLUMN STEERING SYSTEM
AVENSIS REPAIR MANUAL (RM1018E)
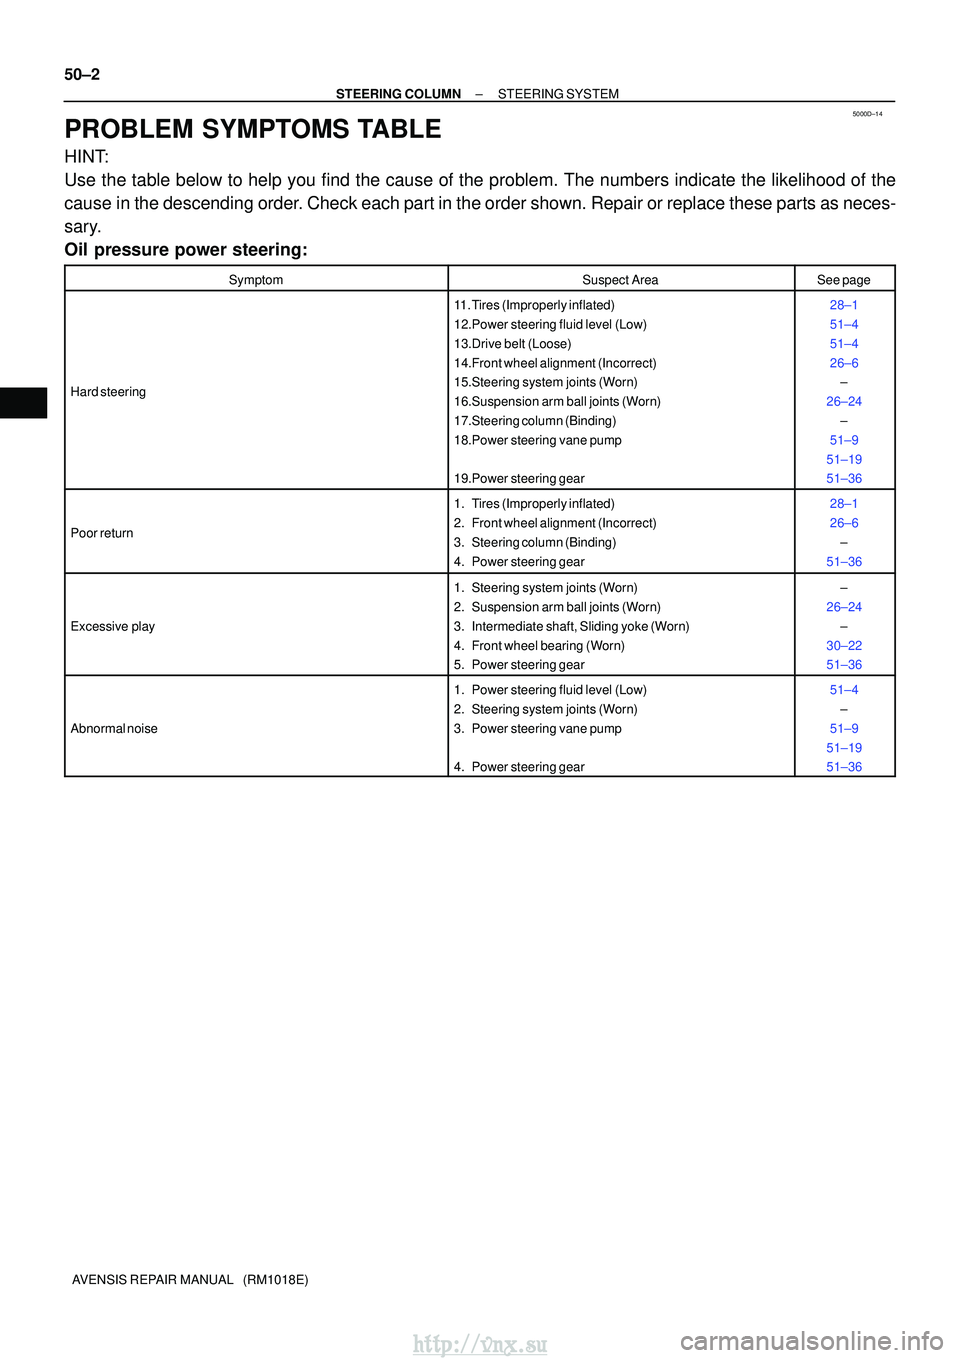
PROBLEM SYMPTOMS TABLE
HINT:
Use the table below to help you find the cause of the problem. The numbers \
indicate the likelihood of the
cause in the descending order. Check each part in the order shown. Repair or replace these parts as n\
eces-
sary.
Oil pressure power steering:
SymptomSuspect AreaSee page
Hard steering
11. Tires (Improperly inflated)
12.Power steering fluid level (Low)
13.Drive belt (Loose)
14.Front wheel alignment (Incorrect)
15.Steering system joints (Worn)
16.Suspension arm ball joints (Worn)
17.Steering column (Binding)
18.Power steering vane pump
19.Power steering gear28±1
51±4
51±4
26±6 ±
26±24 ±
51±9
51±19
51±36
Poor return
1. Tires (Improperly inflated)
2. Front wheel alignment (Incorrect)
3. Steering column (Binding)
4. Power steering gear28±1
26±6 ±
51±36
Excessive play
1. Steering system joints (Worn)
2. Suspension arm ball joints (Worn)
3. Intermediate shaft, Sliding yoke (Worn)
4. Front wheel bearing (Worn)
5. Power steering gear±
26±24 ±
30±22
51±36
Abnormal noise
1. Power steering fluid level (Low)
2. Steering system joints (Worn)
3. Power steering vane pump
4. Power steering gear51±4 ±
51±9
51±19
51±36
http://vnx.su
Page 1239 of 2234
±
STEERING COLUMN STEERING SYSTEM
50±3
AVENSIS REPAIR MANUAL (RM1018E)
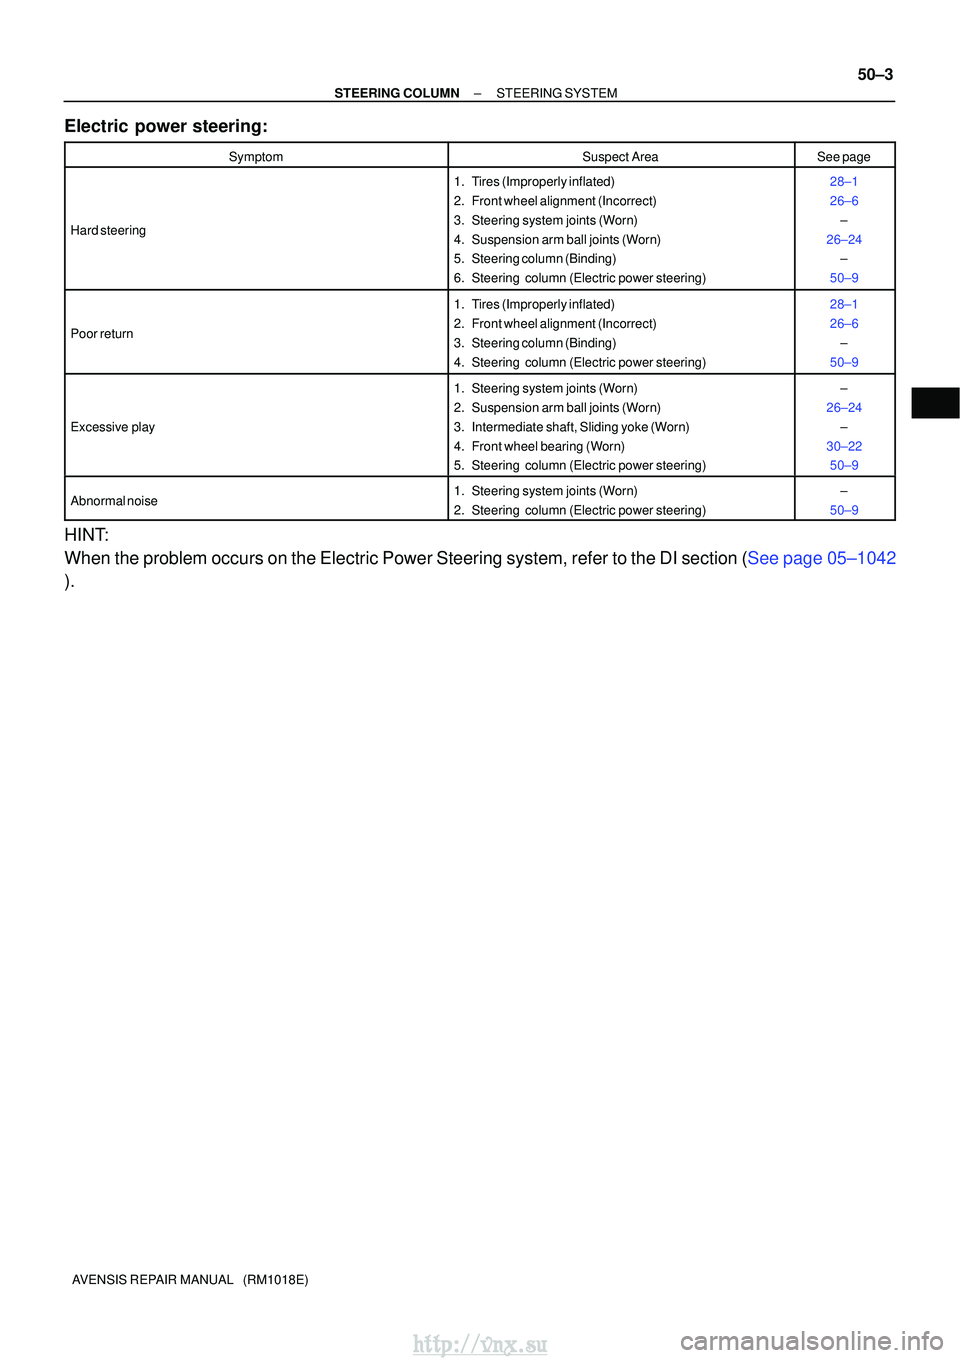
Electric power steering:
SymptomSuspect AreaSee page
Hard steering
1. Tires (Improperly inflated)
2. Front wheel alignment (Incorrect)
3. Steering system joints (Worn)
4. Suspension arm ball joints (Worn)
5. Steering column (Binding)
6. Steering column (Electric power steering)28±1
26±6
±
26±24 ±
50±9
Poor return
1. Tires (Improperly inflated)
2. Front wheel alignment (Incorrect)
3. Steering column (Binding)
4. Steering column (Electric power steering)28±1
26±6 ±
50±9
Excessive play
1. Steering system joints (Worn)
2. Suspension arm ball joints (Worn)
3. Intermediate shaft, Sliding yoke (Worn)
4. Front wheel bearing (Worn)
5. Steering column (Electric power steering)±
26±24 ±
30±22 50±9
Abnormal noise1. Steering system joints (Worn)
2. Steering column (Electric power steering)±
50±9
HINT:
When the problem occurs on the Electric Power Steering system, refer to \
the DI section (See page 05±1042
).
http://vnx.su
Page 1240 of 2234
5000E±04
F44778
Maximum
Freeplay
30 mm (1.18 in.)
50±4
±
STEERING COLUMN STEERING SYSTEM
AVENSIS REPAIR MANUAL (RM1018E)
ON±VEHICLE INSPECTION
1. CHECK STEERING WHEEL FREEPLAY
(a) Stop the vehicle and face the tires straight ahead.
(b) Rock the steering wheel gently up and down with a finger lightly, check the steering wheel freeplay.
Maximum freeplay: 30 mm (1.18 in.)
http://vnx.su