Page 1596 of 2234
Adhesive
Adhesive
BO4420Body
B67835
Primer M
Primer M
AdhesiveCORRECT
WRONG
: Primer M
70±42
±
WINDSHIELD/WINDOWGLASS/MIRROR BACK DOOR GLASS (WAGON MODELS)
AVENSIS REPAIR MANUAL (RM1018E)
6. INSTALL BACK DOOR GLASS
(a) Clean and shape the contact surface of the vehicle body. (1) Using a knife, cut away any rough adhesive on the
contact surface of the body to ensure the appropri-
ate surface shape.
HINT:
Leave as much adhesive on the body as possible. (2) Clean the contact surface of the body with a pieceof shop rag saturated with cleaner.
HINT:
Even if all the adhesive has been removed, clean the body.
(b) Using a brush, coat the exposed part of the body on the vehicle side with Primer M.
NOTICE:
�Allow the primer coating to dry for 3 minutes or more.
�Do not coat the adhesive with Primer M.
�Do not keep any of the opened Primer M for later use.
http://vnx.su
Page 1604 of 2234
B64130
Mark
B67820
Primer M
Primer M
AdhesiveCORRECT
WRONG
Primer M
±
WINDSHIELD/WINDOWGLASS/MIRROR BACK WINDOW GLASS (SEDAN MODELS)
70±31
AVENSIS REPAIR MANUAL (RM1018E)
(b) Position the glass.
(1) Using a suction cup, place the glass in the correctposition.
(2) Check that the whole contact surface of the glass rim is perfectly even.
(3) Place reference marks between the glass and ve- hicle body.
NOTICE:
Check that the stoppers are attached to the vehicle body
correctly.
HINT:
When reusing the glass, check and correct the reference mark
positions. (4) Remove the glass.
(c) Using a brush, coat the exposed part of the vehicle body with Primer M.
NOTICE:
�Allow the primer coating to dry for 3 minutes or more.
�Do not coat the adhesive with Primer M.
�Do not keep any of the opened Primer M for later use.
http://vnx.su
Page 1633 of 2234

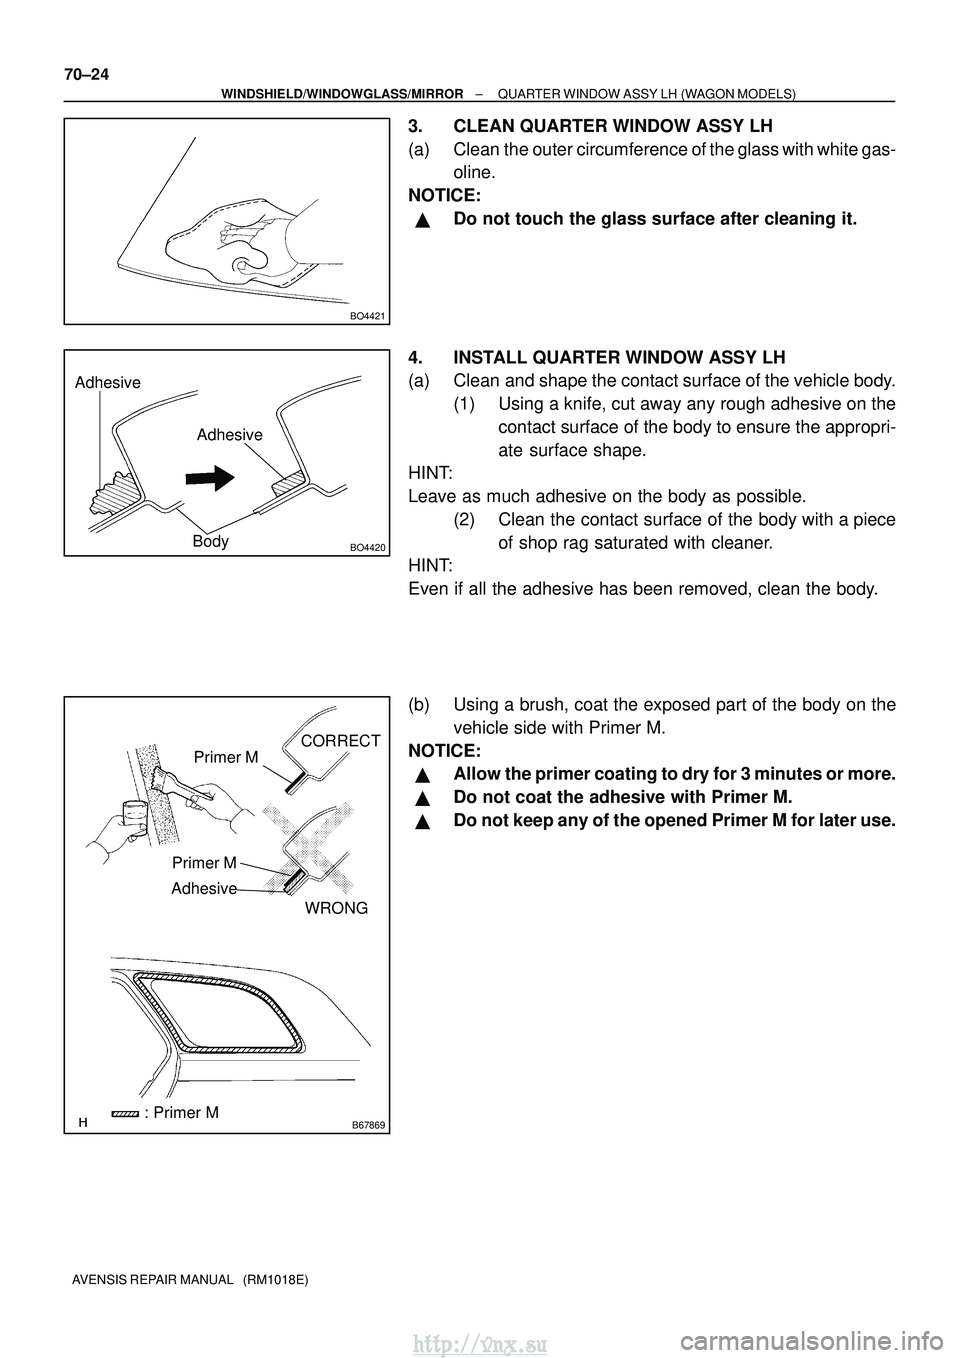
BO4421
Adhesive
Adhesive
BO4420Body
B67869
Primer M
Primer M
Adhesive
CORRECT
WRONG
: Primer M
70±24
±
WINDSHIELD/WINDOWGLASS/MIRROR QUARTER WINDOW ASSY LH (WAGON MODELS)
AVENSIS REPAIR MANUAL (RM1018E)
3. CLEAN QUARTER WINDOW ASSY LH
(a) Clean the outer circumference of the glass with white gas- oline.
NOTICE:
�Do not touch the glass surface after cleaning it.
4. INSTALL QUARTER WINDOW ASSY LH
(a) Clean and shape the contact surface of the vehicle body. (1) Using a knife, cut away any rough adhesive on thecontact surface of the body to ensure the appropri-
ate surface shape.
HINT:
Leave as much adhesive on the body as possible.
(2) Clean the contact surface of the body with a pieceof shop rag saturated with cleaner.
HINT:
Even if all the adhesive has been removed, clean the body.
(b) Using a brush, coat the exposed part of the body on the
vehicle side with Primer M.
NOTICE:
�Allow the primer coating to dry for 3 minutes or more.
�Do not coat the adhesive with Primer M.
�Do not keep any of the opened Primer M for later use.
http://vnx.su
Page 1723 of 2234
Disarmed state
(No key in ignition key cylinder.)
Continued from next pageContinued on next page
Performing the following will cause the system to go into arming prepara\
tion state.
�
With all doors and engine hood closed, lock all doors by wireless opera\
tion.
Arming preparation state
Performing any of the following will cause the
system to return to disarmed state.
� Unlock any door by wireless operation.
� Unlock any door.
� Open any door.
� Open engine hood.
� Insert key into ignition key cylinder.
� Reconnect battery.
� Turn ignition switch from OFF to ON. With all doors and engine hood closed,
lock all doors. Allow approx. 27.5 sec.
to elapse.
Performing the following will cause the
system to go into armed state.
�
73±32
±
THEFT DETERRENT & DOOR LOCK THEFT DETERRENT SYSTEM
AVENSIS REPAIR MANUAL (RM1018E)
2. ACTIVE ARMING MODE
�Active arming mode starts the alarm control right when the doors are loc\
ked.
http://vnx.su
Page 1725 of 2234

73±34
±
THEFT DETERRENT & DOOR LOCK THEFT DETERRENT SYSTEM
AVENSIS REPAIR MANUAL (RM1018E)
3. FORCED DOOR LOCK CONTROL
(a) The forced door lock control prevents the vehicle from being tampered with. Immediately after a door\
is unlocked (alarm starts), the door is forced to lock by a forced doo\
r lock signal.
(1) Conditions that force the doors to lock:
When no key is in the ignition key cylinder and 0.4 seconds have elapsed aft\
er the previous out-
put of a forced door lock signal, the doors will be forced to lock if any o\
f the following conditions
is present.
�The theft deterrent system is in the armed state of active arming mode.
�All the doors are locked. �Any door is unlocked.
�Any door is unlocked.
HINT:
Only Europe:
Forced door lock control does not operate if any door is unlocked by key\
.
4. ALARM MEMORY FUNCTION
(a) If the alarm is set off (tampering is detected) while the theft deterrent system is set, the\
alarm memory function will record it. Whenever you cancel the theft deterrent system, the al\
arm memory function
causes the taillights to light up for 2 seconds in order to inform you t\
hat the alarm has been set off.
(1) Conditions of the alarm memory function that cause the taillights to lig\
ht up:
When the theft deterrent system has entered into the alarm sounding state (\
tampering has been
detected) even once, the taillights will light up for 2 seconds if any of the following conditions is
present.
�Switched to the disarmed state from the armed state.
5. SECURITY INDICATOR OUTPUT
(a) The theft warning ECU outputs a signal to light up the security indicator, according to the state of the theft deterrent system. However, some of the actual lighting conditions of the security indicator are d\
if-
ferent from the outputs of the theft warning ECU.
Output:
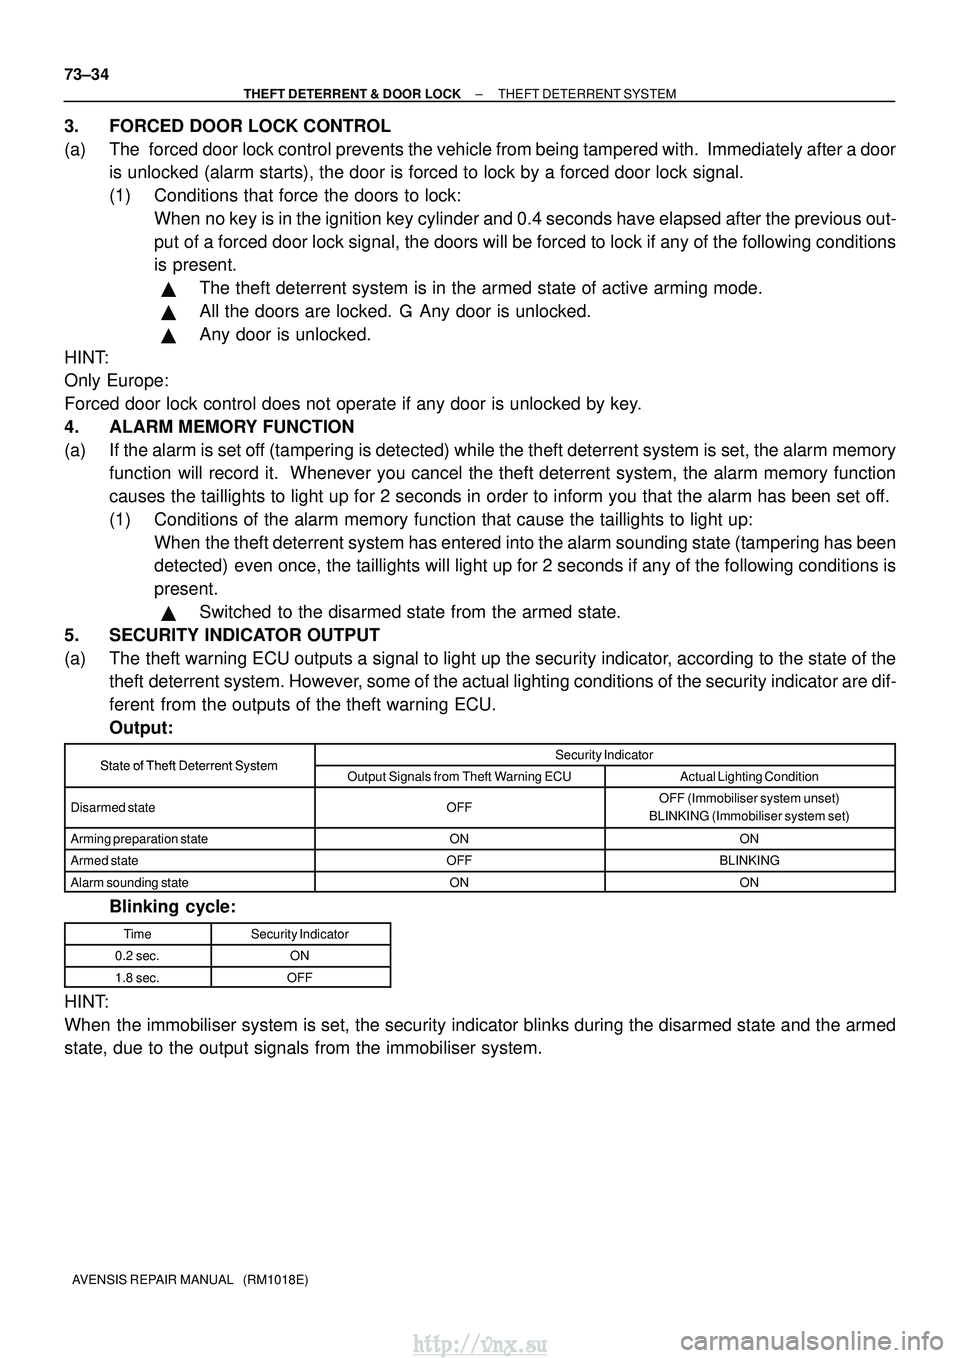
State of Theft Deterrent SystemSecurity IndicatorState of Theft Deterrent SystemOutput Signals from Theft Warning ECUActual Lighting Condition
Disarmed stateOFFOFF (Immobiliser system unset)
BLINKING (Immobiliser system set)
Arming preparation stateONON
Armed stateOFFBLINKING
Alarm sounding stateONON
Blinking cycle:
TimeSecurity Indicator
0.2 sec.ON
1.8 sec.OFF
HINT:
When the immobiliser system is set, the security indicator blinks during the \
disarmed state and the armed
state, due to the output signals from the immobiliser system.
http://vnx.su
Page 1731 of 2234

730EY±02
±
THEFT DETERRENT & DOOR LOCK TRANSMITTER SUB±ASSY MODULE SET DOOR
CONTROL73±21
AVENSIS REPAIR MANUAL (RM1018E)
REGISTRATION
1. REGISTER RECOGNITION CODE
HINT:
�Register the recognition code when replacing the door control transmitter or the\
door control receiverr.
�The add mode is used to register new recognition codes while still retai\
ning codes already registered.
This mode is used when a new transmitter is added. If the number of regi\
stered codes exceeds 4, the
previously registered codes will be erased in order, starting from the first registered code.
�The rewrite mode is used to erase all the previously registered recognition\
codes in order to register
new recognition codes. This mode is used when the transmitter or the door control receiver is ex-
changed for a new one.
�The confirmation mode is used to confirm how many recognition codes have al\
ready been registered
before an additional registration of a recognition codes.
�The all clear mode is used to erase all the registered codes and disables t\
he wireless door lock func-
tion. This mode is used when the transmitter is lost.
�All the following registration procedures must be performed in order con\
tinuously.
http://vnx.su
Page 1733 of 2234
Within 40 sec.
ON
LOCK
ON±LOCK operation: 1 time
Add Mode
Rewrite Mode
ON±LOCK operation: 2 times
Confirmation Mode
ON±LOCK operation: 3 times
All Clear Mode
ON±LOCK operation: 5 times
Number of ON±LOCK operations of ignition switch:
Turn ignition switch from LOCK to ON and back to LOCK at approximately
1 second intervals according to the number of times shown below.
Mode Selection:
If the number of the ON±LOCK operations of the ignition switch
is 0, 4 or 6 or more, there will be no response (power door lock and
unlock operation) to inform which mode has been selected.
Remove key from ignition key cylinder.
8.
7.
Within 3 sec.
T1
T1: Approx. 1 sec.
Continued from previous page
Continued on next page
ON
LOCK T1 T1
ON
LOCK T1 T1
ON
LOCK T1 T1
±
THEFT DETERRENT & DOOR LOCK TRANSMITTER SUB±ASSY MODULE SET DOOR
CONTROL73±23
AVENSIS REPAIR MANUAL (RM1018E)
http://vnx.su
Page 1734 of 2234

Continued from previous page
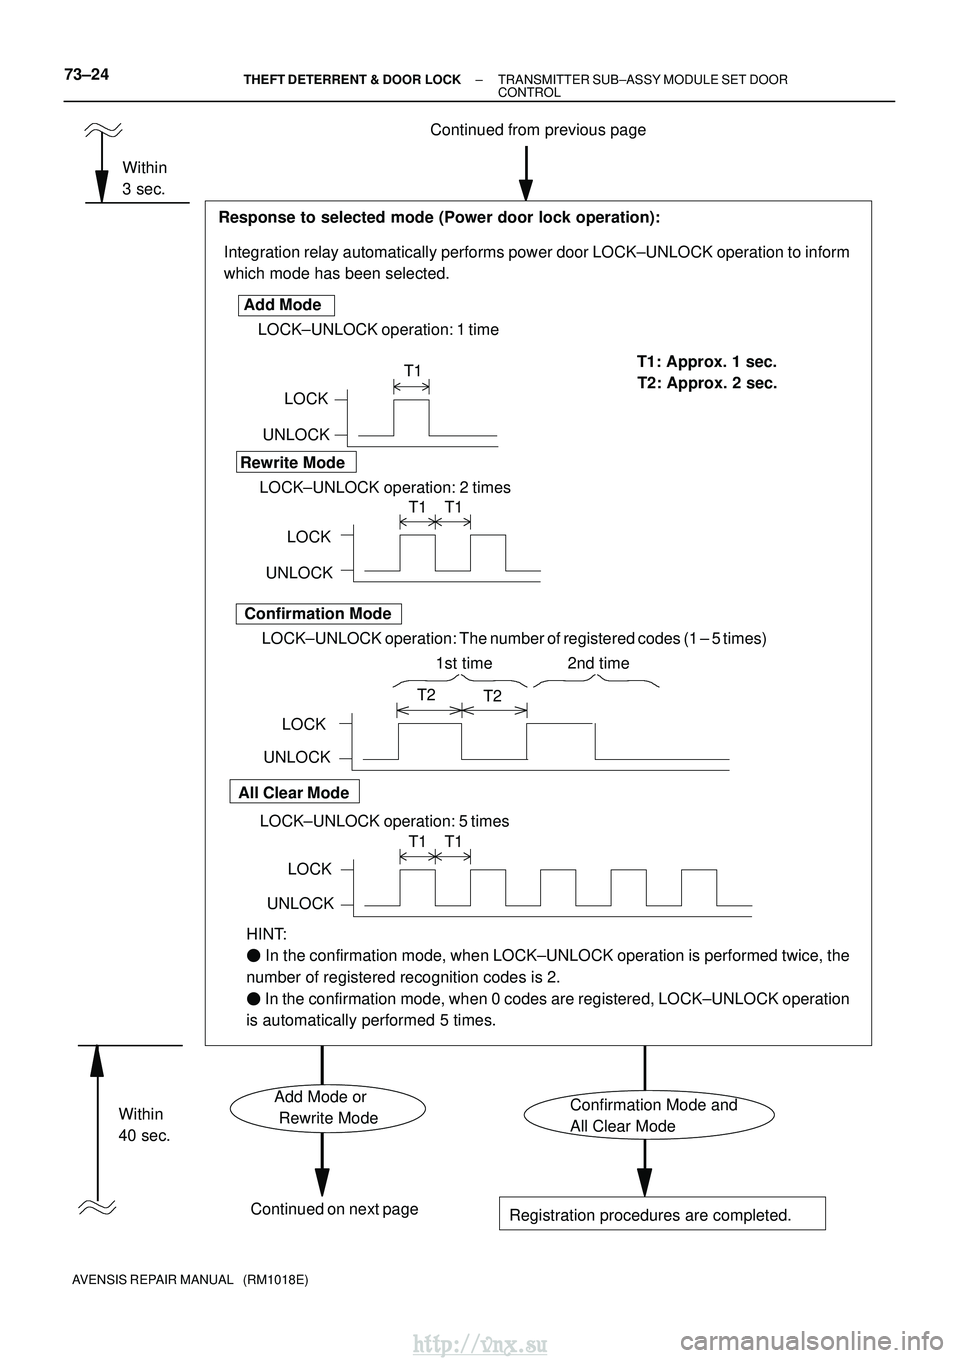
Integration relay automatically performs power door LOCK±UNLOCK opera\
tion to inform
which mode has been selected.
Response to selected mode (Power door lock operation):
UNLOCKLOCK
LOCK±UNLOCK operation: 1 time
Add Mode
Rewrite Mode Confirmation Mode
All Clear Mode
T1 T1: Approx. 1 sec.
T1 T1
T2
T2
T1 T1
LOCK±UNLOCK operation: 2 times
LOCK±UNLOCK operation: The number of registered codes (1 ± 5 times)
LOCK±UNLOCK operation: 5 times UNLOCK
LOCK
UNLOCK LOCK
UNLOCK LOCK
Continued on next page
Registration procedures are completed.
HINT:
� In the confirmation mode, when LOCK±UNLOCK operation is performed twice,\
the
number of registered recognition codes is 2.
� In the confirmation mode, when 0 codes are registered, LOCK±UNLOCK o\
peration
is automatically performed 5 times. T2: Approx. 2 sec.
Confirmation Mode and
All Clear ModeAdd Mode or
Rewrite Mode
Within
3 sec.
Within
40 sec.
1st time 2nd time
73±24±
THEFT DETERRENT & DOOR LOCK TRANSMITTER SUB±ASSY MODULE SET DOOR
CONTROL
AVENSIS REPAIR MANUAL (RM1018E)
http://vnx.su